


Maven公共中央仓库发布自己的Jar包
流程概要
创建工单
配置环境和项目
发布jar包
一、创建工单
1. 注册账号
https://issues.sonatype.org/secure/Signup!default.jspa ,前往该地址注册一个 sonatype 账号

2. 创建工单
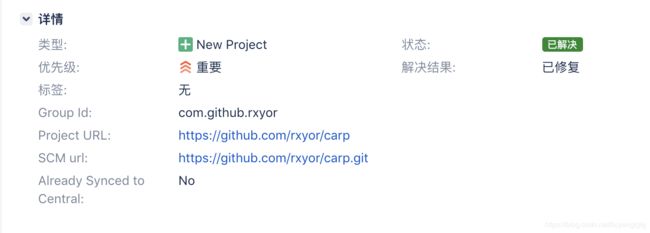
登录注册的账号,页面控制面板上方菜单,有一个新建按钮(由于语言设置的不同,你的界面可能是英文)。点击,创建一个工单,如下图:

如果你有自己的域名,可以写你自己域名。没有的话可以用github账号作为组织域名标识。假如你的github用户名为xxx, 项目名为simple,则可以这样填写:
项目:Community Support - Open Source Project Repository Hosting (OSSRH)
问题类型:New Project
Group Id:com.github.xxx
Project URL:https://github.com/xxx/simple
SCM url:https://github.com/xxx/simple.git
创建后进入自己的工单,如下所示:
我的工单已经被管理员审批通过,所以是已解决状态。没有审批过的是开放状态,需要等待管理员的审批,由于时区不同,东半球的白天,西半球却是黑夜,耐心等待即可。
二、配置环境和项目
1. 配置maven setting.xml
上传jar到公共的中央仓库,首先要在setting.xml加入一些配置,如下
snapshotid>
sonatype用户名username>
sonatype密码password>
server>
releaseid>
sonatype用户名username>
sonatype密码password>
server>
servers>
2. 配置pom.xml
我把自己项目的pom.xml文件粘贴如下:
xmlns="http://maven.apache.org/POM/4.0.0"
xmlns:xsi="http://www.w3.org/2001/XMLSchema-instance"
xsi:schemaLocation="http://maven.apache.org/POM/4.0.0 http://maven.apache.org/xsd/maven-4.0.0.xsd">
4.0.0modelVersion>
com.github.rxyorgroupId>
carp-parentartifactId>
1.0.0version>
pompackaging>
carpname>
carp is project which contains common utils ,redis delay job , distributed lock and
so on!
description>
https://github.com/rxyor/carpurl>
UTF-8project.build.sourceEncoding>
1.8maven.compiler.source>
1.8maven.compiler.target>
3.0.1maven-source-plugin.version>
3.0.0maven-clean-plugin.version>
3.0.2maven-resources-plugin.version>
3.7.0maven-compiler-plugin.version>
2.20.1maven-surefire-plugin.version>
3.2.0maven-war-plugin.version>
2.5.2maven-install-plugin.version>
2.8.2maven-deploy-plugin.version>
1.6maven-gpg-plugin.version>
properties>
org.apache.maven.pluginsgroupId>
maven-source-pluginartifactId>
trueattach>
configuration>
compilephase>
jargoal>
goals>
execution>
executions>
plugin>
org.apache.maven.pluginsgroupId>
maven-javadoc-pluginartifactId>
UTF-8encoding>
UTF-8charset>
UTF-8docencoding>
configuration>
attach-javadocsid>
packagephase>
jargoal>
goals>
-Xdoclint:noneadditionalJOption>
configuration>
execution>
executions>
plugin>
org.apache.maven.pluginsgroupId>
maven-compiler-pluginartifactId>
1.8source>
1.8target>
UTF-8encoding>
configuration>
plugin>
plugins>
build>
The Apache Software License, Version 2.0name>
http://www.apache.org/licenses/LICENSE-2.0.txturl>
repodistribution>
license>
licenses>
https://github.com/rxyor/carpurl>
scm:git:https://github.com/rxyor/carp.gitconnection>
scm:git:https://github.com/rxyor/carpdeveloperConnection>
scm>
rxyorname>
rxyor@outlook.comemail>
https://github.com/rxyorurl>
developer>
developers>
releaseid>
[1.8,)jdk>
activation>
-Xdoclint:noneadditionalparam>
properties>
snapshotid>
https://oss.sonatype.org/content/repositories/snapshotsurl>
snapshotRepository>
releaseid>
https://oss.sonatype.org/service/local/staging/deploy/maven2url>
repository>
distributionManagement>
org.apache.maven.pluginsgroupId>
maven-source-pluginartifactId>
releaseid>
packagephase>
jar-no-forkgoal>
goals>
execution>
snapshotid>
packagephase>
jar-no-forkgoal>
goals>
execution>
executions>
plugin>
org.apache.maven.pluginsgroupId>
maven-gpg-pluginartifactId>
${maven-gpg-plugin.version}version>
releaseid>
verifyphase>
signgoal>
goals>
execution>
executions>
plugin>
org.sonatype.pluginsgroupId>
nexus-staging-maven-pluginartifactId>
trueextensions>
releaseserverId>
https://oss.sonatype.org/nexusUrl>
trueautoReleaseAfterClose>
configuration>
plugin>
plugins>
build>
profile>
profiles>
project>
3. pom.xml配置说明
上传到中央仓库并可以成功发布有以下前提条件:
包含jar源码包
包含java doc
包含签名校验
版本号包含snapshot的可能也无法发布成功
等…
pom.xml配置的几个插件就是解决上述问题的,
maven-source-plugin用于生成源码包
maven-javadoc-plugin用于生成java doc,大部分代码的java doc注释都不规范,为了防止不规范的java doc注释导致打包失败,插件可以加入如下配置:
-Xdoclint:noneadditionalJOption>
configuration>
maven-gpg-plugin用于添加签名
4. 安装并配置gpg
#安装gpg
brew install gpg
#生成key
gpg --gen-key
#输入对应信息
Real name:
Email address:
#查询生成的公钥的信息
gpg --list-keys
---------------------------------
pub rsa2048 2019-05-30 [SC] [expires: 2021-05-29]
B619ABB4B37B166061CD17352FCF6A922383XXXX
uid [ultimate] rxyor
sub rsa2048 2019-05-30 [E] [expires: 2021-05-29]
#上传到密钥服务器
gpg --keyserver hkp://keyserver.ubuntu.com:11371 --send-keys B619ABB4B37B166061CD17352FCF6A922383XXXX
gpg: sending key 2FCF6A922383D13B to hkp://keyserver.ubuntu.com:11371
#查询密钥是否上传成功
gpg --keyserver hkp://keyserver.ubuntu.com:11371 --recv-keys B619ABB4B37B166061CD17352FCF6A922383XXXX
gpg: key 2FCF6A922383D13B: "rxyor " not changed
gpg: Total number processed: 1
gpg: unchanged: 1
三、发布jar包
1. deploy
工程根目录打开命令行工具,输入如下命令:
mvn clean deploy -P release -Darguments=gpg.passphrase="gpg密钥密码"
即使按照上述教程配置,你有可能遇到如下错误:
1) gpg签名错误
[INFO] --- maven-gpg-plugin:1.6:sign (release) @ carp-parent ---
gpg: signing failed: Inappropriate ioctl for device
gpg: signing failed: Inappropriate ioctl for device
[ERROR] Failed to execute goal org.apache.maven.plugins:maven-gpg-plugin:1.6:sign (release) on project carp-parent: Exit code: 2 -> [Help 1]
如果发生错误,你的gpg可能需要额外的配置,以Mac为例,在gpg安装目录(~/.gnup)下建立两个配置文件:gpg.conf、gpg-agent.conf
# gpg.conf中加入
use-agent
pinentry-mode loopback
# gpg-agent.conf中加入
allow-loopback-pinentry
2) 400或401错误
请注意检查是否存在以下情况:
发布到release时版本号不能包含snapshot
setting.xml 密码配置不对
setting.xml 中server id 与pom.xml配置不一致
maven环境变量配置setting.xml位置与自己配置的setting.xml不是同一个
解决上述错误后,再次执行上述命令,不出意外的话应该就可以deploy成功了。
2. Staging Repositories 关闭仓库操作
前往https://oss.sonatype.org/#stagingRepositories ,并使用sonatype账户登录, 按照下图所示关闭仓库

关闭仓库的时候需要检查是否出现错误,如果有错误需要按错误提示信息进行解决,如下图可以查看错误信息:
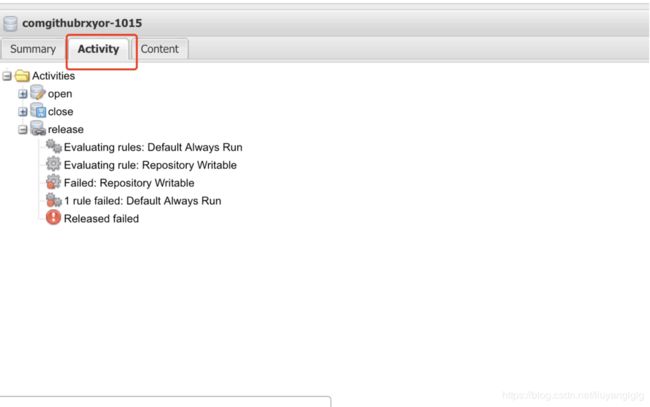
但实际上,由于pom.xml加入了插件:nexus-staging-maven-plugin,这插件在deploy成功后会自动帮你进行Staging Repositories Close操作。
3. 提醒管理员审批
关闭成功后,还需要在你的工单中提醒管理员你的组件发布成功,可以添加如下注释:
Component has been successfully issued
管理审批通过后,2个小时左右你就能在公共中央仓库搜索到发布的jar包了。
4. 中央仓库搜索发布的jar包
中央仓库搜索地址:https://search.maven.org/


 639
639


 被折叠的 条评论
为什么被折叠?
被折叠的 条评论
为什么被折叠?
 到【灌水乐园】发言


