


摘选自:
GUI 应用程序架构的十年变迁:MVC、MVP、MVVM、Unidirectional、Clean
https://zhuanlan.zhihu.com/p/26799645
MV* in Android
此部分完整代码在这里,笔者在这里节选出部分代码方便对照演示。Android中的Activity的功能很类似于iOS中的UIViewController,都可以看做MVC中的Controller。在2010年左右经典的Android程序大概是这样的:
TextView mCounterText;
Button mCounterIncrementButton;

int mClicks = 0;

public void onCreate(Bundle b) {
  super.onCreate(b);

  mCounterText = (TextView) findViewById(R.id.tv_clicks);
  mCounterIncrementButton = (Button) findViewById(R.id.btn_increment);

  mCounterIncrementButton.setOnClickListener(new View.OnClickListener() {
    public void onClick(View v) {
      mClicks++;
      mCounterText.setText(""+mClicks);
    }
  });
}
后来2013年左右出现了ButterKnife这样的基于注解的控件绑定框架,此时的代码看上去是这样的:
@Bind(R.id.tv_clicks) mCounterText;
@OnClick(R.id.btn_increment)
public void onSubmitClicked(View v) {
    mClicks++;
    mCounterText.setText("" + mClicks);
}
后来Google官方也推出了数据绑定的框架,从此MVVM模式在Android中也愈发流行:
<layout xmlns:android="http://schemas.android.com/apk/res/android">
   <data>
       <variable name="counter" type="com.example.Counter"/>
       <variable name="handlers" type="com.example.ClickHandler"/>
   </data>
   <LinearLayout
       android:orientation="vertical"
       android:layout_width="match_parent"
       android:layout_height="match_parent">
       <TextView android:layout_width="wrap_content"
           android:layout_height="wrap_content"
           android:text="@{counter.value}"/>
       <Buttonandroid:layout_width="wrap_content"
           android:layout_height="wrap_content"
           android:text="@{handlers.clickHandle}"/>
   </LinearLayout>
</layout>
后来Anvil这样的受React启发的组件式框架以及Jedux这样借鉴了Redux全局状态管理的框架也将Unidirectional 架构引入了Android开发的世界。
MVC
-
声明View中的组件对象或者Model对象
    private Subscription subscription;
    private RecyclerView reposRecycleView;
    private Toolbar toolbar;
    private EditText editTextUsername;
    private ProgressBar progressBar;
    private TextView infoTextView;
    private ImageButton searchButton;
-
将组件与Activity中对象绑定,并且声明用户响应处理函数
        super.onCreate(savedInstanceState);
        setContentView(R.layout.activity_main);
        progressBar = (ProgressBar) findViewById(R.id.progress);
        infoTextView = (TextView) findViewById(R.id.text_info);
        //Set up ToolBar
        toolbar = (Toolbar) findViewById(R.id.toolbar);
        setSupportActionBar(toolbar);
        //Set up RecyclerView
        reposRecycleView = (RecyclerView) findViewById(R.id.repos_recycler_view);
        setupRecyclerView(reposRecycleView);
        // Set up search button
        searchButton = (ImageButton) findViewById(R.id.button_search);
        searchButton.setOnClickListener(new View.OnClickListener() {
            @Override
            public void onClick(View v) {
                loadGithubRepos(editTextUsername.getText().toString());
            }
        });
        //Set up username EditText
        editTextUsername = (EditText) findViewById(R.id.edit_text_username);
        editTextUsername.addTextChangedListener(mHideShowButtonTextWatcher);
        editTextUsername.setOnEditorActionListener(new TextView.OnEditorActionListener() {
            @Override
            public boolean onEditorAction(TextView v, int actionId, KeyEvent event) {
                if (actionId == EditorInfo.IME_ACTION_SEARCH) {
                    String username = editTextUsername.getText().toString();
                    if (username.length() > 0) loadGithubRepos(username);
                    return true;
                }
                return false;
            }
});
-
用户输入之后的更新流程
        progressBar.setVisibility(View.VISIBLE);
        reposRecycleView.setVisibility(View.GONE);
        infoTextView.setVisibility(View.GONE);
        ArchiApplication application = ArchiApplication.get(this);
        GithubService githubService = application.getGithubService();
        subscription = githubService.publicRepositories(username)
                .observeOn(AndroidSchedulers.mainThread())
                .subscribeOn(application.defaultSubscribeScheduler())
                .subscribe(new Subscriber<List<Repository>>() {
                    @Override
                    public void onCompleted() {
                        progressBar.setVisibility(View.GONE);
                        if (reposRecycleView.getAdapter().getItemCount() > 0) {
                            reposRecycleView.requestFocus();
                            hideSoftKeyboard();
                            reposRecycleView.setVisibility(View.VISIBLE);
                        } else {
                            infoTextView.setText(R.string.text_empty_repos);
                            infoTextView.setVisibility(View.VISIBLE);
                        }
                    }

                    @Override
                    public void onError(Throwable error) {
                        Log.e(TAG, "Error loading GitHub repos ", error);
                        progressBar.setVisibility(View.GONE);
                        if (error instanceof HttpException
                                && ((HttpException) error).code() == 404) {
                            infoTextView.setText(R.string.error_username_not_found);
                        } else {
                            infoTextView.setText(R.string.error_loading_repos);
                        }
                        infoTextView.setVisibility(View.VISIBLE);
                    }

                    @Override
                    public void onNext(List<Repository> repositories) {
                        Log.i(TAG, "Repos loaded " + repositories);
                        RepositoryAdapter adapter =
                                (RepositoryAdapter) reposRecycleView.getAdapter();
                        adapter.setRepositories(repositories);
                        adapter.notifyDataSetChanged();
                    }
});
MVP
-
将Presenter与View绑定,并且将用户响应事件绑定到Presenter中
        //Set up presenter
        presenter = new MainPresenter();
        presenter.attachView(this);
        ...

        // Set up search button
        searchButton = (ImageButton) findViewById(R.id.button_search);
        searchButton.setOnClickListener(new View.OnClickListener() {
            @Override
            public void onClick(View v) {
                presenter.loadRepositories(editTextUsername.getText().toString());
            }
        });
-
Presenter中调用Model更新数据,并且调用View中进行重新渲染
    public void loadRepositories(String usernameEntered) {
        String username = usernameEntered.trim();
        if (username.isEmpty()) return;

        mainMvpView.showProgressIndicator();
        if (subscription != null) subscription.unsubscribe();
        ArchiApplication application = ArchiApplication.get(mainMvpView.getContext());
        GithubService githubService = application.getGithubService();
        subscription = githubService.publicRepositories(username)
                .observeOn(AndroidSchedulers.mainThread())
                .subscribeOn(application.defaultSubscribeScheduler())
                .subscribe(new Subscriber<List<Repository>>() {
                    @Override
                    public void onCompleted() {
                        Log.i(TAG, "Repos loaded " + repositories);
                        if (!repositories.isEmpty()) {
                            mainMvpView.showRepositories(repositories);
                        } else {
                            mainMvpView.showMessage(R.string.text_empty_repos);
                        }
                    }

                    @Override
                    public void onError(Throwable error) {
                        Log.e(TAG, "Error loading GitHub repos ", error);
                        if (isHttp404(error)) {
                            mainMvpView.showMessage(R.string.error_username_not_found);
                        } else {
                            mainMvpView.showMessage(R.string.error_loading_repos);
                        }
                    }

                    @Override
                    public void onNext(List<Repository> repositories) {
                        MainPresenter.this.repositories = repositories;
                    }
                });
        }
MVVM
-
XML中声明数据绑定
<data>
        <variable
            name="viewModel"
            type="uk.ivanc.archimvvm.viewmodel.MainViewModel"/>
</data>
...
            <EditText
                android:id="@+id/edit_text_username"
                android:layout_width="match_parent"
                android:layout_height="wrap_content"
                android:layout_toLeftOf="@id/button_search"
                android:hint="@string/hit_username"
                android:imeOptions="actionSearch"
                android:inputType="text"
                android:onEditorAction="@{viewModel.onSearchAction}"
                android:textColor="@color/white"
                android:theme="@style/LightEditText"
                app:addTextChangedListener="@{viewModel.usernameEditTextWatcher}"/>
-
View中绑定ViewModel
        super.onCreate(savedInstanceState);
        binding = DataBindingUtil.setContentView(this, R.layout.main_activity);
        mainViewModel = new MainViewModel(this, this);
        binding.setViewModel(mainViewModel);
        setSupportActionBar(binding.toolbar);
        setupRecyclerView(binding.reposRecyclerView);
-
ViewModel中进行数据操作
public boolean onSearchAction(TextView view, int actionId, KeyEvent event) {
        if (actionId == EditorInfo.IME_ACTION_SEARCH) {
            String username = view.getText().toString();
            if (username.length() > 0) loadGithubRepos(username);
            return true;
        }
        return false;
    }

    public void onClickSearch(View view) {
        loadGithubRepos(editTextUsernameValue);
    }

    public TextWatcher getUsernameEditTextWatcher() {
        return new TextWatcher() {
            @Override
            public void beforeTextChanged(CharSequence charSequence, int start, int count, int after) {

            }

            @Override
            public void onTextChanged(CharSequence charSequence, int start, int before, int count) {
                editTextUsernameValue = charSequence.toString();
                searchButtonVisibility.set(charSequence.length() > 0 ? View.VISIBLE : View.GONE);
            }

            @Override
            public void afterTextChanged(Editable editable) {

            }
        };
}
Unidirectional User Interface Architecture: 单向数据流
Unidirectional User Interface Architecture架构的概念源于后端常见的CROS/Event Sourcing模式,其核心思想即是将应用状态被统一存放在一个或多个的Store中,并且所有的数据更新都是通过可观测的Actions触发,而所有的View都是基于Store中的状态渲染而来。该架构的最大优势在于整个应用中的数据流以单向流动的方式从而使得有用更好地可预测性与可控性,这样可以保证你的应用各个模块之间的松耦合性。与MVVM模式相比,其解决了以下两个问题:
-
避免了数据在多个ViewModel中的冗余与不一致问题
-
分割了ViewModel的职责,使得ViewModel变得更加Clean
双向数据绑定的不足
This means that one change (a user input or API response) can affect the state of an application in many places in the code — for example, two-way data binding. That can be hard to maintain and debug.
Facebook强调,双向数据绑定极不利于代码的扩展与维护。从具体的代码实现角度来看,双向数据绑定会导致更改的不可预期性(UnPredictable),就好像Angular利用Dirty Checking来进行是否需要重新渲染的检测,这导致了应用的缓慢,简直就是来砸场子的。而在采用了单向数据流之后,整个应用状态会变得可预测(Predictable),也能很好地了解当状态发生变化时到底会有多少的组件发生变化。另一方面,相对集中地状态管理,也有助于你不同的组件之间进行信息交互或者状态共享,特别是像Redux这种强调Single Store与SIngle State Tree的状态管理模式,能够保证以统一的方式对于应用的状态进行修改,并且Immutable的概念引入使得状态变得可回溯。
譬如Facebook在Flux Overview中举的例子,当我们希望在一个界面上同时展示未读信息列表与未读信息的总数目的时候,对于MV*就有点恶心了,特别是当这两个组件不在同一个ViewModel/Controller中的时候。一旦我们将某个未读信息标识为已读,会引起控制已读信息、未读信息、未读信息总数目等等一系列模型的更新。特别是很多时候为了方便我们可能在每个ViewModel/Controller都会设置一个数据副本,这会导致依赖连锁更新,最终导致不可预测的结果与性能损耗。而在Flux中这种依赖是反转的,Store接收到更新的Action请求之后对数据进行统一的更新并且通知各个View,而不是依赖于各个独立的ViewModel/Controller所谓的一致性更新。从职责划分的角度来看,除了Store之外的任何模块其实都不知道应该如何处理数据,这就保证了合理的职责分割。这种模式下,当我们创建新项目时,项目复杂度的增长瓶颈也就会更高,不同于传统的View与ViewLogic之间的绑定,控制流被独立处理,当我们添加新的特性,新的数据,新的界面,新的逻辑处理模块时,并不会导致原有模块的复杂度增加,从而使得整个逻辑更加清晰可控。
这里还需要提及一下,很多人应该是从React开始认知到单向数据流这种架构模式的,而当时Angular 1的缓慢与性能之差令人发指,但是譬如Vue与Angular 2的性能就非常优秀。借用Vue.js官方的说法,
The virtual-DOM approach provides a functional way to describe your view at any point of time, which is really nice. Because it doesn’t use observables and re-renders the entire app on every update, the view is by definition guaranteed to be in sync with the data. It also opens up possibilities to isomorphic JavaScript applications.
Instead of a Virtual DOM, Vue.js uses the actual DOM as the template and keeps references to actual nodes for data bindings. This limits Vue.js to environments where DOM is present. However, contrary to the common misconception that Virtual-DOM makes React faster than anything else, Vue.js actually out-performs React when it comes to hot updates, and requires almost no hand-tuned optimization. With React, you need to implementshouldComponentUpdate everywhere and use immutable data structures to achieve fully optimized re-renders.
总而言之,笔者认为双向数据流与单向数据流相比,性能上孰优孰劣尚无定论,最大的区别在于单向数据流与双向数据流相比有更好地可控性,这一点在上文提及的函数响应式编程中也有体现。若论快速开发,笔者感觉双向数据绑定略胜一筹,毕竟这种View与ViewModel/ViewLogic之间的直接绑定直观便捷。而如果是注重于全局的状态管理,希望维护耦合程度较低、可测试性/可扩展性较高的代码,那么还是单向数据流,即Unidirectional Architecture较为合适。一家之言,欢迎讨论。
Flux:数据流驱动的页面
Flux不能算是绝对的先行者,但是在Unidirectional Architecture中却是最富盛名的一个,也是很多人接触到的第一个Unidirectional Architecture。Flux主要由以下几个部分构成:
-
Stores:存放业务数据和应用状态,一个Flux中可能存在多个Stores
-
View:层次化组合的React组件
-
Actions:用户输入之后触发View发出的事件
-
Dispatcher:负责分发Actions
 根据上述流程,我们可知Flux模式的特性为:
-
Dispatcher:Event Bus中设置有一个单例的Dispatcher,很多Flux的变种都移除了Dispatcher依赖。
-
只有View使用可组合的组件:在Flux中只有React的组件可以进行层次化组合,而Stores与Actions都不可以进行层次化组合。React组件与Flux一般是松耦合的,因此Flux并不是Fractal,Dispatcher与Stores可以被看做Orchestrator。
-
用户事件响应在渲染时声明:在React的 render() 函数中,即负责响应用户交互,也负责注册用户事件的处理器
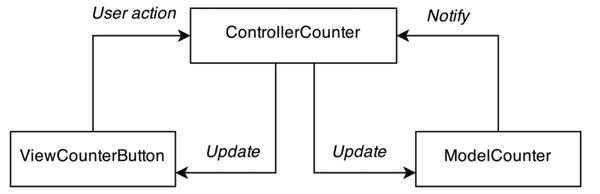
下面我们来看一个具体的代码对比,首先是以经典的Cocoa风格编写一个简单的计数器按钮:
class ModelCounter

    constructor: (@value=1) ->

    increaseValue: (delta) =>
        @value += delta

class ControllerCounter

    constructor: (opts) ->
        @model_counter = opts.model_counter
        @observers = []

    getValue: => @model_counter.value

    increaseValue: (delta) =>
        @model_counter.increaseValue(delta)
        @notifyObservers()

    notifyObservers: =>
        obj.notify(this) for obj in @observers

    registerObserver: (observer) =>
        @observers.push(observer)

class ViewCounterButton

    constructor: (opts) ->
        @controller_counter = opts.controller_counter
        @button_class = opts.button_class or 'button_counter'
        @controller_counter.registerObserver(this)

    render: =>
        elm = $("<button class=\"#{@button_class}\">
                #{@controller_counter.getValue()}</button>")
        elm.click =>
            @controller_counter.increaseValue(1)
        return elm

    notify: =>
        $("button.#{@button_class}").replaceWith(=> @render())
上述代码逻辑用上文提及的MVC模式图演示就是:
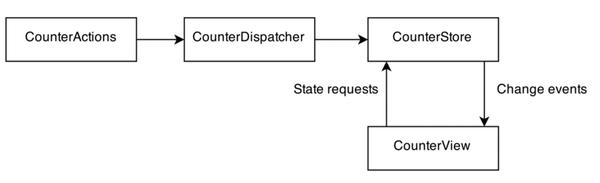
而如果用Flux模式实现,会是下面这个样子:
# Store
class CounterStore extends EventEmitter

    constructor: ->
        @count = 0
        @dispatchToken = @registerToDispatcher()

    increaseValue: (delta) ->
        @count += 1

    getCount: ->
        return @count

    registerToDispatcher: ->
        CounterDispatcher.register((payload) =>
            switch payload.type
                when ActionTypes.INCREASE_COUNT
                    @increaseValue(payload.delta)
        )

# Action
class CounterActions

    @increaseCount: (delta) ->
        CounterDispatcher.handleViewAction({
            'type': ActionTypes.INCREASE_COUNT
            'delta': delta
        })

# View
CounterButton = React.createClass(

    getInitialState: ->
        return {'count': 0}

    _onChange: ->
        @setState({
            count: CounterStore.getCount()
        })

    componentDidMount: ->
        CounterStore.addListener('CHANGE', @_onChange)

    componentWillUnmount: ->
        CounterStore.removeListener('CHANGE', @_onChange)

    render: ->
        return React.DOM.button({'className': @prop.class}, @state.value)

)
其数据流图为:
Redux:集中式的状态管理
Redux是Flux的所有变种中最为出色的一个,并且也是当前Web领域主流的状态管理工具,其独创的理念与功能深刻影响了GUI应用程序架构中的状态管理的思想。Redux将Flux中单例的Dispatcher替换为了单例的Store,即也是其最大的特性,集中式的状态管理。并且Store的定义也不是从零开始单独定义,而是基于多个Reducer的组合,可以把Reducer看做Store Factory。Redux的重要组成部分包括:
-
Singleton Store:管理应用中的状态,并且提供了一个dispatch(action)函数。
-
Provider:用于监听Store的变化并且连接像React、Angular这样的UI框架
-
Actions:基于用户输入创建的分发给Reducer的事件
-
Reducers:用于响应Actions并且更新全局状态树的纯函数

根据上述流程,我们可知Redux模式的特性为:
-
以工厂模式组装Stores:Redux允许我以createStore()函数加上一系列组合好的Reducer函数来创建Store实例,还有另一个applyMiddleware()函数可以允许在dispatch()函数执行前后链式调用一系列中间件。
-
Providers:Redux并不特定地需要何种UI框架,可以与Angular、React等等很多UI框架协同工作。Redux并不是Fractal,一般来说Store被视作Orchestrator。
-
User Event处理器即可以选择在渲染函数中声明,也可以在其他地方进行声明。
Model-View-Update
又被称作Elm Architecture,上面所讲的Redux就是受到Elm的启发演化而来,因此MVU与Redux之间有很多的相通之处。MVU使用函数式编程语言Elm作为其底层开发语言,因此该架构可以被看做更纯粹的函数式架构。MVU中的基本组成部分有:
-
Model:定义状态数据结构的类型
-
View:纯函数,将状态渲染为界面
-
Actions:以Mailbox的方式传递用户事件的载体
-
Update:用于更新状态的纯函数
 根据上述流程,我们可知Elm模式的特性为:
-
到处可见的层次化组合:Redux只是在View层允许将组件进行层次化组合,而MVU中在Model与Update函数中也允许进行层次化组合,甚至Actions都可以包含内嵌的子Action
-
Elm属于Fractal架构:因为Elm中所有的模块组件都支持层次化组合,即都可以被单独地导出使用
Model-View-Intent
MVI是一个基于RxJS的响应式单向数据流架构。MVI也是Cycle.js的首选架构,主要由Observable事件流对象与处理函数组成。其主要的组成部分包括:
-
Intent:Observable提供的将用户事件转化为Action的函数
-
Model:Observable提供的将Action转化为可观测的State的函数
-
View:将状态渲染为用户界面的函数
-
Custom Element:类似于React Component那样的界面组件

根据上述流程,我们可知MVI模式的特性为:
-
重度依赖于Observables:架构中的每个部分都会被转化为Observable事件流
-
Intent:不同于Flux或者Redux,MVI中的Actions并没有直接传送给Dispatcher或者Store,而是交于正在监听的Model
-
彻底的响应式,并且只要所有的组件都遵循MVI模式就能保证整体架构的fractal特性
Clean Architecture
 Uncle Bob 提出 Clean Architecture 最早并不是专门面向于GUI应用程序,而是描述了一种用于构建可扩展、可测试软件系统的概要原则。 Clean Architecture 可能运用于构建网站、Web 应用、桌面应用以及移动应用等不同领域场景的软件开发中。其定义的基本原则保证了关注点分离以及整个软件项目的模块性与可组织性,也就是我们在上文提及的 GUI 应用程序架构中所需要考量的点。 Clean Architecture 中最基础的理论当属所谓的依赖原则(Dependency Rule),在依赖洋葱图中的任一内层模块不应该了解或依赖于任何外层模块。换言之,我们定义在外层模块中的代码不应该被内层模块所引入,包括变量、函数、类等等任何的软件实体。除此之外,Clean Architecture 还强制规定了所有邻接圈层之间的交互与通信应当以抽象方式定义,譬如在 Android 中应该利用 Java 提供的 POJOs 以及 Interfaces,而 iOS 中应该使用 Protocols 或者标准类。这种强制定义也就保证了不同层之间的组件完全解耦合,并且能够很方便地更改或者 Mock 测试,而不会影响到其他层的代码。Clean Architecture 是非常理想化的架构定义模式,也仅是提出了一些基本的原则,其在 iOS 的具体实践也就是所谓的 VIPER 架构。


 918
918

 被折叠的 条评论
为什么被折叠?
被折叠的 条评论
为什么被折叠?
 到【灌水乐园】发言


