作者:gnuhpc
出处:http://www.cnblogs.com/gnuhpc/
本Guide利用Eclipse以及Ant建立一个简单的Web Service,以演示Web Service的基本开发过程:
1.系统条件:
- Eclipse Java EE IDE for Web Developers
- Java SE 6
- Windows XP
2.基本环境搭建:
1)Java SE6 JDK的安装:下载Java SE6 JDK,双击,安装默认选项进行安装即可。
2)Eclipse的安装与配置:
安装时直接解压。
配置处有两点,Window>Preferences>Java>Installed JREs确保如下设置:
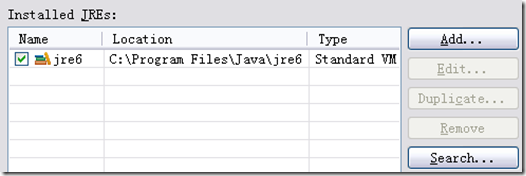
安装路径可能略有不同。
Window>Preferences>Java>Compiler 确保如下设置:
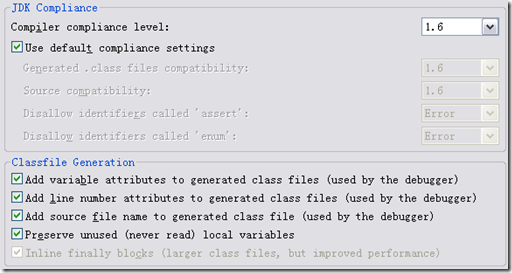
3.建立Server端工程和相关包与类:
创建一个Java Project,命名为wsServerHelloWorld:
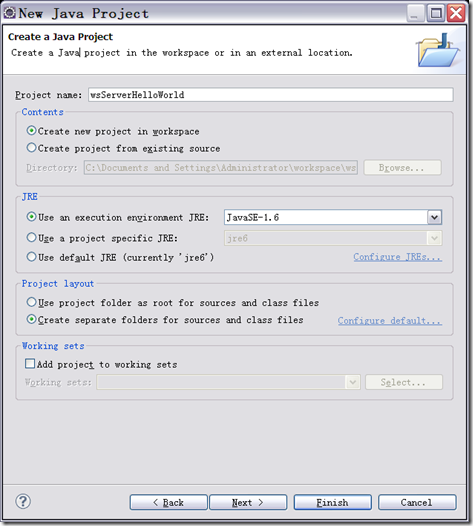
在这个项目下建立包:org.gnuhpc.wsServer
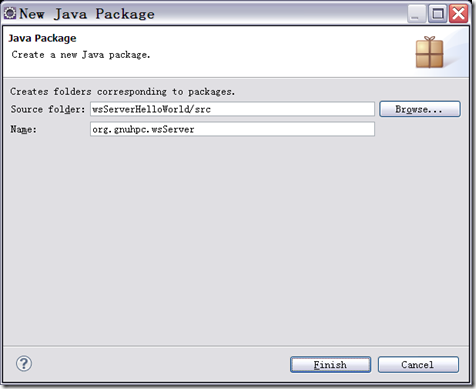
在这个包下边建立类:SayHello
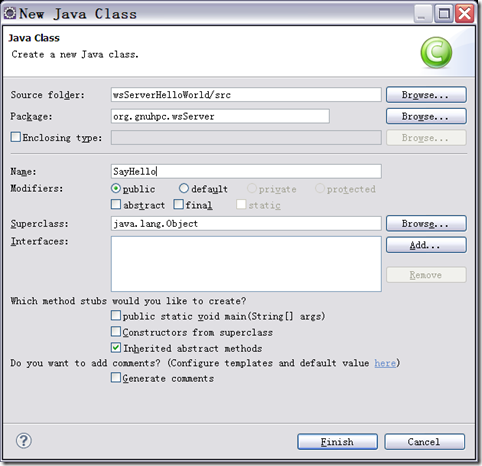
在SayHello.java文件中输入以下代码:
package org.gnuhpc.wsServer;
import javax.jws.WebService;
@WebService
public class SayHello {
private static final String SALUTATION = "Hello";public String getGreeting(String name) {
return SALUTATION + " " + name;
}
}
其中注意到@WebService ,这个称作annotation或者metadata,Java SE 5中的Web Services Metadata Specification引入的。Java SE 6中对于Web Services规范的升级以及JAX-WS(Java API for XML Web Services)2.0规范,这些升级使得我们Web Services的创建和调用变得更加容易。使用这些新功能,我们可以仅仅使用简单的Annotations注释从一个Java类创建Web Services。开发者将其类和方法之前用该annotations指定,类告诉runtime engine以Web Service的方式和操作来使能该类和方法。这个annotations可以产生一个可布署的Web Service,是一个WSDL映射annotations,将Java源代码与代表Web Service的WSDL元素连接在了一起。
4.使用Ant产生Server端代码:
首先在项目中新建一个文件:build.xml,然后使用OpenWith>AntEditor打开,输入以下脚本代码:
- <project default="wsgen">
- <target name="wsgen">
- <exec executable="wsgen">
- <arg line="-cp ./bin -keep -s ./src -d ./bin
- org.gnuhpc.wsServer.SayHello"/>
- </exec>
- </target>
- </project>
default指定了默认执行的Target为wsgen,wsgen可以创建一个能够使用WebService的类,它生成所有用于WebService发布的源代码文件和经过编译过的二进制类文件。它还生成WSDL和符合规范的该类的WebService。
Target名称为wsgen,具体执行的命令的参数:
-cp 为类路径
-keep后产生的java文件
-s 产生的源文件放在哪
-d 产生的输出问价放在哪
然后使用Ant Build选项运行:
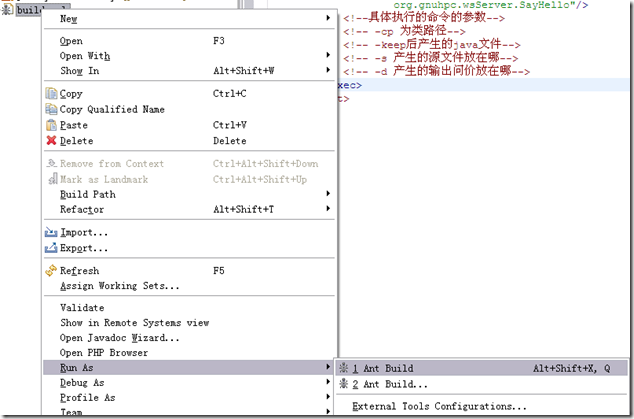
在成功执行的提示后,我们刷新一下Project

我们在Project区域可以看到,结果如下:
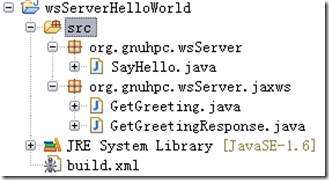
5.分布Web Service
org.gnuhpc.wsServer下建立一个类RunService:
package org.gnuhpc.wsServer;
import javax.xml.ws.Endpoint;
public class RunService {
/**
*@paramargs
*/
public static void main(String[] args) {
System.out.println("SayHello Web Service started.");
Endpoint.publish("http://localhost:8080/wsServerExample" ,
new SayHello());
}
}
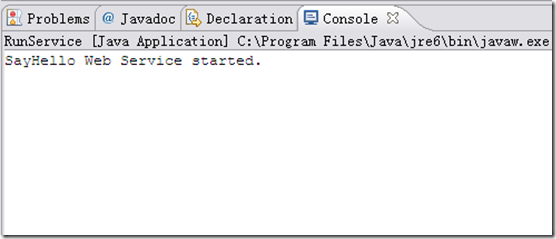
运行Run As>Java Application。我们得到结果,说明这个web service的Server端已经启动。
6.查看WSDL:
Window>Show View>Other>General>Internal Web Browser,在其中输入:http://localhost:8080/wsServerExample?wsdl
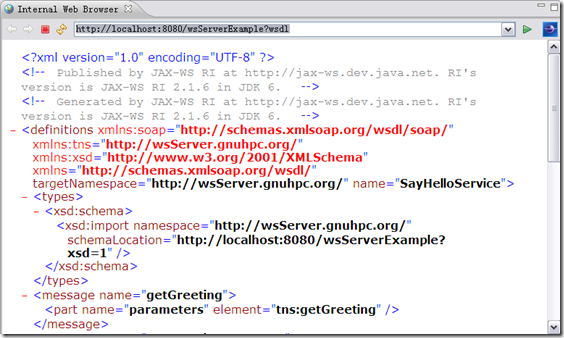
你可以看看到底WSDL都记录了哪些信息。看完后可以停止该Server。
7.监测Server
我们创建完Server可以用过Eclipse Web Services Explorer监测Server,
Window>Open Perspective>Other >JavaEE
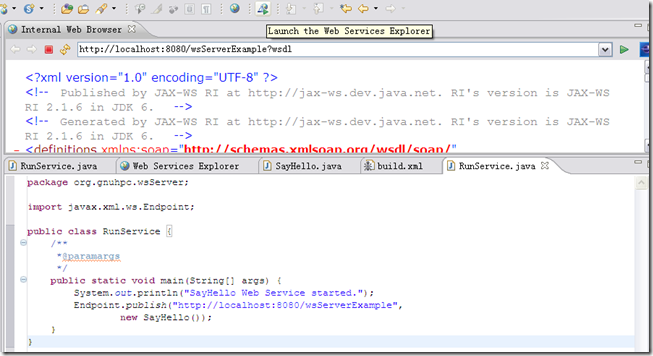
打开Eclipse Web Services Explorer
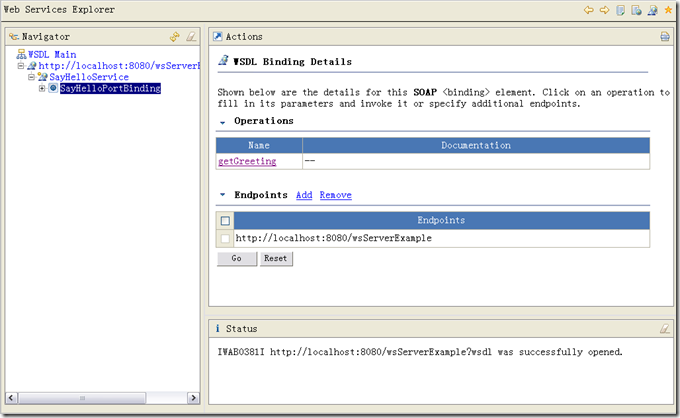
单击WSDL Main,在URL中输入:http://localhost:8080/wsServerExample?wsdl 按Go按钮后出现一下视图:
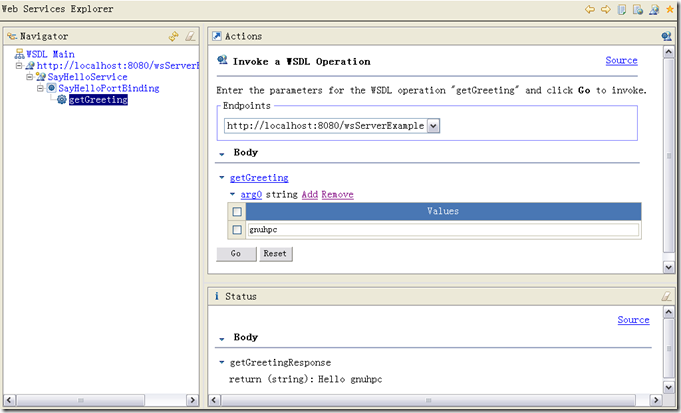
我们可以触发一个Web Service操作:点击getGreetings,添加一个参数,比如gnuhpc,然后点击Go按钮:
8.创建Client端 工程和相关包与类:
创建一个Java Project,命名为wsClientHelloWorld,在这个项目下建立包:org.gnuhpc.wsClient
9.使用Ant产生Client代码框架:
编写Web service时,可以使用工具来利用WSDL生成进行调用的客户端桩;或者也可以使用底层API来手动编写Web service。前者方便,后者灵活,现在我们通过前者做说明:
新建文件build.xml
New>File>build.xml
<project default="wsimport"> <target name="wsimport"> <exec executable="wsimport"> <arg line="-keep -s ./src -p org.gnuhpc.wsClient -d ./bin http://localhost:8080/wsServerExample?wsdl"/> </exec> </target> </project>
- <project default="wsimport">
- <target name="wsimport">
- <exec executable="wsimport">
- <arg line="-keep -s ./src -p org.gnuhpc.wsClient
- -d ./bin http://localhost:8080/wsServerExample?wsdl"/>
- </exec>
- </target>
- </project>
注意:wsgen 支持从 Java class 创建 Web services,wsimport 支持从 WSDL 创建 Web services,分别对应于 JAX-RPC 方式下的 Java2WSDL 和 WSDL2Java。要根据发布的WSDL进行创建,这也就是为什么要先运行RunServer的原因了。
运行Server的RunService : Run As>Java Application>
运行该Ant脚本,产生Client代码:Run As>Ant Build
运行成功的提示如下:

生成的代码如下:
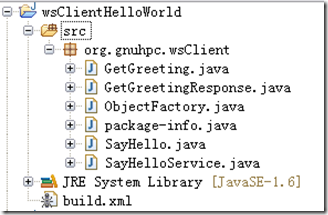
这一步读取WSDL并生成客户端桩。这些桩是将为我们的代码所用的Java类和接口。这些桩给服务器端功能提供了一个客户端接口。例如,如果我们的服务器提供一个Maths服务,该服务带有一个叫做add的方法。我们的客户端代码将调用桩上的一个方法,而桩实现将对该方法使用参数封装,把Java方法调用变为Web service请求。这个请求将基于HTTP发送给服务器,而且将使用SOAP作为RPC协议。监听服务器接收该SOAP消息,然后(十有八九)将其转换为服务器处的一次方法调用。

10.编写Client代码
创建一个类:SayHelloClient
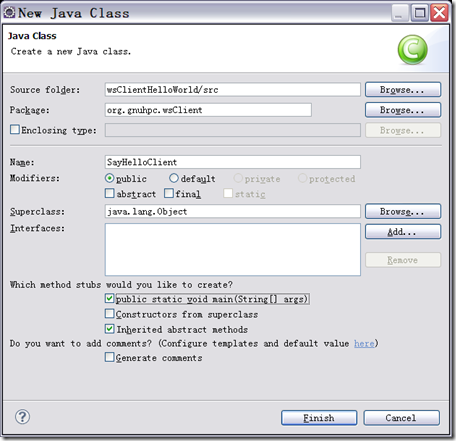
package org.gnuhpc.wsClient;
import java.io.BufferedReader;
import java.io.IOException;
import java.io.InputStreamReader;import javax.xml.ws.BindingProvider;
public class SayHelloClient {
/**
* @param args
*/
public static void main(String[] args) {
SayHelloService shs = new SayHelloService();
SayHello sh = (SayHello) shs.getSayHelloPort();
((BindingProvider) sh).getRequestContext().put(
BindingProvider.ENDPOINT_ADDRESS_PROPERTY,
"http://localhost:8080/wsServerExample");
System.out.println(((BindingProvider) sh).toString());String userName = null;
boolean exit = false;
while (!exit) {
System.out.print("/n Please enter yourname (type 'quit' to exit): ");
BufferedReader br = new BufferedReader(new InputStreamReader(
System.in));
try {
userName = br.readLine();
} catch (IOException e) {
System.out.println("Errorreadingname.");
System.exit(1);
}
if (!(exit = userName.trim().equalsIgnoreCase("quit")
|| userName.trim().equalsIgnoreCase("exit"))) {
System.out.println(sh.getGreeting(userName));
}
}
System.out.println("/nThank you for running the client.");
}
}
当你运行SayHelloClient时,它创建了一个新的Service--SayHelloService,这是通过Ant脚本调用wsimport产生的一个proxy,用来调用目标服务端点的操作。然后Client得到请求上下文,添加端点地址http://localhost:8080/wsServerExample ,在这里处理请求消息。
11.运行Client
右键SayHelloClient.java,选择Run As> Java Application,得到:

可以使用脚本完成对Server和Client的调用:
在Client中建立文件buildall.xml:
<project default="runClient"> <!-- ================================= target: wsimport ================================= --> <target name="wsimport" description="--> Read the WSDL and generate the required artifacts"> <exec executable="wsimport"> <arg line="-keep -s ./src -p org.gnuhpc.wsClient -d ./bin http://localhost:8080/wsServerExample?wsdl"/> </exec> </target> <!-- ================================= target: runServer ================================= --> <target name="runServer" description="--> Runs the Web service server from a terminal"> <echo> Running the following command from the terminal to run the server: ${java.home}/bin/java -cp "C:/Documents and Settings/Administrator/workspace/wsServerHelloWorld/bin" org.gnuhpc.wsServer.RunService </echo> <exec dir="c:/Progra~1/Java/jdk1.6.0_13/bin" executable="cmd" spawn="true" os="Windows XP" description="runs on XP"> <arg line="start cmd /K start cmd /K" /> <arg line='"c:/Progra~1/Java/jdk1.6.0_13/bin/java" -cp "C:/Documents and Settings/Administrator/workspace/wsServerHelloWorld/bin" org.gnuhpc.wsServer.RunService' /> </exec> </target> <!-- ================================= target: pause ================================= --> <target name="pause" depends="runServer" description="--> Pauses briefly while the server starts"> <sleep seconds="5"/> </target> <!-- ================================= target: runClient ================================= --> <target name="runClient" depends="pause" description="--> Runs a Web service client from a terminal"> <echo> Running the following command from the terminal to run the client: ${java.home}/bin/java -cp "c:/DOCUME~1/Administrator/workspace/wsClientHelloWorld/bin" org.gnuhpc.wsClient.SayHelloClient </echo> <exec dir="c:/Progra~1/Java/jdk1.6.0_13/bin/" executable="cmd" spawn="true" os="Windows XP" description="Runs on XP"> <arg line="start cmd /K start cmd /K" /> <arg line='"c:/Progra~1/Java/jdk1.6.0_13/bin/java -cp" "c:/DOCUME~1/Administrator/workspace/wsClientHelloWorld/bin" org.gnuhpc.wsClient.SayHelloClient' /> </exec> </target> </project>
- <project default="runClient">
- <!-- =================================
- target: wsimport
- ================================= -->
- <target name="wsimport" description="-->
- Read the WSDL and generate the required artifacts">
- <exec executable="wsimport">
- <arg line="-keep -s ./src -p org.gnuhpc.wsClient -d ./bin
- http://localhost:8080/wsServerExample?wsdl"/>
- </exec>
- </target>
- <!-- =================================
- target: runServer
- ================================= -->
- <target name="runServer" description="-->
- Runs the Web service server from a terminal">
- <echo>
- Running the following command from the terminal to run the server:
- ${java.home}/bin/java -cp "C:/Documents and Settings/Administrator/workspace/wsServerHelloWorld/bin"
- org.gnuhpc.wsServer.RunService
- </echo>
- <exec dir="c:/Progra~1/Java/jdk1.6.0_13/bin" executable="cmd" spawn="true"
- os="Windows XP" description="runs on XP">
- <arg line="start cmd /K start cmd /K" />
- <arg line='"c:/Progra~1/Java/jdk1.6.0_13/bin/java" -cp
- "C:/Documents and Settings/Administrator/workspace/wsServerHelloWorld/bin"
- org.gnuhpc.wsServer.RunService' />
- </exec>
- </target>
- <!-- =================================
- target: pause
- ================================= -->
- <target name="pause" depends="runServer" description="-->
- Pauses briefly while the server starts">
- <sleep seconds="5"/>
- </target>
- <!-- =================================
- target: runClient
- ================================= -->
- <target name="runClient" depends="pause" description="-->
- Runs a Web service client from a terminal">
- <echo>
- Running the following command from the terminal to run the client:
- ${java.home}/bin/java -cp "c:/DOCUME~1/Administrator/workspace/wsClientHelloWorld/bin"
- org.gnuhpc.wsClient.SayHelloClient
- </echo>
- <exec dir="c:/Progra~1/Java/jdk1.6.0_13/bin/" executable="cmd" spawn="true"
- os="Windows XP" description="Runs on XP">
- <arg line="start cmd /K start cmd /K" />
- <arg line='"c:/Progra~1/Java/jdk1.6.0_13/bin/java -cp" "c:/DOCUME~1/Administrator/workspace/wsClientHelloWorld/bin"
- org.gnuhpc.wsClient.SayHelloClient' />
- </exec>
- </target>
- </project>
注意其中的路径名称,选择与你自己系统的路径名即可。
在这个脚本中,默认target为runClient,但是在运行runClient之前还有一个依赖:pause,意味着runClient之前一定要运行pause,而pause的依赖是runServer,那么运行顺序就是
runServer先运行,pause再运行,最后runClient运行。
另一个需要注意的是os值:只有当前系统与指定的OS匹配时才会被执行。
为显示命令。
用Ant Build运行得到一个Server,5秒钟后出现一个Client。
12.使用SOAP监视器监视C-S的通信:
到这一步,我们已经建立了一个Server 一个Client端,我们现在想使用Eclipse的TCP/IP Monitor监视SOAP通信。

打开:Window>Show View>Other>Debug>TCP/IP Monitor
配置:Windows>Preferences >Run/Debug > TCP/IPMonitor
添加一个TCP/IP Monitor:
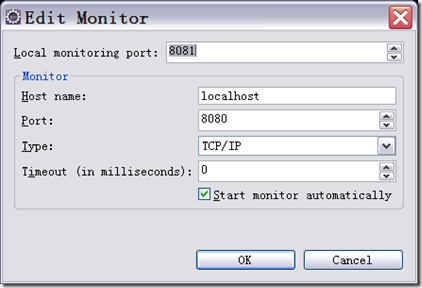
Port为远端服务器端口,Local Monitoring Port为本地监听端口
现在我们需要更新一下Client代码(将端口8080,设置为8081),将Web Service通过Monitor重定向。然后运行脚本: 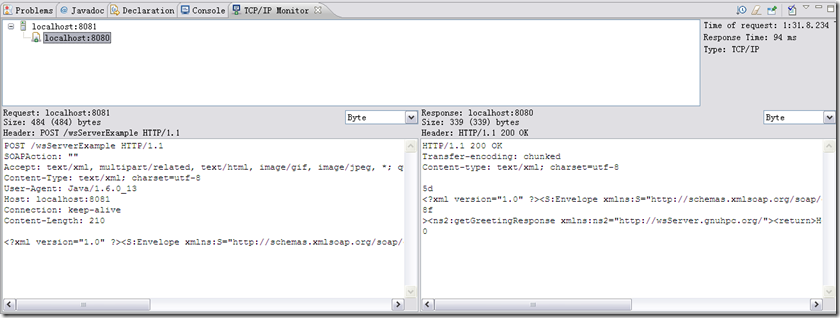
左右分别的文本全文为:
POST /wsServerExample HTTP/1.1
SOAPAction: ""
Accept: text/xml, multipart/related, text/html, image/gif, image/jpeg, *; q=.2, */*; q=.2
Content-Type: text/xml; charset=utf-8
User-Agent: Java/1.6.0_13
Host: localhost:8081
Connection: keep-alive
Content-Length: 210http://schemas.xmlsoap.org/soap/envelope/">http://wsServer.gnuhpc.org/">gnuhpc
HTTP/1.1 200 OK
Transfer-encoding: chunked
Content-type: text/xml; charset=utf-85d
http://schemas.xmlsoap.org/soap/envelope/">
8f
>http://wsServer.gnuhpc.org/">Hello gnuhpc
0
其中的含义不言自明。
所有代码下载:
http://cid-a0a0b50959052db4.skydrive.live.com/self.aspx/.Public/WebService.rar
2010.1.5 补充:
1.网友Alexander Ananiev在其Blog 上表示在他看来还是手工写WSDL和schemas比较靠谱,更加有重用性和扩展性,并不推荐使用annotations自动生成WSDL。
2.JAX-WS 包括了 Java Architecture for XML Binding (JAXB) 和 SOAP with Attachments API for Java (SAAJ).
前者为从XML Schema到Java代码表示提供了一个方便的映射方法,屏蔽了从SOAP消息中的XML Schema到Java代码之间转换的具体细节。而SAAJ则为处理在SOAP消息中附带的XML提供了一个标准的方法。另外,JAX-WS还定义了从WSDL上定义的服务到实现这些服务的Java类之间的映射,任何定义在WSDL中的复杂类型都将根据JAXB定义的标准转换到Java类中。
3.开发JAX-WS有两种思路:
- Contract first:先写好WSDL,然后从中生成Java 代码来实现。
- Code first:先写好一些plain old Java object (POJO) classes,然后使用annotations产生WSDL和Java类。
前者需要很好的WSDL和XSD知识,初学者一般建议后者,另外要是将一个已经实现的类以Web Service的方式呈现也建议用后者。前者的一个例子是:http://myarch.com/create-jax-ws-service-in-5-minutes
4.常见Annotations含义:
The @WebService annotation的含义:
| Property | Description |
|---|---|
| name | Specifies the name of the service interface. This property is mapped to the name attribute of the wsdl:portType element that defines the service's interface in a WSDL contract. The default is to append PortType to the name of the implementation class. [a ] |
| targetNamespace | Specifies the target namespace under which the service is defined. If this property is not specified, the target namespace is derived from the package name. |
| serviceName | Specifies the name of the published service. This property is mapped to the name attribute of the wsdl:service element that defines the published service. The default is to use the name of the service's implementation class. [a ] |
| wsdlLocation | Specifies the URI at which the service's WSDL contract is stored. The default is the URI at which the service is deployed. |
| endpointInterface | Specifies the full name of the SEI that the implementation class implements. This property is only used when the attribute is used on a service implementation class. |
| portName | Specifies the name of the endpoint at which the service is published. This property is mapped to the name attribute of the wsdl:port element that specifies the endpoint details for a published service. The default is the append Port to the name of the service's implementation class. [a ] |
|
[a ] When you generate WSDL from an SEI the interface's name is used in place of the implementation class' name | |
@XmlSeeAlso:
Suppose you want to build a web service that manages the inventory for a store that sells wakeboards and related equipment. Wakeboards are short boards made of buoyant material that are used to ride over the surface of a body of water, typically behind a boat or with a cable-skiing apparatus.
For simplicity, let's assume that the store sells only three types items: wakeboards, bindings, and towers for boats. You want the web service to be fairly simple to use and have a minimal amount of exposed operations. So to keep things simple, the web service uses an abstract Item class in its operations instead of using type-specific operations. The following Item class can be used to model any inventory object that you might want to expose through your web service:
public abstract class Item implements Serializable { private long id; private String brand; private String name; private double price; ... }
Extending the Item class, you can define the following Wakeboard , WakeboardBinding and Tower classes:
public class Wakeboard extends Item { private String size; } public class WakeboardBinding extends Item { private String size; } public class Tower extends Item { private Fit fit; private String tubing; public static enum Fit { Custom, Exact, Universal }; }
Because this example is about type substitution, let's make the inheritance hierarchy a little more interesting by introducing a Wearable abstract class. Wearable holds the size attribute for both the Wakeboard and WakeboardBinding classes. The Wearable class is defined as follows:
public abstract class Wearable extends Item { protected String size; }
And the resulting Wakeboard and WakeboardBinding classes are:
public class Wakeboard extends Wearable { } public class WakeboardBinding extends Wearable { }
Also, because the web service manages inventory, you'll want the inventory items to be persisted to a database using the Java Persistence API (sometimes referred to as JPA). To do this, you need to add an @Entity annotation to each of the classes that will be persisted. The only class that you probably don't want to persist is the Wearable class. You can add the @MappedSuperclass annotation to this class so that the JPA will use the attributes of this class for persisting subclasses. Next, you need to add the @Id and the @GeneratedValue(strategy = GenerationType.AUTO) annotations to the Item.Id field. As a result, the field will be used as the primary key in the database and the Id will be automatically generated if not provided. Finally, because you might add new types of Item s into the system at a later time, you should add the @Inheritance(strategy=InheritanceType.JOINED) annotation to the Item class. This will store each subclass in its own database table.
The final data classes look like the following:
@Entity @Inheritance(strategy=InheritanceType.JOINED) public abstract class Item implements Serializable { @Id @GeneratedValue(strategy = GenerationType.AUTO) private Long id; private String brand; private String itemName; private double price; // Getters & setters ... } @MappedSuperclass public abstract class Wearable extends Item { protected String size; ... } @Entity public class Wakeboard extends Wearable {} @Entity public class WakeboardBinding extends Wearable {} @Entity public class Tower extends Item { private Fit fit; private String tubing; public static enum Fit { Custom, Exact, Universal }; ... }
Now that you defined the data model for the application, you can now define the web service interface. Because the application manages information about wakeboard equipment, let's call the web service WakeRider and let's expose four operations in the web service: addItem , updateItem , removeItem , and getItems .
Here is what the WakerRider class looks like:
@WebService() public class WakeRider { ... public List<Item> getItems() {...} public boolean addItem(Item item) {...} public boolean updateItem(Item item) {...} public boolean removeItem(Item item) {...} }
If you deployed this web service and then looked at the generated WSDL and schema, you would notice that only the Item type is defined -- there is no mention of Wearable , Wakeboard , WakeboardBinding , or Tower . This is because when JAX-WS introspects the WakeRider class there is no mention of the other classes. To remedy that you can use the new @XmlSeeAlso annotation and list the other classes that you want to expose through the WakeRider web service.
Here is what the WakeRider class looks like with the @XmlSeeAlso annotation:
@WebService() @XmlSeeAlso({Wakeboard.class, WakeboardBinding.class, Tower.class}) public class WakeRider { ... }
Now when you deploy the WakeRider service and look at the generated schema, you will see types for Item , Wearable , Wakeboard , WakeboardBinding , and Tower as well as some other types used internally by JAX-WS and JAXB.
@WebResult含义:specifies that the name of the result of the operation in the generated WSDL
targetNamespace含义:The XML namespace used for the WSDL and XML elements generated from this Web Service.
@RequestWrapper 含义:生成的请求包装器 bean、元素名称和名称空间,用于对在运行时使用的请求包装器 bean 进行序列化和反序列化。
@ResponseWrapper 含义:提供 JAXB 生成的响应包装器 bean、元素名称和名称空间,用于对在运行时使用的响应包装器 bean 进行序列化和反序列化。
@WebParam 含义:用于定制从单个参数至 Web Service 消息部件和 XML 元素的映射。
@WebMethod annotation :表示作为一项 Web Service 操作的方法。
@WebService annotation: 定义了一个Web Service端点接口(service endpoint interface (SEI)),声明了一个Client在这个Service上可能invoke 的方法,所有在这个类中定义的public方法都会被映射到WSDL中,除非有一个@WebMethod中设置有排他元素为true的。
5.在Web Service完成后要将相关文件打包生成WAR文件,然后将该文件部署到支持JAX-WS 2.0标准的Web Server上,Java 6有一个轻量级的Web server,通过简单的API就可以将Web Service发布。


 907
907

 被折叠的 条评论
为什么被折叠?


