


mkpass 解释:make password
[root@cham2 ~]# mkpasswd make password ^C
[root@cham2 ~]# mkpasswd 直接输入不行的
-bash: mkpasswd: 未找到命令
[root@cham2 ~]# yum install -y expect 要安装一个包。
已加载插件:fastestmirror
随手生成一个密码
#mkpasswd
![]()
指定密码长度12位
#mkpasswd -l 12
![]()
还可以指定3个特殊符号
#mkpasswd -l 12 -s 3
![]()
也可以不要特殊符号,只要小些大写
#mkpasswd -l 12 -s 0
![]()
su命令
su命令是用于切换用户 **普通用户显示$,root用户显示#**
su的优缺点;
su的确为管理带来方便,通过切换到root下,能完成所有系统管理工具,只要把root的密码交给任何一个普通用户,他都能切换到root来完成所有的系统管理工作;但通过su切换到root后,也有不安全因素;比如系统有10个用户,而且都参与管理。如果这10个用户都涉及到超级权限的运用,做为管理员如果想让其它用户通过su来切换到超级权限的root,必须把root权限密码都告诉这10个用户;如果这10个用户都有root权限,通过root权限可以做任何事,这在一定程度上就对系统的安全造成了威协;想想Windows吧,简直就是恶梦;“没有不安全的系统,只有不安全的人”,我们绝对不能保证这 10个用户都能按正常操作流程来管理系统,其中任何一人对系统操作的重大失误,都可能导致系统崩溃或数据损失;所以su 工具在多人参与的系统管理中,并不是最好的选择,su只适用于一两个人参与管理的系统,毕竟su并不能让普通用户受限的使用;超级用户root密码应该掌握在少数用户手中,这绝对是真理!所以集权而治的存在还是有一定道理的;
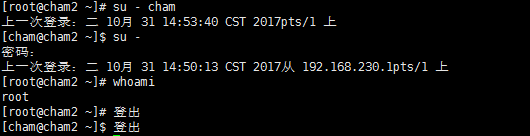
su - cham 和 su cham ,是有所区别的。加-是彻底的切换。

在cham家目录下,就会去加载cham的自己的配置文件

普通用户也可以登录到root,只要知道root 密码就行
还可以在su的时候以cham用户的身份去执行一条命令,不登录cham直接执行
# su - -c "touch /tmp/cham.111" cham
[root@cham2 ~]# su - -c "touch /tmp/cham.111" cham
[root@cham2 ~]# ls -lt /tmp/ |head
总用量 12
-rw-rw-r--. 1 cham  cham   0 10月 31 14:36 cham.111
drwx------. 3 root  root  17 10月 30 12:53 systemd-private-6606fcf724b44e09ad6d69ab6146ea2c-vmtoolsd.service-xzj3RY
drw-r--r--. 2 cham  cham  17 10月 26 20:47 yyy
-rwxrwxrwx. 1 cham  cham   6 10月 26 20:02 321321
drwxrwxrwx. 2 cham  cham   6 10月 26 16:59 cham11
-rwxrwxrwx. 1 cham  cham   1 10月 26 16:48 cham
drwxrwxrwx. 2 user1 user1  6 10月 26 16:27 user1
-rw-r--r--. 2 root  root   0 10月 25 17:31 1.txt.bak
drw-r--r-x. 2 user1 cham  19 10月 25 15:41 cham2
[root@cham2 ~]# id cham
uid=1000(cham) gid=1000(cham) 组=1000(cham),1005(grp2),1007(user5)
[root@cham2 ~]# date
2017年 10月 31日 星期二 14:37:37 CST
再登录user5,发现有问题,缺少可加载的用户配置文件和家目录,操作一下让它恢复正常
[root@cham2 ~]# passwd user5
更改用户 user5 的密码 。
新的 密码:
无效的密码: 密码少于 8 个字符
重新输入新的 密码:
passwd:所有的身份验证令牌已经成功更新。
[root@cham2 ~]# su - cham
上一次登录:二 10月 31 14:49:39 CST 2017pts/1 上
[cham@cham2 ~]$ su - user5
密码:
最后一次失败的登录:二 10月 31 14:49:50 CST 2017pts/1 上
最有一次成功登录后有 1 次失败的登录尝试。
su: 警告:无法更改到 /home/user5 目录: 没有那个文件或目录
-bash-4.2$
-bash-4.2$ pwd
/home/cham
-bash-4.2$ 登出
[cham@cham2 ~]$ 登出
[root@cham2 ~]# id user5                        看一下user5的所有者和所属组
uid=1007(user5) gid=1007(user5) 组=1007(user5)
[root@cham2 ~]# mkdir /home/user5               首先创建用户家目录
[root@cham2 ~]# chown user5:
[root@cham2 ~]# chown user5:user5 /home/user5/  更改/home/user5/的所有者以及所属组,加不加-R都可以,因
                                                为仅仅是个目录
[root@cham2 ~]# su - user5                      在登录还是不行
上一次登录:二 10月 31 14:51:01 CST 2017pts/1 上
-bash-4.2$ pwd
/home/user5
-bash-4.2$ 登出
[root@cham2 ~]# su - cham
上一次登录:二 10月 31 14:50:54 CST 2017pts/1 上
[cham@cham2 ~]$ ls -la
总用量 16
drwx------. 2 cham grp2  83 10月 27 15:13 .
drwxr-xr-x. 9 root root  98 10月 31 14:52 ..
-rw-------. 1 cham grp2 633 10月 31 14:51 .bash_history
-rw-r--r--. 1 cham grp2  18 8月   3 2016 .bash_logout
-rw-r--r--. 1 cham grp2 193 8月   3 2016 .bash_profile
-rw-r--r--. 1 cham grp2 231 8月   3 2016 .bashrc
[cham@cham2 ~]$ 登出
[root@cham2 ~]# ls /etc/skel/              缺少配置文件.bash开头的文件,系统有个模板在这个路径
[root@cham2 ~]# ls -la /etc/skel/
总用量 24
drwxr-xr-x.  2 root root   62 10月 19 06:56 .
drwxr-xr-x. 77 root root 8192 10月 31 14:50 ..
-rw-r--r--.  1 root root   18 8月   3 2016 .bash_logout
-rw-r--r--.  1 root root  193 8月   3 2016 .bash_profile
-rw-r--r--.  1 root root  231 8月   3 2016 .bashrc
[root@cham2 ~]# cp /etc/skel/.bash*  /home/user5/  拷贝/etc/skel/.bash*(代表拷贝.bash通配)
                                                   到/home/user5/到user5的家目录下去
[root@cham2 ~]# chown -R user5:user5 !$            更改所有者以及所属组要加-R(目录里的目录或者文件也全
                                                   部更改)(!$表示上一条命令的最后参数)
chown -R user5:user5 /home/user5/
[root@cham2 ~]#
[root@cham2 ~]# su - user5                         再试试,正常了
上一次登录:二 10月 31 14:53:13 CST 2017pts/1 上
[user5@cham2 ~]$ pwd
/home/user5
[user5@cham2 ~]$ 登出
[root@cham2 ~]#
sudo
它可以让普通用户临时去执行一条命令。以指定用户的身份去执行,这样可以避免把root用户密码给普通用户
用来以其他身份来执行命令,预设的身份为root。在/etc/sudoers中设置了可执行sudo指令的用户。若其未经授权的用户企图使用sudo,则会发出警告的邮件给管理员。用户使用sudo时,必须先输入密码,之后有5分钟的有效期限,超过期限则必须重新输入密码。
语法:sudo /usr/bin/ls /root/ 使用时可以不加绝对路径。
选项: (该部分只做了解)
-b:在后台执行指令;
-h:显示帮助;
-H:将HOME环境变量设为新身份的HOME环境变量;
-k:结束密码的有效期限,也就是下次再执行sudo时便需要输入密码;
-l:列出目前用户可执行与无法执行的指令;
-p:改变询问密码的提示符号;
-s:执行指定的shell;
-u<用户>:以指定的用户作为新的身份。若不加上此参数,则预设以root作为新的身份;
-v:延长密码有效期限5分钟;
-V :显示版本信息。
让用户使用不在输入密码 NOPASSWD:
配置sudo必须通过编辑/etc/sudoers文件,而且只有超级用户才可以修改它。使用visudo命令编辑/etc/sudoers配置文件,操作方法同vi命令。当对多个命令设置速sudo权限时,需要用逗号加空格隔开。使用visudo有两个原因,一是它能够防止两个用户同时修改它;二是它也能进行有限的语法检查。所以,即使只有你一个超级用户,你也最好用visudo来检查一下语法。
来做一个实验
执行#visudo 可以打开sudo ,也就是sudo的配置文件/etc/sudoers.tmp,*visudo还可以检测错误*
挺重要的不建议用#vi sudo,直接打开
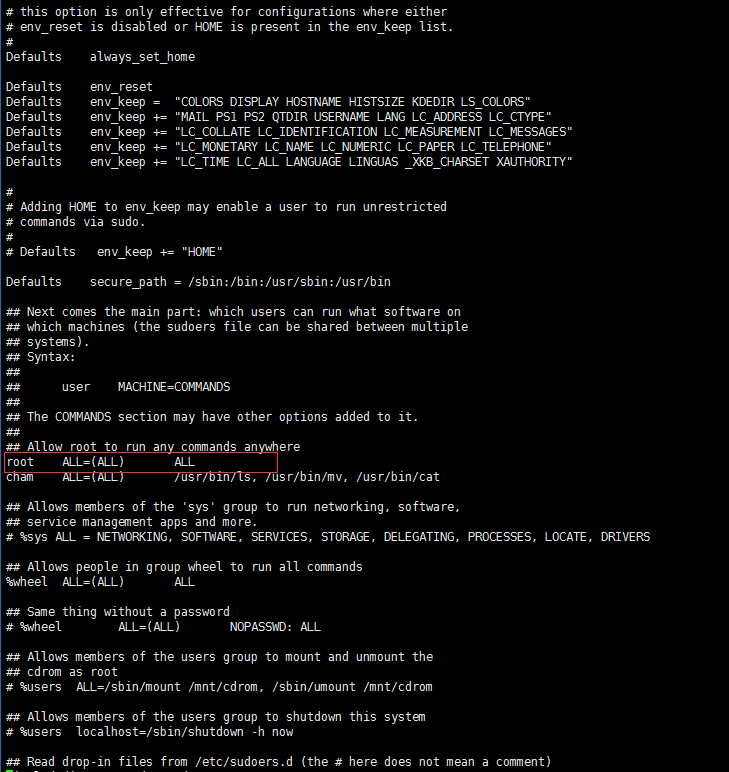
执行#visudo ,用方向键下找到root ALL=(ALL) ALL 这是整个文件最核心的一句
它表示允许root用户去运行所有的命令,。外面ALL值得是主机但实际不准确,括号(ALL)指的是用户,比如root。我们加一句![]() :wq保存退出
:wq保存退出
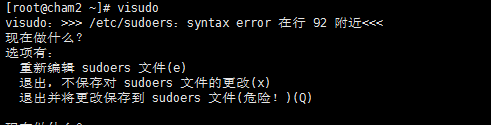
提示92行语法错误,按e重新编辑,输入:set nu查看行序号![]()
要写绝对路径,用逗号分隔,要有一个空格,如下
![]()
再:wq保存退出
下面来看一下sudo的用法,登录到cham用户,su - cham ,正常呢,在cham用户下使用ls /root/是不行的。
因为ls命令有个set_uid 和set_gid都把它去掉![]()
![]()
[root@cham2 ~]# su - cham
上一次登录:二 10月 31 15:23:47 CST 2017pts/1 上
[cham@cham2 ~]$ ls /root/
111     123     1_heard.txt  22.txt  2.txt.bak.bak  88_sorft.txt  anaconda-ks.cfg.1
11.txt  12.txt  1_sorft      234     88_heard.txt   88.txt
[cham@cham2 ~]$ 登出
[root@cham2 ~]# chmod u-s /bin/ls
[root@cham2 ~]# su - cham
上一次登录:二 10月 31 15:57:44 CST 2017pts/1 上
[cham@cham2 ~]$ ls /root/
111     123     1_heard.txt  22.txt  2.txt.bak.bak  88_sorft.txt  anaconda-ks.cfg.1
11.txt  12.txt  1_sorft      234     88_heard.txt   88.txt
[cham@cham2 ~]$ 登出
[root@cham2 ~]# ls -l /usr/bin/ls
-rwxr-sr-x. 1 root root 117656 11月  6 2016 /usr/bin/ls
[root@cham2 ~]# chmod g-s /usr/bin/ls
[root@cham2 ~]# su - cham
上一次登录:二 10月 31 15:58:39 CST 2017pts/1 上
[cham@cham2 ~]$ ls /root/                           正常的话是权限不够的!
ls: 无法打开目录/root/: 权限不够
[cham@cham2 ~]$ sudo /usr/bin/ls /root/             sudo的用法,第一次用会提示输入用户的密码

We trust you have received the usual lecture from the local System
Administrator. It usually boils down to these three things:

    #1) Respect the privacy of others.
    #2) Think before you type.
    #3) With great power comes great responsibility.

[sudo] password for cham:
Sorry, try again.
[sudo] password for cham:
Sorry, try again.
[sudo] password for cham:
111	123	1_heard.txt  22.txt  2.txt.bak.bak  88_sorft.txt  anaconda-ks.cfg.1
11.txt	12.txt	1_sorft      234     88_heard.txt   88.txt
[cham@cham2 ~]$ sudo /usr/bin/ls /root/            第2次使用就不用了
111	123	1_heard.txt  22.txt  2.txt.bak.bak  88_sorft.txt  anaconda-ks.cfg.1
11.txt	12.txt	1_sorft      234     88_heard.txt   88.txt
[cham@cham2 ~]$ ls /root/
ls: 无法打开目录/root/: 权限不够
[cham@cham2 ~]$ sudo /usr/bin/ls /root/
111	123	1_heard.txt  22.txt  2.txt.bak.bak  88_sorft.txt  anaconda-ks.cfg.1
11.txt	12.txt	1_sorft      234     88_heard.txt   88.txt
[cham@cham2 ~]$ cat /root/12.txt
cat: /root/12.txt: 权限不够
[cham@cham2 ~]$ sudo /usr/bin/cat /root/12.txt
root:x:0:0:root:/root:/bin/bash
bin:x:1:1:bin:/bin:/sbin/nologin
[cham@cham2 ~]$
再进入visudo同样的方法给user5设定,并且第一次使用不输入密码,如下NOPASSWD

使用时可以不加绝对路径。
[cham@cham2 ~]$ 登出
[root@cham2 ~]# visudo
[root@cham2 ~]# visudo
visudo:/etc/sudoers.tmp 未更改
[root@cham2 ~]# visudo
[root@cham2 ~]# su - user5
上一次登录:二 10月 31 14:56:14 CST 2017pts/1 上
[user5@cham2 ~]$ ls /root/
ls: 无法打开目录/root/: 权限不够
[user5@cham2 ~]$ sudo /usr/bin/ls /root/
111	123	1_heard.txt  22.txt  2.txt.bak.bak  88_sorft.txt  anaconda-ks.cfg.1
11.txt	12.txt	1_sorft      234     88_heard.txt   88.txt
[user5@cham2 ~]$ sudo ls /root/
111	123	1_heard.txt  22.txt  2.txt.bak.bak  88_sorft.txt  anaconda-ks.cfg.1
11.txt	12.txt	1_sorft      234     88_heard.txt   88.txt
下面再来试试命令的Aliase,命令的别名


[cham@cham2 ~]$ sudo ls /root/
[sudo] password for cham:
111	123	1_heard.txt  22.txt  2.txt.bak.bak  88_sorft.txt  anaconda-ks.cfg.1
11.txt	12.txt	1_sorft      234     88_heard.txt   88.txt
[cham@cham2 ~]$ cat /root/12.txt
cat: /root/12.txt: 权限不够
[cham@cham2 ~]$ sudo cat /root/12.txt
root:x:0:0:root:/root:/bin/bash
bin:x:1:1:bin:/bin:/sbin/nologin
还有用户组
针对一个组去做限制,工作种可能会用到,但不会用的特别复杂。
sudo配置文件样例

#
# Sample /etc/sudoers file.
#
# This file MUST be edited with the 'visudo' command as root.
#
# See the sudoers man page for the details on how to write a sudoers file.
#

##
# User alias specification
##
User_Alias	FULLTIMERS = millert, mikef, dowdy
User_Alias	PARTTIMERS = bostley, jwfox, crawl
User_Alias	WEBMASTERS = will, wendy, wim

##
# Runas alias specification
##
Runas_Alias	OP = root, operator
Runas_Alias	DB = oracle, sybase

##
# Host alias specification
##
Host_Alias	SPARC = bigtime, eclipse, moet, anchor:\
		SGI = grolsch, dandelion, black:\
		ALPHA = widget, thalamus, foobar:\
		HPPA = boa, nag, python
Host_Alias	CUNETS = 128.138.0.0/255.255.0.0
Host_Alias	CSNETS = 128.138.243.0, 128.138.204.0/24, 128.138.242.0
Host_Alias	SERVERS = master, mail, www, ns
Host_Alias	CDROM = orion, perseus, hercules

##
# Cmnd alias specification
##
Cmnd_Alias	DUMPS = /usr/sbin/dump, /usr/sbin/rdump, /usr/sbin/restore, \
			/usr/sbin/rrestore, /usr/bin/mt
Cmnd_Alias	KILL = /usr/bin/kill
Cmnd_Alias	PRINTING = /usr/sbin/lpc, /usr/bin/lprm
Cmnd_Alias	SHUTDOWN = /usr/sbin/shutdown
Cmnd_Alias	HALT = /usr/sbin/halt
Cmnd_Alias	REBOOT = /usr/sbin/reboot
Cmnd_Alias	SHELLS = /sbin/sh, /usr/bin/sh, /usr/bin/csh, /usr/bin/ksh, \
			 /usr/local/bin/tcsh, /usr/bin/rsh, \
			 /usr/local/bin/zsh
Cmnd_Alias	SU = /usr/bin/su
Cmnd_Alias	VIPW = /usr/sbin/vipw, /usr/bin/passwd, /usr/bin/chsh, \
		       /usr/bin/chfn

##
# Override built-in defaults
##
Defaults               syslog=auth
Defaults>root          !set_logname
Defaults:FULLTIMERS    !lecture
Defaults:millert       !authenticate
Defaults@SERVERS       log_year, logfile=/var/log/sudo.log

##
# User specification
##

# root and users in group wheel can run anything on any machine as any user
root		ALL = (ALL) ALL
%wheel		ALL = (ALL) ALL

# full time sysadmins can run anything on any machine without a password
FULLTIMERS	ALL = NOPASSWD: ALL

# part time sysadmins may run anything but need a password
PARTTIMERS	ALL = ALL

# jack may run anything on machines in CSNETS
jack		CSNETS = ALL

# lisa may run any command on any host in CUNETS (a class B network)
lisa		CUNETS = ALL

# operator may run maintenance commands and anything in /usr/oper/bin/
operator	ALL = DUMPS, KILL, SHUTDOWN, HALT, REBOOT, PRINTING,\
		sudoedit /etc/printcap, /usr/oper/bin/

# joe may su only to operator
joe		ALL = /usr/bin/su operator

# pete may change passwords for anyone but root on the hp snakes
pete		HPPA = /usr/bin/passwd [A-z]*, !/usr/bin/passwd root

# bob may run anything on the sparc and sgi machines as any user
# listed in the Runas_Alias "OP" (ie: root and operator)
bob		SPARC = (OP) ALL : SGI = (OP) ALL

# jim may run anything on machines in the biglab netgroup
jim		+biglab = ALL

# users in the secretaries netgroup need to help manage the printers
# as well as add and remove users
+secretaries	ALL = PRINTING, /usr/bin/adduser, /usr/bin/rmuser

# fred can run commands as oracle or sybase without a password
fred		ALL = (DB) NOPASSWD: ALL

# on the alphas, john may su to anyone but root and flags are not allowed
john		ALPHA = /usr/bin/su [!-]*, !/usr/bin/su *root*

# jen can run anything on all machines except the ones
# in the "SERVERS" Host_Alias
jen		ALL, !SERVERS = ALL

# jill can run any commands in the directory /usr/bin/, except for
# those in the SU and SHELLS aliases.
jill		SERVERS = /usr/bin/, !SU, !SHELLS

# steve can run any command in the directory /usr/local/op_commands/
# as user operator.
steve		CSNETS = (operator) /usr/local/op_commands/

# matt needs to be able to kill things on his workstation when
# they get hung.
matt		valkyrie = KILL

# users in the WEBMASTERS User_Alias (will, wendy, and wim)
# may run any command as user www (which owns the web pages)
# or simply su to www.
WEBMASTERS	www = (www) ALL, (root) /usr/bin/su www

# anyone can mount/unmount a cd-rom on the machines in the CDROM alias
ALL		CDROM = NOPASSWD: /sbin/umount /CDROM,\
		/sbin/mount -o nosuid\,nodev /dev/cd0a /CDROM
sudo -i 详解
sudo : 暂时切换到超级用户模式以执行超级用户权限,提示输入密码时该密码为当前用户的密码,而不是超级账户的密码。不过有时间限制,Ubuntu默认为一次时长15分钟。
su : 切换到某某用户模式,提示输入密码时该密码为切换后账户的密码,用法为“su账户名称”。如果后面不加账户时系统默认为root账户,密码也为超级账户的密码。没有时间限制。
sudo -i: 为了频繁的执行某些只有超级用户才能执行的权限,而不用每次输入密码,可以使用该命令。提示输入密码时该密码为当前账户的密码。没有时间限制。执行该命令后提示符变为“#”而不是“$”。想退回普通账户时可以执行“exit”或“logout” 。
其实,还有几个类似的用法:
sudo /bin/bash:
这个命令也会切换到root的bash下,但不能完全拥有root的所有环境变量,比如PATH,可以拥有root用户的权限。这个命令和 sudo -s 是等同的。
sudo -s : 如上
sudo su : 这个命令,也是登录到了root,但是并没有切换root的环境变量,比如PATH。
sudo su - : 这个命令,纯粹的切换到root环境下,可以这样理解,先是切换到了root身份,然后又以root身份执行了 su -,此时跟使用root登录没有什么区别。此结果貌似跟sudo -i的效果是一样的,但是也有不同,sudo只是临时拥有了root的权限,而su则是使用root账号登录了linux系统。
所以,我们再来总结一下:
sudo su - 约等于 sudo -i
sudo -s 完全等于 sudo /bin/bash 约等于 sudo su
sudo 终究被一个"临时权限的帽子"扣住,不能等价于纯粹的登录到系统里。
限制root远程登录
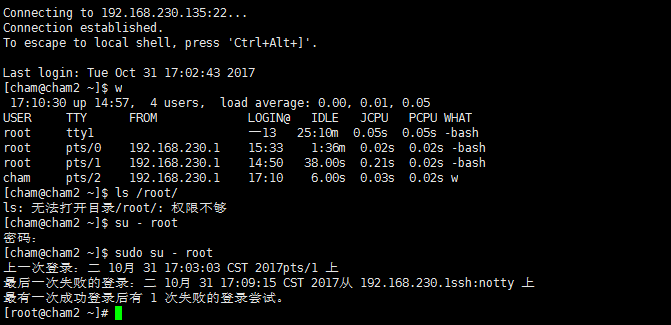
直接登录root用户是有一定的危险性的。
做一个user aliase
#visudo


# vi /etc/ssh/sshd_config 限制root远程登录
进入后用/Root去搜索
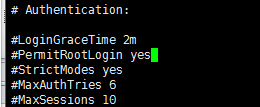
把#号去掉,把PermitRootLogin yes改成no
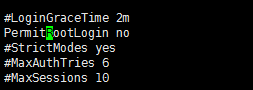
:wq保存,重启一下服务
![]()
用普通用户去登陆一下。


 299
299

 被折叠的 条评论
为什么被折叠?
被折叠的 条评论
为什么被折叠?
 到【灌水乐园】发言


