


我使用过FindContours,而且知道有能够直接寻找联通区域的函数。但是我使用的大多只是“最大轮廓”或者"轮廓数目“这些数据。其实轮廓还有另一个很重要的性质,那就是轮廓的相互包含特性。

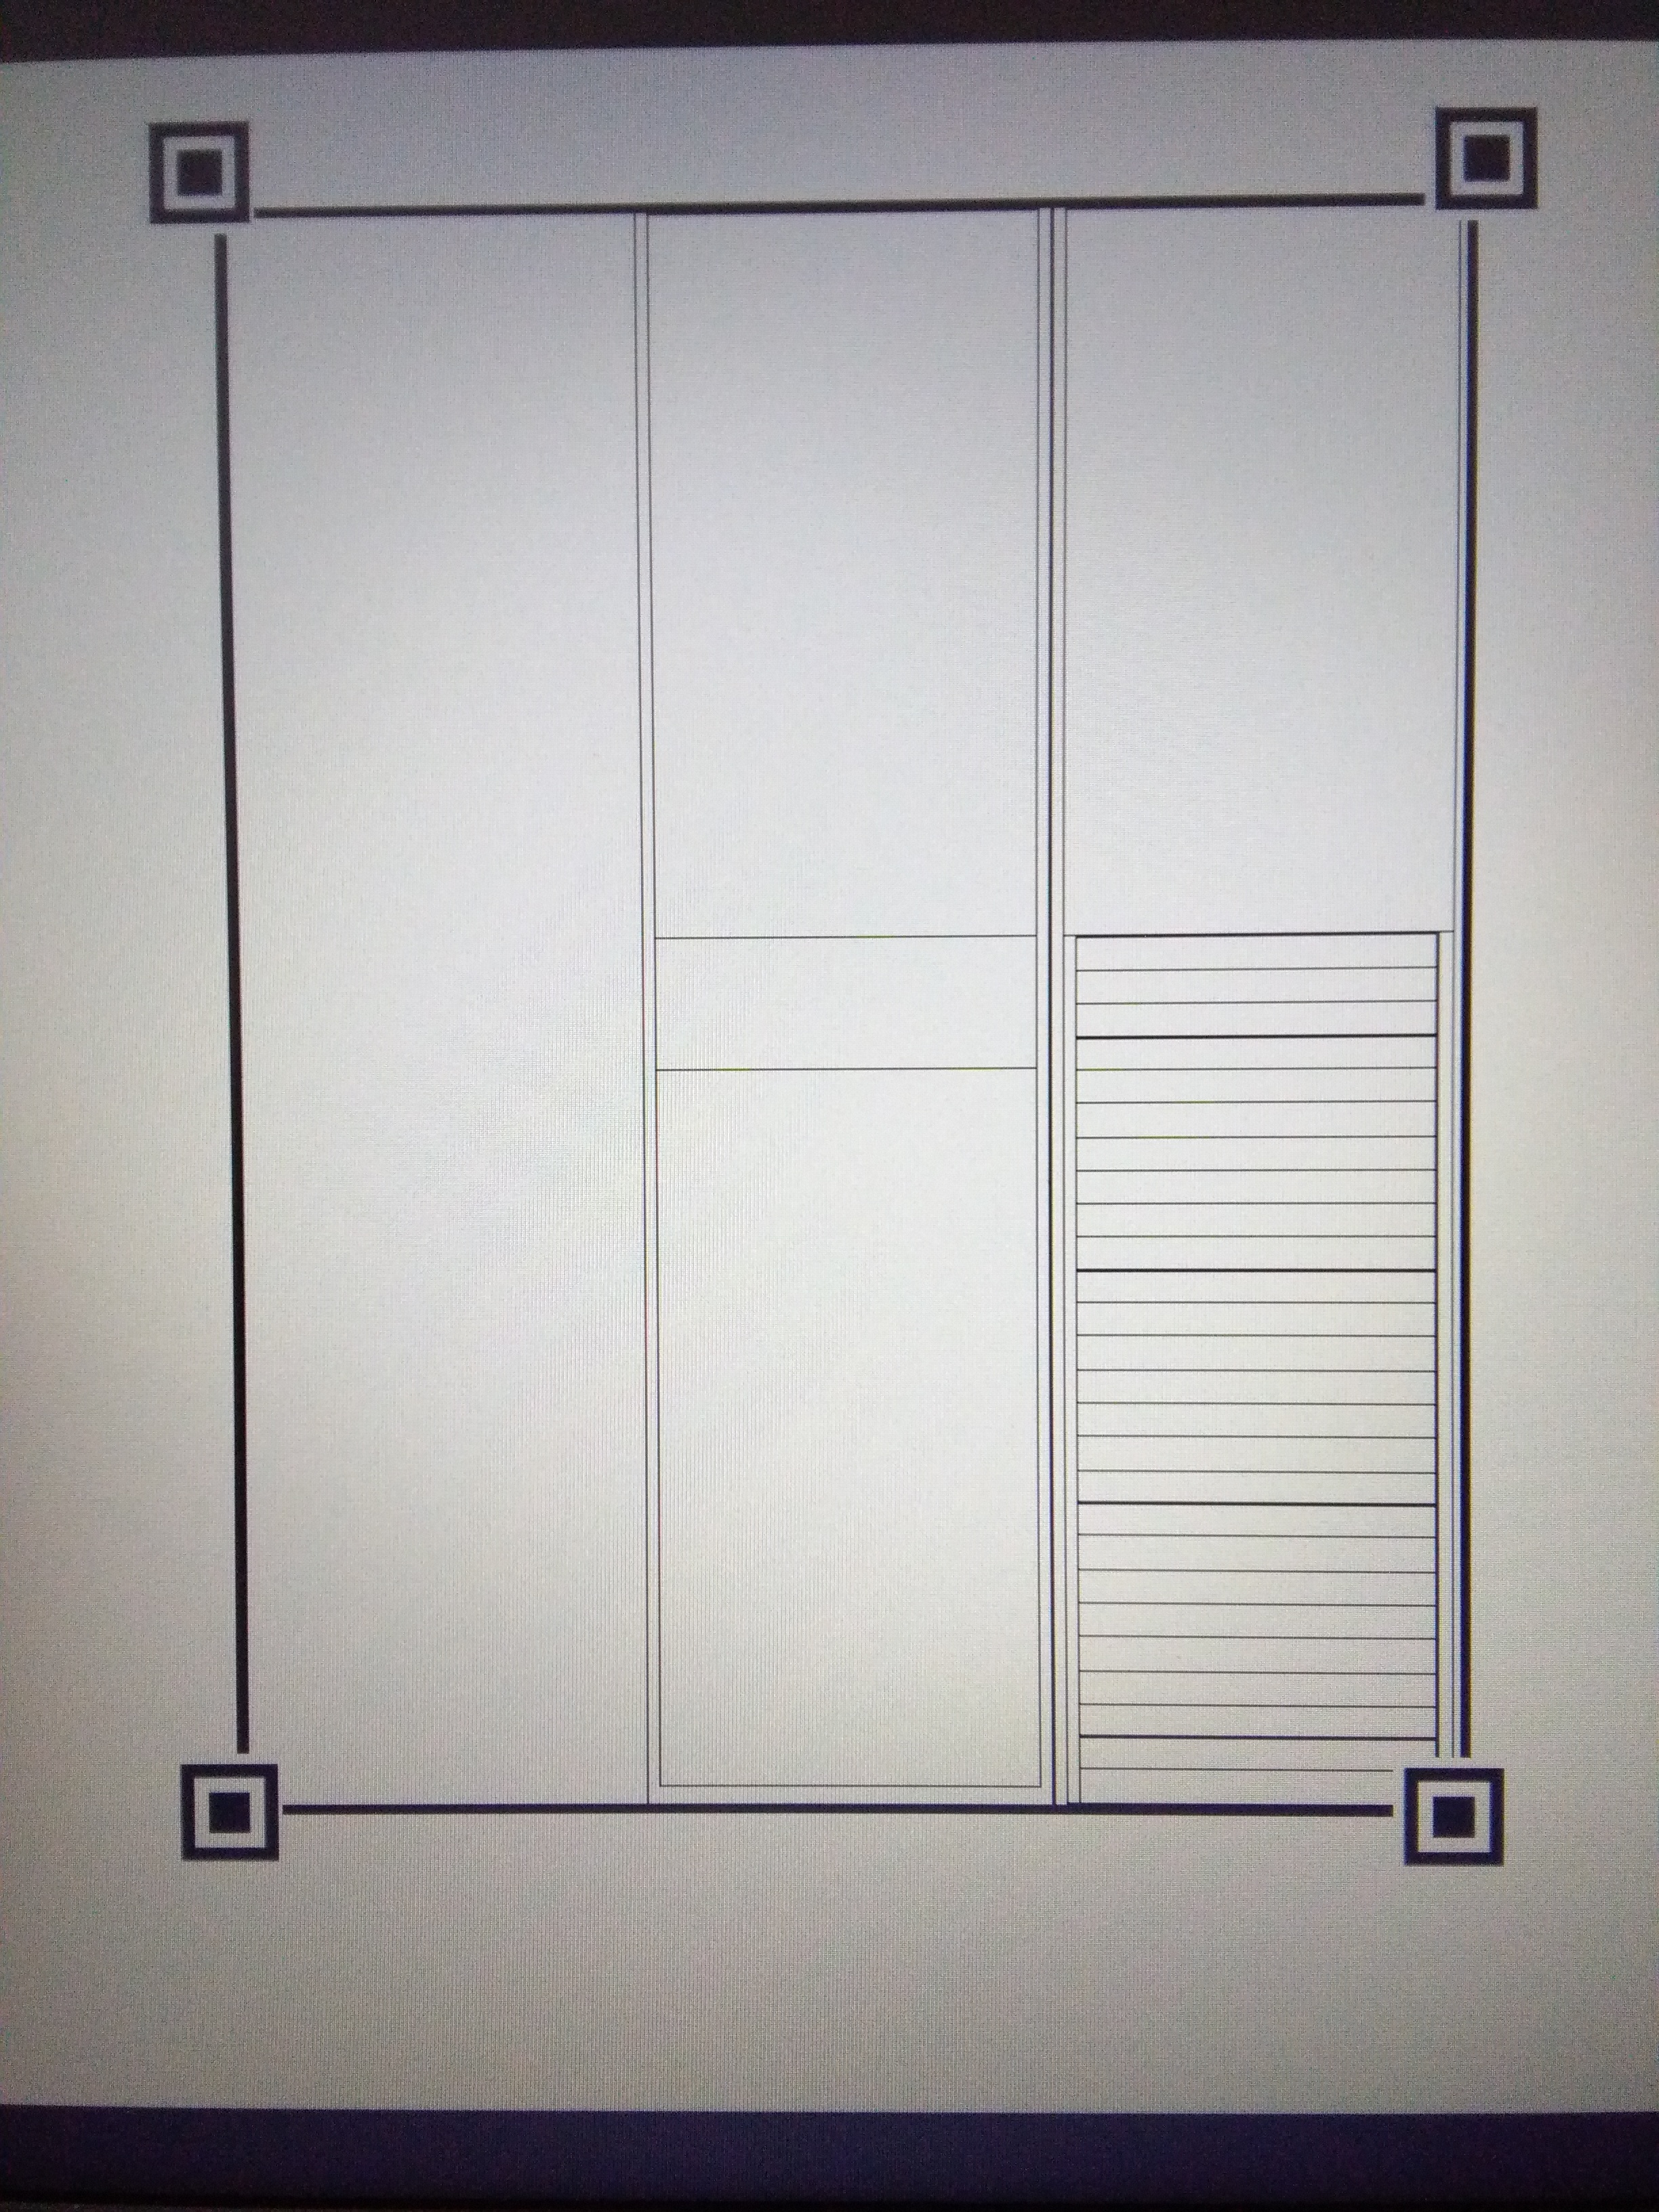
 ,这种特性,在图上只有三处,而且在自然图片中是不容易重复的(当然二维码内部还有校验机制)。那么基于此就能够很容易地获取准确定位。将二维码的这种机制进行扩展,能够得到对实际物体的定位方法。比如如果我将笔记本的内页设计成这样(当然也可以是答题卡之类),那么就能够为准确的定位、透视变换打下好的基础。
Mat src = imread("e:/sandbox/contours.png",0);
threshold(src,src,100,255,THRESH_OTSU);
vector<vector<Point> > contours,contours2;
vector<Vec4i> hierarchy;
findContours( src, contours, hierarchy, CV_RETR_TREE, CHAIN_APPROX_NONE, Point(0, 0) );
waitKey();
}
enum
{
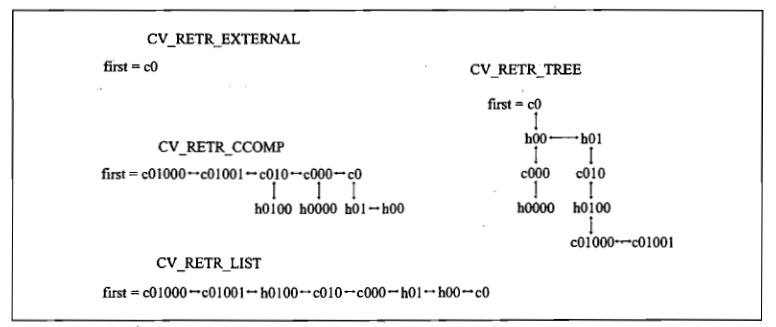
CV_RETR_EXTERNAL=0,
CV_RETR_LIST=1,
CV_RETR_CCOMP=2,
CV_RETR_TREE=3,
CV_RETR_FLOODFILL=4
};
enum { CHAIN_APPROX_NONE = 1,
CHAIN_APPROX_SIMPLE = 2,
CHAIN_APPROX_TC89_L1 = 3,
CHAIN_APPROX_TC89_KCOS = 4
}
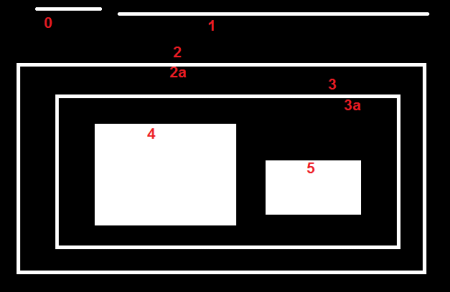
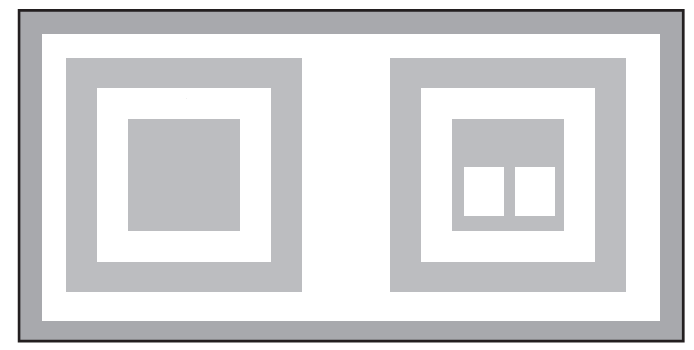
Here, contours 0,1,2 are external or outermost. We can say, they are in hierarchy-0 or simply they are in same hierarchy level.
Next comes contour-2a. It can be considered as a child of contour-2 (or in opposite way, contour-2 is parent of contour-2a). So let it be in hierarchy-1. Similarly contour-3 is child of contour-2 and it comes in next hierarchy. Finally contours 4,5 are the children of contour-3a, and they come in the last hierarchy level. From the way I numbered the boxes, I would say contour-4 is the first child of contour-3a (It can be contour-5 also).
I mentioned these things to understand terms like same hierarchy level, external contour, child contour, parent contour, first child etc. Now let's get into OpenCV.
Hierarchy Representation in OpenCV (层级关系)
So each contour has its own information regarding what hierarchy it is, who is its child, who is its parent etc. OpenCV represents it as an array of four values : **[Next, Previous, First_Child, Parent]**
*"Next denotes next contour at the same hierarchical level."*For eg, take contour-0 in our picture. Who is next contour in its same level ? It is contour-1. So simply put Next = 1. Similarly for Contour-1, next is contour-2. So Next = 2.
What about contour-2? There is no next contour in the same level. So simply, put Next = -1. What about contour-4? It is in same level with contour-5. So its next contour is contour-5, so Next = 5.
*"Previous denotes previous contour at the same hierarchical level."*It is same as above. Previous contour of contour-1 is contour-0 in the same level. Similarly for contour-2, it is contour-1. And for contour-0, there is no previous, so put it as -1.
*"First_Child denotes its first child contour."*There is no need of any explanation. For contour-2, child is contour-2a. So it gets the corresponding index value of contour-2a. What about contour-3a? It has two children. But we take only first child. And it is contour-4. So First_Child = 4 for contour-3a.
*"Parent denotes index of its parent contour."*It is just opposite of First_Child. Both for contour-4 and contour-5, parent contour is contour-3a. For contour-3a, it is contour-3 and so on.
-
Note
- If there is no child or parent, that field is taken as -1
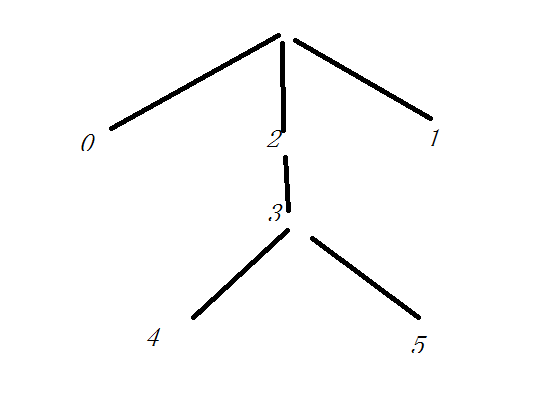
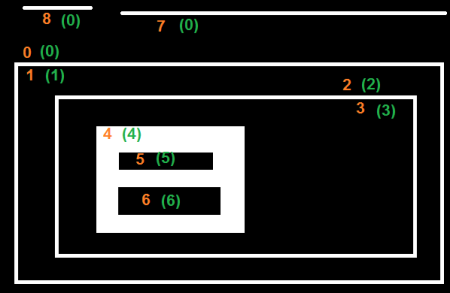
4. RETR_TREE
And this is the final guy, Mr.Perfect. It retrieves all the contours and creates a full family hierarchy list. It even tells, who is the grandpa, father, son, grandson and even beyond... :).
For examle, I took above image, rewrite the code for cv2.RETR_TREE, reorder the contours as per the result given by OpenCV and analyze it. Again, red letters give the contour number and green letters give the hierarchy order.
Take contour-0 : It is in hierarchy-0. Next contour in same hierarchy is contour-7. No previous contours. Child is contour-1. And no parent. So array is [7,-1,1,-1].
Take contour-2 : It is in hierarchy-1. No contour in same level. No previous one. Child is contour-2. Parent is contour-0. So array is [-1,-1,2,0].
And remaining, try yourself. Below is the full answer:


#include "opencv2/imgproc/imgproc.hpp"
#include <iostream>
#include <stdio.h>
#include <stdlib.h>
#include <math.h>
using namespace cv;
using namespace std;
//找到所提取轮廓的中心点
//在提取的中心小正方形的边界上每隔周长个像素提取一个点的坐标,求所提取四个点的平均坐标(即为小正方形的大致中心)
Point Center_cal(vector<vector<Point> > contours,int i)
{
int centerx=0,centery=0,n=contours[i].size();
centerx = (contours[i][n/4].x + contours[i][n*2/4].x + contours[i][3*n/4].x + contours[i][n-1].x)/4;
centery = (contours[i][n/4].y + contours[i][n*2/4].y + contours[i][3*n/4].y + contours[i][n-1].y)/4;
Point point1=Point(centerx,centery);
return point1;
}
int main( int argc, char** argv[] )
{
Mat src = imread( "e:/sandbox/qrcode.jpg", 1 );
resize(src,src,Size(800,600));//标准大小
Mat src_gray;
Mat src_all=src.clone();
Mat threshold_output;
vector<vector<Point> > contours,contours2;
vector<Vec4i> hierarchy;
//预处理
cvtColor( src, src_gray, CV_BGR2GRAY );
blur( src_gray, src_gray, Size(3,3) ); //模糊,去除毛刺
threshold( src_gray, threshold_output, 100, 255, THRESH_OTSU );
//寻找轮廓
//第一个参数是输入图像 2值化的
//第二个参数是内存存储器,FindContours找到的轮廓放到内存里面。
//第三个参数是层级,**[Next, Previous, First_Child, Parent]** 的vector
//第四个参数是类型,采用树结构
//第五个参数是节点拟合模式,这里是全部寻找
findContours( threshold_output, contours, hierarchy, CV_RETR_TREE, CHAIN_APPROX_NONE, Point(0, 0) );
//轮廓筛选
int c=0,ic=0,area=0;
int parentIdx=-1;
for( int i = 0; i< contours.size(); i++ )
{
//hierarchy[i][2] != -1 表示不是最外面的轮廓
if (hierarchy[i][2] != -1 && ic==0)
{
parentIdx = i;
ic++;
}
else if (hierarchy[i][2] != -1)
{
ic++;
}
//最外面的清0
else if(hierarchy[i][2] == -1)
{
ic = 0;
parentIdx = -1;
}
//找到定位点信息
if ( ic >= 2)
{
contours2.push_back(contours[parentIdx]);
ic = 0;
parentIdx = -1;
}
}
//填充定位点
for(int i=0; i<contours2.size(); i++)
drawContours( src_all, contours2, i, CV_RGB(0,255,0) , -1 );
//连接定位点
Point point[3];
for(int i=0; i<contours2.size(); i++)
{
point[i] = Center_cal( contours2, i );
}
line(src_all,point[0],point[1],Scalar(0,0,255),2);
line(src_all,point[1],point[2],Scalar(0,0,255),2);
line(src_all,point[0],point[2],Scalar(0,0,255),2);
imshow( "结果", src_all );
waitKey(0);
return(0);
}


 1万+
1万+


 被折叠的 条评论
为什么被折叠?
被折叠的 条评论
为什么被折叠?
 到【灌水乐园】发言


