maven是目前java项目中比较流行的构建工具,特别是它提供的插件,如果使用得当,整个项目研发流程都将会受益,从而提高研发、测试和部署的效率。这里记录几个常用插件的用法,既方便自己日后回顾,也便于有兴趣的同仁交流指正。各位实践过程中如果发现有趣的插件或者更好的用法,也欢迎留言分享。
Maven工程标准架构
| 目录 | 备注 |
|---|---|
| ${basedir} | 存放 pom.xml和所有的子目录 |
| ${basedir}/src/main/resources | 项目的资源,如spring配置文件,properties资源文件等 |
| ${basedir}/src/main/webapps | web项目特有 |
| ${basedir}/src/test/java | 项目的测试类,比如说 JUnit代码、TestNg代码 |
| ${basedir}/src/test/resources | 测试代码使用的资源 |
插件一 maven-resources-plugin
Maven可以区别对待Java代码文件和资源文件,默认的主资源文件目录是src/main/resources,我们可以通过这个插件实现资源文件过滤。资源文件过滤的意思是指我们可以在资源文件里用使用占位符${propertyName},然后开启对资源文件的过滤,pom.xml里再统一设置所有{propertyName}对应的值,就可以在构建过程中将值替换掉资源文件中对应的${propertyName},实现了代码配置分离、做到了参数的统一维护。
示例用法
<resources>
<resource>
<directory>src/main/resources</directory>
<includes>
<include>properties/*.properties</include>
</includes>
<filtering>true</filtering>
</resource>
<resource>
<directory>src/main/resources</directory>
<includes>
<include>*.xml</include>
<include>mapper/**/*.xml</include>
<include>mysqlMapper/**/*.xml</include>
<include>*.properties</include>
</includes>
</resource>
</resources>
……
<properties>
<runtime.env>local</runtime.env>
</properties>
我们的主应用集成后,会根据实际要求部署到不同的环境中,比如联调环境、测试环境、压力环境、预发布环境、生产环境等,而这些环境上的资源配置信息显然是不一样的,针对每套环境,每个具体占位符${propertyName}都会有不同的值,而这种场景可以使用Maven的profile来支持,每个profile都可以独立维护一套参数值,在mvn package的时候灵活指定;此外,maven也支持在package的时候指定多个profile,这个特性在执行自动部署的时候特别有用。使用这个插件,我们的项目可以做到多环境支持,参考命令
mvn package -Pnocheck,env-test
示例用法
<profiles>
<profile>
<id>nocheck</id>
<properties>
<skipTests>true</skipTests>
<checkstyle.skip>true</checkstyle.skip>
<license.skip>true</license.skip>
<notice.skip>true</notice.skip>
<versions.skip>true</versions.skip>
</properties>
</profile>
<profile>
<!-- 本地环境,默认是windows -->
<id>local</id>
<activation>
<activeByDefault>true</activeByDefault>
</activation>
<properties>
<runtime.env>local</runtime.env>
</properties>
</profile>
<profile>
<id>env-test</id>
<properties>
<runtime.env>env-test</runtime.env>
</properties>
</profile>
</profiles>
插件二 maven-jar-plugin
当我们将项目模块化后,有一些通用的资源文件基本上大多数模块都会用到,比如log4j.properties,jdbc.properties等,模块中有了这些资源文件,我们才能单独对该模块进行开发、调试。默认情况下maven-jar-plugin会将这些资源文件全部package成一个jar包进行发布,如果这样的jar包集成到一个主应用中部署,运行,很可能导致主应用的配置不生效,我称之为配置混乱,为了解决这个问题,可以开启maven-jar-plugin的排除功能,在执行mvn package之前排除指定的资源文件。
示例用法
<plugin>
<groupId>org.apache.maven.plugins</groupId>
<artifactId>maven-jar-plugin</artifactId>
<configuration>
<excludes>
<exclude>applicationContext.xml</exclude>
<exclude>properties/**</exclude>
<exclude>log4j.properties</exclude>
</excludes>
</configuration>
</plugin>
插件三 maven-war-plugin
项目如果是web主应用,我们可以使用maven-war-plugin来对webapps下各类文件进行过滤。用法参考maven-resources-plugin
示例用法
<plugin>
<groupId>org.apache.maven.plugins</groupId>
<artifactId>maven-war-plugin</artifactId>
<configuration>
<warName>demo-Rest</warName>
<webResources>
<resource>
<directory>src/main/webapp/WEB-INF</directory>
<filtering>true</filtering>
<targetPath>WEB-INF</targetPath>
<includes>
<include>web.xml</include>
</includes>
</resource>
</webResources>
</configuration>
</plugin>
插件四 properties-maven-plugin
随着项目的不断迭代,我们的资源配置项将会变得更多,这个会直接影响到pom.xml的体积膨胀;此外,如果项目目标部署环境比较多,pom.xml将会膨胀得更快,更加难以维护。为了解决这个问题,我们需要将这些配置信息独立出来,并按照不同环境进行归类,使用properties-maven-plugin就会达到这个效果。
示例用法(将每个环境的信息放在不同的目录下,然后在mvn package切换不同的profile实现去指定目录读取配置信息,用读取到的value去替换资源配置文件的占位符)
<plugin>
<groupId>org.codehaus.mojo</groupId>
<artifactId>properties-maven-plugin</artifactId>
<version>1.0.0</version>
<configuration>
<files>
<file>profiles/${runtime.env}/jdbc.properties</file>
<file>profiles/${runtime.env}/redis.properties</file>
<file>profiles/${runtime.env}/batch.properties</file>
<file>profiles/${runtime.env}/config.properties</file>
</files>
</configuration>
<executions>
<execution>
<phase>initialize</phase>
<goals>
<goal>read-project-properties</goal>
</goals>
</execution>
</executions>
</plugin>
插件五 maven-assembly-plugin
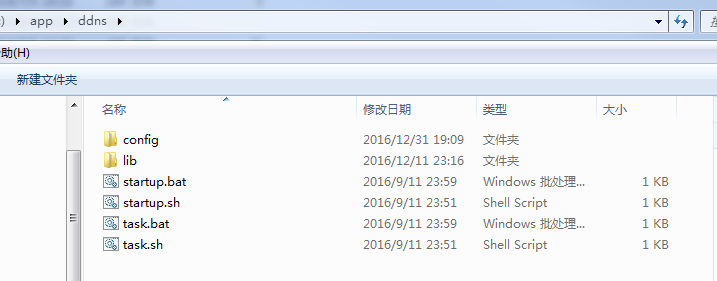
Java项目中有一种类型的主应用,是需要独立部署在后台启动的,比如socket服务程序,比如定时调度程序,比如dubbo服务程序,这些程序理论上只需要执行一个简单的java命令即可;稍微复杂一些的,我们可以规范一下自己的主应用结构,定义配置文件夹和依赖库文件夹,再准备启动的批处理脚本sh或bat文件即可。使用maven-assembly-plugin就可以达到这种效果。
示例用法
<plugin>
<groupId>org.apache.maven.plugins</groupId>
<artifactId>maven-assembly-plugin</artifactId>
<configuration>
<appendAssemblyId>false</appendAssemblyId>
<descriptors>
<descriptor>target/classes/package.xml</descriptor>
</descriptors>
</configuration>
<executions>
<execution>
<id>make-assembly</id>
<phase>package</phase>
<goals>
<goal>single</goal>
</goals>
</execution>
</executions>
</plugin>
附package.xml
<assembly
xmlns="http://maven.apache.org/plugins/maven-assembly-plugin/assembly/1.1.2"xmlns:xsi="http://www.w3.org/2001/XMLSchema-instance"xsi:schemaLocation="http://maven.apache.org/plugins/maven-assembly-plugin/assembly/1.1.2 http://maven.apache.org/xsd/assembly-1.1.2.xsd">
<id>package</id>
<formats>
<format>tar.gz</format>
</formats>
<includeBaseDirectory>true</includeBaseDirectory>
<fileSets>
<fileSet>
<directory>src/main/bin</directory>
<includes>
<include>*.sh</include>
<include>*.bat</include>
</includes>
<filtered>true</filtered>
<outputDirectory></outputDirectory>
<fileMode>0755</fileMode>
</fileSet>
<fileSet>
<directory>${basedir}/src/main/config</directory>
<includes>
<include>*.properties</include>
<include>log4j.xml</include>
</includes>
<outputDirectory>config</outputDirectory>
<filtered>true</filtered>
<fileMode>0644</fileMode>
</fileSet>
<fileSet>
<directory>${basedir}/src/main/config</directory>
<includes>
<include>log4j.dtd</include>
</includes>
<outputDirectory>config</outputDirectory>
<fileMode>0644</fileMode>
</fileSet>
</fileSets>
<dependencySets>
<dependencySet>
<outputDirectory>lib</outputDirectory>
<scope>runtime</scope>
<fileMode>0644</fileMode>
</dependencySet>
</dependencySets>
</assembly>
附示例生成的Java应用结构图

插件六 maven-shade-plugin
有时候,我们需要将所有配置文件和依赖库文件全部放在一个jar包中,运维的同事只需要执行java -jar batch.jar即可完成启动。虽然使用maven-assembly-plugin也可以做到这一点,但是在读取配置文件的时候有可能会遇到一些问题,这个时候,我们可能需要使用到maven-shade-plugin这个插件,经笔者实践按照如下示例用法配置确实可用;当然本示例配置了mainClass,直接执行java -jar batch.jar确实没问题,但如果执行java com.fastjrun.demospring4.BatchInit -classpath batch.jar也是可以的。
示例用法
<plugin>
<groupId>org.apache.maven.plugins</groupId>
<artifactId>maven-shade-plugin</artifactId>
<version>3.0.0</version>
<executions>
<execution>
<phase>package</phase>
<goals>
<goal>shade</goal>
</goals>
<configuration>
<finalName>batch</finalName>
<shadedArtifactAttached>true</shadedArtifactAttached>
<shadedClassifierName>jar-with-dependencies</shadedClassifierName>
<transformers>
<transformer
implementation="org.apache.maven.plugins.shade.resource.ManifestResourceTransformer">
<mainClass>com.fastjrun.demospring4.BatchInit</mainClass></transformer>
<transformer
implementation="org.apache.maven.plugins.shade.resource.AppendingTransformer">
<resource>META-INF/spring.handlers</resource>
</transformer>
<transformer
implementation="org.apache.maven.plugins.shade.resource.AppendingTransformer">
<resource>META-INF/spring.schemas</resource>
</transformer>
<transformer
implementation="org.apache.maven.plugins.shade.resource.AppendingTransformer">
<resource>META-INF/spring.tooling</resource>
</transformer>
</transformers>
<filters>
<filter>
<artifact>*:*</artifact>
<excludes>
<exclude>META-INF/*.SF</exclude>
<exclude>META-INF/*.DSA</exclude>
<exclude>META-INF/*.RSA</exclude>
</excludes>
</filter>
</filters>
</configuration>
</execution>
</executions>
</plugin>
插件七 versions-maven-plugin
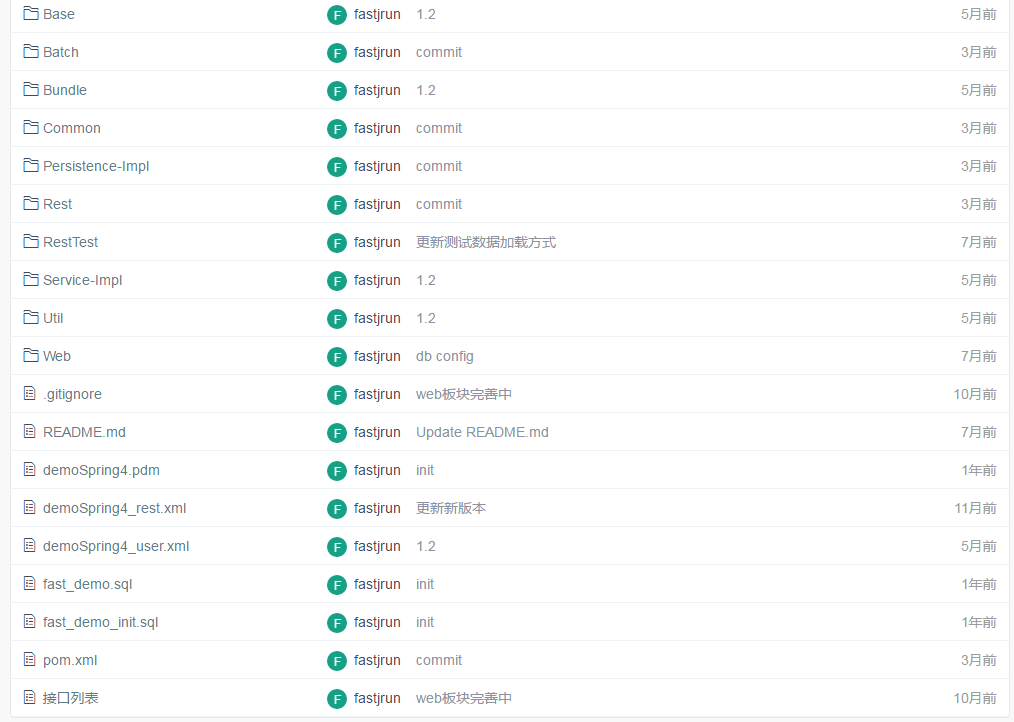
当项目模块化后,我们会遇到一个问题,就是项目版本升级的时候,需要同时变更父模块和所有子模块中的版本号 ,而这是一个比较琐碎且容易出错的事情,还好maven考虑得很周到,提供了这样一个插件,我们使用命令行就可以达到效果了。我们的项目视图如下

参考命令如下
mvn versions:set-DnewVersion=1.2-SNAPSHOT
总结
本文汇总了笔者常用的几个插件及其用法,经实践,基于eclipse的kepler、luna版本都能很好支持maven-resources-plugin、maven-jar-plugin、maven-war-plugin和properties-maven-plugin使用,同时也支持profile的activeByDefault设置,研发同事在不需要任何调整的情况下就能直接开发、调试代码,且在开发结束后,可以直接使用mvn命令打包,打出各个环境的部署程序。从开发、调试、测试、验证到上线的整个过程,所有模块的pom.xml直到下一个迭代变更版本前都不用修改,直接使用。


 1万+
1万+


 被折叠的 条评论
为什么被折叠?


