


In the Answer File pane you should now have the LocalAccounts component selected under the oobeSystem pass. <?xml:namespace prefix = o />
Now in the Properties pane, type the user’s name (logon and display names), Administrators for the user’s local group, and an optional de.ion (Figure 3):
现在在应答文件里的
oobeSystem
配置过程里,你已经有了
LocalAccounts
组件,在
Properties
面板里,输入你的用户名和密码、用户加入的本地组等等
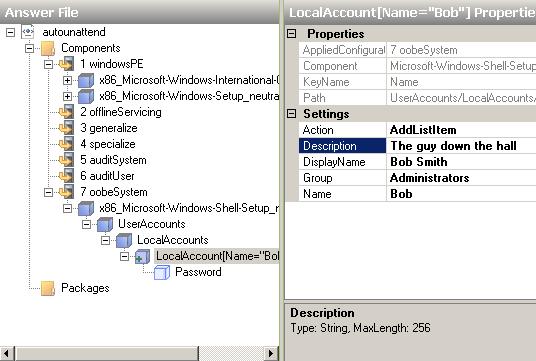
Note that we’re .ly creating a local user account here . the computer. If the computer will belong to a domain, you would typically create the domain user account ahead of time in Active Directory. You still have to create a local computer account as a fallback however, and it should belong to the local Administrators group . the machine since the default Administrator account is disabled in Vista.
注意到我们创建了一个本地账户。如果是域计算机,我们通常已经创建好用户了。但你仍要创建一个本地管理员账户,因为默认的用户
administrator
是禁用的。
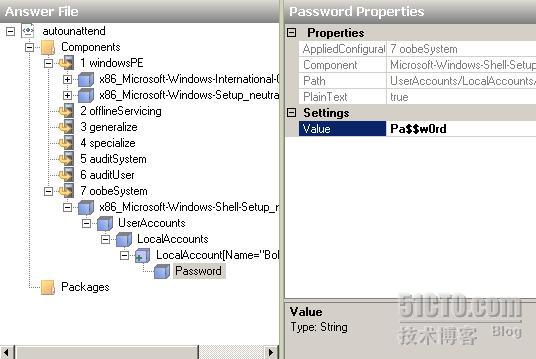
In the Answer File, select the Password component beneath LocalAccount. Then in the Properties pane type a password for the user account you’re creating . the computer (Figure 4):
在应答文件里,找到
LocalAccount
下的
Password
组件
,
输入你想要的密码
Specifying a Computer Name and Default Theme
指定计算机名和默认主题
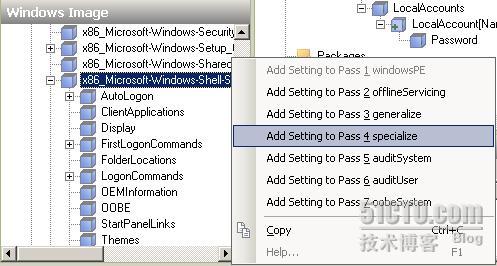
Back in the Windows Image pane, right-click . the Microsoft-Windows-Shell-Setup node and select Add Setting to pass 4 specialize as shown in Figure 5:
把
Microsoft-Windows-Shell-Setup
节点加入
pass 4 specialize
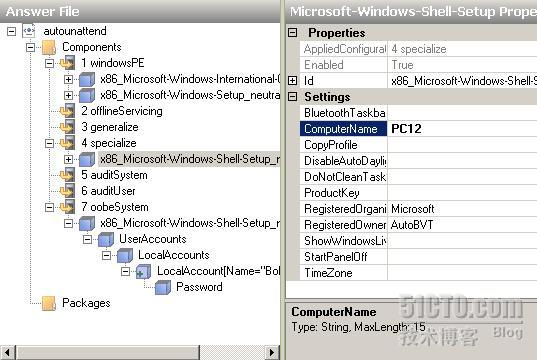
In the Answer File pane you should now have the Microsoft-Windows-Shell-Setup component selected under the specialize pass.
Now in the Properties pane, type a name for the computer in the value box to the right of the ComputerName setting (Figure 6):
如图,输入你想要的计算机名称
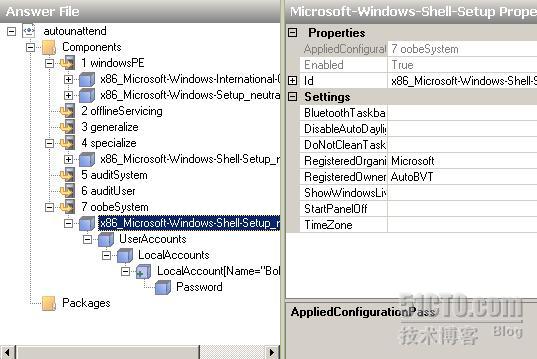
Now wait just a minute. Why do we have to add the Microsoft-Windows-Shell-Setup component to our answer file when we did this in the previous section above where we added a local user account for the computer? Because (a) you can add many answer file components to more than .e configuration pass and (b) the computer name can .ly be specified using an answer file in the specialize configuration pass and not during the oobeSystem configuration pass (see Figure 7):
现在让我们停几分钟回顾一下。为什么必须添加
Microsoft-Windows-Shell-Setup
到应答文件里,而我们之前已经添加过一个了?因为
1
)你可以把同一节点添加到不同的配置过程里;
2
)要实现计算机名,你只能添加到
Specialize
配置过程里。
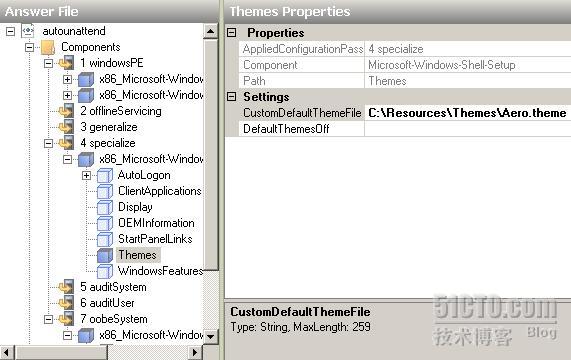
Now let’s specify the default Aero theme. In the Answer File pane, select Microsoft-Windows-Shell-Setup\Themes. Then in the Properties pane type the path to the default Aero theme as shown in Figure 8:
现在让我们来指定
Aero
主题。找到
Microsoft-Windows-Shell-Setup\Themes
,如下图填写路径
Specifying the Protect Your PC and Network Location Settings
指定保护
pc
方式和网络位置设置
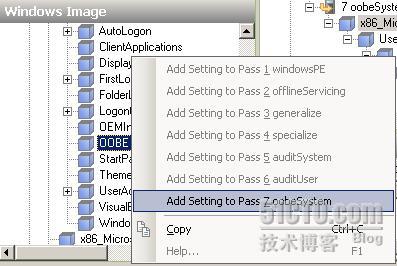
Now let’s configure the Protect Your PC setting, which determines whether Vista will automatically download and install updates or not. In the Windows Image pane, right-click . OOBE under Microsoft-Windows-Shell-Setup and select Add Setting to pass 7 oobeSystem (Figure 9)
把
Microsoft-Windows-Shell-Setup
下的
OOBE
添加到
pass 7 oobeSystem
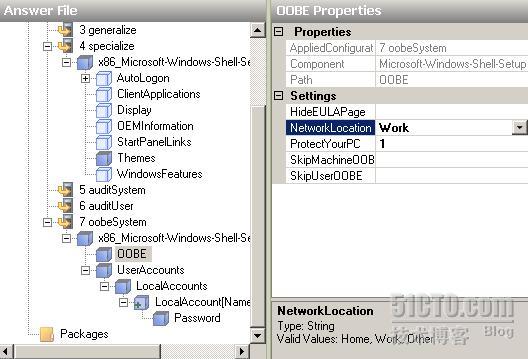
In the Answer File pane you should now have the Microsoft-Windows-Shell-Setup\OOBE component selected under the oobeSystem pass.
In the Properties pane, click in the value box to the right of the ProtectYourPC setting and type 1 to specify that Vista should automatically download and install updates when they become available.
在
Properties
面板里,为
ProtectYourPC
输入值
1
,这样
Vista
会自动下载安装更新。
Then in the Properties pane again, click the value box to the right of the NetworkLocation setting until a drop-down arrow appears. Click the arrow and select Work to indicate that the computer will be used at work (Figure 10):
在
NetworkLocation
的下拉菜单里选择你的场景。
<!--[if !supportLineBreakNewLine]-->
<!--[endif]-->
Specifying the Time Zone
指定时区
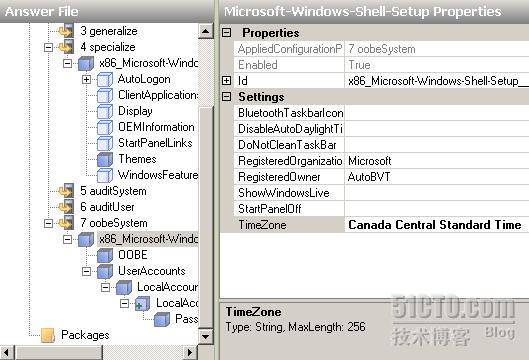
We’re almost done. In the Answer File pane, under oobeSystem, select the Microsoft-Windows-Shell-Setup component. Then in the Properties pane, I would type Canada Central Standard Time in the value box to the right of the TimeZone setting, but you would probably type something different—see this page . TechNet for what you can type here. The result is shown in Figure 11:
Validating and Testing the Answer File
检查和测试应答文件
Now from Windows SIM’s menu, select Tools, then Validate Answer File. You should .ly see a series of Information messages in the Messages pane, and these you can ignore. If you see any Error or Warning messages, double-click . them and correct any errors you find in your answer file until validation succeeds.
在菜单里选择
Tools
下的
Validate Answer File
,在
Message
面板里查看信息是否有问题。
Save your modified answer file using the same file name (autounattend.xml) as before. Then copy it to a USB flash drive and try using it together with your Vista SP1 Enterprise product DVD to perform an Unattended Install From DVD installation of Vista . a bare-metal system. Your installation should proceed in a completely unattended fashion, after which Vista will run is performance check (this can’t be prevented) and then you’ll be presented with a logon screen for Bob Smith. Bob can then type his password, log ., and start working . his computer.
保存你的文件,像之前那样保存到一个
U
盘的根目录里,这下你就完成了一个真正的无人值守安装的应答文件。
The question we posed at the end of the last article was, is it possible to automate the Windows Welcome phase of Setup so that the user won’t have to perform these final steps? Yes it is, and you do this by configuring settings in your answer file to automate the machineOOBE configuration pass of Setup. Let’s do this now.
Windows
欢迎界面也是可以实现完全无人职守设置的。要实现这个目标你只要配置应答文件的
machineOOBE
配置过程,现在让我们看看如何做。
Opening your Minimal Answer File
打开你之前创建的应答文件
On your technician computer, start Windows SIM, open your Vista SP1 Enterprise install image in the Image Pane, and then in the Answer File pane open the autounattend.xml file you created in article seven previously (see Figure 1):
打开
Windows SIM
,打开
Vista SP1
的镜像,打开之前创建的
autounattend.xml
文件

Specifying a User Name and Password
填写用户名和密码
In the Windows Image pane, expand the Components node to display the Microsoft-Windows-Shell-Setup node beneath it. Then expand Microsoft-Windows-Shell-Setup node to display the UserAccounts, then LocalAccounts, then LocalAccount. Right-click . LocalAccount and select Add Setting to pass 7 oobeSystem as shown in Figure 2:
在
Windows Image
面板里,展开
Components
节点,找到
Microsoft-Windows-Shell-Setup
,把
UserAccounts/LocalAccounts/LocalAccount
添加到
oobeSystem
配置过程里

In the Answer File pane you should now have the LocalAccounts component selected under the oobeSystem pass.
Now in the Properties pane, type the user’s name (logon and display names), Administrators for the user’s local group, and an optional de.ion (Figure 3):
现在在应答文件里的
oobeSystem
配置过程里,你已经有了
LocalAccounts
组件,在
Properties
面板里,输入你的用户名和密码、用户加入的本地组等等

Note that we’re .ly creating a local user account here . the computer. If the computer will belong to a domain, you would typically create the domain user account ahead of time in Active Directory. You still have to create a local computer account as a fallback however, and it should belong to the local Administrators group . the machine since the default Administrator account is disabled in Vista.
注意到我们创建了一个本地账户。如果是域计算机,我们通常已经创建好用户了。但你仍要创建一个本地管理员账户,因为默认的用户
administrator
是禁用的。
In the Answer File, select the Password component beneath LocalAccount. Then in the Properties pane type a password for the user account you’re creating . the computer (Figure 4):
在应答文件里,找到
LocalAccount
下的
Password
组件
,
输入你想要的密码

Specifying a Computer Name and Default Theme
指定计算机名和默认主题
Back in the Windows Image pane, right-click . the Microsoft-Windows-Shell-Setup node and select Add Setting to pass 4 specialize as shown in Figure 5:
把
Microsoft-Windows-Shell-Setup
节点加入
pass 4 specialize

In the Answer File pane you should now have the Microsoft-Windows-Shell-Setup component selected under the specialize pass.
Now in the Properties pane, type a name for the computer in the value box to the right of the ComputerName setting (Figure 6):
如图,输入你想要的计算机名称

Now wait just a minute. Why do we have to add the Microsoft-Windows-Shell-Setup component to our answer file when we did this in the previous section above where we added a local user account for the computer? Because (a) you can add many answer file components to more than .e configuration pass and (b) the computer name can .ly be specified using an answer file in the specialize configuration pass and not during the oobeSystem configuration pass (see Figure 7):
现在让我们停几分钟回顾一下。为什么必须添加
Microsoft-Windows-Shell-Setup
到应答文件里,而我们之前已经添加过一个了?因为
1
)你可以把同一节点添加到不同的配置过程里;
2
)要实现计算机名,你只能添加到
Specialize
配置过程里。

Now let’s specify the default Aero theme. In the Answer File pane, select Microsoft-Windows-Shell-Setup\Themes. Then in the Properties pane type the path to the default Aero theme as shown in Figure 8:
现在让我们来指定
Aero
主题。找到
Microsoft-Windows-Shell-Setup\Themes
,如下图填写路径

Specifying the Protect Your PC and Network Location Settings
指定保护
pc
方式和网络位置设置
Now let’s configure the Protect Your PC setting, which determines whether Vista will automatically download and install updates or not. In the Windows Image pane, right-click . OOBE under Microsoft-Windows-Shell-Setup and select Add Setting to pass 7 oobeSystem (Figure 9)
把
Microsoft-Windows-Shell-Setup
下的
OOBE
添加到
pass 7 oobeSystem

In the Answer File pane you should now have the Microsoft-Windows-Shell-Setup\OOBE component selected under the oobeSystem pass.
In the Properties pane, click in the value box to the right of the ProtectYourPC setting and type 1 to specify that Vista should automatically download and install updates when they become available.
在
Properties
面板里,为
ProtectYourPC
输入值
1
,这样
Vista
会自动下载安装更新。
Then in the Properties pane again, click the value box to the right of the NetworkLocation setting until a drop-down arrow appears. Click the arrow and select Work to indicate that the computer will be used at work (Figure 10):
在
NetworkLocation
的下拉菜单里选择你的场景。

Specifying the Time Zone
指定时区
We’re almost done. In the Answer File pane, under oobeSystem, select the Microsoft-Windows-Shell-Setup component. Then in the Properties pane, I would type Canada Central Standard Time in the value box to the right of the TimeZone setting, but you would probably type something different—see this page . TechNet for what you can type here. The result is shown in Figure 11:

Validating and Testing the Answer File
检查和测试应答文件
Now from Windows SIM’s menu, select Tools, then Validate Answer File. You should .ly see a series of Information messages in the Messages pane, and these you can ignore. If you see any Error or Warning messages, double-click . them and correct any errors you find in your answer file until validation succeeds.
在菜单里选择
Tools
下的
Validate Answer File
,在
Message
面板里查看信息是否有问题。
Save your modified answer file using the same file name (autounattend.xml) as before. Then copy it to a USB flash drive and try using it together with your Vista SP1 Enterprise product DVD to perform an Unattended Install From DVD installation of Vista . a bare-metal system. Your installation should proceed in a completely unattended fashion, after which Vista will run is performance check (this can’t be prevented) and then you’ll be presented with a logon screen for Bob Smith. Bob can then type his password, log ., and start working . his computer.
保存你的文件,像之前那样保存到一个
U
盘的根目录里,这下你就完成了一个真正的无人值守安装的应答文件。
转载于:https://blog.51cto.com/xmuxsp/128255


 被折叠的 条评论
为什么被折叠?
被折叠的 条评论
为什么被折叠?
 到【灌水乐园】发言


