


这几天在学习Quartz2D,学习了一个简单画板的实现,现在把实现过程记录一下。
主要用到的点就是画线,截屏,绘制图片,选择图片,以及保存所有绘制的线。
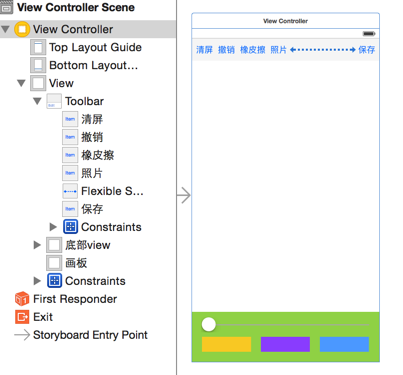
首先在storyboard上布局好控件,设置约束等等,最后的效果是这样:
自定义画板DrawView,使用时可能是从xib中加载,也可能是手动创建,所以创建对象的方法需要实现两个:
#import <UIKit/UIKit.h>

@interface DrawView : UIView
/** 线宽 */
@property (nonatomic, assign) NSInteger lineWidth;

/** 颜色 */
@property(nonatomic, strong) UIColor *pathColor;

/** 图片 */
@property(nonatomic, strong) UIImage *image;

- (void)clear;

- (void)undo;

@end
- (void)awakeFromNib {
[self setUp];
}
- (instancetype)initWithFrame:(CGRect)frame {
if (self == [super initWithFrame:frame]) {
[self setUp];
}
return self;
}setUp初始化方法,初始化时要做的事情就是给画板添加拖动手势,也可以将画笔路径的线宽在这里设置
//自定义初始化方法
- (void)setUp {

    //添加手势
    UIPanGestureRecognizer *pan = [[UIPanGestureRecognizer alloc]initWithTarget:self action:@selector(pan:)];
    [self addGestureRecognizer:pan];

    //初始化时设置路径线宽
    _lineWidth = 2;

}
手指在画板上移动时开始绘制线条,这里因为原生的UIBezierPath类没有办法设置路径颜色,所以这里只能自定义Path类了
#import <UIKit/UIKit.h>

@interface DrawPath : UIBezierPath

@property (nonatomic, strong) UIColor *pathColor;

@end
手指移动时,绘制线条,路径是自定义的Path类
@interface DrawView ()

@property(nonatomic, strong)DrawPath *path;
/** 保存所有路径的数组 */
@property(nonatomic, strong) NSMutableArray *pathArr;

@end

//懒加载
- (NSMutableArray *)pathArr {
    if (_pathArr == nil) {

        _pathArr = [NSMutableArray array];

    }
    return _pathArr;
}
- (void)pan:(UIPanGestureRecognizer *)pan {
//获取开始的触摸点
CGPoint startP = [pan locationInView:self];
if (pan.state == UIGestureRecognizerStateBegan) {
//创建贝塞尔路径
_path = [[DrawPath alloc]init];
_path.lineWidth = _lineWidth;
_path.pathColor = _pathColor;
//不能在手指抬起时将路径添加到数组,因为在遍历数组画线时路径还没有被添加到数组里面
[_pathArr addObject:_path];
//设置起点
[_path moveToPoint:startP];
}
//连线
[_path addLineToPoint:startP];
//重绘,调用drawRect方法
[self setNeedsDisplay];
}画线实现drawRect方法,绘制线条或者图片时,是把数组中的路径全部画出来
- (void)drawRect:(CGRect)rect {

    //把所有路径画出来
    for (DrawPath *path in self.pathArr) {

        if ([path isKindOfClass:[UIImage class]]) {
            //画图
            UIImage *image = (UIImage *)path;
            [image drawInRect:rect];
        }else {
            //画线
            [path.pathColor set];
            [path stroke];
        }
    }

}
当把图片添加到画板时
- (void)setImage:(UIImage *)image {

    _image = image;

    [self.pathArr addObject:image];

    //重绘调用drawRect才能在画板上显示图片
    [self setNeedsDisplay];
}
还可以把直接更新路径数组的操作封装在画板中
- (void)clear {
    //清除
    [self.pathArr removeAllObjects];

    [self setNeedsDisplay];

}

- (void)undo {
    //撤销
    [self.pathArr removeLastObject];

    [self setNeedsDisplay];
}
控制器中:
@interface ViewController () <UIImagePickerControllerDelegate, UINavigationControllerDelegate>
@property (weak, nonatomic) IBOutlet DrawView *drawView;
@end
实现几个按钮对画板的操作:
- (IBAction)clear:(id)sender {

    //清屏
    [_drawView clear];

}

- (IBAction)undo:(id)sender {

    //撤销
    [_drawView undo];

}

- (IBAction)eraser:(id)sender {

    //擦除 就是把路径的颜色设置为画板的背景色,假象
    _drawView.pathColor = _drawView.backgroundColor;
    _drawView.lineWidth = 20;

}

- (IBAction)changeLineWidth:(UISlider *)sender {

    //改变路径线宽
    _drawView.lineWidth = sender.value;

}

- (IBAction)changeColor:(UIButton *)sender {


    //改变路径颜色
    _drawView.pathColor = sender.backgroundColor;

}

- (IBAction)pickPhoto:(id)sender {

    //选择照片
    //弹出系统相册
    UIImagePickerController *picker = [[UIImagePickerController alloc]init];

    //设置选择控制器的来源 UIImagePickerControllerSourceTypeSavedPhotosAlbum:照片库
    picker.sourceType = UIImagePickerControllerSourceTypeSavedPhotosAlbum;

    //设置代理
    picker.delegate = self;

    //modal出控制器
    [self presentViewController:picker animated:YES completion:nil];

}

- (void)imagePickerController:(UIImagePickerController *)picker didFinishPickingMediaWithInfo:(NSDictionary<NSString *,id> *)info {

    //获取选择的图片
    UIImage *image = info[UIImagePickerControllerOriginalImage];

    //创建一个处理图片的view
    ImageHandleView *handleView = [[ImageHandleView alloc]initWithFrame:self.drawView.bounds];

    handleView.handleCompletionBlock = ^(UIImage *image){

        _drawView.image = image;
    };

    [self.drawView addSubview:handleView];

    //将图片画在画板上
    handleView.image = image;

    //_drawView.image = image;

    //dismiss
    [self dismissViewControllerAnimated:YES completion:nil];
    //NSLog(@"%@", info);

}

- (IBAction)save:(id)sender {

    [UIView animateWithDuration:0.15 animations:^{
        //保存当前画板上的内容

        //开启上下文
        UIGraphicsBeginImageContextWithOptions(_drawView.bounds.size, NO, 0);

        //获取位图上下文
        CGContextRef ctx = UIGraphicsGetCurrentContext();

        //把控件上的图层渲染到上下文
        [_drawView.layer renderInContext:ctx];

        //获取上下文中的图片
        UIImage *image = UIGraphicsGetImageFromCurrentImageContext();

        //关闭上下文
        UIGraphicsEndImageContext();

        //保存图片到相册
        UIImageWriteToSavedPhotosAlbum(image, self, @selector(image:didFinishSavingWithError:contextInfo:), nil);

        self.drawView.alpha = 0;
    } completion:^(BOOL finished) {
        [UIView animateWithDuration:0.15 animations:^{
            self.drawView.alpha = 1;
        }];
    }];

}

//保存成功后的方法必须是这个,不能随便写
- (void)image:(UIImage *)image didFinishSavingWithError:(NSError *)error contextInfo:(void *)contextInfo {

    NSLog(@"保存成功");

}
从相册选择完图片后把图片显示在画板上了但是还没有渲染到layer,这时候需要对图片进行移动缩放旋转这些操作的话,但是UIImage是不能拉伸旋转这些操作的,UIImageView才可以,所以解决思路就是自定义一个view来专门处理对图片的操作,在自定义view上放一个UIImageView,从相册选择图片后获取的image设置给UIImageView,这样的自定义view上操作UIIamgeView。
#import <UIKit/UIKit.h>

@interface ImageHandleView : UIView
/** 图片 */
@property(nonatomic, strong) UIImage *image;

/** block */
@property(nonatomic, strong) void(^handleCompletionBlock)(UIImage *image);
@end
#import "ImageHandleView.h"
@interface ImageHandleView () <UIGestureRecognizerDelegate>
/** image */
@property(nonatomic, weak) UIImageView *imageView;
@end
@implementation ImageHandleView
//防止图片上的触摸事件传递到画板
- (UIView *)hitTest:(CGPoint)point withEvent:(UIEvent *)event {
return _imageView;
}
- (UIImageView *)imageView {
if (_imageView == nil) {
UIImageView *imageV = [[UIImageView alloc]initWithFrame:self.bounds];
_imageView = imageV;
//设置imgaeview允许与用户交互
_imageView.userInteractionEnabled = YES;
//添加手势
[self setUpGestureRecognizer];
//把这个imageview添加到图片处理的view上
[self addSubview:imageV];
}
return _imageView;
}
#pragma mark - 添加手势
- (void)setUpGestureRecognizer {
//平移手势
UIPanGestureRecognizer *pan = [[UIPanGestureRecognizer alloc]initWithTarget:self action:@selector(pan:)];
[_imageView addGestureRecognizer:pan];
//旋转手势
UIRotationGestureRecognizer *rotation = [[UIRotationGestureRecognizer alloc]initWithTarget:self action:@selector(rotation:)];
rotation.delegate = self;
[_imageView addGestureRecognizer:rotation];
//缩放手势
UIPinchGestureRecognizer *pinch = [[UIPinchGestureRecognizer alloc]initWithTarget:self action:@selector(pinch:)];
pinch.delegate = self;
[_imageView addGestureRecognizer:pinch];
//长按手势
UILongPressGestureRecognizer *longPress = [[UILongPressGestureRecognizer alloc]initWithTarget:self action:@selector(longPress:)];
[_imageView addGestureRecognizer:longPress];
}
#pragma mark - 处理平移手势
- (void)pan:(UIPanGestureRecognizer *)pan {
//获取手指的偏移量
CGPoint tranp = [pan translationInView:self.imageView];
//设置imageview的形变
self.imageView.transform = CGAffineTransformTranslate(self.imageView.transform, tranp.x, tranp.y);
//复位
[pan setTranslation:CGPointZero inView:self.imageView];
}
#pragma mark - 处理旋转手势
- (void)rotation:(UIRotationGestureRecognizer *)rotation {
//设置imageview的形变
self.imageView.transform = CGAffineTransformRotate(self.imageView.transform, rotation.rotation);
//复位
rotation.rotation = 0;
}
#pragma mark - 处理缩放手势
- (void)pinch:(UIPinchGestureRecognizer *)pinch {
//设置imageview的形变
self.imageView.transform = CGAffineTransformScale(self.imageView.transform, pinch.scale, pinch.scale);
//复位
pinch.scale = 1;
}
#pragma mark - 处理长按手势
- (void)longPress:(UILongPressGestureRecognizer *)longPress {
//图片处理完成
if (longPress.state == UIGestureRecognizerStateBegan) {
//高亮效果
[UIView animateWithDuration:0.25 animations:^{
self.imageView.alpha = 0;
} completion:^(BOOL finished) {
[UIView animateWithDuration:0.25 animations:^{
self.imageView.alpha = 1;
} completion:^(BOOL finished) {
//高亮时生成一张新的图片
//开启位图上下文
UIGraphicsBeginImageContextWithOptions(self.bounds.size, NO, 0);
//获取位图上下文
CGContextRef ctx = UIGraphicsGetCurrentContext();
//把控件的图层渲染到上下文
[self.layer renderInContext:ctx];
//从上下文中获取新的图片
UIImage *image = UIGraphicsGetImageFromCurrentImageContext();
//关闭上下文
UIGraphicsEndImageContext();
//调用block
if(_handleCompletionBlock) {
_handleCompletionBlock(image);
}
//移除父控件
[self removeFromSuperview];
}];
}];
}
}
#pragma mark - 手势代理方法 <UIGestureRecognizerDelegate>
- (BOOL)gestureRecognizer:(UIGestureRecognizer *)gestureRecognizer shouldRecognizeSimultaneouslyWithGestureRecognizer:(UIGestureRecognizer *)otherGestureRecognizer {
//yes表示同时支持多个手势
return YES;
}
- (void)setImage:(UIImage *)image {
_image = image;
//把图片展示到UIImageView上
self.imageView.image = image;
}
@end需要注意的是,当长按将操作过的图片绘制都画板上生成一张新的图片后,这时候需要把这个image设置给画板drawView,但是这时候就必须要在专门处理图片的view中去import画板view,这样耦合性太强。所以为了解耦,可以使用代理或者Block。我用了Block将刚刚生成的image先保存起来,在控制器中初始化imageHandleView之后再赋值给drawView。
最后保存画板上的内容就是将画板上的内容生成图片保存到相册即可。注意,保存完之后执行的方法必须是这个:
- (void)image:(UIImage *)image didFinishSavingWithError:(NSError *)error contextInfo:(void *)contextInfo;最后效果图是这样的:
画线: 带图片的:
带图片的: 保存生成的图片:


 5556
5556

 被折叠的 条评论
为什么被折叠?
被折叠的 条评论
为什么被折叠?
 到【灌水乐园】发言


