


代码管理平台
一、代码管理平台介绍
版本控制,记录若干文件内容变化,以便将来查阅特定版本修订情况
版本管理工具发展史:cvs-->svn-->git
svn:全称subversion,是一个开源版本控制系统,始于2000年
git是Linux的创始人linus发起的,2005年发布。
git与svn不同在于git不需要依赖服务端就可以工作,即git是分布式的。
githup是基于git的在线web页面代码托管平台,可以选择付费服务。
gitlab可以认为是一个开源的github,两种没有直接关系。
二、安装svn
首先安装subversion
[root@ying01 ~]# yum install -y subversion
创建项目目录,并初始化文件,创建svn资源仓库
[root@ying01 ~]# mkdir -p /data/svnroot/myproject             //创建svnroot/myproject多层目录
[root@ying01 ~]# ls -la /data/svnroot/myproject
总用量 0
drwxr-xr-x 2 root root  6 8月  30 22:51 .
drwxr-xr-x 3 root root 23 8月  30 22:51 ..
[root@ying01 ~]# svnadmin create /data/svnroot/myproject/     //用svnadmin命令初始化文件,创建svn资源仓库
[root@ying01 ~]# ls -la /data/svnroot/myproject
总用量 8
drwxr-xr-x 6 root root  86 8月  30 22:52 .
drwxr-xr-x 3 root root  23 8月  30 22:51 ..
drwxr-xr-x 2 root root  54 8月  30 22:52 conf
drwxr-sr-x 6 root root 233 8月  30 22:52 db
-r--r--r-- 1 root root   2 8月  30 22:52 format
drwxr-xr-x 2 root root 231 8月  30 22:52 hooks
drwxr-xr-x 2 root root  41 8月  30 22:52 locks
-rw-r--r-- 1 root root 229 8月  30 22:52 README.txt
查看其目录下的配置文件目录;authz :控制权限; passwd :密码文件 ;svnserve.conf :仓库的配置文件
[root@ying01 ~]# cd /data/svnroot/myproject/conf/
[root@ying01 conf]# ls
authz  passwd  svnserve.conf
在authz文件中,增加以下内容
[root@ying01 conf]# vim authz

[groups]                //此处为标志,下面内容写在此处


admins = ying,user1    //定义用户组

[/]                    //根目录,指的是 /data/svnroot/myproject/
@admins = rw           //所定义用户组,赋予rw权利
* = r                  //除admins组外,给所有用户,r的权利

[myproject:/]          //项目名称,可以是/data/svnroot/下多个项目
user1 = rw             //user1用户具有rw权利
编辑passwd文件,增加以下内容:
[root@ying01 conf]# vim passwd

[users]

aming = www123          //定义ying用户的密码
user1 = www1234         //定义user1的用户密码
配置svnserve.conf文件,添加以下内容
[root@ying01 conf]# vim svnserve.conf


[general]                          //此处为标志,下面内容写在此处

anon-access = none                 //匿名用户,无权利
auth-access =  write               //用户名密码登录,可以写
password-db = passwd               //用户的密码存在passwd文件
authz-db = authz                   //权限控制在authz文件
realm = /data/svnroot/myproject    //对此项目生效(处需要绝对路径)
配置完文件,现在可以启动svn;
命令:svnserve -d -r /data/svnroot/ 解释: -d :后台模式(daemon mode) ; -r :要服务的目录的根目录
[root@ying01 conf]# svnserve -d -r /data/svnroot/   //启动svn服务
[root@ying01 conf]# ps aux |grep svn
root      2229  0.0  0.0 162240   656 ?        Ss   23:55   0:00 svnserve -d -r /data/svnroot/
root      2231  0.0  0.0 112720   976 pts/0    S+   23:56   0:00 grep --color=auto svn
[root@ying01 conf]# netstat -lnpt |grep svn
tcp        0      0 0.0.0.0:3690            0.0.0.0:*               LISTEN      2229/svnserve
三、客户端上使用svn(linux)
机器配置:
服务器:ying01 192.168.112.136
客户端:ying02 192.168.112.138
首先在客户端ying02安装svn
[root@ying02 ]# yum install -y subversion
在客户端ying02创建myproject项目工作副本,并且指定应户名的方式创建;
[root@ying02 ~]# svn checkout svn://192.168.112.136/myproject --username=ying
认证领域: <svn://192.168.112.136:3690> /data/svnroot/myproject        //此目录为ying01上定义的项目目录
用户名: ying
“ying”的密码:

-----------------------------------------------------------------------
注意!  你的密码,对于认证域:

   <svn://192.168.112.136:3690> /data/svnroot/myproject

只能明文保存在磁盘上!  如果可能的话,请考虑配置你的系统,让 Subversion
可以保存加密后的密码。请参阅文档以获得详细信息。

你可以通过在“/root/.subversion/servers”中设置选项“store-plaintext-passwords”为“yes”或“no”,
来避免再次出现此警告。
-----------------------------------------------------------------------
保存未加密的密码(yes/no)?yes
取出版本 0。
此时在root下会生成一个myprojecct的目录;注意:在哪个目录下,就在哪个目录下生成myproject目录
[root@ying02 ~]# ls -ld myproject/
drwxr-xr-x 3 root root 28 8月  31 23:47 myproject/
在此目录下创建一个文本,试传输到服务器
[root@ying02 ~]# cd myproject/
[root@ying02 myproject]# touch 123.txt
[root@ying02 myproject]# svn add ./123.txt                 //先add预提交,添加到版本控制中心
A         123.txt
[root@ying02 myproject]# svn commit -m "add 123.txt"       //然后把文件123.txt上传到服务器ying01
正在增加       123.txt
传输文件数据.
提交后的版本为 1。
此时在服务器ying01上,查看服务器端内容
首先还需要在服务端创建工作目录,此时自动在root下生成myproject目录
[root@ying01 ~]# svn checkout svn://192.168.112.136/myproject/
认证领域: <svn://192.168.112.136:3690> /data/svnroot/myproject
“root”的密码:                   //此时切换root用户,不用管,回车;因为你没有指定以哪个用户身份创建
认证领域: <svn://192.168.112.136:3690> /data/svnroot/myproject
用户名: ying
“ying”的密码:

-----------------------------------------------------------------------
注意!  你的密码,对于认证域:

   <svn://192.168.112.136:3690> /data/svnroot/myproject

只能明文保存在磁盘上!  如果可能的话,请考虑配置你的系统,让 Subversion
可以保存加密后的密码。请参阅文档以获得详细信息。

你可以通过在“/root/.subversion/servers”中设置选项“store-plaintext-passwords”为“yes”或“no”,
来避免再次出现此警告。
-----------------------------------------------------------------------
保存未加密的密码(yes/no)?yes
A    123.txt
取出版本 1。
现在到客户端ying02上,给123.txt写入内容
[root@ying02 myproject]# echo "abcdefg" > 123.txt
[root@ying02 myproject]# cat 123.txt
abcdefg

[root@ying02 myproject]# svn commit -m "add 123.txt"   //此时因为123.txt服务端已经存在,就不需要预提交
正在发送       123.txt
传输文件数据.
提交后的版本为 2。
到服务端ying01上,更新,并查看123.txt内容
[root@ying01 myproject]# svn up
正在升级 '.':
U    123.txt
更新到版本 2。
[root@ying01 myproject]# cat 123.txt
abcdefg
在本地删除文件:svn delete filename
[root@ying02 myproject]# svn delete 123.txt                  //删除客户端上的123.txt
D         123.txt
[root@ying02 myproject]# svn commit -m "delete 123.txt"      //删除服务端上的文件
正在删除       123.txt

提交后的版本为 3。
在服务端ying01 查看123.txt
[root@ying01 myproject]# ls
123.txt
[root@ying01 myproject]# svn up  //更新后,123.txt 文件删除
正在升级 '.':
D    123.txt
更新到版本 3。
查看变更日志:svn log
[root@ying01 myproject]# svn log
----------------------------------------------------------
r3 | ying | 2018-08-30 23:08:32 +0800 (四, 2018-08-30) | 1 行

delete 123.txt
------------------------------------------------------------------------
r2 | ying | 2018-08-30 23:05:15 +0800 (四, 2018-08-30) | 1 行

add 123.txt
------------------------------------------------------------------------
r1 | ying | 2018-08-30 22:13:23 +0800 (四, 2018-08-30) | 1 行

add 123.txt
------------------------------------------------------------------------
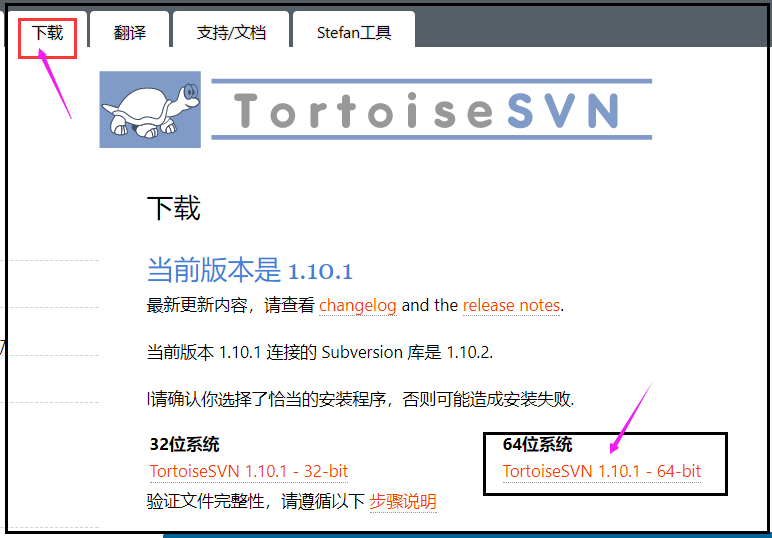
四、客户端上使用svn(windows)
打开官网下载最新版TortoiseSVN:https://tortoisesvn.net/index.zh.html
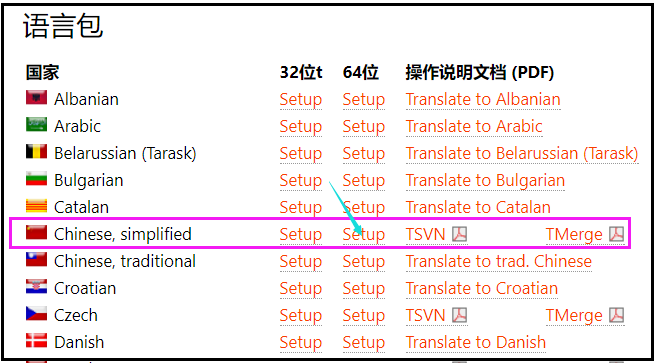
下载中文简体的语言包
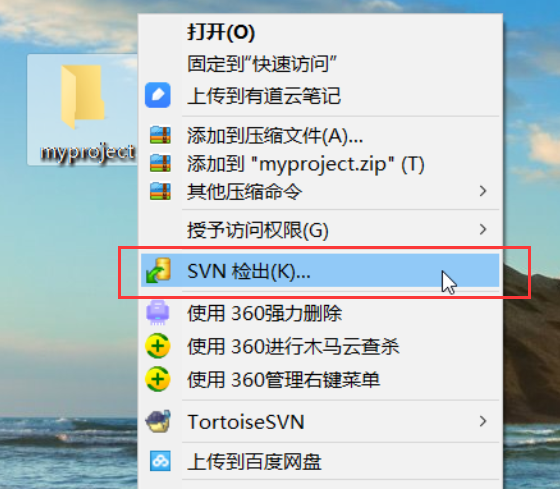
软件安装后,在桌面创建一个myproject的文件夹,并右键,选择SVN检出
填写服务端的库,然后确定
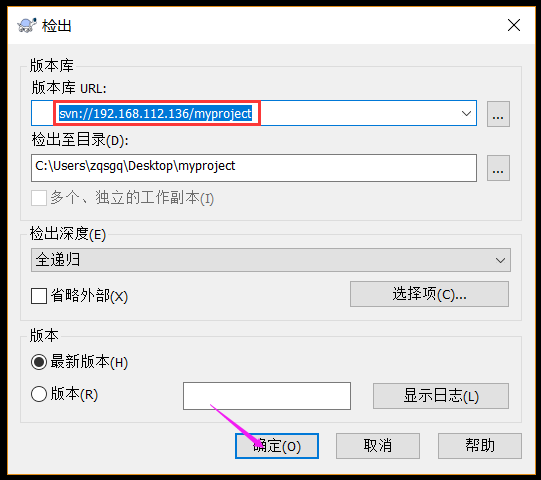
此时发现错误
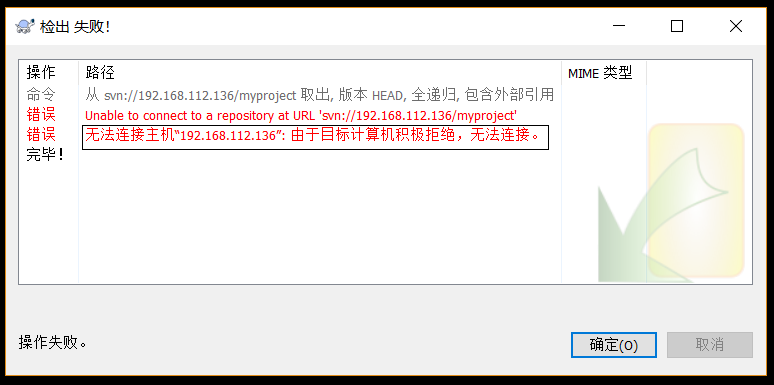
查看svnserve是否启动,让其启动状态
[root@ying01 ~]# netstat -lnpt |grep svn
[root@ying01 ~]# svnserve -d -r /data/svnroot/
[root@ying01 ~]# netstat -lnpt |grep svn
tcp        0      0 0.0.0.0:3690            0.0.0.0:*               LISTEN      1864/svnserve
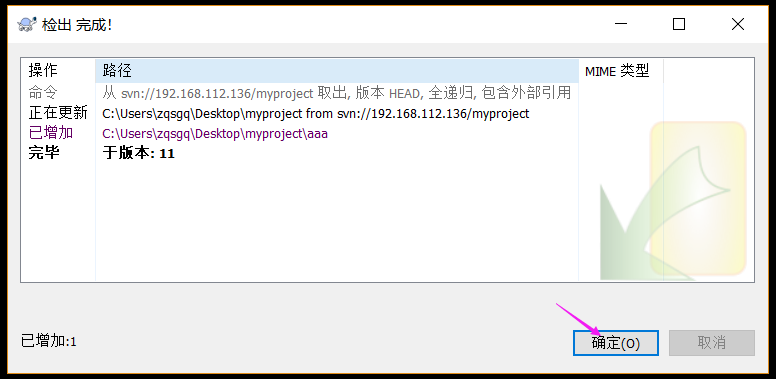
此时再次检出,发现可以了。
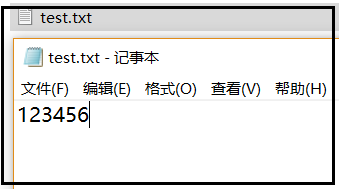
配置完毕后,现在开始做测试;在桌面myproject的文件夹创建test.txt
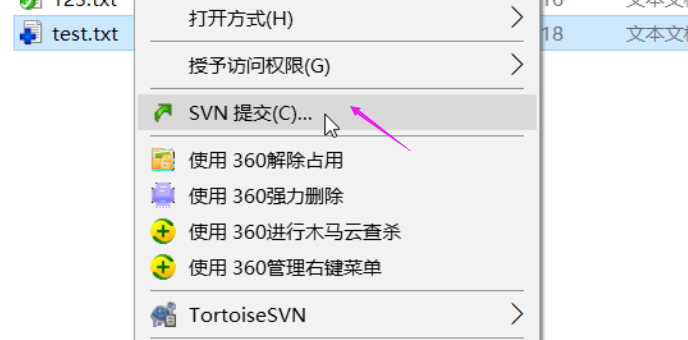
点击右键,选择TortoiseSVN > 加入
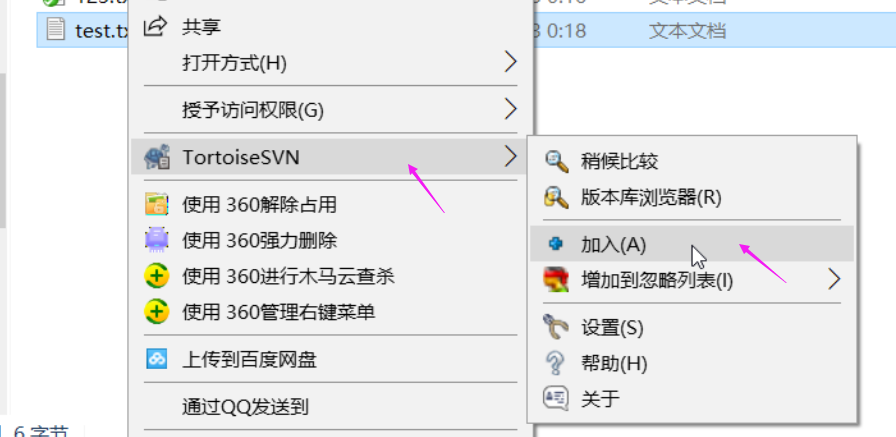
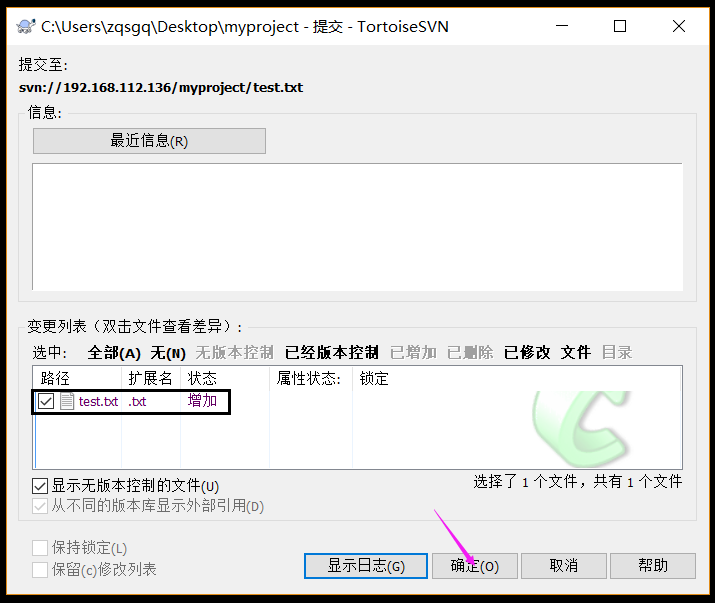
此时文件上出现蓝色加号(+),在点击右键,选择SVN提交
此时添加已经完成,点击确定
此时提交已经完成,点击确定。发现蓝色加号,已经变成绿色对号
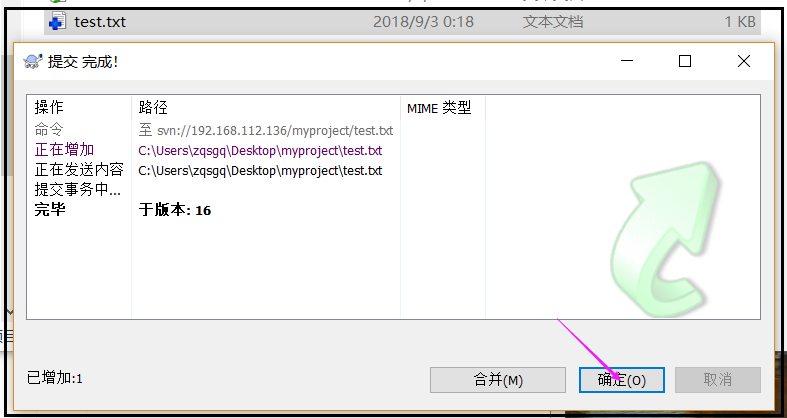
此时客户端已经加载完成,现在服务端,进行查看
[root@ying01 myproject]# ls      //test.txt没有在
123.txt
[root@ying01 myproject]# svn up  //更新后,发现存在
正在升级 '.':
A    test.txt
更新到版本 16。
[root@ying01 myproject]# ls
123.txt  test.txt
[root@ying01 myproject]# cat test.txt
123456[root@ying01 myproject]#
五、单机上使用git
安装git
[root@ying01 ~]# yum install -y git
创建gitroot目录,并在此目录下初始化
[root@ying01 ~]# mkdir /data/gitroot
[root@ying01 ~]# cd /data/gitroot/
[root@ying01 gitroot]# git init                  //初始化仓库,此目录下为git仓库
初始化空的 Git 版本库于 /data/gitroot/.git/
[root@ying01 gitroot]# ls -la
总用量 0
drwxr-xr-x   3 root root  18 9月   3 08:18 .
drwxr-xr-x. 13 root root 179 9月   3 08:18 ..
drwxr-xr-x   7 root root 119 9月   3 08:18 .git
[root@ying01 gitroot]# ls
[root@ying01 gitroot]# ls .git/
branches  config  description  HEAD  hooks  info  objects  refs
此时新建在gitroot下新建1.txt文件,但是提交的时候出现错误;
[root@ying01 gitroot]# echo AAAAAAAA > 1.txt
[root@ying01 gitroot]# cat 1.txt
AAAAAAAA
[root@ying01 gitroot]# git add 1.txt
[root@ying01 gitroot]# git commit -m "add 1.txt"

*** Please tell me who you are.

Run

  git config --global user.email "you@example.com"
  git config --global user.name "Your Name"

to set your account's default identity.
Omit --global to set the identity only in this repository.

fatal: unable to auto-detect email address (got 'root@ying01.(none)')
按照操作提示,定义邮箱,以及用户名
[root@ying01 gitroot]# git config --global user.email "txwd188@126.com"
[root@ying01 gitroot]# git config --global user.name "ying"
此时再提交1.txt
[root@ying01 gitroot]# git commit -m "add 1.txt"
[master(根提交) 07a22e9] add 1.txt
 1 file changed, 1 insertion(+)
 create mode 100644 1.txt
此时在1.txt文件中,追加内容;并添加到仓库、提交
[root@ying01 gitroot]# echo BBBBBBBB >> 1.txt
[root@ying01 gitroot]# git add 1.txt
[root@ying01 gitroot]# git commit -m "add 1.txt agin"
[master 3036bb8] add 1.txt agin
 1 file changed, 1 insertion(+)
git status:查看当前仓库中的状态,比如是否有改动的文件
[root@ying01 gitroot]# git status
# 位于分支 master
无文件要提交,干净的工作区
再增加内容,但是不加载、不提交时候的状态
[root@ying01 gitroot]# echo CCCCCCCC >> 1.txt
[root@ying01 gitroot]# git status
# 位于分支 master
# 尚未暂存以备提交的变更:
#   (使用 "git add <file>..." 更新要提交的内容)
#   (使用 "git checkout -- <file>..." 丢弃工作区的改动)
#
#	修改:      1.txt
#
修改尚未加入提交(使用 "git add" 和/或 "git commit -a")
git diff :可以对比1.txt本次修改了什么内容,相比较仓库里面的版本
[root@ying01 gitroot]# git diff 1.txt
diff --git a/1.txt b/1.txt
index 0e722fb..0c1d7ea 100644
--- a/1.txt
+++ b/1.txt
@@ -1,2 +1,3 @@
 AAAAAAAA
 BBBBBBBB
+CCCCCCCC
在增加1.txt到仓库,并commit提交
[root@ying01 gitroot]# git add 1.txt
[root@ying01 gitroot]# git commit -m "add 1.txt agin"
[master 2f6c78d] add 1.txt agin
 1 file changed, 1 insertion(+)
再增加一行内容到1.txt,加载,并提交
[root@ying01 gitroot]# echo DDDDDDDD >> 1.txt
[root@ying01 gitroot]# git add 1.txt
[root@ying01 gitroot]# cat 1.txt
AAAAAAAA
BBBBBBBB
CCCCCCCC
DDDDDDDD
[root@ying01 gitroot]# git commit -m "ch 1.txt agin"
[master e70c0fb] ch 1.txt agin
 1 file changed, 1 insertion(+
git log :查看所有提交记录;格式比较繁琐,有之前定义的邮箱和用户名
[root@ying01 gitroot]# git log
commit e70c0fbdff1ea50fedd4428df1c4b48531fc29d2
Author: ying <txwd188@126.com>
Date:   Mon Sep 3 09:00:20 2018 +0800

    ch 1.txt agin

commit 2f6c78df82035720f2dea41d9575e079b464d015
Author: ying <txwd188@126.com>
Date:   Mon Sep 3 08:55:48 2018 +0800

    add 1.txt agin

commit 3036bb8704eab42771f571154dd70ddd6fa85672
Author: ying <txwd188@126.com>
Date:   Mon Sep 3 08:51:21 2018 +0800

    add 1.txt agin

commit 07a22e9fde4e71dc803d32af3002ef6049a0c908
Author: ying <txwd188@126.com>
Date:   Mon Sep 3 08:49:20 2018 +0800

    add 1.txt
[root@ying01 gitroot]#
[root@ying01 gitroot]# cat /root/.gitconfig    //在/root/.gitconfig文件里面就是定义的邮箱和用户名
[user]
	email = txwd188@126.com
	name = ying
查看日志的时候,可以定义一行:git log --pretty=oneline
[root@ying01 gitroot]# git log --pretty=oneline
e70c0fbdff1ea50fedd4428df1c4b48531fc29d2 ch 1.txt agin
2f6c78df82035720f2dea41d9575e079b464d015 add 1.txt agin
3036bb8704eab42771f571154dd70ddd6fa85672 add 1.txt agin
07a22e9fde4e71dc803d32af3002ef6049a0c908 add 1.txt
[root@ying01 gitroot]# cat 1.txt
AAAAAAAA
BBBBBBBB
CCCCCCCC
DDDDDDDD
回退版本,其中后面跟的字符串是简写: git reset --hard ID
root@ying01 gitroot]# git reset --hard 2f6c78df      //回退到ID号:2f6c78df这一步
HEAD 现在位于 2f6c78d add 1.txt agin
[root@ying01 gitroot]# git log --pretty=oneline          //此时自动退到:2f6c78df这一行
2f6c78df82035720f2dea41d9575e079b464d015 add 1.txt agin
3036bb8704eab42771f571154dd70ddd6fa85672 add 1.txt agin
07a22e9fde4e71dc803d32af3002ef6049a0c908 add 1.txt
[root@ying01 gitroot]# cat 1.txt                        //1.txt内容也相应的退到此步
AAAAAAAA
BBBBBBBB
CCCCCCCC
git reflog :查看所有历史版本
[root@ying01 gitroot]# git reflog
2f6c78d HEAD@{0}: reset: moving to 2f6c78df
e70c0fb HEAD@{1}: commit: ch 1.txt agin
2f6c78d HEAD@{2}: commit: add 1.txt agin
3036bb8 HEAD@{3}: commit: add 1.txt agin
07a22e9 HEAD@{4}: commit (initial): add 1.txt
[root@ying01 gitroot]# git reset --hard e70c0fb        //直接恢复到e70c0fb这一行
HEAD 现在位于 e70c0fb ch 1.txt agin
[root@ying01 gitroot]# git log --pretty=oneline         //查看日志,发现这一行存在
e70c0fbdff1ea50fedd4428df1c4b48531fc29d2 ch 1.txt agin
2f6c78df82035720f2dea41d9575e079b464d015 add 1.txt agin
3036bb8704eab42771f571154dd70ddd6fa85672 add 1.txt agin
07a22e9fde4e71dc803d32af3002ef6049a0c908 add 1.txt
[root@ying01 gitroot]# cat 1.txt                       //查看1.txt,看到之前的DDDDDDD又恢复
AAAAAAAA
BBBBBBBB
CCCCCCCC
DDDDDDDD
git checkout -- 1.txt :恢复1.txt
[root@ying01 gitroot]# rm -f 1.txt           //删除1.txt
[root@ying01 gitroot]# ls
[root@ying01 gitroot]# git checkout           //检索列表状态
D	1.txt
[root@ying01 gitroot]# git checkout -- 1.txt   //直接恢复1.txt
[root@ying01 gitroot]# ls
1.txt
再写入一行内容,增加到仓库,有撤销增加 :git reset HEAD 1.txt
root@ying01 gitroot]# echo EEEEEEEE >> 1.txt
[root@ying01 gitroot]# git add 1.txt             //加载到仓库
[root@ying01 gitroot]# git reset HEAD 1.txt
重置后撤出暂存区的变更:
M	1.txt
[root@ying01 gitroot]# cat 1.txt
AAAAAAAA
BBBBBBBB
CCCCCCCC
DDDDDDDD
EEEEEEEE
[root@ying01 gitroot]# git checkout -- 1.txt     //从仓库中提出来
[root@ying01 gitroot]# cat 1.txt                 //EEE这行消失
AAAAAAAA
BBBBBBBB
CCCCCCCC
DDDDDDDD
从仓库中把1.txt删除
[root@ying01 gitroot]# ls
1.txt
[root@ying01 gitroot]# git rm 1.txt   //从工作区删除
rm '1.txt'
[root@ying01 gitroot]# ls
[root@ying01 gitroot]# git commit -m "delete 1.txt" //从仓库中删除1.txt
[master 3e10741] delete 1.txt
 1 file changed, 4 deletions(-)
 delete mode 100644 1.txt
[root@ying01 gitroot]# ls
[root@ying01 gitroot]# git checkout -- 1.txt        //此时仓库中已经没有1.txt
error: pathspec '1.txt' did not match any file(s) known to git.
可以这样恢复1.txt
[root@ying01 gitroot]# git log --pretty=oneline            //查看git日志
3e10741cb39e6d097a03da1e0fd811a9f4fc2866 delete 1.txt
e70c0fbdff1ea50fedd4428df1c4b48531fc29d2 ch 1.txt agin
2f6c78df82035720f2dea41d9575e079b464d015 add 1.txt agin
3036bb8704eab42771f571154dd70ddd6fa85672 add 1.txt agin
07a22e9fde4e71dc803d32af3002ef6049a0c908 add 1.txt
[root@ying01 gitroot]# git reset --hard e70c0fb            //定义相应的ID,恢复到相应的位置
HEAD 现在位于 e70c0fb ch 1.txt agin
[root@ying01 gitroot]# ls
1.txt
[root@ying01 gitroot]# cat 1.txt
AAAAAAAA
BBBBBBBB
CCCCCCCC
DDDDDDDD
六、 建立远程仓库
现在网站https://github.com ,注册一个账号

点击注册后,密码有问题,重新填写

选择无限制免费公共存储库
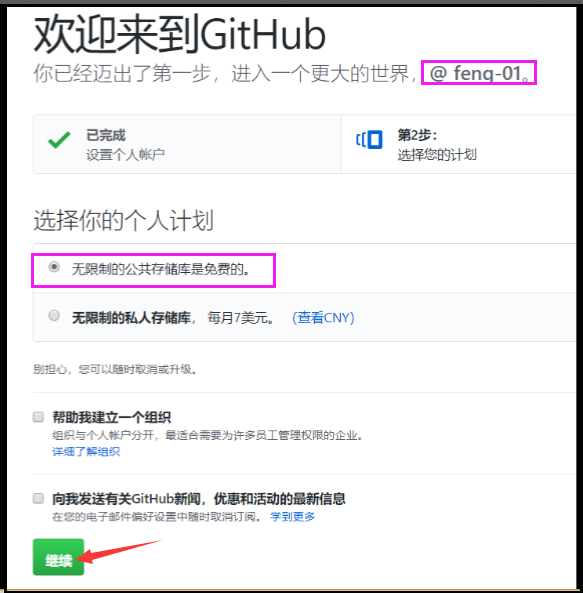
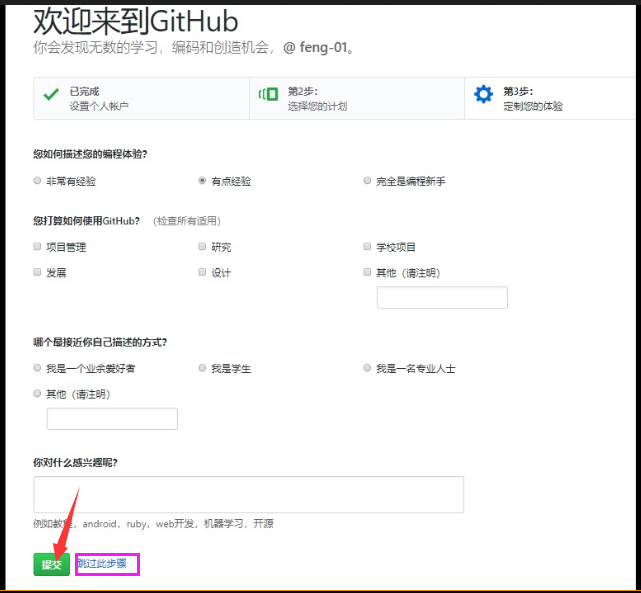
点击继续,填写一些信息,也可以跳过此页面
注册成功,需要在邮箱里面激活
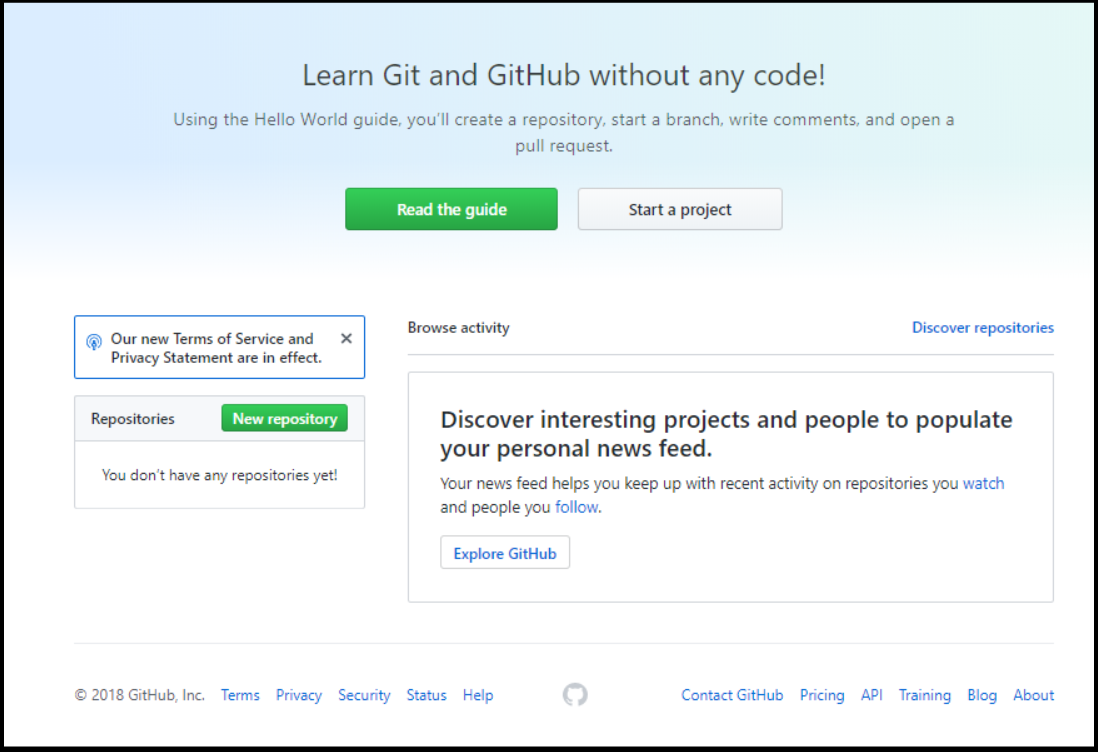
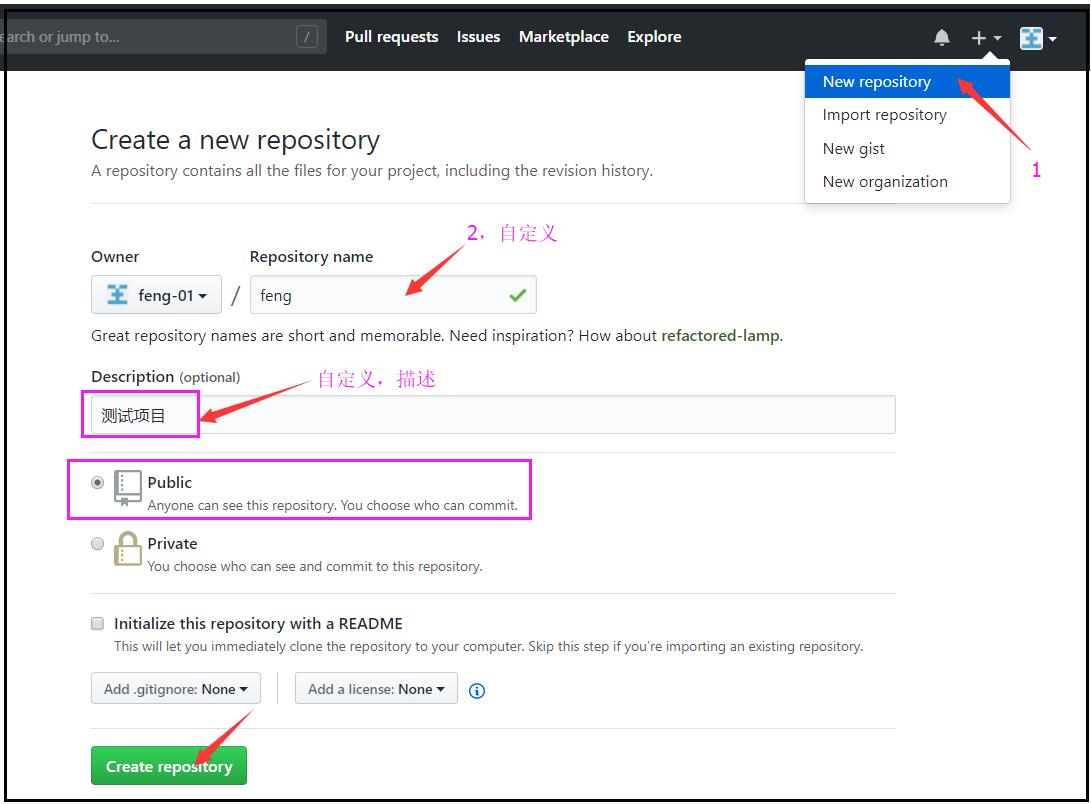
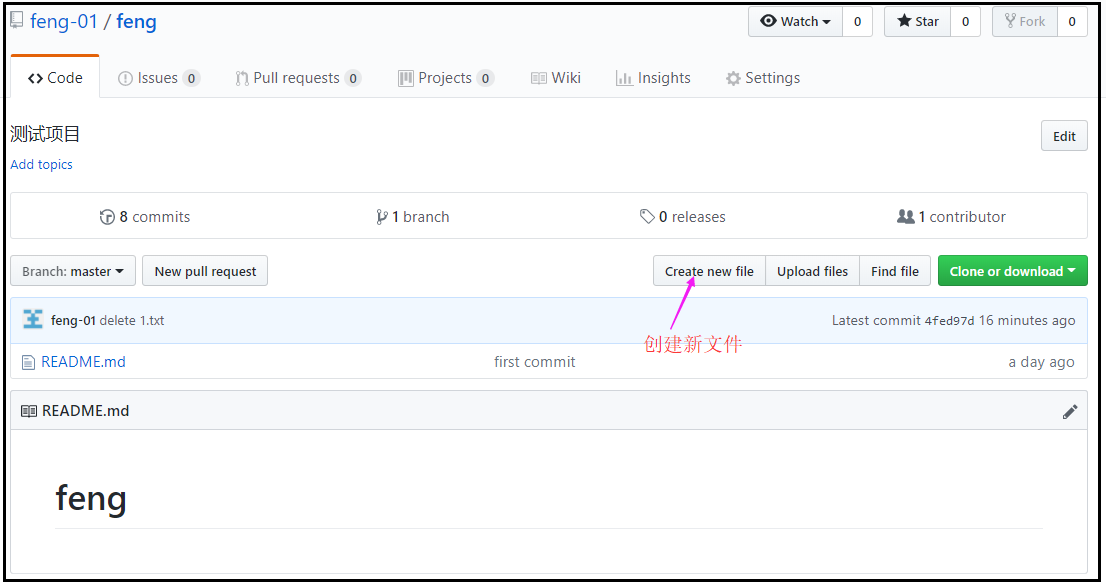
点击右上角+(加号),选择 New repository 创建新库
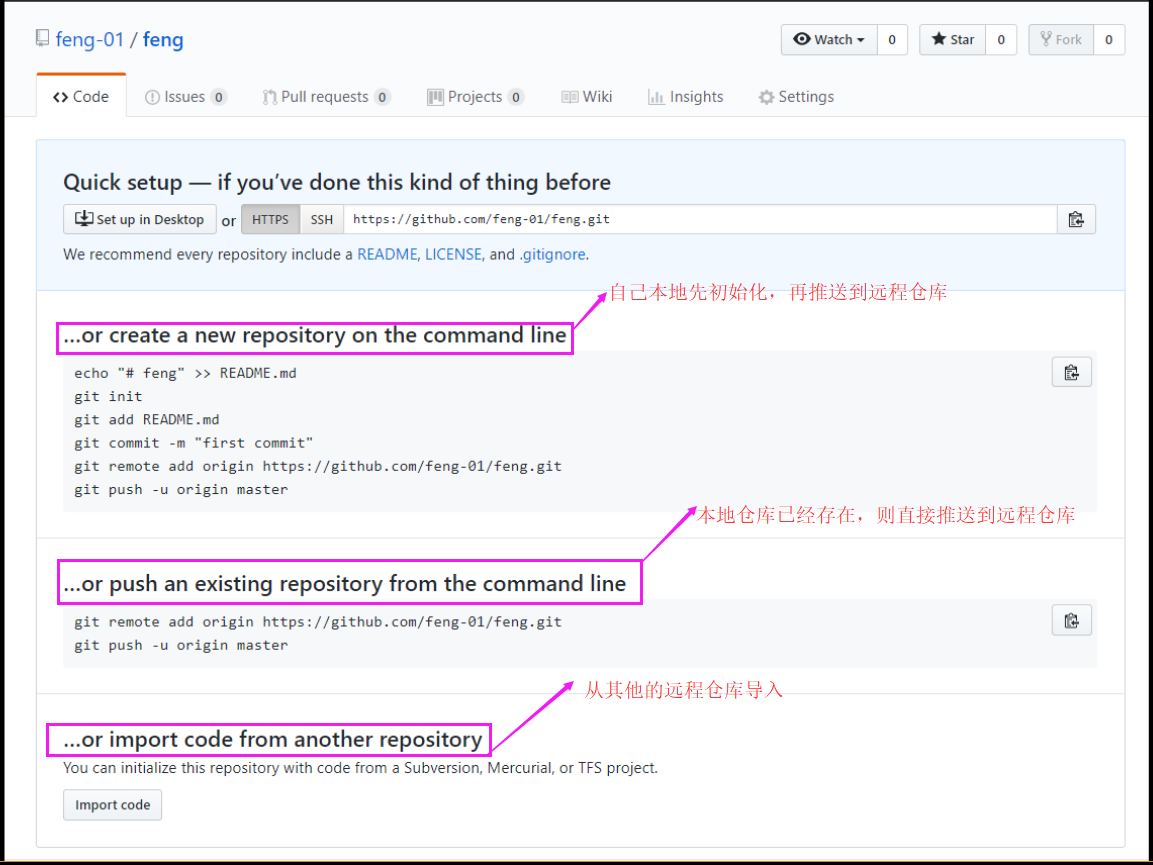
此时出现如下页面,里面有三种情况的操作方法
现在设置秘钥,在linux虚拟机上生成公钥
[root@ying01 ~]# ssh-keygen
Generating public/private rsa key pair.
Enter file in which to save the key (/root/.ssh/id_rsa):
Enter passphrase (empty for no passphrase):
Enter same passphrase again:
Your identification has been saved in /root/.ssh/id_rsa.
Your public key has been saved in /root/.ssh/id_rsa.pub.
The key fingerprint is:
SHA256:2LLmPK0JDYsyDCzScLOR54W8a+6EvaPz/dvo/vpvxWk root@ying01
The key's randomart image is:
+---[RSA 2048]----+
|                 |
|   o .           |
|. = + .          |
|.+ * o o         |
|+.o + o S    . . |
|=  + = o      E  |
|o.o B +.     o   |
| o.+.B...o  .    |
|  .==.**B=+o.    |
+----[SHA256]-----+
[root@ying01 ~]# cat .ssh/id_rsa.pub
ssh-rsa AAAAB3NzaC1yc2EAAAADAQABAAABAQC+X/2tfggcYIe/3qp98blHj4ySD0GbVmP5QfU7tXXMbE/+FnktHOA3l9+noxXxNXFpaDjc4k+R9TV1R4yG8U0+bx8zucaVTSQWgFCiwDlKhY4pUgfQePtNX+AVUo7yf0+ysz7P3cyUTIInHORB2R/DoKzcxMEM9AHkb//G/UtLaRBhLLWhNGz/R8S5ZhdsC3+X+yKKDVffua8RWkAqevntf4lWz6KEYbuTjxzM7cOXOrHx0/w3/qtvD/Vee+I7vZHkCdqwMfQxn9pTh6c3RwBwcx9jzbJJ7YLV5KmOx0QqSK8qHylgjuO2ZS1wF1+eTdO1D2zP2aEykF6dDNhzQRb5 root@ying01
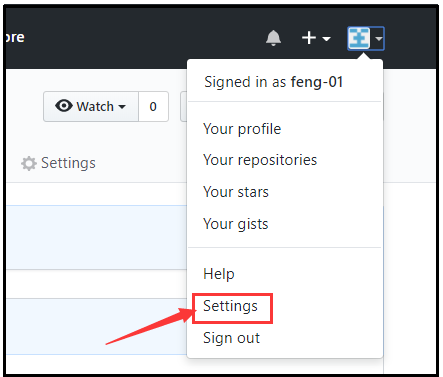
点击右边的符号,选择setting,进入设置页面
按下图选择 SSH keys
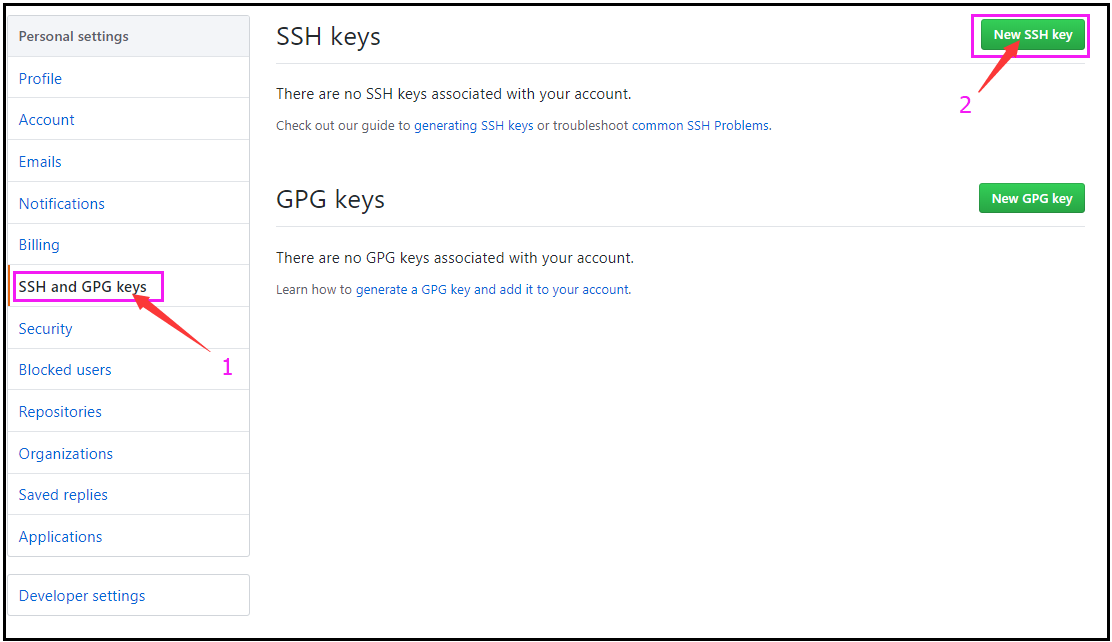
选择公钥的名称,把之前在linux虚拟机上生成的秘钥复,制到方框内,点击Add SSH keys 加载此秘钥

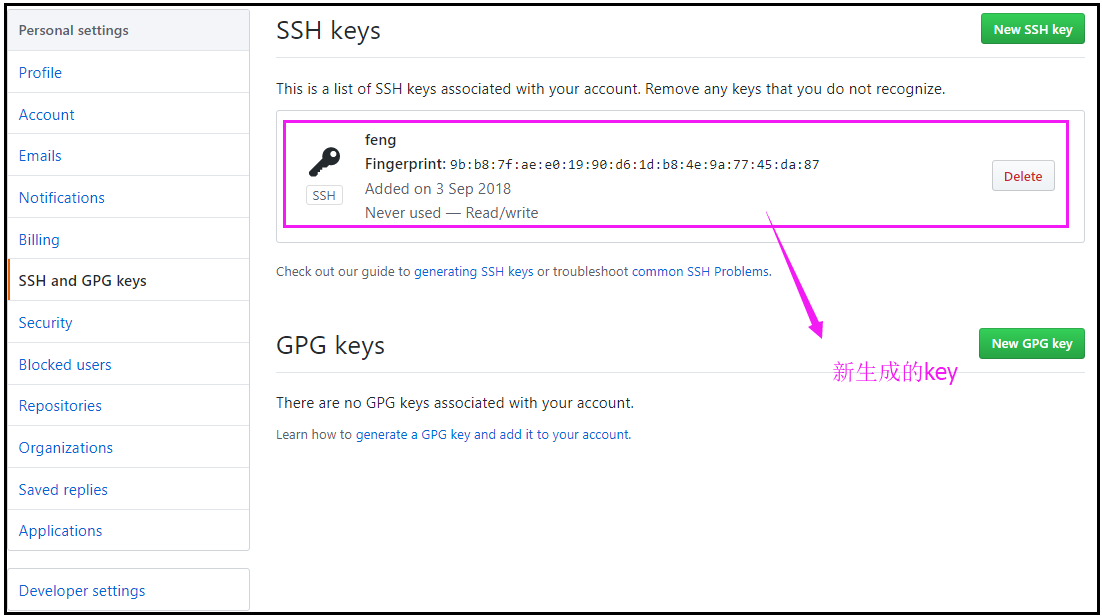
此时有生成新的秘钥
在linux虚拟机上,也建立一个目录(仓库),名称和网页设置的仓库名保持一致
[root@ying01 ~]# cd /tmp/
[root@ying01 tmp]# mkdir feng
[root@ying01 tmp]# cd feng/
此时按照官网上的操作步骤(第一种,初始化),使本地和远程仓库相连
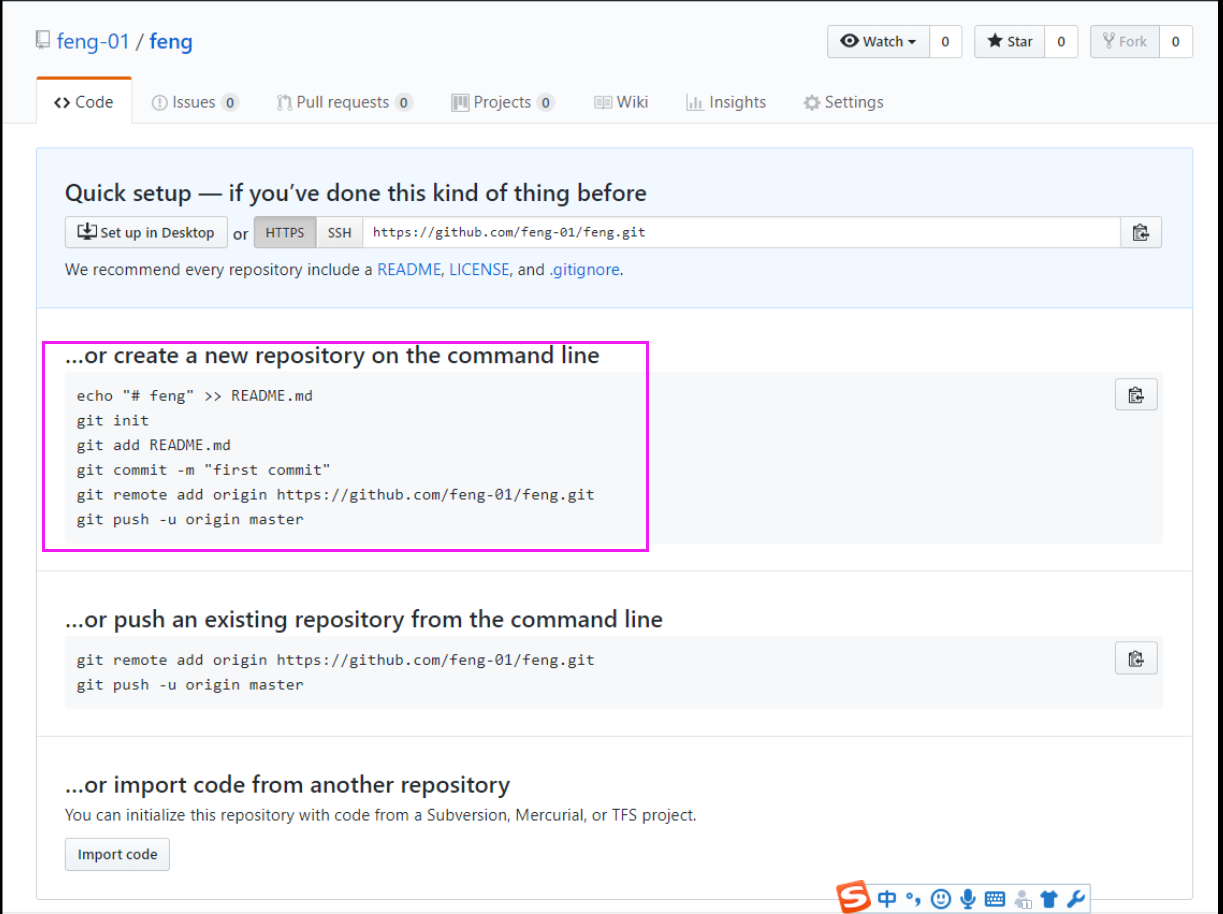
[root@ying01 feng]# echo "# feng" >> README.md
[root@ying01 feng]# ls
README.md
[root@ying01 feng]# git init
初始化空的 Git 版本库于 /tmp/feng/.git/
[root@ying01 feng]# ls -la
总用量 8
drwxr-xr-x 3 root root 35 9月 3 17:16 .
drwxrwxrwt. 20 root root 4096 9月 3 17:15 ..
drwxr-xr-x 7 root root 119 9月 3 17:16 .git
-rw-r--r-- 1 root root 7 9月 3 17:16 README.md
[root@ying01 feng]# git add README.md
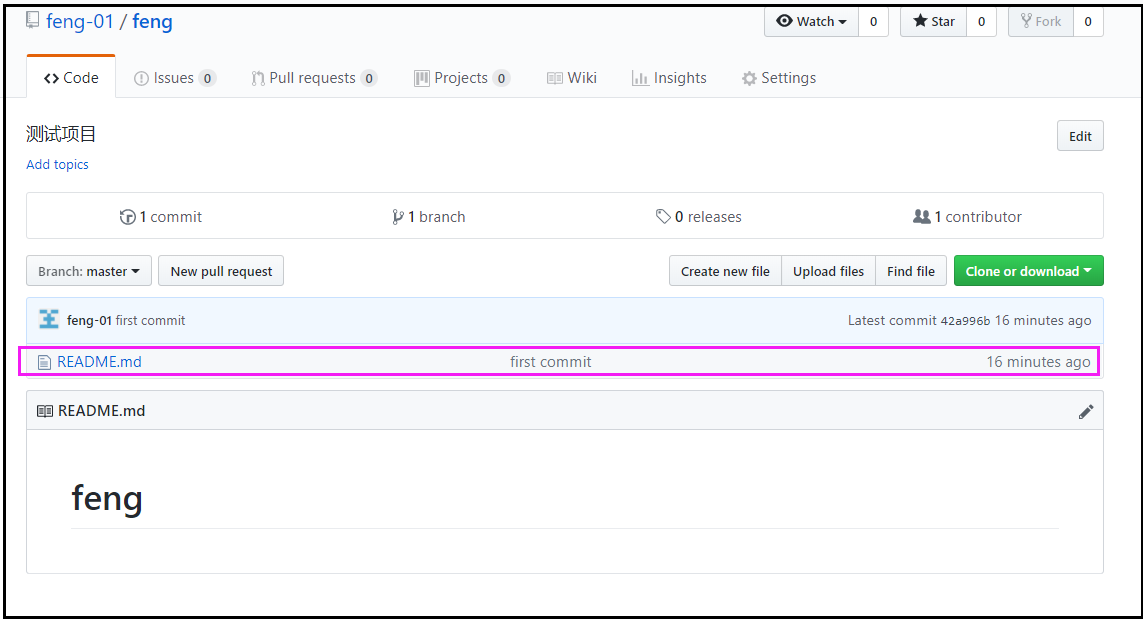
[root@ying01 feng]# git commit -m "first commit"
[master(根提交) 42a996b] first commit
1 file changed, 1 insertion(+)
create mode 100644 README.md
[root@ying01 feng]# git remote add origin https://github.com/feng-01/feng.git
[root@ying01 feng]# git push -u origin master //推送到远程
Username for 'https://github.com': feng-01 //需要登录用户
Password for 'https://feng-01@github.com': //登录密码
Counting objects: 3, done.
Writing objects: 100% (3/3), 211 bytes | 0 bytes/s, done.
Total 3 (delta 0), reused 0 (delta 0)
To https://github.com/feng-01/feng.git
* [new branch] master -> master
分支 master 设置为跟踪来自 origin 的远程分支 master。
刷新远程仓库的页面,此时可以看到 README.md 已经被推送到远程仓库
此时我们有点疑问,为什么之前设置了秘钥,为什么还要需要输入登录账号以及密码?
首先,按照官网的测试 SSH keys 的说明,按部操作
[root@ying01 feng]# ssh -T git@github.com
The authenticity of host 'github.com (13.229.188.59)' can't be established.
RSA key fingerprint is SHA256:nThbg6kXUpJWGl7E1IGOCspRomTxdCARLviKw6E5SY8.
RSA key fingerprint is MD5:16:27:ac:a5:76:28:2d:36:63:1b:56:4d:eb:df:a6:48.
Are you sure you want to continue connecting (yes/no)? yes
Warning: Permanently added 'github.com,13.229.188.59' (RSA) to the list of known hosts.
Hi feng-01! You've successfully authenticated, but GitHub does not provide shell access.
从上面最后一行,已经看出设置成功,但是我继续测试,还是需要输入登录账号和密码;现在需要在打开git/config文件
[root@ying01 feng]# vim .git/config

[remote "origin"]                                   //默认
        url = https://github.com/feng-01/feng.git
        fetch = +refs/heads/*:refs/remotes/origin/*

[remote "origin"]
        url = git@github.com:feng-01/feng.git       //更改后
        fetch = +refs/heads/*:refs/remotes/origin/*
此时新建一个文件,然后推送,此时能够使用秘钥登录
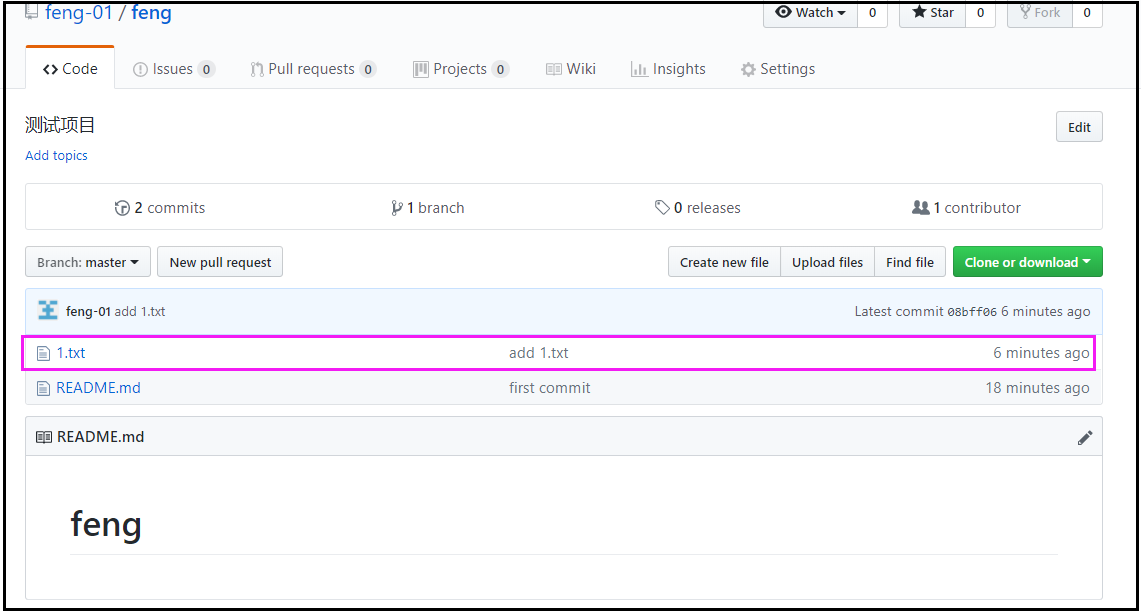
[root@ying01 feng]# echo "123456" > 1.txt
[root@ying01 feng]# git add 8.txt
[root@ying01 feng]# git commit -m "add 1.txt"
[master 3cc0df7] add 1.txt
 1 file changed, 1 insertion(+)
 create mode 100644 1.txt
[root@ying01 feng]# git push   //下面的提示:永久性地将IP地址'13 .250.177.223'的RSA主机密钥添加到已知主机列表中。
Warning: Permanently added the RSA host key for IP address '13.250.177.223' to the list of known hosts.
Counting objects: 3, done.
Delta compression using up to 2 threads.
Compressing objects: 100% (2/2), done.
Writing objects: 100% (2/2), 215 bytes | 0 bytes/s, done.
Total 2 (delta 1), reused 0 (delta 0)
remote: Resolving deltas: 100% (1/1), completed with 1 local object.
To git@github.com:feng-01/feng.git
   508a237..3cc0df7  master -> master
怎么删除gitgub远程仓库的文件呢?
在github上只能删除仓库,却无法删除文件夹或文件, 所以只能通过命令来解决。
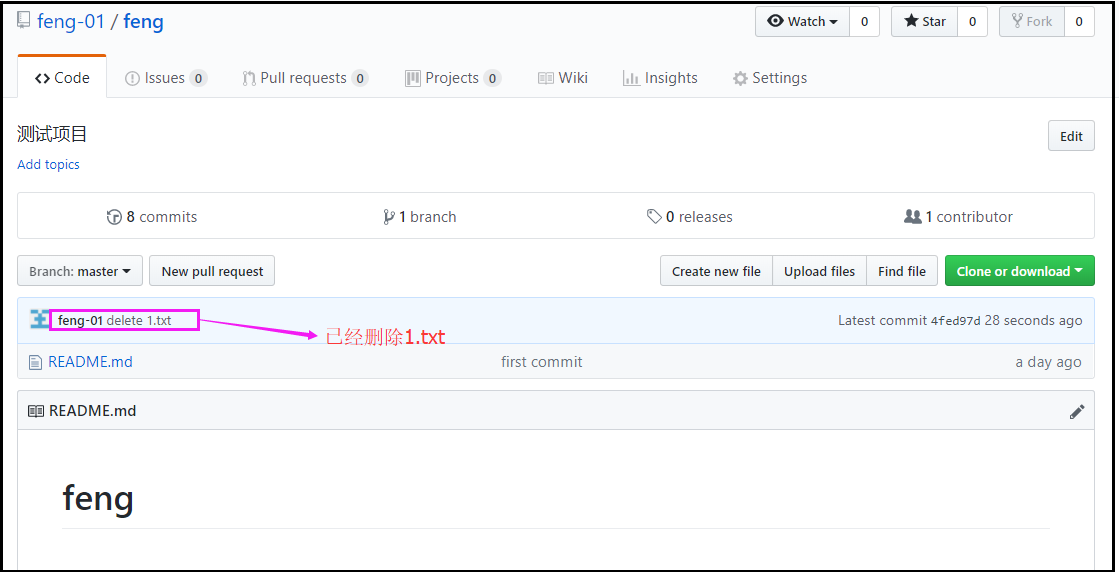
[root@ying01 feng]# git rm 1.txt                    //删除1.txt
rm '1.txt'
[root@ying01 feng]# git commit -m "delete 1.txt"
[master 4fed97d] delete 1.txt
 1 file changed, 1 deletion(-)
 delete mode 100644 1.txt
[root@ying01 feng]# git push                        //推送到github
Counting objects: 3, done.
Delta compression using up to 2 threads.
Compressing objects: 100% (1/1), done.
Writing objects: 100% (2/2), 224 bytes | 0 bytes/s, done.
Total 2 (delta 0), reused 0 (delta 0)
To git@github.com:feng-01/feng.git
   400d346..4fed97d  master -> master
[root@ying01 feng]#
此时在github页面,刷新,可以看到1.txt已经被删除
七、克隆远程仓库
克隆远程仓库,此仓库为开源库 python zer0_out库,因为开源只有读的权限。
[root@ying01 home]# git clone git@github.com:yifeif/zero_out.git
正克隆到 'zero_out'...
remote: Counting objects: 18, done.
remote: Compressing objects: 100% (15/15), done.
remote: Total 18 (delta 1), reused 14 (delta 0), pack-reused 0
接收对象中: 100% (18/18), 8.75 KiB | 0 bytes/s, done.
处理 delta 中: 100% (1/1), done.
[root@ying01 home]# ls
mysql  nfstestdir  pure-ftp  user10  user12  user14  user17  user3  user7  virftp   zero_out
nba    php-fpm     user1     user11  user13  user15  user18  user4  user8  ying111
[root@ying01 home]# ls zero_out/
LICENSE  MANIFEST.in  pip_pkg.sh  README.md  setup.py  tensorflow_zero_out

[root@ying01 zero_out]# git commit -m "change readme.md"
[master 19cb892] change readme.md
 1 file changed, 3 insertions(+)
[root@ying01 zero_out]# git push
Warning: Permanently added the RSA host key for IP address '52.74.223.119' to the list of known hosts.
ERROR: Permission to yifeif/zero_out.git denied to feng-01.
fatal: Could not read from remote repository.

Please make sure you have the correct access rights           //无此权限,说明只有读的权限
and the repository exists.
克隆有读写权限的库,比如在github上创建自己的库
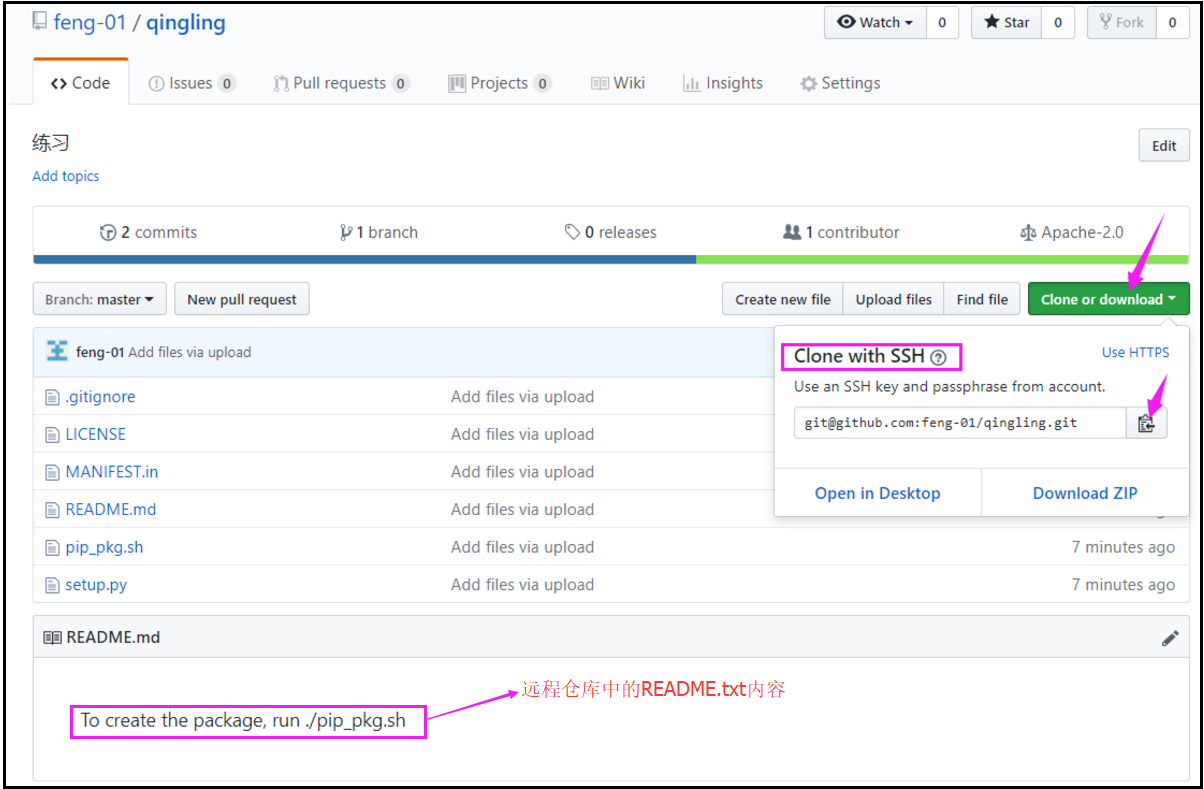
在本地克隆此远程仓库
[root@ying01 home]# git clone git@github.com:feng-01/qingling.git
正克隆到 'qingling'...
remote: Counting objects: 11, done.
remote: Compressing objects: 100% (7/7), done.
remote: Total 11 (delta 0), reused 0 (delta 0), pack-reused 0
接收对象中: 100% (11/11), 7.88 KiB | 0 bytes/s, done.
[root@ying01 home]# ls qingling/
LICENSE MANIFEST.in pip_pkg.sh README.md setup.py
[root@ying01 home]# cd qingling/
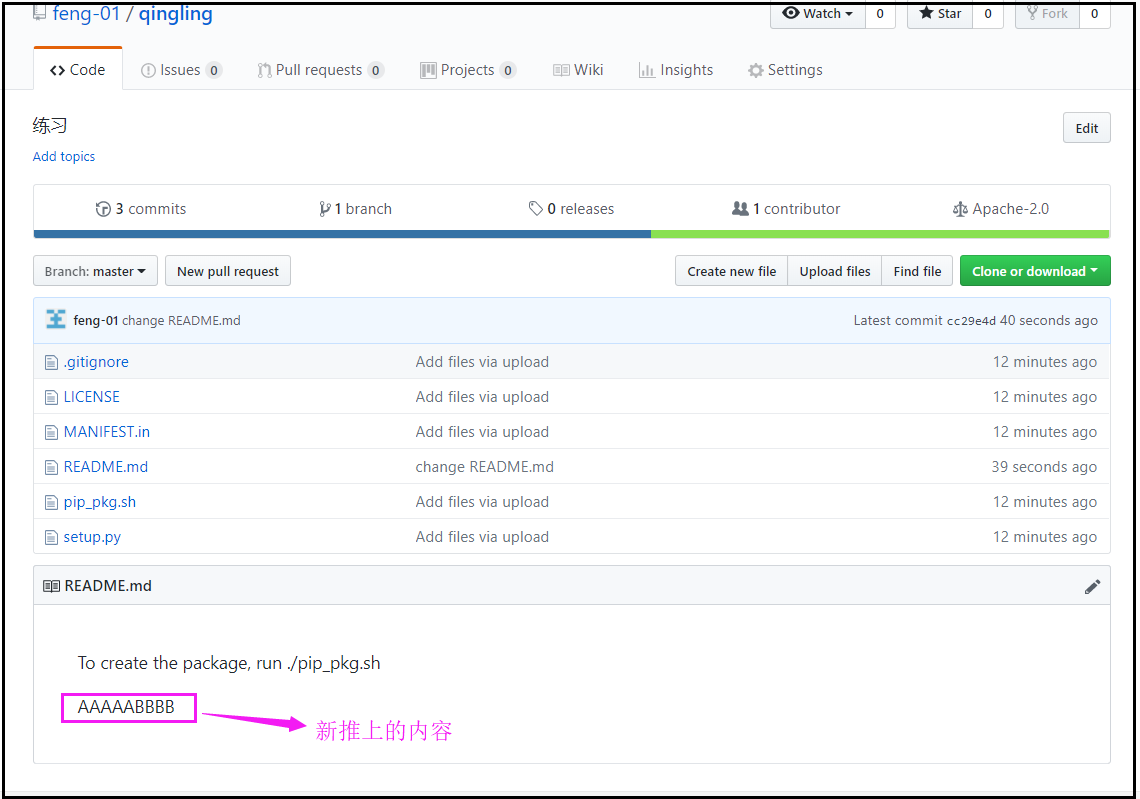
[root@ying01 qingling]# cat README.md //注意此文件内容,以下就按此文件做测试
To create the package, run ./pip_pkg.sh
在README.md写入部分内容,并推送到远程仓库上
[root@ying01 qingling]# echo "AAAAABBBB" >> README.md
[root@ying01 qingling]# cat README.md
To create the package, run ./pip_pkg.sh

AAAAABBBB
[root@ying01 qingling]# git add README.md
[root@ying01 qingling]# git commit -m "change README.md"
[master cc29e4d] change README.md
 1 file changed, 1 insertion(+)
[root@ying01 qingling]# git push
Counting objects: 5, done.
Delta compression using up to 2 threads.
Compressing objects: 100% (3/3), done.
Writing objects: 100% (3/3), 304 bytes | 0 bytes/s, done.
Total 3 (delta 1), reused 0 (delta 0)
remote: Resolving deltas: 100% (1/1), completed with 1 local object.
To git@github.com:feng-01/qingling.git
   f39ca7f..cc29e4d  master -> master
在github上的qingling仓库中的README.md查看其内容变化
那么在github上的qingling仓库中的README.md,编辑器内容
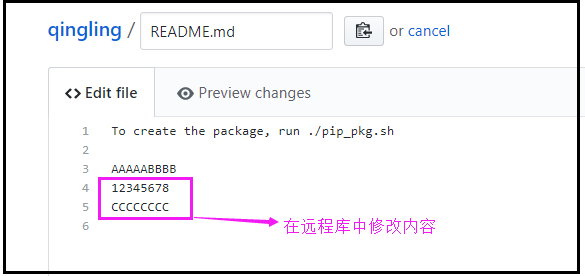
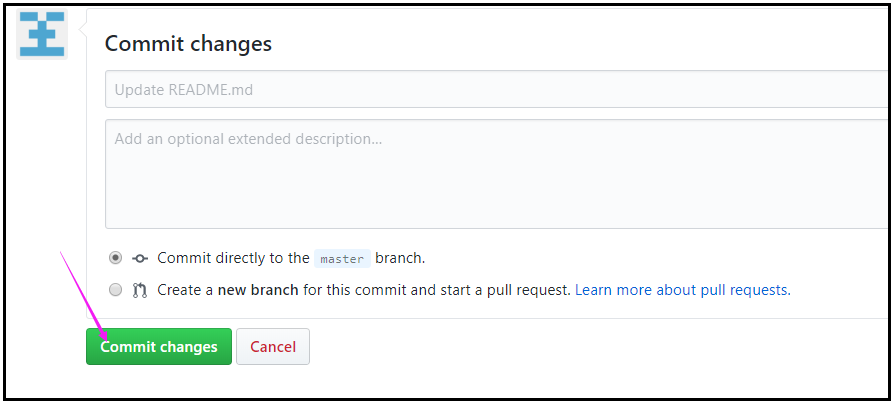
增加上面的内容后,点击 commit changes
在本地把远程仓库的内容拉回来,用git pull
[root@ying01 qingling]# git pull
remote: Counting objects: 3, done.
remote: Compressing objects: 100% (3/3), done.
remote: Total 3 (delta 1), reused 0 (delta 0), pack-reused 0
Unpacking objects: 100% (3/3), done.
来自 github.com:feng-01/qingling
   cc29e4d..c8d7070  master     -> origin/master
更新 cc29e4d..c8d7070
Fast-forward
 README.md | 2 ++
 1 file changed, 2 insertions(+)
[root@ying01 qingling]# cat README.md          //其内容和远程仓库里的内容一样
To create the package, run ./pip_pkg.sh

AAAAABBBB
12345678
CCCCCCCC
八、分支管理
查看分支:git branch
[root@ying01 ~]# cd /data/gitroot/
[root@ying01 gitroot]# git branch
* master
创建分支:git branch 分支名
[root@ying01 gitroot]# git branch ying
[root@ying01 gitroot]# git branch
* master
  ying
切换分支:git checkout 分支名
[root@ying01 gitroot]# ls
1.txt
[root@ying01 gitroot]# git checkout ying
切换到分支 'ying'
[root@ying01 gitroot]# git branch    //星号代表 目前所在分支
  master
* ying
[root@ying01 gitroot]# ls
1.txt
在分支ying 上创建 2.txt。但是切换到master分支上却没有2.txt,说明分支是相互独立的
[root@ying01 gitroot]# echo "how are you" > 2.txt
[root@ying01 gitroot]# git add 2.txt
[root@ying01 gitroot]# git commit -m "add 2.txt"
[ying c2cdd92] add 2.txt
 1 file changed, 1 insertion(+)
 create mode 100644 2.txt
[root@ying01 gitroot]# ls
1.txt  2.txt

[root@ying01 gitroot]# git checkout master
切换到分支 'master'
[root@ying01 gitroot]# ls                 //master分支上没有2.txt
1.txt
[root@ying01 gitroot]# git branch
* master
  ying
合并分支:git merge 用户名
[root@ying01 gitroot]# git merge ying
更新 e70c0fb..c2cdd92
Fast-forward
 2.txt | 1 +
 1 file changed, 1 insertion(+)
 create mode 100644 2.txt
[root@ying01 gitroot]# ls            //此时master分支上,也出现2.txt
1.txt  2.txt
[root@ying01 gitroot]# git branch
* master
  ying
在master分支上的2.txt,增加内容,
[root@ying01 gitroot]# echo "how do you do" >> 2.txt
[root@ying01 gitroot]# cat 2.txt
how are you
how do you do
[root@ying01 gitroot]# git add 2.txt
[root@ying01 gitroot]# comm
comm     command
[root@ying01 gitroot]# git commit -m "ch 2.txt"
[master bb9d5c0] ch 2.txt
 1 file changed, 1 insertion(+)
在ying分支上的2.txt也增加内容
[root@ying01 gitroot]# git checkout ying
切换到分支 'ying'
[root@ying01 gitroot]# echo "weclome to china" >> 2.txt
[root@ying01 gitroot]# git add 2.txt
[root@ying01 gitroot]# git commit -m "ch 2.txt"
[ying e088a46] ch 2.txt
 1 file changed, 1 insertion(+)
[root@ying01 gitroot]# cat 2.txt
how are you
weclome to china
回到master分支上,合并ying分支,结果又冲突;因为只有2分支内容一样才能合并。
[root@ying01 gitroot]# git checkout master
切换到分支 'master'
[root@ying01 gitroot]# cat 2.txt
how are you
how do you do
[root@ying01 gitroot]# git merge ying
自动合并 2.txt
冲突(内容):合并冲突于 2.txt
自动合并失败,修正冲突然后提交修正的结果。
[root@ying01 gitroot]# cat 2.txt
how are you
<<<<<<< HEAD
how do you do
=======
weclome to china
>>>>>>> ying
[root@ying01 gitroot]# vim 2.txt   //改为个ying分支一样的内容

how are you
weclome to china
此时master和ying分支上内容一样,此时合并
[root@ying01 gitroot]# git commit -a
[master 147955f] Merge branch 'ying'
[root@ying01 gitroot]# git add 2.txt
[root@ying01 gitroot]# git commit -m "ch 2.txt"
# 位于分支 master
无文件要提交,干净的工作区
[root@ying01 gitroot]# git merge ying       //合并成功
Already up-to-date.
[root@ying01 gitroot]# git checkout 2.txt
[root@ying01 gitroot]# cat 2.txt
how are you
weclome to china
删除分支:git branch -d 分支名
[root@ying01 gitroot]# git branch -d ying
已删除分支 ying(曾为 e088a46)。
[root@ying01 gitroot]# git branch
* master
强制删除分支:git branch -D 分支名
[root@ying01 gitroot]# git branch ying01
[root@ying01 gitroot]# git branch ying02
[root@ying01 gitroot]# git branch
* master
  ying01
  ying02
[root@ying01 gitroot]# git branch -D ying01
已删除分支 ying01(曾为 147955f)。
[root@ying01 gitroot]# git branch -d ying02
已删除分支 ying02(曾为 147955f)。
[root@ying01 gitroot]#
九、远程分支
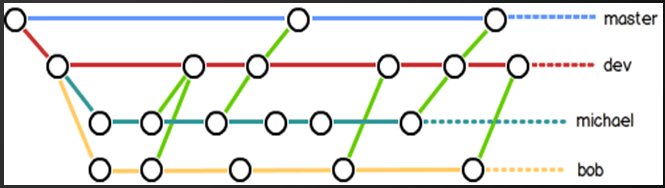
分支使用的原则
- master分支是非常重要的,线上发布代码使用master分支。平时开发代码不要在这个分支上
- 创建一个dev分支,专门用作开发,只有当发布到线上之前,才会把dev分支合并到master
- 开发人员应该在dev的基础上再分支成个人分支,在个人分支里面开发代码,然后合并到dev分支。
比如dev合并bob分支(dev,bob分支事先创建好):
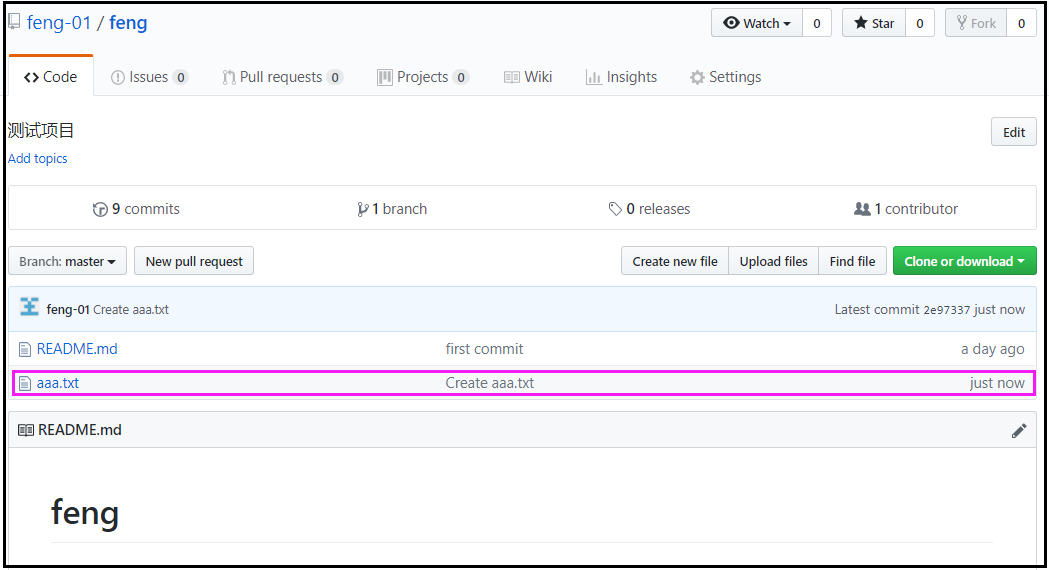
现在远程仓库,创建一个新的文件aaa.txt

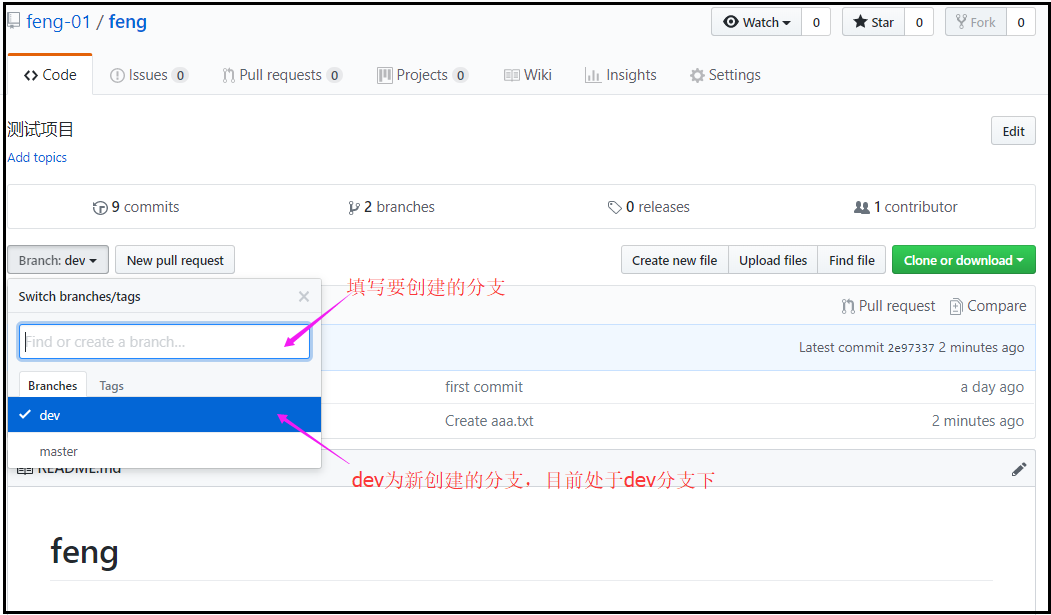
再创建一个分支dev
在本地仓库下,把仓库更新内容pull下来,但是本地还是只能看到一个分支master
[root@ying01 ~]# cd /tmp/feng/
[root@ying01 feng]# ls
README.md
[root@ying01 feng]# git branch           //查看分支,此时只有maser
* master
[root@ying01 feng]# git pull             //从远程推送
remote: Counting objects: 3, done.
remote: Compressing objects: 100% (2/2), done.
remote: Total 3 (delta 0), reused 0 (delta 0), pack-reused 0
Unpacking objects: 100% (3/3), done.
来自 github.com:feng-01/feng
   4fed97d..2e97337  master     -> origin/master
 * [新分支]          dev        -> origin/dev
更新 4fed97d..2e97337
Fast-forward
 aaa.txt | 4 ++++
 1 file changed, 4 insertions(+)
 create mode 100644 aaa.txt
[root@ying01 feng]# git branch        //还是只有master分支
* master
查看远程分支:git ls-remote origin
[root@ying01 feng]# git ls-remote origin
2e973378072fdc2f5f782652420a521ffe5995a7	HEAD
2e973378072fdc2f5f782652420a521ffe5995a7	refs/heads/dev
2e973378072fdc2f5f782652420a521ffe5995a7	refs/heads/master
取出远程分支dev:git checkout -b dev origin/dev
[root@ying01 feng]# git checkout -b dev origin/dev
分支 dev 设置为跟踪来自 origin 的远程分支 dev。
切换到一个新分支 'dev'
[root@ying01 feng]# git branch
* dev
  master
[root@ying01 feng]# ls
aaa.txt  README.md
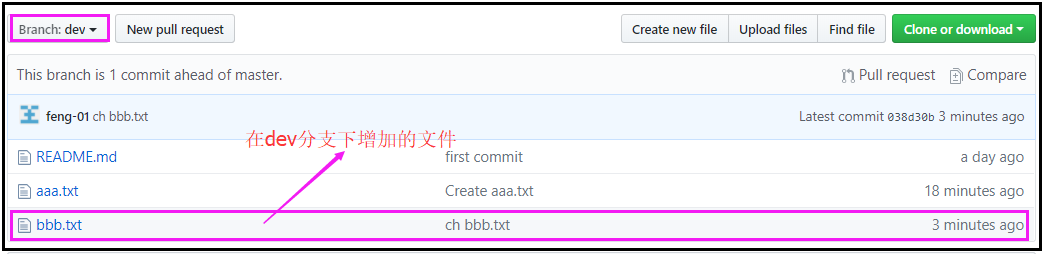
在dev分支下,创建bbb.txt,并推送到远程仓库
[root@ying01 feng]# echo "12345678" > bbb.txt
[root@ying01 feng]# git add bbb.txt
[root@ying01 feng]# git commit -m "ch bbb.txt"
[dev 038d30b] ch bbb.txt
 1 file changed, 1 insertion(+)
 create mode 100644 bbb.txt
[root@ying01 feng]# git push
Counting objects: 4, done.
Delta compression using up to 2 threads.
Compressing objects: 100% (2/2), done.
Writing objects: 100% (3/3), 303 bytes | 0 bytes/s, done.
Total 3 (delta 0), reused 0 (delta 0)
To git@github.com:feng-01/feng.git
   2e97337..038d30b  dev -> dev
dev分支下的文件,里面有bbb.txt
因为是在dev分支下创建的分支,所以推送上来,master分支文件未变,但是master本地有变化,此时master也变化

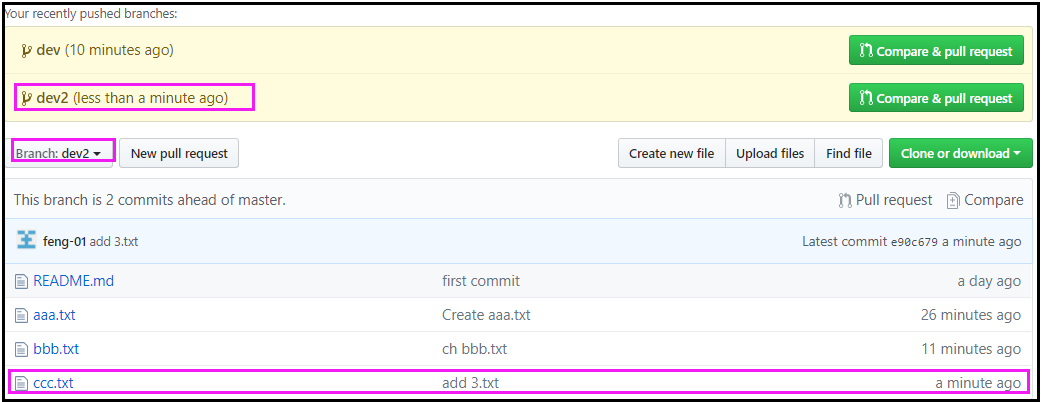
重新创建一个分支dev2,并创建ccc.txt
[root@ying01 feng]# git branch dev2
[root@ying01 feng]# git branch
* dev
  dev2
  master
[root@ying01 feng]# git checkout dev2
切换到分支 'dev2'
[root@ying01 feng]# ls
aaa.txt  bbb.txt  README.md
[root@ying01 feng]# echo "88888888" > ccc.txt
[root@ying01 feng]# git add ccc.txt
[root@ying01 feng]# git commit -m "add ccc.txt"
[dev2 e90c679] add ccc.txt
 1 file changed, 1 insertion(+)
 create mode 100644 ccc.txt
只推送到dev2,这样即使其他分支有变化,远程仓库只是的dev2分支有变化
[root@ying01 feng]# git push origin dev2
Counting objects: 4, done.
Delta compression using up to 2 threads.
Compressing objects: 100% (2/2), done.
Writing objects: 100% (3/3), 261 bytes | 0 bytes/s, done.
Total 3 (delta 1), reused 0 (delta 0)
remote: Resolving deltas: 100% (1/1), completed with 1 local object.
To git@github.com:feng-01/feng.git
 * [new branch]      dev2 -> dev2
在远程仓库可以看到,新的分支dev2,以及新增加的ccc.txt文件
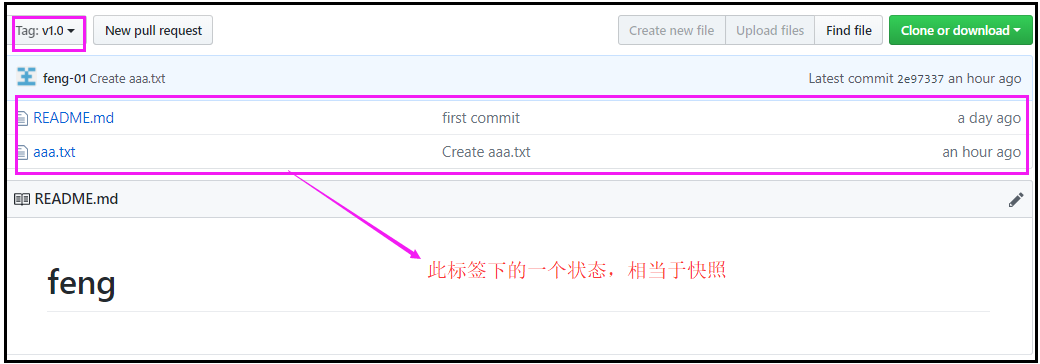
十、 标签管理
定义:
标签类似于快照功能,可以给版本库打一个标签,记录某个时刻库的状态。也可以随时恢复到该状态。
定义标签需要在master下; 定义标签:git tag v1.0
[root@ying01 feng]# git checkout master          //切换到master
切换到分支 'master'
[root@ying01 feng]# git tag v1.0                //定义标签
[root@ying01 feng]# git tag                     //查看标签
v1.0
查看指定标签信息:git show v1.0
[root@ying01 feng]# git show v1.0
commit 2e973378072fdc2f5f782652420a521ffe5995a7         //标签是针对的commit
Author: feng-01 <42930606+feng-01@users.noreply.github.com>
Date:   Tue Sep 4 23:43:01 2018 +0800

    Create aaa.txt

diff --git a/aaa.txt b/aaa.txt
new file mode 100644
index 0000000..43bcdaa
--- /dev/null
+++ b/aaa.txt
@@ -0,0 +1,4 @@
+AAAAAAA
+BBBBBBB
+CCCCCCCC
+DDDDDDDD
[root@ying01 feng]# git log --pretty=oneline            //查看master下的commit
2e973378072fdc2f5f782652420a521ffe5995a7 Create aaa.txt
4fed97dd8fe02fccf4af2456a7b56bf348811fc9 delete 1.txt
08bff06220b25b0a33c073e506bd77c967d6f2ae add 1.txt
42a996bd16c5095439e78bd92d5e69d737abb8e4 first commit
查看历史的commit信息
[root@ying01 feng]# git log --pretty=oneline --abbrev-commit
2e97337 Create aaa.txt
4fed97d delete 1.txt
08bff06 add 1.txt
42a996b first commit
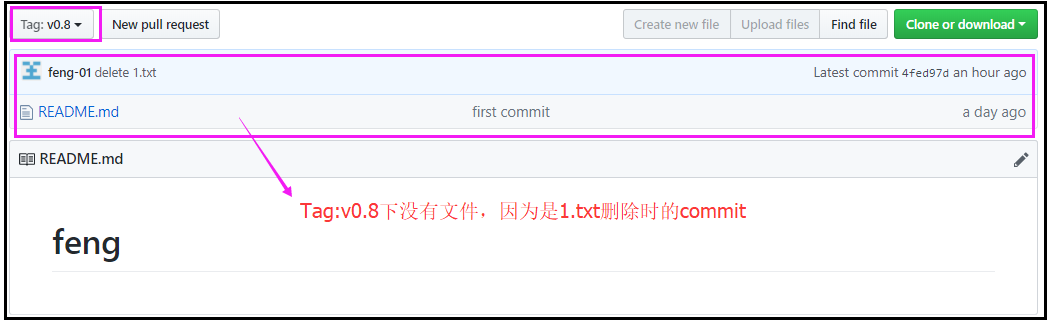
针对历史commit打标签:git tag v0.8 4fed97d
[root@ying01 feng]# git tag v0.8 4fed97d
[root@ying01 feng]# git tag
v0.8
v1.0
可以对标签进行描述
[root@ying01 feng]# git tag -a v0.1 -m "first tag" 2e97337
[root@ying01 feng]# git tag
v0.1
v0.8
v1.0
[root@ying01 feng]# git show v0.1           //查看vtag v0.1标签信息
Tagger: ying <txwd188@126.com>
Date:   Wed Sep 5 00:22:25 2018 +0800

first tag                                    //描述信息

commit 2e973378072fdc2f5f782652420a521ffe5995a7
Author: feng-01 <42930606+feng-01@users.noreply.github.com>
Date:   Tue Sep 4 23:43:01 2018 +0800

    Create aaa.txt

diff --git a/aaa.txt b/aaa.txt
new file mode 100644
index 0000000..43bcdaa
--- /dev/null
+++ b/aaa.txt
@@ -0,0 +1,4 @@
+AAAAAAA
+BBBBBBB
+CCCCCCCC
+DDDDDDDD
删除标签:git tag -d v0.1
[root@ying01 feng]# git tag -d v0.1
已删除 tag 'v0.1'(曾为 5462580)
[root@ying01 feng]# git tag
v0.8
v1.0
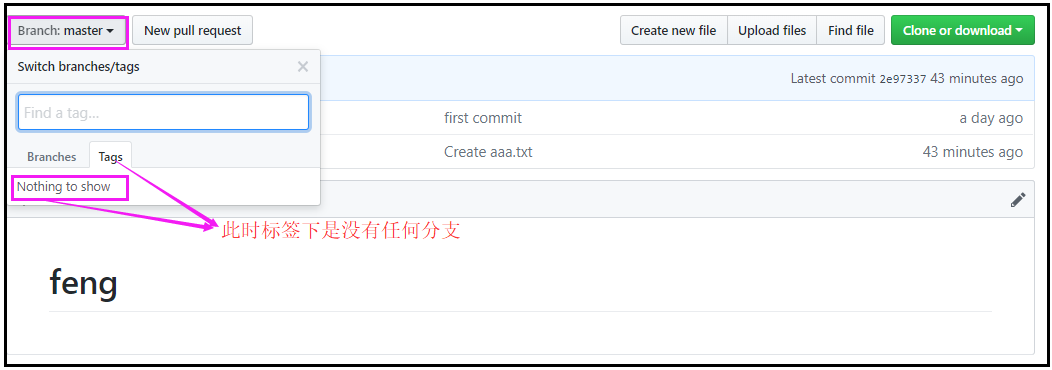
此时远程仓库还没有标签
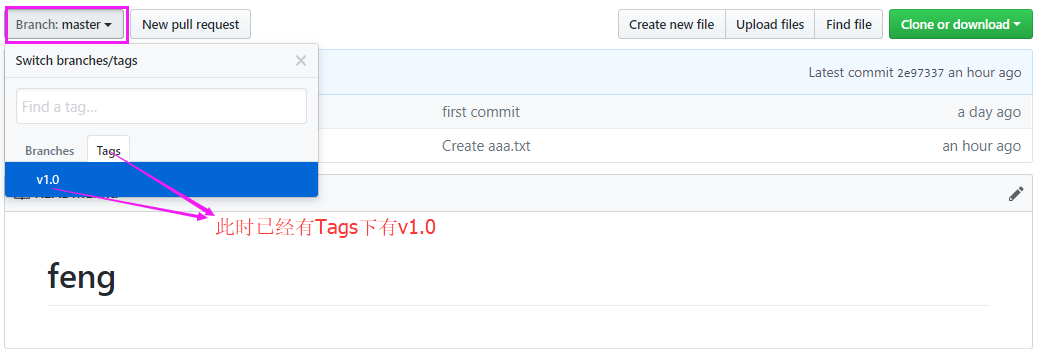
把指定的标签推送到github上的仓库里: git push origin v1.0
[root@ying01 feng]# git push origin v1.0
Total 0 (delta 0), reused 0 (delta 0)
To git@github.com:feng-01/feng.git
 * [new tag]         v1.0 -> v1.0
把V1.0标签推送上去后,刷新页面
把所有的标签推送到远程仓库:git push --tag origin
[root@ying01 feng]# git push --tag origin
Total 0 (delta 0), reused 0 (delta 0)
To git@github.com:feng-01/feng.git
 * [new tag]         v0.8 -> v0.8
此时远程仓库下,多了v0.8
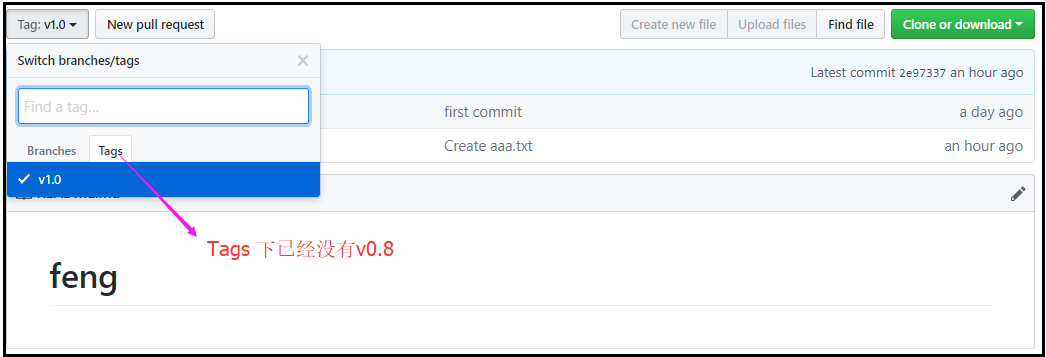
在本地删除一个标签,远程也删除标签:git push origin :refs/tags/v0.8
[root@ying01 feng]# git tag -d v0.8
已删除 tag 'v0.8'(曾为 4fed97d)
[root@ying01 feng]# git tag
v1.0
[root@ying01 feng]# git push origin :refs/tags/v0.8
To git@github.com:feng-01/feng.git
 - [deleted]         v0.8
十一、 git别名
git下命令比如checkout过长,不易拼写,用别名可以提高我们的工作效率。
git定义别名的语句:git config --global alias.br branch
[root@ying01 feng]# git config --global alias.br  branch  //定义branch的别名为br
[root@ying01 feng]# git br
  dev
  dev2
* master
[root@ying01 feng]# ls
aaa.txt  README.md
[root@ying01 feng]# git config --global alias.ci commit  //定义commit的别名为ci
[root@ying01 feng]# echo "99999999" > ddd.txt
[root@ying01 feng]# git add ddd.txt
[root@ying01 feng]# git ci -m "add ddd.txt"
[master 76a9c9c] add ddd.txt
 1 file changed, 1 insertion(+)
 create mode 100644 ddd.txt
[root@ying01 feng]# git config --global alias.co  checkout  //定义checkout的别名为co
[root@ying01 feng]# git co dev
切换到分支 'dev'
其实这些命令都会在git配置文件中生成,当然也可以直接在配置文件中填写
[root@ying01 feng]# vim /root/.gitconfig

[user]
        email = txwd188@126.com
        name = ying
[push]
        default = matching
[alias]
        br = branch
        ci = commit
        co = checkout
小技巧:可以针对 log的别名设置
[root@ying01 feng]# git config --global alias.lg "log --color --graph --pretty=format:'%Cred%h%Creset -%C(yellow)%d%Creset %s %Cgreen(%cr) %C(bold blue)<%an>%Creset' --abbrev-commit"
效果如下:
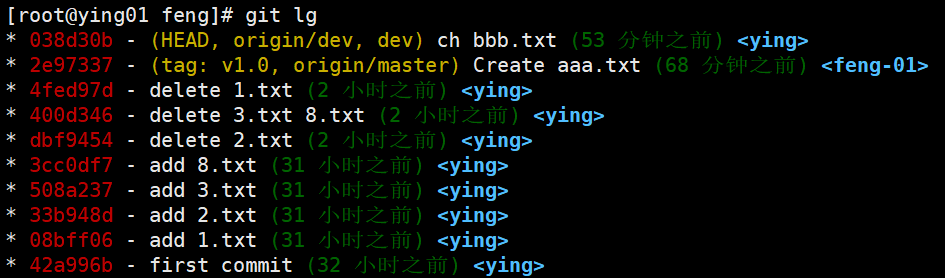
查看git别名清单
[root@ying01 feng]# git config --list |grep alias
alias.br=branch
alias.ci=commit
alias.co=checkout
alias.lg=log --color --graph --pretty=format:'%Cred%h%Creset -%C(yellow)%d%Creset %s %Cgreen(%cr) %C(bold blue)<%an>%Creset' --abbrev-commit
取消别名 git config --global --unset alias.br
[root@ying01 feng]# git config --global --unset alias.br
[root@ying01 feng]# git br
git:'br' 不是一个 git 命令。参见 'git --help'。

您指的是这其中的某一个么?
	branch
	var
[root@ying01 feng]# ^C
[root@ying01 feng]# git br
git:'br' 不是一个 git 命令。参见 'git --help'。

您指的是这其中的某一个么?
	branch
	var
十二、搭建git服务器
搭建git服务器的应用场景:
github毕竟是公开的,而私有仓库又得花钱买。所以我们可以想办法搭建一个私有的,只自己公司使用的,开发人员很少。此时可以使用命令行的git服务器
机器分配
- 客户端 ying01 192.168.112.136
- git服务器 ying02 192.168.112.138
ying02上安装git工具
[root@ying02 ~]# yum -y install git
在ying02上,添加git用户,并且设置shell为/usr/bin/git-shell,目的是为了不让git用户远程登陆
[root@ying02 ~]# useradd -s /usr/bin/git-shell git
[root@ying02 ~]# tail -1 /etc/passwd
git:x:1001:1001::/home/git:/usr/bin/git-shell
[root@ying02 ~]# cd /home/git/
创建 .ssh/authorized_keys 文件,用来放客户机端的公钥
[root@ying02 git]# mkdir .ssh
[root@ying02 git]# touch .ssh/authorized_keys
[root@ying02 git]# ls -l .ssh/authorized_keys
-rw-r--r-- 1 root root 0 9月   5 02:59 .ssh/authorized_keys
[root@ying02 git]# chmod 600 .ssh/authorized_keys
[root@ying02 git]# ls -l .ssh/authorized_keys
-rw------- 1 root root 0 9月   5 02:59 .ssh/authorized_keysh
[root@ying02 git]# chown -R git:git .ssh
[root@ying02 git]# ls -ld .ssh
drwxr-xr-x 2 git git 29 9月   5 02:59 .ssh
在客户机ying01上,复制器ssh的公钥
[root@ying01 ~]# cat .ssh/id_rsa.pub
ssh-rsa AAAAB3NzaC1yc2EAAAADAQABAAABAQC+X/2tfggcYIe/3qp98blHj4ySD0GbVmP5QfU7tXXMbE/+FnktHOA3l9+noxXxNXFpaDjc4k+R9TV1R4yG8U0+bx8zucaVTSQWgFCiwDlKhY4pUgfQePtNX+AVUo7yf0+ysz7P3cyUTIInHORB2R/DoKzcxMEM9AHkb//G/UtLaRBhLLWhNGz/R8S5ZhdsC3+X+yKKDVffua8RWkAqevntf4lWz6KEYbuTjxzM7cOXOrHx0/w3/qtvD/Vee+I7vZHkCdqwMfQxn9pTh6c3RwBwcx9jzbJJ7YLV5KmOx0QqSK8qHylgjuO2ZS1wF1+eTdO1D2zP2aEykF6dDNhzQRb5 root@ying01
把客户机上的公钥粘贴到ying02的authorized_keys文件里
[root@ying02 git]# vim .ssh/authorized_keys

ssh-rsa AAAAB3NzaC1yc2EAAAADAQABAAABAQC+X/2tfggcYIe/3qp98blHj4ySD0GbVmP5QfU7tXXMbE/+FnktHOA3l9+noxXxNXFpaDjc4k+R9TV1R4yG8U0+bx8zucaVTSQWgFCiwDlKhY4pUgfQePtNX+AVUo7yf0+ysz7P3cyUTIInHORB2R/DoKzcxMEM9AHkb//G/UtLaRBhLLWhNGz/R8S5ZhdsC3+X+yKKDVffua8RWkAqevntf4lWz6KEYbuTjxzM7cOXOrHx0/w3/qtvD/Vee+I7vZHkCdqwMfQxn9pTh6c3RwBwcx9jzbJJ7YLV5KmOx0QqSK8qHylgjuO2ZS1wF1+eTdO1D2zP2aEykF6dDNhzQRb5 root@ying01
在客户机ying01上,连接ying02服务器
[root@ying01 ~]# ssh git@192.168.112.138
fatal: Interactive git shell is not enabled.
hint: ~/git-shell-commands should exist and have read and execute access.
Connection to 192.168.112.138 closed.
在服务器ying02上,创建gitroot目录作为git仓库
[root@ying02 git]# mkdir /data/gitroot
[root@ying02 git]# cd /data/gitroot
[root@ying02 gitroot]# git init --bare sample.git     //初始化裸仓库
初始化空的 Git 版本库于 /data/gitroot/sample.git/
[root@ying02 gitroot]# ls
sample.git
[root@ying02 gitroot]# ls -l
总用量 0
drwxr-xr-x 7 root root 119 9月   5 03:09 sample.git
[root@ying02 gitroot]# chown -R git:git sample.git
git init --bare sample.git
会创建一个裸仓库,裸仓库没有工作区,因为服务器上的Git仓库纯粹是为了共享,所以不让用户直接登录到服务器上去改工作区,并且服务器上的Git仓库通常都以.git结尾
服务器已经搭建好,现在客户端ying01上测试
在客户端ying01下,克隆服务器端(ying)的仓库,即远程仓库
[root@ying01 ~]# git clone git@192.168.112.138:/data/gitroot/sample.git
正克隆到 'sample'...
warning: 您似乎克隆了一个空版本库。
[root@ying01 ~]# ls sample/
[root@ying01 ~]# cd sample/
在root/sample本地工作区进行测试,
[root@ying01 sample]# pwd
/root/sample
root@ying01 sample]# ls -la
总用量 4
drwxr-xr-x   3 root root   18 9月   5 03:12 .
dr-xr-x---. 42 root root 4096 9月   5 03:12 ..
drwxr-xr-x   7 root root  119 9月   5 03:12 .git
[root@ying01 sample]# cp /etc/init.d/mysqld  .       //复制一个文件到根下,比如mysqld
[root@ying01 sample]# ls
mysqld
[root@ying01 sample]# git add .                      //加载根目录
[root@ying01 sample]# git commit -m "add new file"   //根目录提交
[master(根提交) ff7de76] add new file
 1 file changed, 378 insertions(+)
 create mode 100755 mysqld
[root@ying01 sample]# git push origin master         //推送到远程仓库master分支
Counting objects: 3, done.
Delta compression using up to 2 threads.
Compressing objects: 100% (2/2), done.
Writing objects: 100% (3/3), 3.85 KiB | 0 bytes/s, done.
Total 3 (delta 0), reused 0 (delta 0)
To git@192.168.112.138:/data/gitroot/sample.git
 * [new branch]      master -> master
在此工作区root/sample下,新建文件,并推送到远程仓库(服务器ying02)
[root@ying01 sample]# echo "wwwwwwww" > 111.txt
[root@ying01 sample]# git add 111.txt
[root@ying01 sample]# git commit -m "add 111.txt"
[master 5b72359] add 111.txt
 1 file changed, 1 insertion(+)
 create mode 100644 111.txt
[root@ying01 sample]# git push
Counting objects: 4, done.
Delta compression using up to 2 threads.
Compressing objects: 100% (2/2), done.
Writing objects: 100% (3/3), 268 bytes | 0 bytes/s, done.
Total 3 (delta 0), reused 0 (delta 0)
To git@192.168.112.138:/data/gitroot/sample.git
   ff7de76..5b72359  master -> master
在/tmp/目录创建一个工作区(与/root/sample区分),模拟其他用户
[root@ying01 ~]# cd /tmp/         //cd到tmp下,克隆远程仓库
[root@ying01 tmp]# git clone git@192.168.112.138:/data/gitroot/sample.git
正克隆到 'sample'...
remote: Counting objects: 6, done.
remote: Compressing objects: 100% (4/4), done.
remote: Total 6 (delta 0), reused 0 (delta 0)
接收对象中: 100% (6/6), 4.08 KiB | 0 bytes/s, done.
[root@ying01 tmp]# ls sample/
111.txt  mysqld
在此工作区/tmp/sample下,更改111.txt内容,到另一工作区去查看
[root@ying01 tmp]# cd sample/
[root@ying01 sample]# pwd
/tmp/sample
[root@ying01 sample]# echo "12345678" >> 111.txt     //更改111.txt内容
[root@ying01 sample]# git add 111.txt
[root@ying01 sample]# git commit -m "ch 111.txt"
[master 2585a5e] ch 111.txt
 1 file changed, 1 insertion(+)
[root@ying01 sample]# git push                       //推送到远程仓库
Counting objects: 5, done.
Delta compression using up to 2 threads.
Compressing objects: 100% (2/2), done.
Writing objects: 100% (3/3), 281 bytes | 0 bytes/s, done.
Total 3 (delta 0), reused 0 (delta 0)
To git@192.168.112.138:/data/gitroot/sample.git
   5b72359..2585a5e  master -> master
到/root/sample工作区下,查看111.txt未变化
[root@ying01 sample]# cd /root/sample/
[root@ying01 sample]# ls
111.txt  mysqld
[root@ying01 sample]# cat 111.txt
wwwwwwww
把远程仓库拉下来(更新),此时111.txt内容和/tmp/sample工作区下111.txt内容一致
[root@ying01 sample]# git pull
remote: Counting objects: 5, done.
remote: Compressing objects: 100% (2/2), done.
remote: Total 3 (delta 0), reused 0 (delta 0)
Unpacking objects: 100% (3/3), done.
来自 192.168.112.138:/data/gitroot/sample
   5b72359..2585a5e  master     -> origin/master
更新 5b72359..2585a5e
Fast-forward
 111.txt | 1 +
 1 file changed, 1 insertion(+)
[root@ying01 sample]# cat 111.txt      //此时111.txt内容有变化
wwwwwwww
12345678
十三、gitlab
13.1 安装gitlab
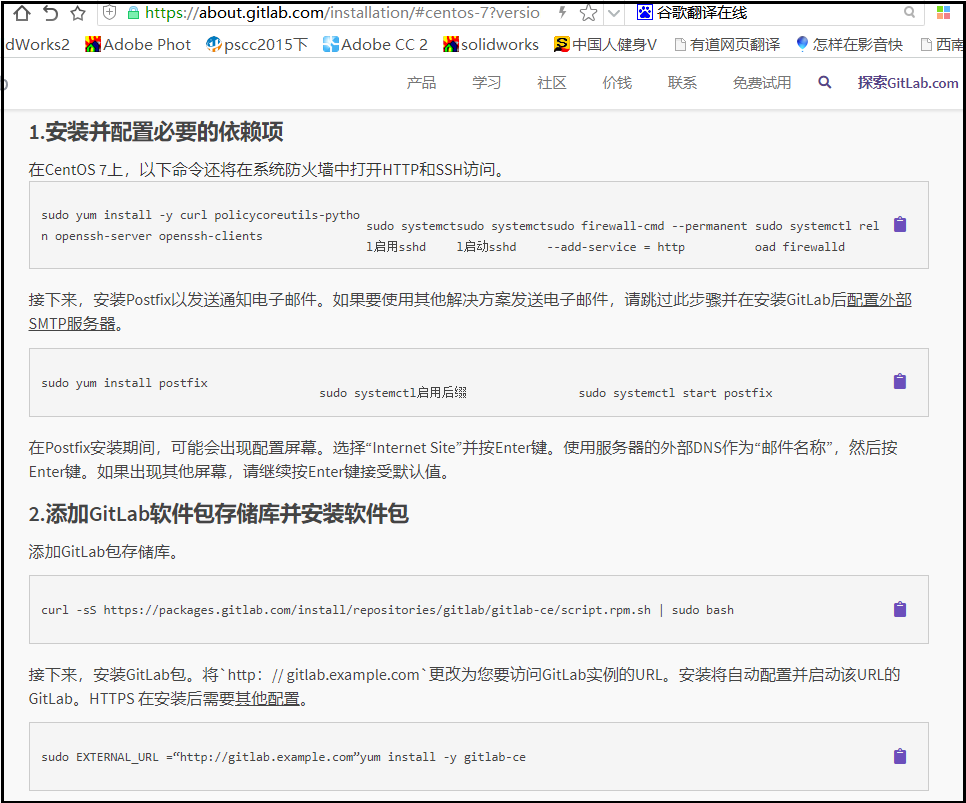
gitlab分社区版(ce)和企业版(ee),官方推荐安装gitlab至少4G内存。
安装方法:https://about.gitlab.com/installation/#centos-7?version=ce
gitlab清华大学镜像站:https://mirrors.tuna.tsinghua.edu.cn/gitlab-ce/yum/el$releasever/
由于gitlab软件比较大,所以选择国内源,下载比较快。
先创建gitlab.repo,写入以下语句
[root@ying01 ~]# vim /etc/yum.repos.d/gitlab.repo

[gitlab-ce]
name=Gitlab CE Repository
baseurl=https://mirrors.tuna.tsinghua.edu.cn/gitlab-ce/yum/el$releasever/
gpgcheck=0
enabled=1
此时yum安装gitlab-ce
[root@ying01 ~]# yum -y install gitlab-ce
gitlab重新配置
[root@ying01 ~]# gitlab-ctl reconfigure

.......
Running handlers:
Running handlers complete
Chef Client finished, 429/614 resources updated in 04 minutes 23 seconds
gitlab Reconfigured!           //配置成功
常看有关gitlab进程,居然如此之多,可见其复杂程度
[root@ying01 ~]# ps aux |grep gitlab
root      2624  0.0  0.0   4380   296 ?        Ss   11:11   0:00 runsvdir -P /opt/gitlab/service log: ...........................................................................................................................................................................................................................................................................................................................................................................................................
gitlab-+  2646  0.4  0.3  39480  8816 ?        Ssl  11:11   0:06 /opt/gitlab/embedded/bin/redis-server 127.0.0.1:0
gitlab-+  2707  0.0  1.4 809888 42752 ?        Ss   11:12   0:00 /opt/gitlab/embedded/bin/postgres -D /var/opt/gitlab/postgresql/data
gitlab-+  2709  0.0  0.5 810088 15544 ?        Ss   11:12   0:00 postgres: checkpointer process
gitlab-+  2710  0.0  0.2 809888  7604 ?        Ss   11:12   0:00 postgres: writer process
gitlab-+  2711  0.0  0.6 809888 18396 ?        Ss   11:12   0:00 postgres: wal writer process
gitlab-+  2712  0.0  0.1 810456  2996 ?        Ss   11:12   0:00 postgres: autovacuum launcher process
gitlab-+  2713  0.0  0.0  32932  2444 ?        Ss   11:12   0:00 postgres: stats collector process
git       2911  0.0  0.0  11688  1024 ?        Ss   11:13   0:00 /bin/bash /opt/gitlab/embedded/bin/gitlab-unicorn-wrapper
git       2929  3.0 14.2 706252 414480 ?       Sl   11:13   0:41 unicorn master -D -E production -c /var/opt/gitlab/gitlab-rails/etc/unicorn.rb /opt/gitlab/embedded/service/gitlab-rails/config.ru
git       2948  4.1 16.2 923028 471368 ?       Ssl  11:13   0:56 sidekiq 5.1.3 gitlab-rails [0 of 25 busy]
root      2964  0.0  0.0   4228   152 ?        Ss   11:13   0:00 runsv gitlab-workhorse
root      2999  0.0  0.0  11680   940 ?        Ss   11:13   0:00 /bin/sh /opt/gitlab/embedded/bin/gitlab-logrotate-wrapper
gitlab-+  3083  0.1  0.3  19588 10568 ?        Ssl  11:13   0:01 /opt/gitlab/embedded/bin/node_exporter --web.listen-address=localhost:9100 --collector.textfile.directory=/var/opt/gitlab/node-exporter/textfile_collector
root      3173  0.0  0.0   4228   156 ?        Ss   11:13   0:00 runsv gitlab-monitor
gitlab-+  3194  0.0  0.3 227944  9632 ?        Ssl  11:13   0:00 /opt/gitlab/embedded/bin/redis_exporter -web.listen-address=localhost:9121 -redis.addr=unix:///var/opt/gitlab/redis/redis.socket
git       3271  0.0 14.1 704208 411220 ?       Sl   11:13   0:00 unicorn worker[0] -D -E production -c /var/opt/gitlab/gitlab-rails/etc/unicorn.rb /opt/gitlab/embedded/service/gitlab-rails/config.ru
git       3274  0.0 14.1 704208 410564 ?       Sl   11:13   0:01 unicorn worker[1] -D -E production -c /var/opt/gitlab/gitlab-rails/etc/unicorn.rb /opt/gitlab/embedded/service/gitlab-rails/config.ru
git       3277  0.0 14.1 704208 412300 ?       Sl   11:13   0:01 unicorn worker[2] -D -E production -c /var/opt/gitlab/gitlab-rails/etc/unicorn.rb /opt/gitlab/embedded/service/gitlab-rails/config.ru
gitlab-+  3382  0.0  0.3 915316  9104 ?        Ss   11:14   0:00 postgres: gitlab gitlabhq_production [local] idle
gitlab-+  3521  0.0  0.3 915440  9628 ?        Ss   11:15   0:00 postgres: gitlab gitlabhq_production [local] idle
gitlab-+  3553  0.0  0.3 915316  9500 ?        Ss   11:15   0:00 postgres: gitlab gitlabhq_production [local] idle
gitlab-+  3579  0.0  0.3 915436 11000 ?        Ss   11:15   0:00 postgres: gitlab gitlabhq_production [local] idle
gitlab-+  3584  0.0  0.3 915328 10244 ?        Ss   11:15   0:00 postgres: gitlab gitlabhq_production [local] idle
root      3652  0.0  0.0   4372   348 ?        S    11:15   0:00 svlogd -tt /var/log/gitlab/unicorn
root      3653  0.0  0.0   4372   568 ?        S    11:15   0:00 svlogd -tt /var/log/gitlab/sidekiq
root      3657  0.0  0.0   4372   344 ?        S    11:15   0:00 svlogd -tt /var/log/gitlab/postgresql
git       3663  0.0  0.5 224080 14828 ?        Ssl  11:15   0:00 /opt/gitlab/embedded/bin/gitla-workhorse -listenNetwork unix -listenUmask 0 -listenAddr /var/opt/gitlab/gitlab-workhorse/socket -authBackend http://localhost:8080 -authSocket /var/opt/gitlab/gitlab-rails/sockets/gitlab.socket -documentRoot /opt/gitlab/embedded/service/gitlab-rails/public -pprofListenAddr  -prometheusListenAddr localhost:9229 -secretPath /opt/gitlab/embedded/service/gitlab-rails/.gitlab_workhorse_secret -config config.toml
root      3669  0.0  0.0   4372   348 ?        S    11:15   0:00 svlogd -tt /var/log/gitlab/gitlab-workhorse
git       3678  0.1  0.8 433212 23644 ?        Ssl  11:15   0:01 /opt/gitlab/embedded/bin/gitaly /var/opt/gitlab/gitaly/config.toml
root      3688  0.0  0.0   4372   568 ?        S    11:15   0:00 svlogd -tt /var/log/gitlab/redis
root      3690  0.0  0.0   4372   344 ?        S    11:15   0:00 svlogd -tt /var/log/gitlab/node-exporter
git       3697  0.5  0.9 325992 27724 ?        Ssl  11:15   0:07 /opt/gitlab/embedded/bin/ruby /opt/gitlab/embedded/bin/gitlab-mon web -c /var/opt/gitlab/gitlab-monitor/gitlab-monitor.yml
root      3700  0.0  0.0   4372   568 ?        S    11:15   0:00 svlogd -tt /var/log/gitlab/gitlab-monitor
root      3705  0.0  0.0   4372   564 ?        S    11:15   0:00 svlogd -tt /var/log/gitlab/nginx
root      3706  0.0  0.0   4372   348 ?        S    11:15   0:00 svlogd -tt /var/log/gitlab/logrotate
gitlab-+  3710  0.6  2.1 603440 61856 ?        Ssl  11:15   0:07 /opt/gitlab/embedded/bin/prometheus -web.listen-address=localhost:9090 -storage.local.path=/var/opt/gitlab/prometheus/data -storage.local.chunk-encoding-version=2 -storage.local.target-heap-size=85764014 -config.file=/var/opt/gitlab/prometheus/prometheus.yml
root      3719  0.0  0.0   4372   564 ?        S    11:15   0:00 svlogd -tt /var/log/gitlab/gitaly
gitlab-+  3726  0.0  0.3 321140 11148 ?        Ssl  11:15   0:00 /opt/gitlab/embedded/bin/alertmanager --web.listen-address=localhost:9093 --storage.path=/var/opt/gitlab/alertmanager/data --config.file=/var/opt/gitlab/alertmanager/alertmanager.yml
root      3734  0.0  0.0   4372   344 ?        S    11:15   0:00 svlogd -tt /var/log/gitlab/redis-exporter
gitlab-+  3749  0.0  0.3 142072 11224 ?        Ssl  11:15   0:00 /opt/gitlab/embedded/bin/postgres_exporter --web.listen-address=localhost:9187 --extend.query-path=/var/opt/gitlab/postgres-exporter/queries.yaml
gitlab-+  3754  0.0  0.3 915740 10540 ?        Ss   11:15   0:01 postgres: gitlab-psql postgres [local] idle
root      3755  0.0  0.0   4372   568 ?        S    11:15   0:00 svlogd -tt /var/log/gitlab/prometheus
root      3756  0.0  0.0   4372   568 ?        S    11:15   0:00 svlogd -tt /var/log/gitlab/postgres-exporter
root      3759  0.0  0.0   4372   568 ?        S    11:15   0:00 svlogd -tt /var/log/gitlab/alertmanager
git       3764  0.4  2.0 1316560 60876 ?       Sl   11:15   0:04 ruby /opt/gitlab/embedded/service/gitaly-ruby/bin/gitaly-ruby 3678 /tmp/gitaly-ruby645930785/socket.0
git       3766  0.3  2.0 1316456 60848 ?       Sl   11:15   0:04 ruby /opt/gitlab/embedded/service/gitaly-ruby/bin/gitaly-ruby 3678 /tmp/gitaly-ruby645930785/socket.1
gitlab-+  3786  0.0  0.3 916044 11240 ?        Ss   11:16   0:01 postgres: gitlab gitlabhq_production [local] idle
gitlab-+  3787  0.0  0.3 915036  8836 ?        Ss   11:16   0:00 postgres: gitlab gitlabhq_production [local] idle
gitlab-+  3788  0.0  0.3 915324  9760 ?        Ss   11:16   0:00 postgres: gitlab gitlabhq_production [local] idle
root      6717  0.0  0.1  38452  3112 ?        Ss   11:35   0:00 /opt/gitlab/embedded/sbin/nginx -p /var/opt/gitlab/nginx
root      6729  0.0  0.0 112724   984 pts/0    S+   11:35   0:00 grep --color=auto gitlab
gitlab也自带nginx服务,本机之前安装了nginx,需要把之前的nginx读物停掉;
[root@ying01 ~]# chkconfig nginx off
[root@ying01 ~]# netstat -ntpl
Active Internet connections (only servers)
Proto Recv-Q Send-Q Local Address           Foreign Address         State       PID/Program name
tcp        0      0 127.0.0.1:9100          0.0.0.0:*               LISTEN      3083/node_exporter
tcp        0      0 127.0.0.1:9229          0.0.0.0:*               LISTEN      3663/gitlab-workhor
tcp        0      0 0.0.0.0:111             0.0.0.0:*               LISTEN      587/rpcbind
tcp        0      0 127.0.0.1:9168          0.0.0.0:*               LISTEN      3697/ruby
tcp        0      0 127.0.0.1:8080          0.0.0.0:*               LISTEN      2929/unicorn master
tcp        0      0 0.0.0.0:20048           0.0.0.0:*               LISTEN      880/rpc.mountd
tcp        0      0 127.0.0.1:8082          0.0.0.0:*               LISTEN      2948/sidekiq 5.1.3
tcp        0      0 127.0.0.1:9236          0.0.0.0:*               LISTEN      3678/gitaly
tcp        0      0 0.0.0.0:22              0.0.0.0:*               LISTEN      656/sshd
tcp        0      0 127.0.0.1:25            0.0.0.0:*               LISTEN      885/master
tcp        0      0 0.0.0.0:8060            0.0.0.0:*               LISTEN      7312/nginx
tcp        0      0 127.0.0.1:9121          0.0.0.0:*               LISTEN      3194/redis_exporter
tcp        0      0 0.0.0.0:2049            0.0.0.0:*               LISTEN      -
tcp        0      0 127.0.0.1:9090          0.0.0.0:*               LISTEN      3710/prometheus
tcp        0      0 0.0.0.0:33058           0.0.0.0:*               LISTEN      -
tcp        0      0 127.0.0.1:9187          0.0.0.0:*               LISTEN      3749/postgres_expor
tcp        0      0 0.0.0.0:10051           0.0.0.0:*               LISTEN      761/zabbix_server
tcp        0      0 0.0.0.0:43716           0.0.0.0:*               LISTEN      824/rpc.statd
tcp        0      0 127.0.0.1:9093          0.0.0.0:*               LISTEN      3726/alertmanager
tcp        0      0 192.168.112.136:27017   0.0.0.0:*               LISTEN      1281/mongod
tcp        0      0 127.0.0.1:27017         0.0.0.0:*               LISTEN      1281/mongod
tcp6       0      0 :::111                  :::*                    LISTEN      587/rpcbind
tcp6       0      0 ::1:9168                :::*                    LISTEN      3697/ruby
tcp6       0      0 :::80                   :::*                    LISTEN      657/httpd
tcp6       0      0 :::20048                :::*                    LISTEN      880/rpc.mountd
tcp6       0      0 :::43955                :::*                    LISTEN      -
tcp6       0      0 :::22                   :::*                    LISTEN      656/sshd
tcp6       0      0 ::1:25                  :::*                    LISTEN      885/master
tcp6       0      0 :::2049                 :::*                    LISTEN      -
tcp6       0      0 :::10051                :::*                    LISTEN      761/zabbix_server
tcp6       0      0 :::9094                 :::*                    LISTEN      3726/alertmanager
tcp6       0      0 :::40073                :::*                    LISTEN      824/rpc.statd
tcp6       0      0 :::3306                 :::*                    LISTEN      1170/mysqld
停止gitlab服务:gitlab-ctl stop 涉及其他服务比较多,涉及以下几项
[root@ying01 ~]# gitlab-ctl stop
/opt/gitlab/embedded/lib/ruby/gems/2.4.0/gems/omnibus-ctl-0.5.0/lib/omnibus-ctl.rb:684: warning: Insecure world writable dir /tmp/ in PATH, mode 041777
ok: down: alertmanager: 0s, normally up
ok: down: gitaly: 1s, normally up
ok: down: gitlab-monitor: 0s, normally up
ok: down: gitlab-workhorse: 1s, normally up
ok: down: logrotate: 0s, normally up
ok: down: nginx: 0s, normally up
ok: down: node-exporter: 0s, normally up
ok: down: postgres-exporter: 0s, normally up
ok: down: postgresql: 1s, normally up
ok: down: prometheus: 0s, normally up
ok: down: redis: 1s, normally up
ok: down: redis-exporter: 0s, normally up
ok: down: sidekiq: 0s, normally up
ok: down: unicorn: 0s, normally up
同时redis-server不能开启,不然会干扰
[root@ying01 ~]# killall redis-server
redis-server: no process found
开启gitlab服务:gitlab-ctl stop
[root@ying01 ~]# gitlab-ctl start
/opt/gitlab/embedded/lib/ruby/gems/2.4.0/gems/omnibus-ctl-0.5.0/lib/omnibus-ctl.rb:684: warning: Insecure world writable dir /tmp/ in PATH, mode 041777
ok: run: alertmanager: (pid 7775) 0s
ok: run: gitaly: (pid 7787) 1s
ok: run: gitlab-monitor: (pid 7799) 0s
ok: run: gitlab-workhorse: (pid 7813) 1s
ok: run: logrotate: (pid 7821) 0s
ok: run: nginx: (pid 7829) 1s
ok: run: node-exporter: (pid 7831) 0s
ok: run: postgres-exporter: (pid 7836) 0s
ok: run: postgresql: (pid 7842) 1s
ok: run: prometheus: (pid 7924) 0s
ok: run: redis: (pid 7936) 1s
ok: run: redis-exporter: (pid 7944) 0s
ok: run: sidekiq: (pid 7950) 1s
ok: run: unicorn: (pid 7957) 0s
查看相关nginx进程
[root@ying01 ~]# ps aux |grep nginx
root      2979  0.0  0.0   4228   164 ?        Ss   11:13   0:00 runsv nginx
root      3705  0.0  0.0   4372   488 ?        S    11:15   0:00 svlogd -tt /var/log/gitlab/nginx
root      8314  0.0  0.0  38456  2064 ?        Ss   11:46   0:00 nginx: master process /opt/gitlab/embedded/sbin/nginx -p /var/opt/gitlab/nginx
gitlab-+  8326  0.0  0.2  42708  6348 ?        S    11:46   0:00 nginx: worker process
gitlab-+  8327  0.0  0.2  42708  6336 ?        S    11:46   0:00 nginx: worker process
gitlab-+  8328  0.0  0.0  38456  1456 ?        S    11:46   0:00 nginx: cache manager process
root     20040  0.0  0.0 112724   984 pts/0    S+   13:22   0:00 grep --color=auto nginx
此时本地gitlab完成。
13.2 gitlab配置
设置域名访问
[root@ying01 ~]# ls /var/opt/gitlab/nginx/conf/
gitlab-http.conf  nginx.conf  nginx-status.conf
[root@ying01 ~]# vim /var/opt/gitlab/nginx/conf/gitlab-http.conf


 listen *:80;                         //设置端口

  server_name gitlab.example.com;     //设置域名
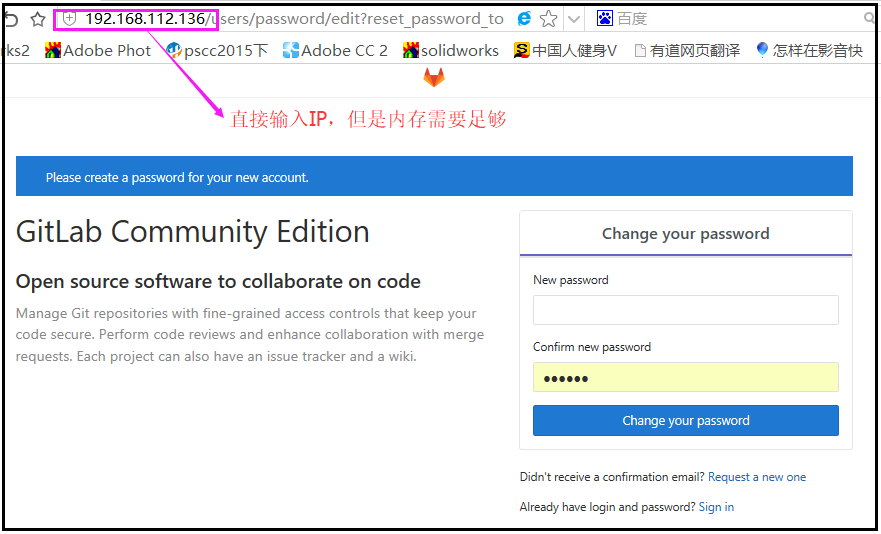
这里直接使用ip 192.168.112.136访问,自动加载到更改密码的页面
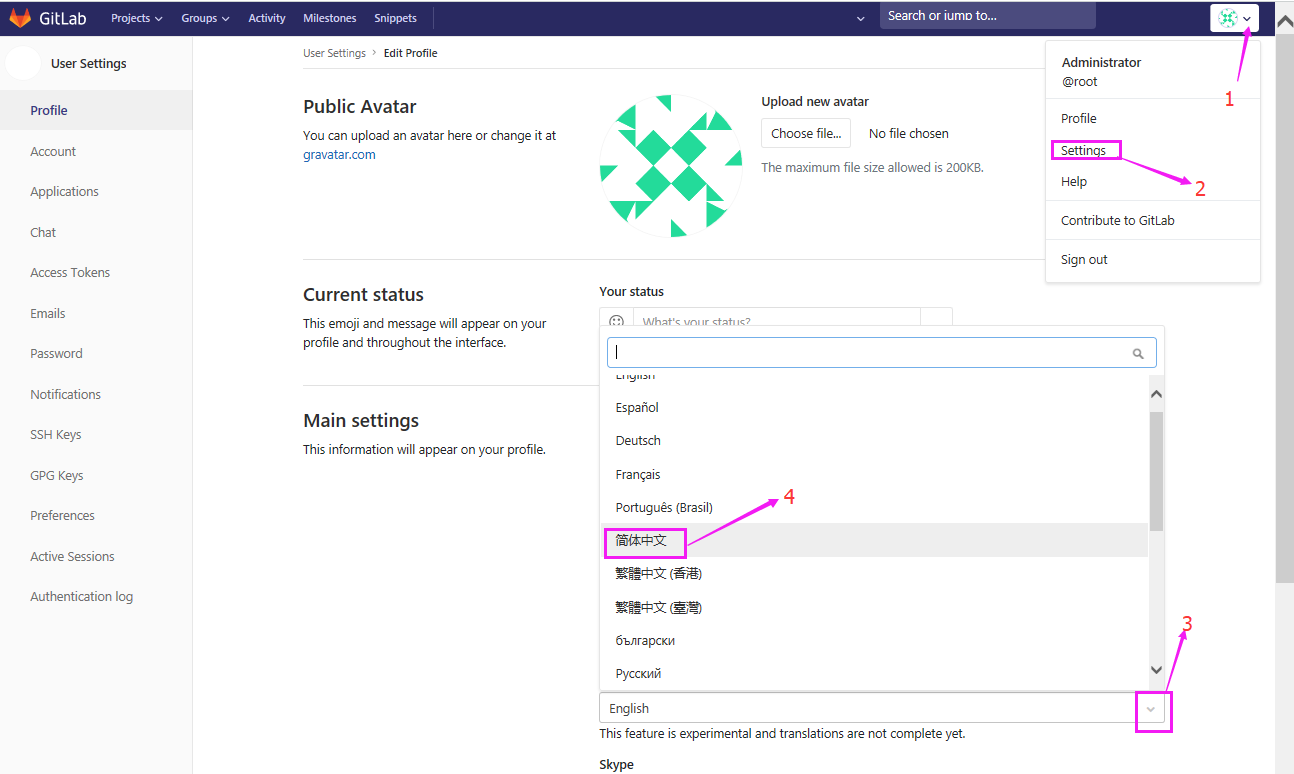
登录后,在右上角,选择设置,把语言选为简体中文
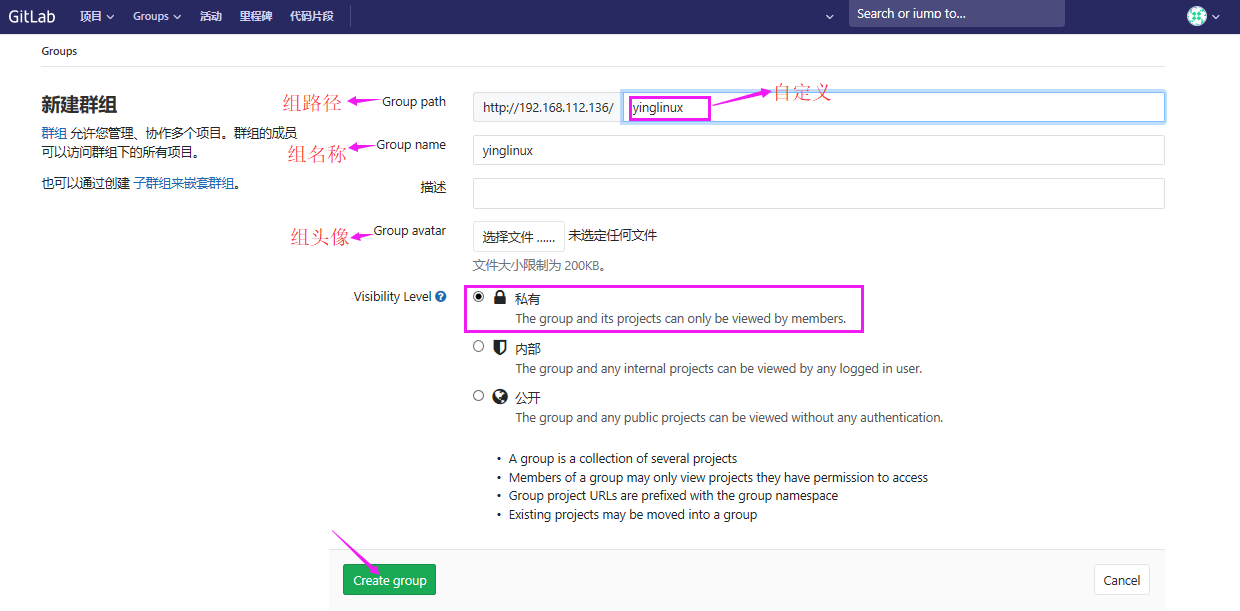
按图示,先建立一个群组yinglinux
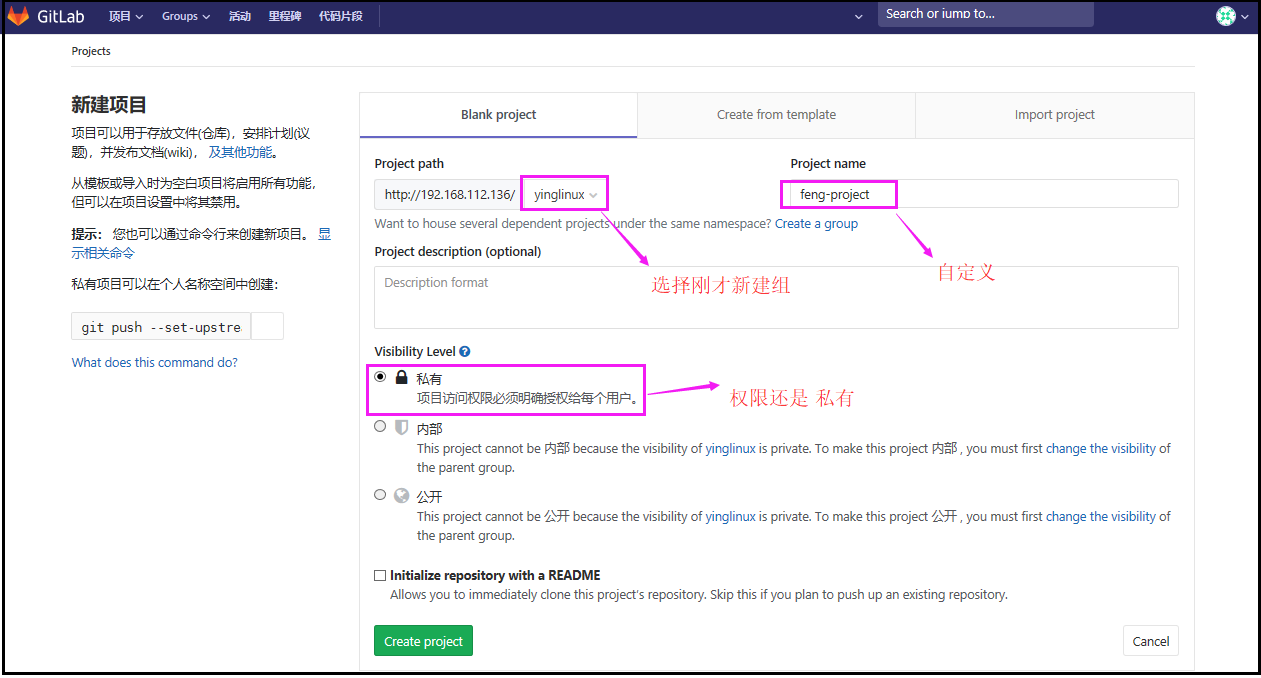
在新建一个项目,群组选择yinglinux
此时会弹出黄色的信息,需要设置SSH秘钥
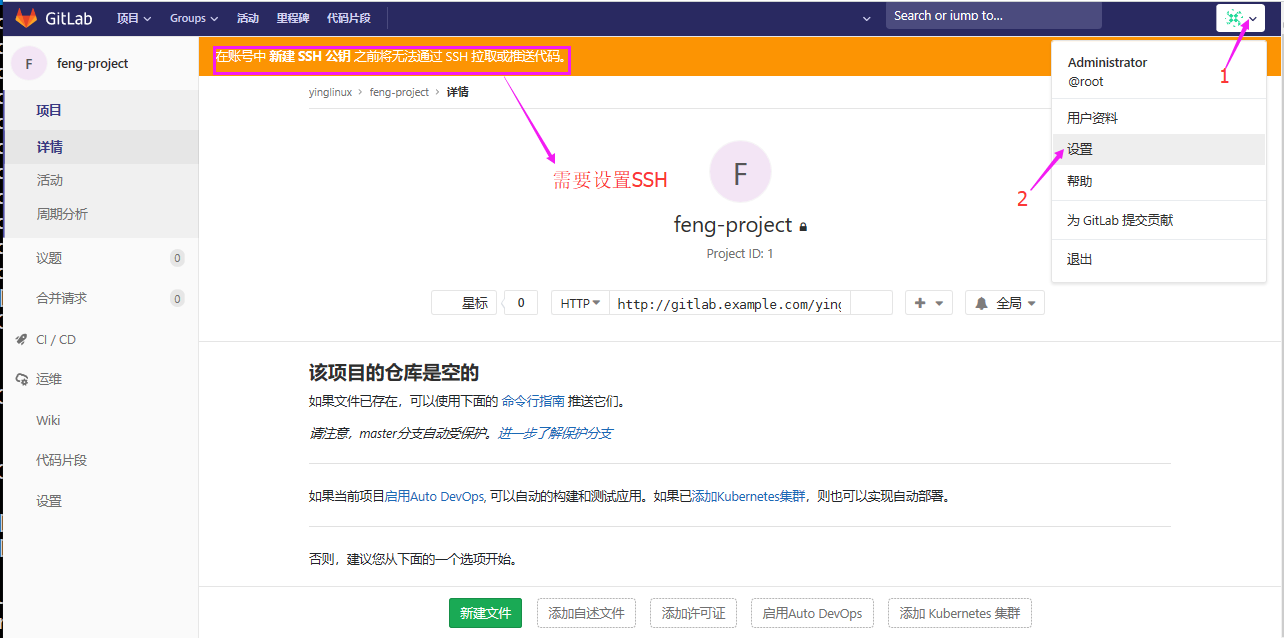
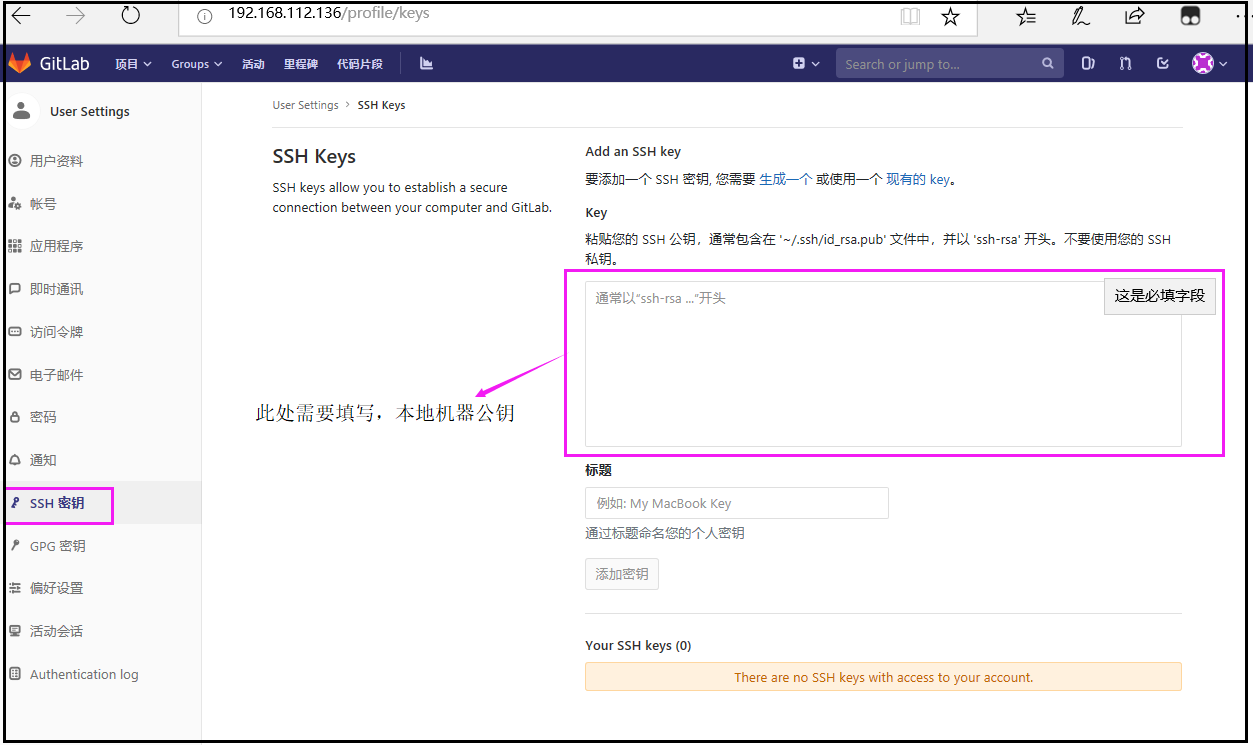
把本地的机器的公钥,复制到方框内,就可以两者两联;
新建用户名
注意:因为360浏览器显示不出来,扳手符号,所以改用 Microsoft Edge
点击菜单栏中 小扳手,点击 new user

定义你所希望的用户名;此时密码不会让你设置
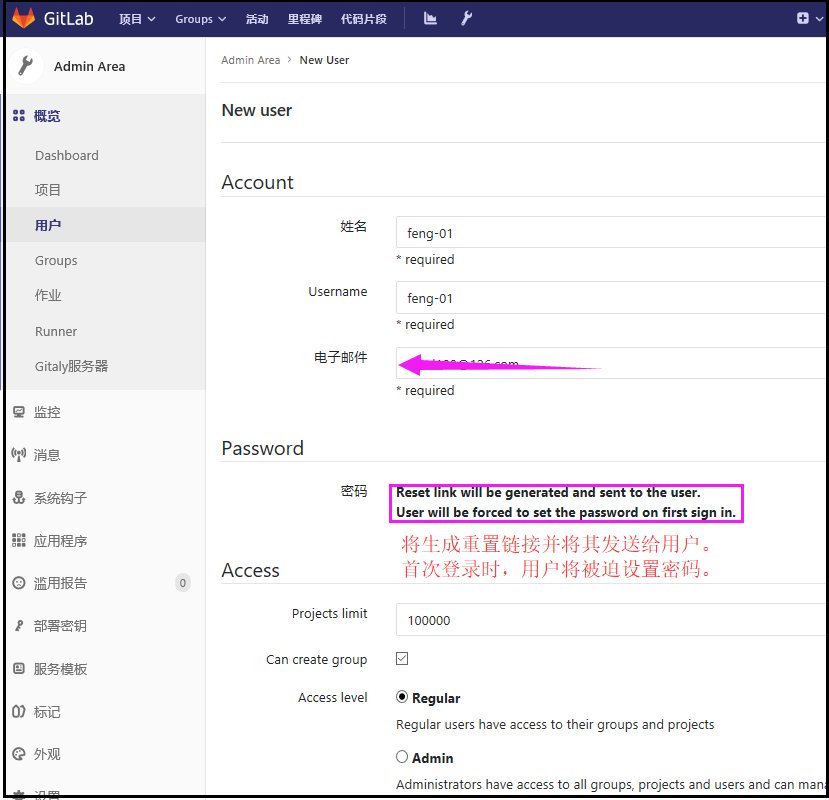
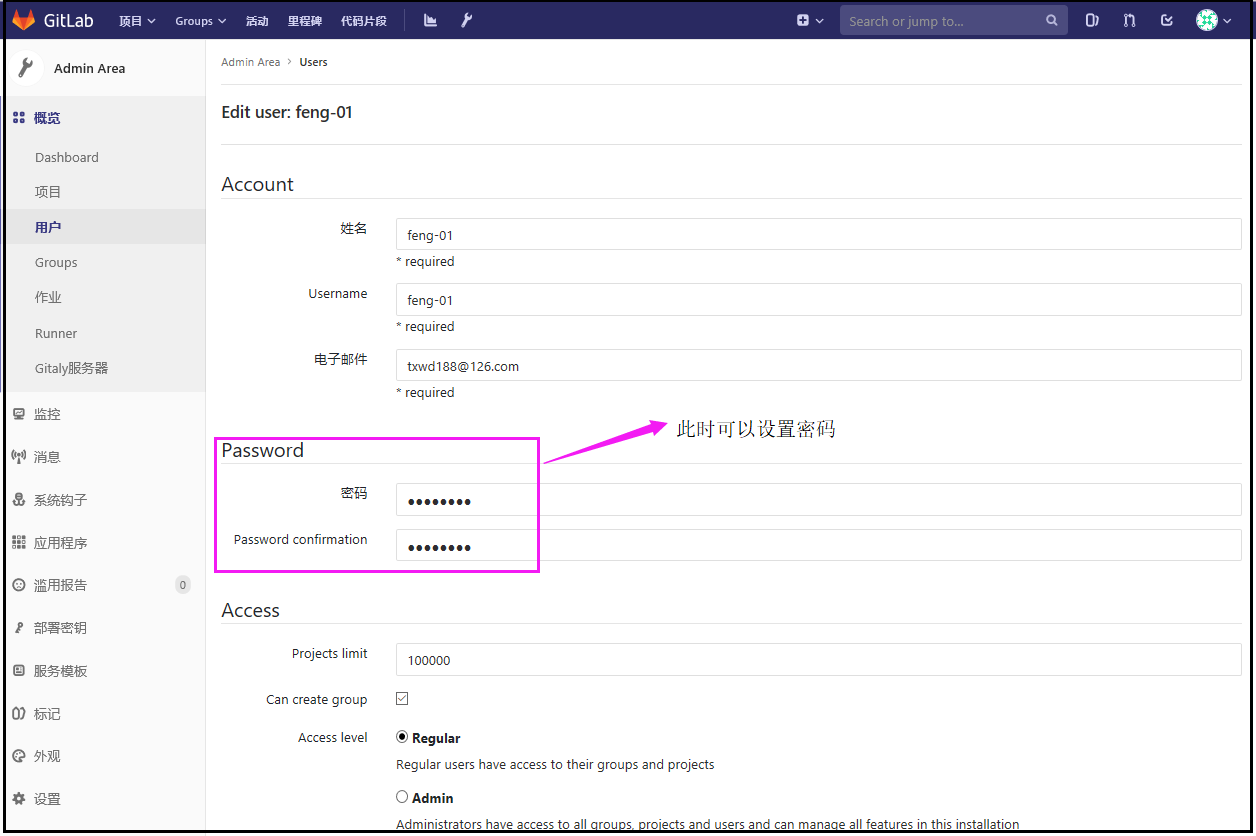
生成用户后,页面顶上会显示 user was successtully created ;点击右上角edit,进行编辑
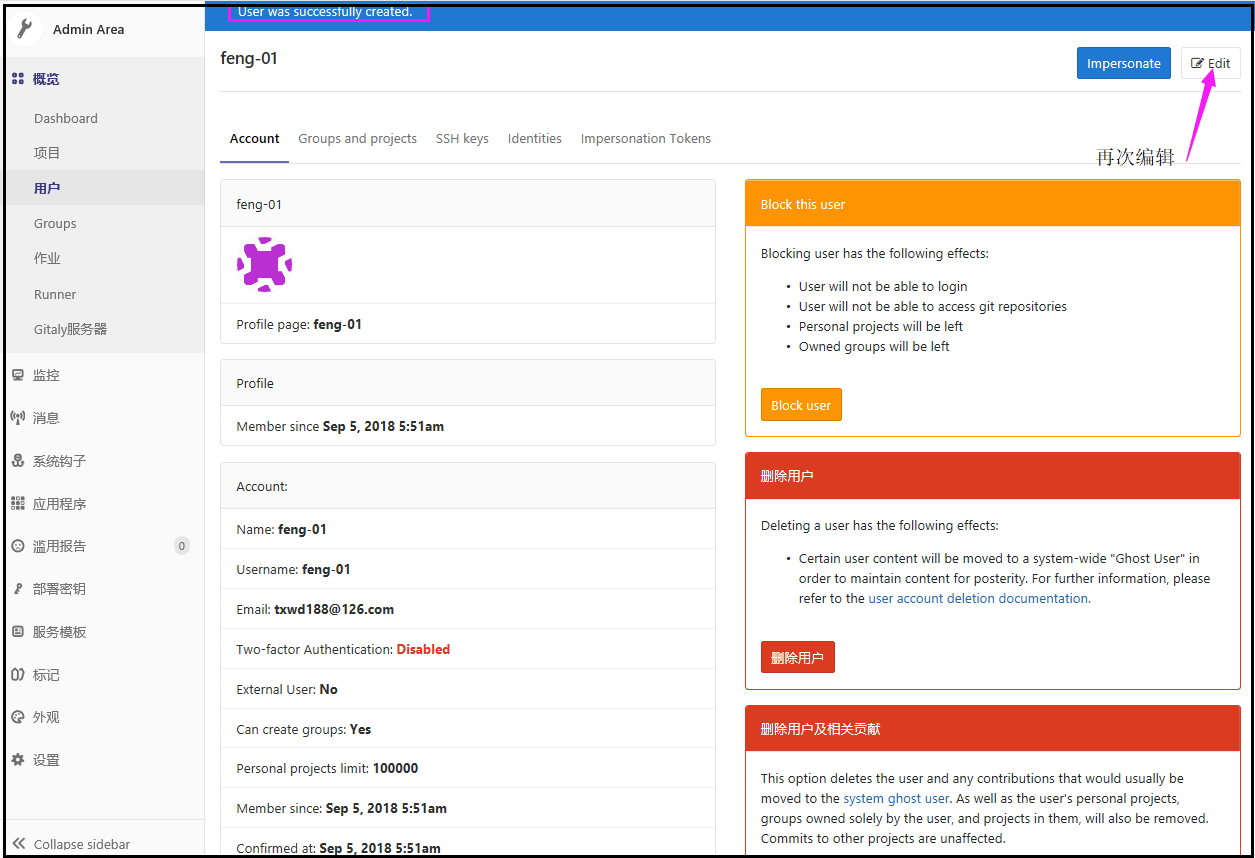
此时密码选项出现空白,随便填写一个密码。
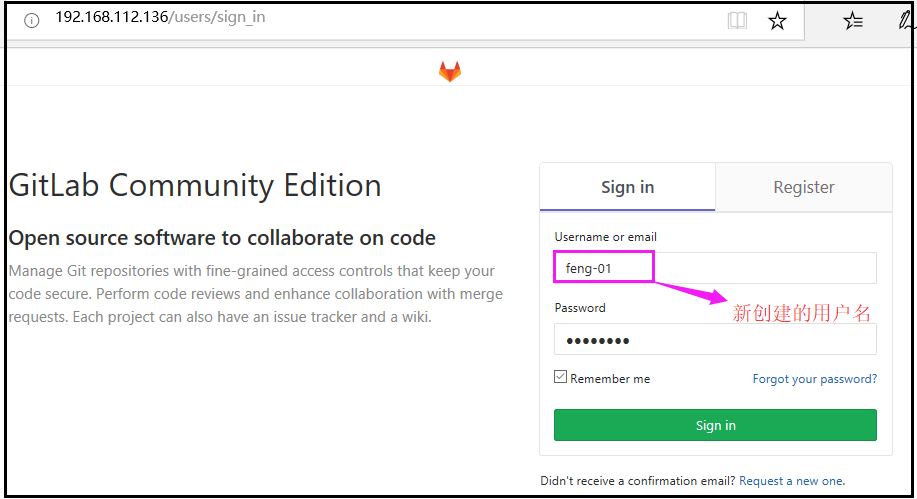
退出当前的用户,登录新创建的用户:feng-01
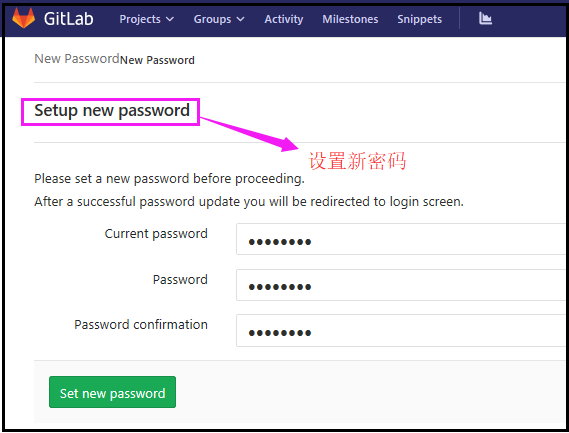
此时会加载到,更换密码的页面。
登录后,在feng-01用户下,可以创建新项目,新群组 不用创建了,因为root用户已经创建了。
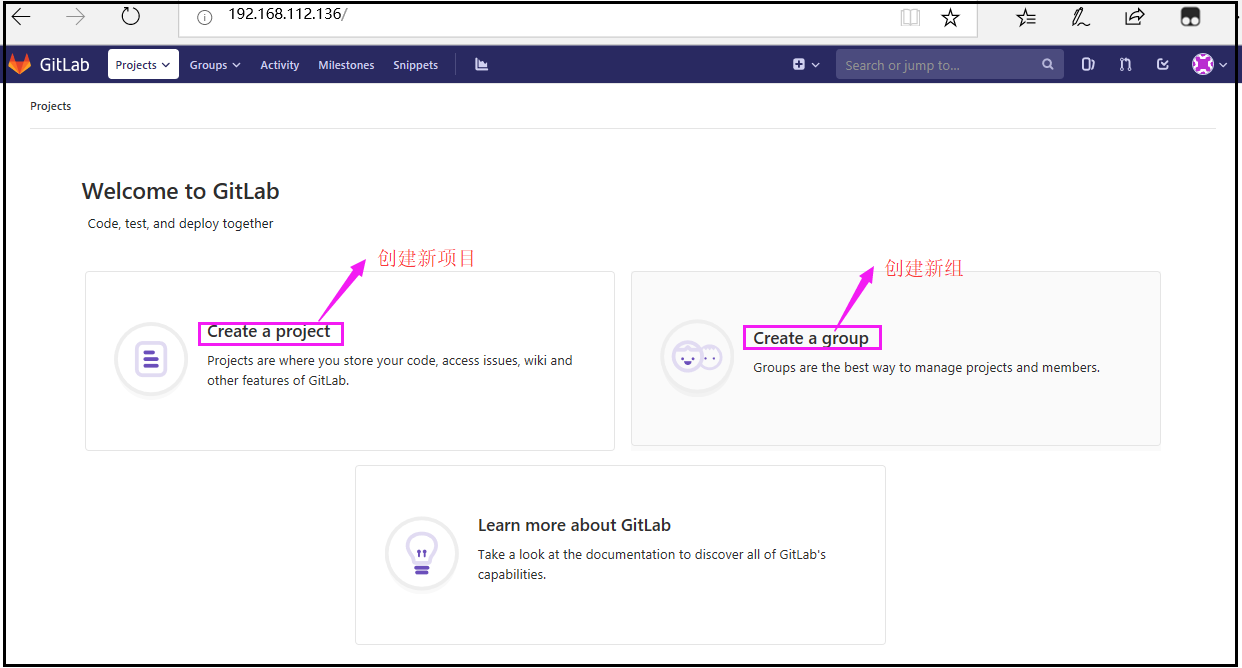
创建的新项目,会加载feng-01用户目录下
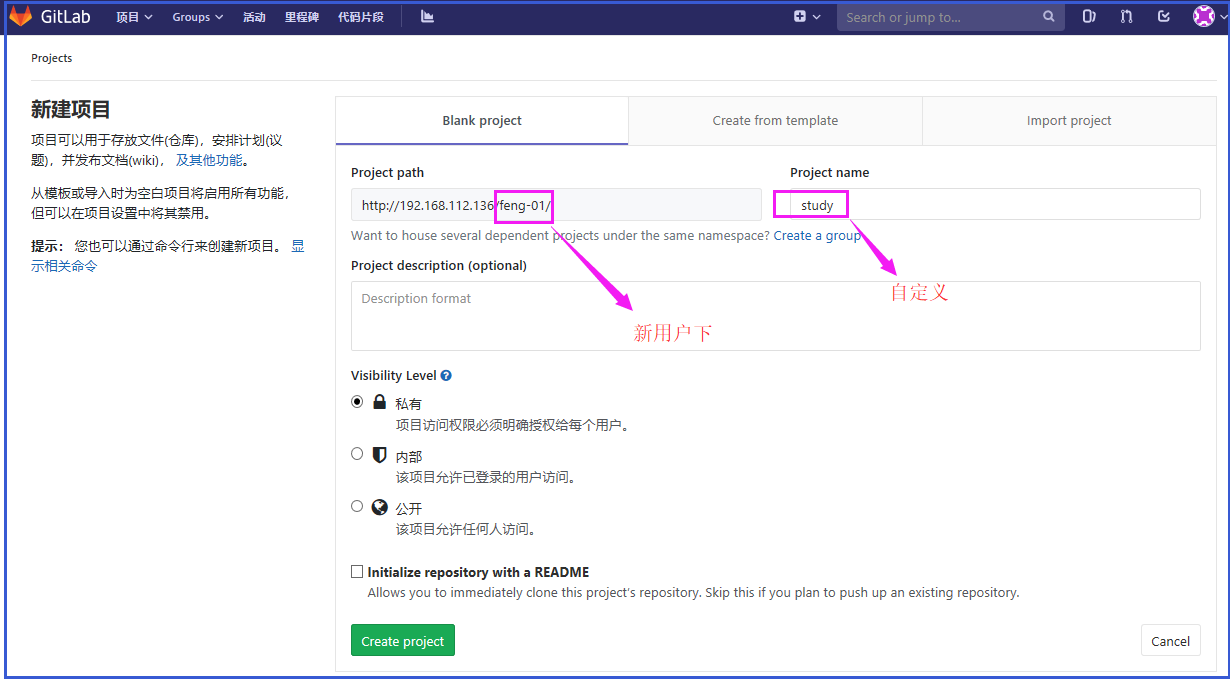
新项目study建立后,后出现SSH 和 http 两种方式 与本地相连
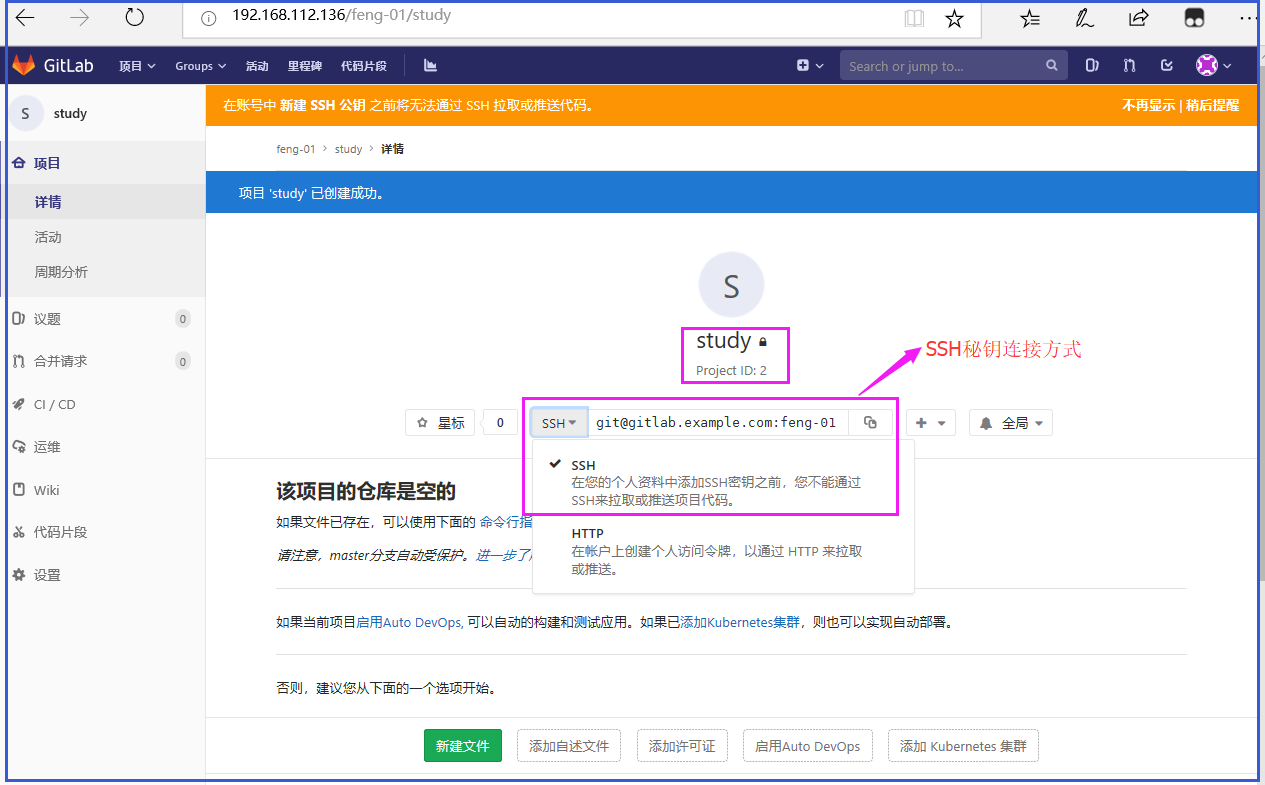
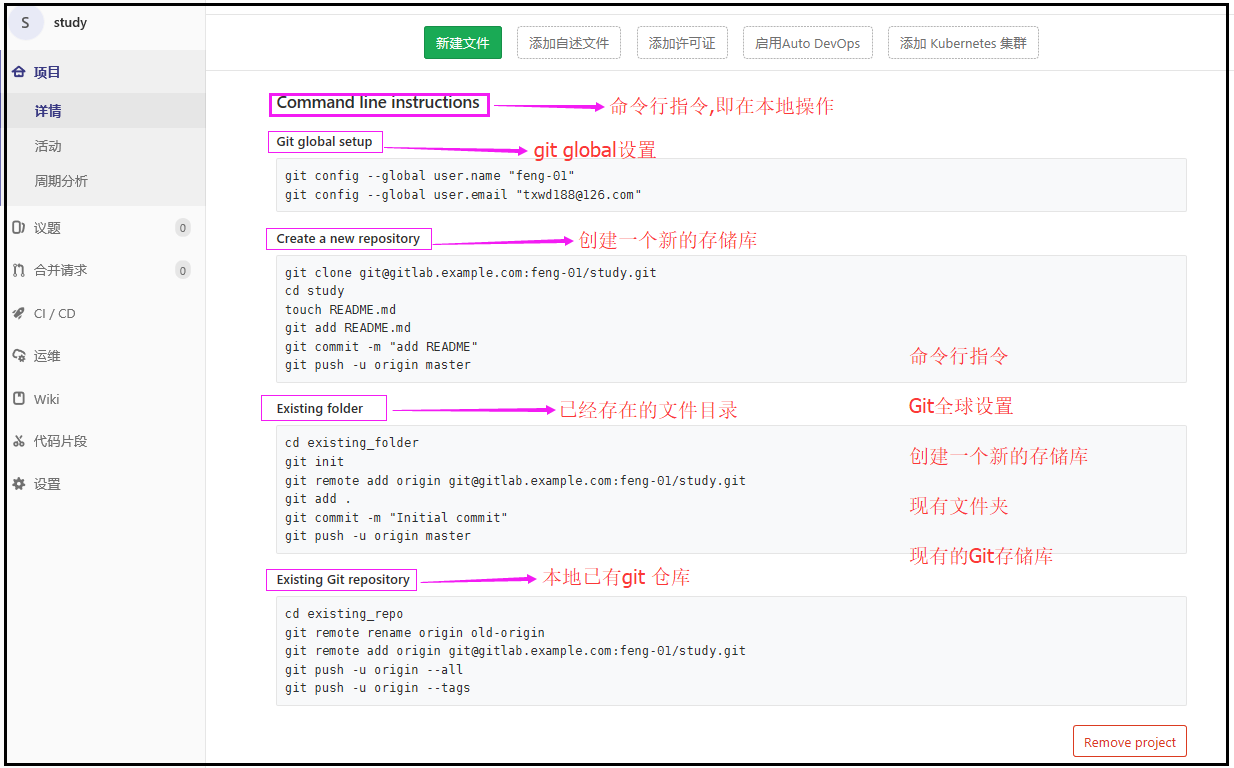
下面就是官方提供的在本地使用命令行的解决方案
13.3 gitlab备份与还原
备份
[root@ying01 ~]# gitlab-rake gitlab:backup:create
Dumping database ...
Dumping PostgreSQL database gitlabhq_production ... [DONE]
done
Dumping repositories ...
 * yinglinux/feng-project ... [SKIPPED]
[SKIPPED] Wiki
 * feng-01/study ... [SKIPPED]
[SKIPPED] Wiki
done
Dumping uploads ...
done
Dumping builds ...
done
Dumping artifacts ...
done
Dumping pages ...
done
Dumping lfs objects ...
done
Dumping container registry images ...
[DISABLED]
Creating backup archive: 1536133882_2018_09_05_11.2.3_gitlab_backup.tar ... done
Uploading backup archive to remote storage  ... skipped
Deleting tmp directories ... done
done
done
done
done
done
done
done
Deleting old backups ... skipping

[root@ying01 ~]# ls /var/opt/gitlab/backups/        //备份的目录
1536133882_2018_09_05_11.2.3_gitlab_backup.tar
[root@ying01 ~]# du -sh /var/opt/gitlab/backups/    //文件很小,只有80K
80K	/var/opt/gitlab/backups/
恢复
在恢复之前,需要停止两个服务,目的防止继续写入。
[root@ying01 ~]# gitlab-ctl stop unicorn ; gitlab-ctl stop sidekiq
/opt/gitlab/embedded/lib/ruby/gems/2.4.0/gems/omnibus-ctl-0.5.0/lib/omnibus-ctl.rb:684: warning: Insecure world writable dir /tmp/ in PATH, mode 041777
ok: down: unicorn: 0s, normally up
/opt/gitlab/embedded/lib/ruby/gems/2.4.0/gems/omnibus-ctl-0.5.0/lib/omnibus-ctl.rb:684: warning: Insecure world writable dir /tmp/ in PATH, mode 041777
ok: down: sidekiq: 0s, normally up
[root@ying01 ~]# gitlab-rake gitlab:backup:restore BACKUP=1536133882_2018_09_05_11.2.3 //恢复备份的文件

[root@ying01 ~]# gitlab-ctl start  //开启服务


 1271
1271

 被折叠的 条评论
为什么被折叠?
被折叠的 条评论
为什么被折叠?
 到【灌水乐园】发言


