


测试环境:Redhat 5.4 关闭iptables 和Selinux
所需服务:Dhcp Vsftp Tftp Xinted
2.开始安装:
(1)安装所需服务
- DHCP:
- [root@station5 ~]# yum -y install dhcp.i*
- [root@station5 ~]# chkconfig dhcpd on
- TFTP:
- [root@station5 ~]# yum -y install tftp.i*
- VSFTPD:
- [root@station5 ~]# yum -y install vsftpd
- kickstart:
- [root@station5 ~]# yum -y install system-config-kickstart
(2)安装配置DHCP服务
修改以下内容:
(3)将TFTP服务状态设置为可运行
- [root@station5 ~]# vim /etc/xinetd.d/tftp
- 14 disable = no #修改第14行把原来的yes修改成no
- [root@station5 ~]# /etc/init.d/xinetd restart
(4)复制Linux启动、内核文件及启动镜像文件:
- [root@station5 ~]# mount /dev/hdc /mnt #挂载光盘到/mnt目录下
- [root@station5 ~]# cp /mnt/isolinux/initrd.img /tftpboot/
- [root@station5 ~]# cp /mnt/isolinux/vmlinuz /tftpboot/
- [root@station5 ~]# cp /usr/lib/syslinux/pxelinux.0 /tftpboot/
(5)将RHEL光盘所有内容复制到/var/ftp/pub目录下
- [root@station5 ~]# cp -r * /var/ftp/pub/
(6)kickstart配置文件的生成:
通过system-config-kickstart 生成无人值守文件,再将生成的ks.cfg无人值守文件保存到/var/ftp下。
基本配置: 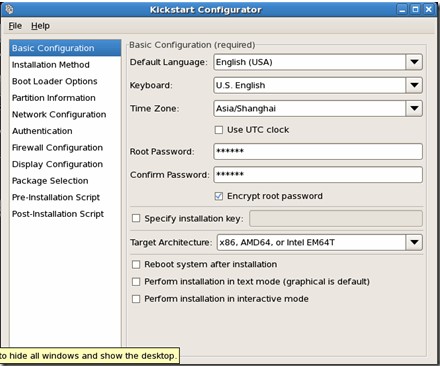
安装方法(这是是通过FTP安装的) 
分区信息:这里我选的是:清除主引导记录和清除现有分区
接下来是新建分区信息,可根据实际情况配置: 
网络配置:选择 Add Network Device ---OK 使用DHCP网络类型:

其他的按照自己的装机需求设置
接下来单击菜单:File--Save File 将ks.cfg保存到/var/ftp目录下面

配置新生成的ks.cfg文件,配置安装的软件包
可以从当前系统安装时自动生成的安装信息/root/anaconda-ks.cfg将软件包信息 复制到ks.cfg文件里
[root@station5 ~]# cat anaconda-ks.cfg
%packages
@admin-tools
@base
@chinese-support
@core
@dialup
@editors
@gnome-desktop
。。。。以下省略。。。
%pachages 后的部分记录系统安装时的软件包的安装情况,复制下来全部复制到ks.cfg文件后面
- [root@station5 ftp]# vim ks.cfg
- #platform=x86, AMD64, or Intel EM64T
- # System authorization information
- auth --useshadow --enablemd5
- # System bootloader configuration
- bootloader --location=mbr
- # Clear the Master Boot Record
- zerombr
- # Partition clearing information
- clearpart --all --initlabel
- # Use graphical install
- graphical
- # Firewall configuration
- firewall --enabled
- # Run the Setup Agent on first boot
- firstboot --disable
- key --skip #顺便增加这个,跳过序列号
- # System keyboard
- keyboard us
- # System language
- lang en_US
- # Installation logging level
- logging --level=info
- # Use network installation
- url --url=ftp://192.168.0.5/pub
- # Network information
- network --bootproto=dhcp --device=eth0 --onboot=on
- # Reboot after installation
- reboot
- #Root password
- rootpw --iscrypted $1$73hBcd2n$DoNPPPAFrOKrj10Cr.eRX0
- # SELinux configuration
- selinux --enforcing
- # System timezone
- timezone Asia/Shanghai
- # Install OS instead of upgrade
- install
- # X Window System configuration information
- xconfig --defaultdesktop=GNOME --depth=32 --resolution=800x600 --startxonboot
- # Disk partitioning information
- part /boot --bytes-per-inode=4096 --fstype="ext3" --size=100
- part / --bytes-per-inode=4096 --fstype="ext3" --size=4096
- part /home --bytes-per-inode=4096 --fstype="ext3" --size=2000
- part swap --bytes-per-inode=4096 --fstype="swap" --size=512
- part /usr --bytes-per-inode=4096 --fstype="ext3" --size=3000
- %packages
- @dialup
- @base
- @gnome-desktop
- @core
- @admin-tools
- @chinese-support
- @printing
- @base-x
- @graphical-internet
- @java
- @text-internet
- @system-tools
- @legacy-software-support
- @editors
- kexec-tools
- fipscheck
- device-mapper-multipath
- sgpio
- emacs
- festival
- audit
- xorg-x11-utils
- xorg-x11-server-Xnest
将复制的%pachages 部分信息放到最后
(7)复制配置文件模块
- [root@station5 ~]# cd /tftpboot/
- [root@station5 tftpboot]# mkdir pxelinux.cfg
- [root@station5 tftpboot]# cp /mnt/isolinux/isolinux.cfg pxelinux.cfg/default
- [root@station5 tftpboot]# chmod u+w pxelinux.cfg/default
- #由于defaults文件默认是只读的,所以增加写的权限
(8)修改default文件,内容如下:
- default linux #用户不选择使用内容时默认使用哪 个标签
- prompt 1
- timeout 600 #等待用户选择时间
- label linux #定义的标签,可以建立这个label指向不同的内核文件
- kernel vmlinuz #内核文件
- append ks=ftp://192.168.0.5/ks.cfg initrdinitrd=initrd.img
- #客户端下载启动文件用无人值守安装文件的地方,也就是上面配置的ks.cfg文件。
(9)重启dhcpd、xinetd、vsftpd 服务
- [root@station5 ~]# /etc/init.d/dhcpd restart
- [root@station5 ~]# /etc/init.d/xinetd restart
- [root@station5 ~]# /etc/init.d/vsftpd restart
(10)客户端安装(前提当然是支持PXE引导)
开机后选择从网络引导,就可以看到以下信息,输入:linux 回车


转载于:https://blog.51cto.com/cbb1133/988830


 被折叠的 条评论
为什么被折叠?
被折叠的 条评论
为什么被折叠?
 到【灌水乐园】发言


