


前言:CocoaPods相关资料
Commands:
+ repo Manage spec-repositories
+ search Searches for pods
+ setup Setup the CocoaPods environment
+ spec Manage pod specs
+ trunk Interact with the CocoaPods API (e.g. publishing new specs)
+ try Try a Pod!
+ update Update outdated project dependencies and create new
-
-
+ cache Manipulate the CocoaPods cache
-
+ init Generate a Podfile for the current directory.
-
+ install Install project dependencies to Podfile.lock versions
-
+ ipc Inter-process communication
-
+ lib Develop pods
-
+ list List pods
-
+ outdated Show outdated project dependencies
-
+ plugins Show available CocoaPods plugins
-
Podfile.lock
-
Options:
-
-
--silent Show nothing
-
--version Show the version of the tool
-
--verbose Show more debugging information
-
--no-ansi Show output without ANSI codes
-
--help Show help banner of specified command
创建CocoaPods核心步骤:
一、上传资源到github
$ git tag -a 1.1.1 -m ’Tag release 1.1.1‘
$ git push --tags
添加成功
Counting objects: 1, done.
Writing objects: 100% (1/1), 163 bytes | 0 bytes/s, done.
Total 1 (delta 0), reused 0 (delta 0)
To https://github.com/c6357/YUKit.git
* [new tag] 1.1.1 -> 1.1.1
二、创建编辑pos spec文件
-
-
这里以YUKit为例
-
官方推荐资源目录模板如下
-
$ tree MyLib -L 2

  MyLib
  ├── .travis.yml
  ├── _Pods.xcproject
  ├── Example
  │   ├── MyLib
  │   ├── MyLib.xcodeproj
  │   ├── MyLib.xcworkspace
  │   ├── Podfile
  │   ├── Podfile.lock
  │   ├── Pods
  │   └── Tests
  ├── LICENSE
  ├── MyLib.podspec
  ├── Pod
  │   ├── Assets
  │   └── Classes
  │     └── RemoveMe.[swift/m]
└── README.md -
push后添加 tag ( 这里的tag 后面pod spec 文件 version 会用到)
-
-
pod spec create
$pod spec create [NAME|https://github.com/USER/REPO] e.g. $ pod spec create YUKit https://github.com/c6357/YUKit本地会生成一个YUKit.podspec文件
-
2.编辑 pod spec文件
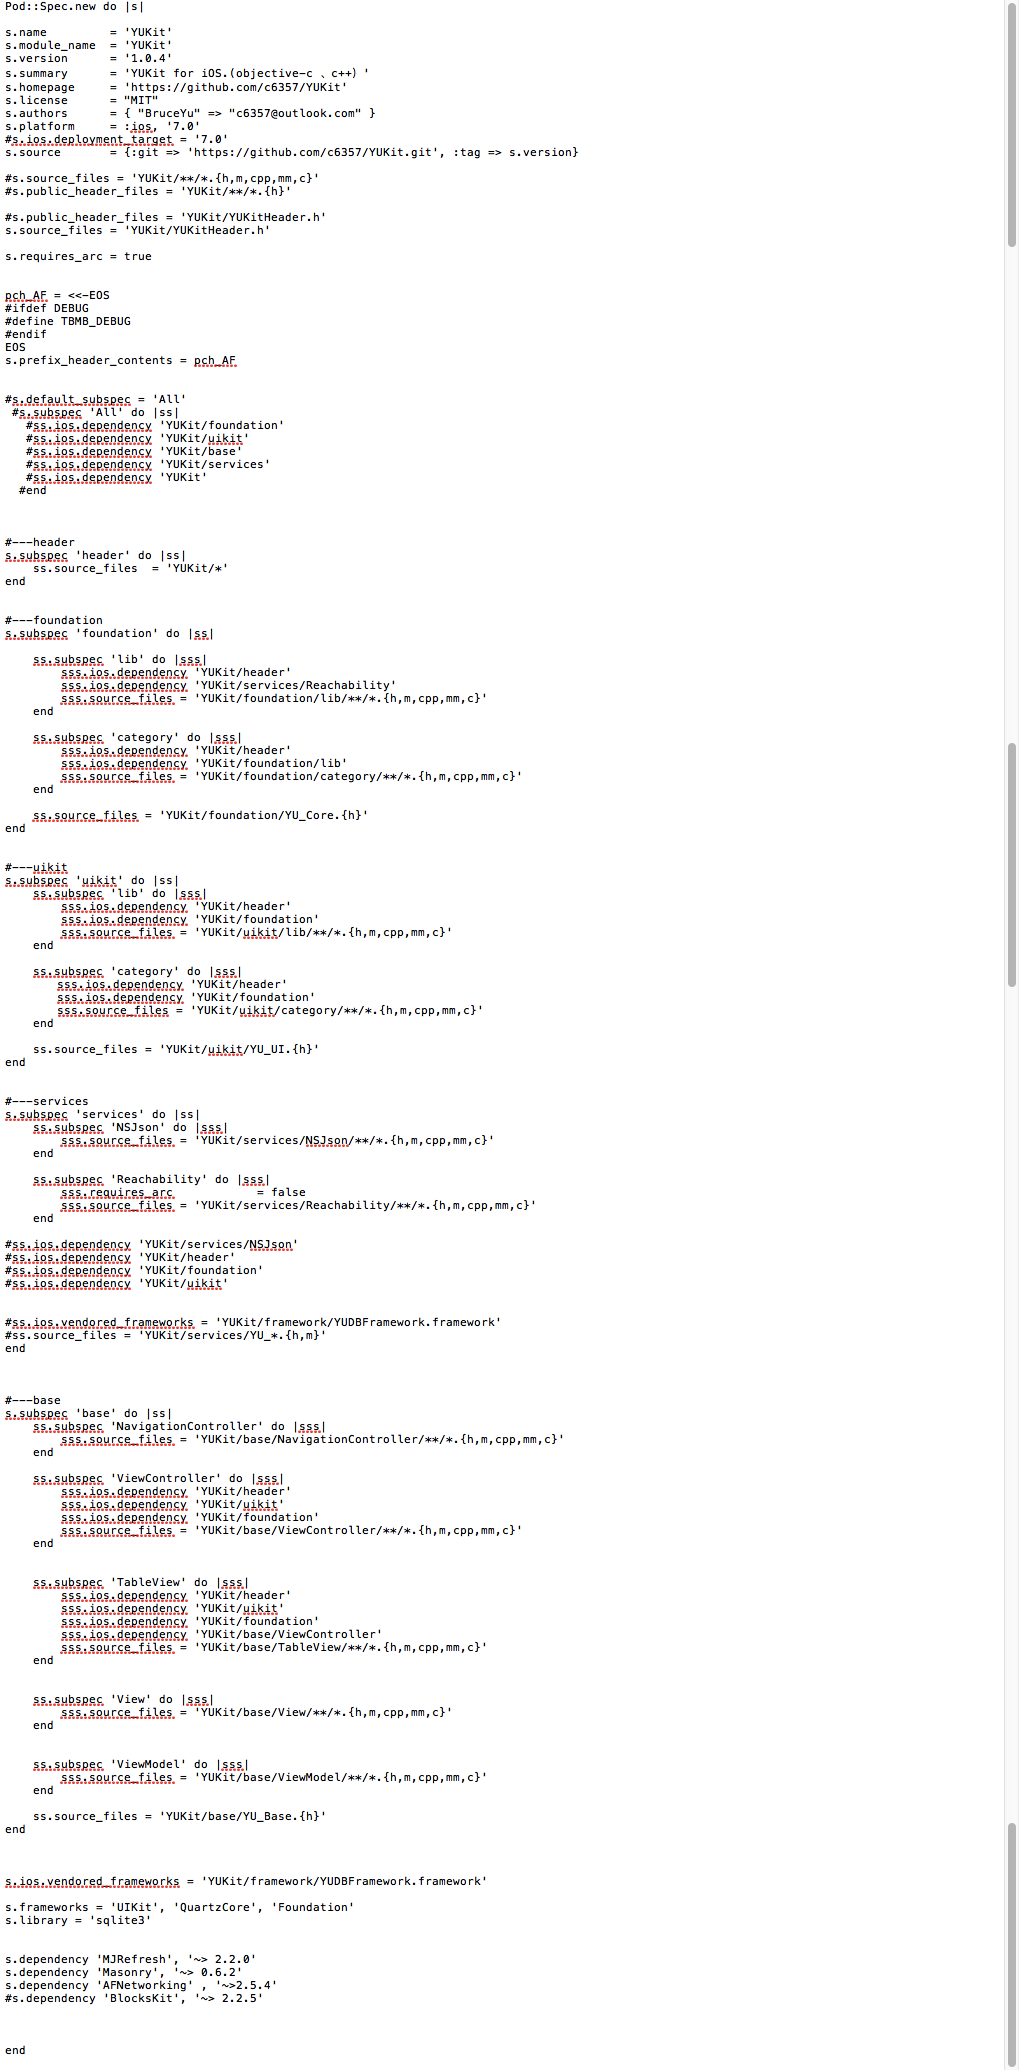
如何编写请参考官方文档Specification 或者参考网上优秀pod spec 文件
三、验证pod spec并提交到Specs
-
本地验证
-
$ cd ~/.cocoapods/repos/REPO_NAME -
$ pod lib lint (验证) -
$ pod lib lint --verbose(验证--并显示详细信息) -
$ pod lib lint --allow-warning(验证--忽略警告) -
YUKit passed validation.
-
-
注册trunk
-
$ pod trunk register orta@cocoapods.org 'Orta Therox' --description='macbook air' -
$ pod trunk add-owner YUkit kyle@cocoapods.org(还可以添加其他小伙伴) -
$ pod trunk me //查看自己的注册信息
-
- Name: Orta Therox
- Email: orta@cocoapods.org
- Since: January 6th, 21:41
- Pods:
- YUKit
- Sessions:
- January 6th, 21:41 - Unverified. IP: XXXXX
- January 6th, 21:42 - May 13th, 21:42. IP: XXXXX
- January 6th, 21:44 - August 20th, 00:56. IP: XXXXX
- January 7th, 08:35 - May 14th, 09:20. IP: XXXXX
Updating spec repo `master`
Validating podspec
Updating spec repo `master`
CocoaPods 1.0.0.beta.6 is available.
-
提交到远端(有警告要选最后一个)
-
$ pod trunk push YUKit.podspe -
$ pod trunk push YUKit.podspe --verbose -
$ pod trunk push YUKit.podspe --allow-warning
-
四、使用
pod'YUKit', '~> 1.1.6'
$pod search yukit
YUKit for iOS.(objective-c 、c++)
pod 'YUKit', '~> 1.1.6'
- Homepage: https://github.com/c6357/YUKit
- Source: https://github.com/c6357/YUKit.git
- Versions: 1.1.6, 1.0.4, 1.0.0, 0.0.9 [master repo]
- Subspecs:
- YUKit/header (1.1.6)
- YUKit/foundation (1.1.6)
- YUKit/foundation/lib (1.1.6)
- YUKit/foundation/category (1.1.6)
- YUKit/uikit (1.1.6)
- YUKit/uikit/lib (1.1.6)
- YUKit/uikit/category (1.1.6)
- YUKit/services (1.1.6)
- YUKit/services/NSJson (1.1.6)
- YUKit/services/Reachability (1.1.6)
- YUKit/base (1.1.6)
- YUKit/base/NavigationController (1.1.6)
- YUKit/base/ViewController (1.1.6)
- YUKit/base/TableView (1.1.6)
- YUKit/base/View (1.1.6) - YUKit/base/ViewModel (1.1.6)
创建私有的请查阅官方文档


 3360
3360

 被折叠的 条评论
为什么被折叠?
被折叠的 条评论
为什么被折叠?
 到【灌水乐园】发言


