


-- 几个月前的学习笔记,懒得再翻译回来了
Continuous Integration
- Continuous Integration
-
-
- Purpose & Main Goals
- Enviroment Infomation
- Configuring Env Path
- Installing JDK 1.8
- Install Nexus
- Configuring iptables
- Verify Nexus service by setting up a Maven project
- Install Maven on server side (later will be used by Jenkins)
- Install GitLab
- Enable SSH connection using GitLab without password
- Install Jenkins
- Setup automated build in Jenkins with Gitlab’s Web Hook feature
- Setup automated deploy after build in Jenkins
- Install Git server(Optional)
-
-
-
Purpose & Main Goals
-
Automatically build
-
Expose problems earlier.
-
Common module management.
-
Internal Maven Server makes building process faster.
-
Set up the standard of the whole life circle of Soft Ware development.
-
Code Review Process setup
-
Build trigger
-
Automatically deploy
-
Automatically test run : (Front end and Back End (Unit Test Framework integration))
-
base platforms setup
gitlab , nexus,jenkins , maven
-
-
Enviroment Infomation
CentOS
root @ qazwsx%1984416ssh
work dir :/home/soft -
Configuring Env Path
open
/etc/profile,add below text to the endPATH=/var/opt/gitlab/git-data/repositories:$PATH export PATH -
Installing JDK 1.8
rpm -ivhjdk-8u65-linux-x64.rpm
-
Install Nexus
in this case , we use the nexus 2 because it’s more friendly with maven then nexus 31
tar -xvfnexus-latest-bundle.tar.gz- run
/home/soft/nexus-extract/nexus-2.13.0-01/bin/nexus - http://127.0.0.1:8081/nexus
- default account : admin/admin123
-
Configuring iptables
vi /etc/sysconfig/iptablesadd this to the end :
-A INPUT -p tcp -m sate --state NEW -m tcp --dport 8081 -j ACCEPTor ,simply turn off the iptable service by
service iptables stop -
Verify Nexus service by setting up a Maven project
- In project’s pom.xml,add this(it tells maven which repository to deploy the jar):
<!-- release to --> <distributionManagement> <repository> <id>releases</id> <name>releases</name> <url>http://172.16.3.64:8081/nexus/content/repositories/releases/</url> </repository> </distributionManagement>- In maven’s setting.xml (pls use
mvn help:effective-settingsto ensure that which file is currently effective)
<mirror>
    <id>nexus-internal</id>
    <mirrorOf>*</mirrorOf><!-- means this nexus server would take over all the pull request from maven-->
    <name>nexus-internal</name>
    <url>http://172.16.3.64:8081/nexus/content/groups/public/</url>
</mirror>
<server> <id>releases</id> <username>admin</username> <password>admin123</password> </server> -
Install Maven on server side (later will be used by Jenkins)
- tar -xvf apache-maven-3.3.9-bin.tar.gz
-
Install GitLab
- Official Installation Guide : https://about.gitlab.com/downloads/#centos6
- If you’re in CentOS 6/7 , to avoid from the network connectivity problem in China, I suggest you use the rpm way.
in my case : I use gitlab-ce-8.8.5-ce.1.el6.x86_64.rpm - install path would be :
/var/opt/gitlab - default repository is
/var/opt/gitlab/git-data - setting file is :
/etc/gitlab/gitlab.rb - Use
gitlab-ctlto manage the application (start,stop,tail,etc) - Problems occured solved:
- Port in use ?
Because the component “Tweak” using 8080 as the default port,if it’s been taken by any other program,GitLab would be failed to start.
- Port in use ?
To change the port
vi /etc/gitlab/gitlab.rb- Find session # GitLab Unicorn #
- Modify
unicorn['listen'] = '127.0.0.1',unicorn['port'] = 8090 - Apply changes :
sudo gitlab-ctl reconfigure - Check logs
sudo gitlab-ctl tail - Set git user’s default shell to bash :
usermod -s /bin/bash git
- Default Account ?
- During the installing process,you’d be asked to set your password,it means your current Linux account ,e.g
root;After installation has been done,you can use that to login into the system. - If there’s no account/pwd setting process came out during the installation,you can register one from the entry index,and it’d be the admin authority.
- During the installing process,you’d be asked to set your password,it means your current Linux account ,e.g
-
Enable SSH connection using GitLab without password
- Use Git Bash as the Git Client in Windows.
- Open GitBash from user home dir : e.g
C:\Users\bob\.ssh> -
Execute command :
ssh-keygen -t rsaC:\Users\bob\.ssh>ls id_rsa id_rsa.pub known_hosts type %userprofile%\.ssh\id_rsa.pub | clip -
Go to GitLab User Profile Page,add a SSH Key like below (the key’s already in your clip)

About ssh no-pwd verify login:
After your execute the commandssh-keygen -t rsa
The generated 3 files : id_rsa, id_rsa.pub , known hosts are bound together on the client side ,and it must be under client side’s user folder (in this case :C:\Users\bob\.ssh).
After you gave out the public keyid_rsa.pubto the server side , where did it go?
it’s been added to the end of the file of/var/opt/gitlab/.ssh/authorized_keyson the server side
-
Install Jenkins
- Download latest Jenkins here
- Start it with executing
nohup java -jar jenkins.war &.
Or you can deploy it into tomcat , which is more recommended. - Install git plugin from system admin page.
- To add Credential,here are the steps:
- Supposed I’m trying to add a project and my git accont is bob
- Login as bob in git server
ssh-keygen -t rsapress ENTER till it’s done.*(this will gen 2 files “id_rsa”,”id_rsa.pub” under default user home “/home/bob/.ssh”,cat id_rsaand you’ll see the private key content )- go to the jenkins admin page : index->Credentials->System->Goblal credentials->Add Credentials
- Kind: SSH
- Scope: Global
- Username : your git username(linux account)
- Private Key : Enter directly (step 3)
- other field just leave for empty
- try a maven@git project build with jenkins
- index -> new
- choose maven,next
- choose git and give the git url
- choose the credential that you just created. save
- click build on the left side
-
Setup automated build in Jenkins with Gitlab’s Web Hook feature
- GitLab:
- go to Settings > Webhooks
- at “URL” fill in with
http://172.16.3.64:8180/jenkins/gitlab/build_now/eclipse_maven_web - at “Trigger” choose whenever you want it to be triggered.
-
Jenkins:
-
Install plugin Gitlab Hook Plugin on Jenkins ,see Usage
-
配置 –> Gitlab Web Hook
check the option : Trigger build also when pushing to merged branches -
Project Configuration
-
参数化构建过程,do as follow
 ;
; -
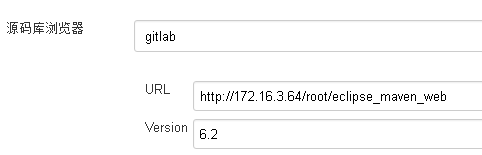
go to
Branches to buildfill in with$BRANCH_TO_BUILD - go to source browser,do as follow
-
-
- GitLab:
-
Setup automated deploy after build in Jenkins
- Install Deploy to container Plugin
- Do as follow

-
enable tomcat manage console
- configure the conf/tomcat-users.xml
  <role rolename="tomcat"/>
  <role rolename="role1"/>
  <role rolename="admin"/>
  <role rolename="admin-script"/>
  <role rolename="manager-gui"/>
  <role rolename="manager-script"/>
  <role rolename="manager"/>
  <role rolename="admin-gui"/>
  <user username="tomcat" password="tomcat" roles="manager,manager-gui,tomcat,role1,admin,admin-gui,manager-script,admin-script"/>
tomcat/tomcat would be the user Jenkins’d use.
-
Install Git server(Optional)
- install neccesary dependence
yum install curl-devel expat-devel gettext-devel openssl-devel zlib-devel perl-devel
some times the zlib env might go wrong ,try download and make installwget http://jaist.dl.sourceforge.net/project/libpng/zlib/1.2.8/zlib-1.2.8.tar.gz- other dependence error pls ref to this link
-
install git
- get latest git source package here
tar -zxvf git-2.9.0.tar.gzcd git2.9./configuremakemake installgit version
-
add git accounts on server side
- add a user :
useradd -g git git - set password for it :
passwd git - delete a user (
-fmeans also delete user’s folder)userdel -f git
- add a user :
-
create a test repository directory
mkdir /home/soft/git/repo1- initial :
git init --bare project.git
-
grand authority
sudo chown -R git:git project.git
-
ssh setting (client side)
ssh-keygen -t rsascp ~/.ssh/id_rsa.pub root@192.168.56.1:~/
or you can pass your rsa key in text ,after key generating,do
cat rsa.puband you’ll see the rsa key content,
pass it to server admin,and he shall write that into/home/git/.ssh/authorized_keys(real path might depends)-
verify uploaded file(server side):
ls ~/id_rsa.pub -
try it on client side
mkdir testrepo1
cd testrepo1
git clone git@172.16.3.64:/home/soft/git/repo1/project.git
- install neccesary dependence


 1万+
1万+

 被折叠的 条评论
为什么被折叠?
被折叠的 条评论
为什么被折叠?
 到【灌水乐园】发言


