


==================================
Shiro 的加深理解:
==================================
1. Shiro 和 Spring 系组件的对标, Shiro = Spring Security + Spring Session. 就是说 Shiro 不仅仅是一个安全框架, 同时也是一个 Session 管理框架. 其实这也是很自然的事情, Shiro 会拦截所有的 web 请求, 通过 SecurityManager 进行安全审核, 接着 SecurityManager 又委托 SessionManager 进行 session 管理. 当然 Shiro 并没有强制我们一定要使用它来进行 Session 管理.
2. Shiro Session 管理: 就是和普通的 web session 管理一样, 管理 session 属性, 默认是保存在内存中, 也可以保存在分布式的存储中, 比如 redis.
3. Shiro cache 的内容是: 仅仅缓存 Realm 的认证和鉴权相关的数据, 不会包含 Session 属性数据.
默认情况下, Web 服务器端的 Session 都是保存在内存中, 如果服务重启升级, Session 就丢了, 如果是集群部署, session 保存在单机内存中也不太合适, 这时就需要引入集中 session 存储了, 现在比较流行使用 redis 存储.
==================================
Shiro 内置的 Session Manager
==================================
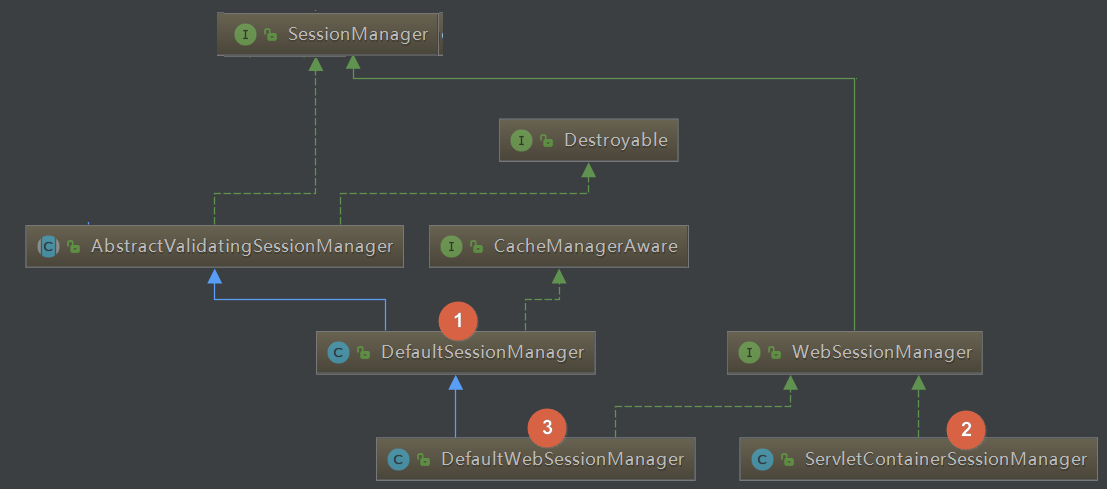
Session Manager, Shiro 使用 session 来管理 subject 的生命周期, 包括: 创建/停止/过期 等等, shiro 内置了三个实现:
1. DefaultSessionManager
DefaultSecurityManager 使用的默认 Session Manager, 用于 JavaSE 环境.
2. ServletContainerSessionManager
DefaultWebSecurityManager 默认使用的 Session Manager, 使用 Servlet 容器服务器的会话. 如果运行在 Tomcat 中, HttpSession 接口的实现类是 org.apache.catalina.session.StandardSessionFacade. 用于 Web 环境.
3. DefaultWebSessionManager
可以替代 ServletContainerSessionManager, 自定义 Session 的管理策略, 甚至包括自定义持久化方案, Shiro 提供了一个默认的 MemorySessionDAO 持久化 DAO 实现, 也有 redis 持久化方案, 比如这个开源项目, http://alexxiyang.github.io/shiro-redis/
下面是启用 DefaultWebSessionManager 的简单示例, 采用了默认的 MemorySessionDAO 来持久化 (应该是基于并发 HashMap 类).
@Bean
public DefaultWebSessionManager sessionManager() {
    DefaultWebSessionManager sessionManager = new DefaultWebSessionManager();
    sessionManager.setGlobalSessionTimeout(1800000l);
    sessionManager.setDeleteInvalidSessions(true);
    sessionManager.setSessionValidationSchedulerEnabled(true);
    sessionManager.setSessionIdCookieEnabled(true);
    SimpleCookie cookie = new SimpleCookie(ShiroHttpSession.DEFAULT_SESSION_ID_NAME);  //cookie 名为: JSESSIONID
    cookie.setHttpOnly(true);
    cookie.setMaxAge(1800000);
    sessionManager.setSessionIdCookie(cookie);
    return sessionManager;
}
==================================
使用 Shiro 框架后几个常用对象的具体实现类
==================================
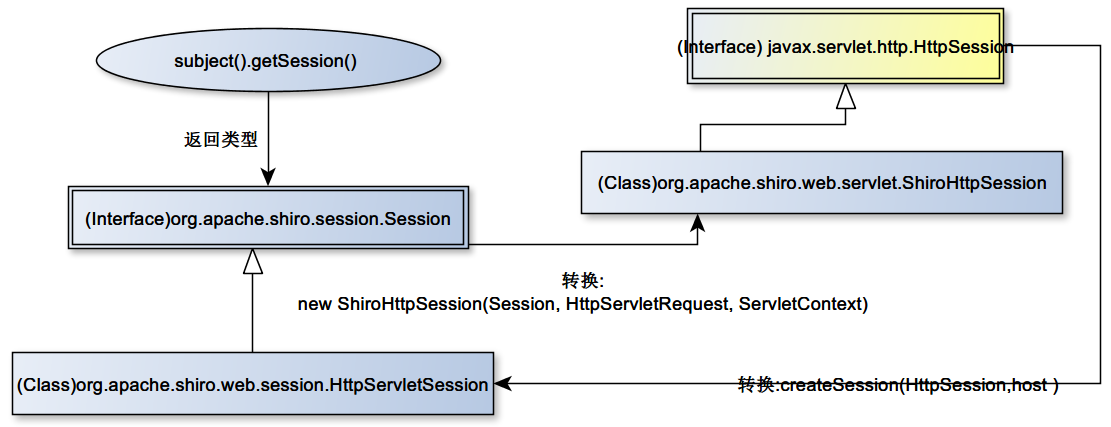
Shiro 不管是采用 ServletContainerSessionManager 还是 DefaultWebSessionManager, 使用 Shiro 框架后, 视图方法注入的 HttpServletRequest 参数都会被替换为 shiro 的 ShiroHttpServletRequest 实现类.
另外需要注意, Shiro subject.getSession() 返回的 session 对象, 实现的接口是 org.apache.shiro.session.Session, 这个接口和标准 HttpSession 接口没有父子关系, 不能简单强转, Shiro 内部有相互转换的代码.
1. subject.getSession() 返回值的具体类: org.apache.shiro.subject.support.DelegatingSubject$StoppingAwareProxiedSession
2. Controller 视图方法注入的 HttpSession 接口参数, 具体实现类是 org.apache.catalina.session.StandardSessionFacade
3. Controller 视图方法中, 通过 request.getSession() 方法, 返回值的类型和 视图方法注入的 HttpSession 参数类型一致.
详情对象的类型如下:
subject.getSession()     : org.apache.shiro.subject.support.DelegatingSubject$StoppingAwareProxiedSession
httpSession              : org.apache.catalina.session.StandardSessionFacade
httpRequest.getSession() : org.apache.catalina.session.StandardSessionFacade
httpRequest              : org.apache.shiro.web.servlet.ShiroHttpServletRequest
httpResponse             : org.apache.catalina.connector.ResponseFacade
下图是几个Session类之间的关系:
==================================
Shiro Session 和标准 HttpSession 的互操作性
==================================
虽然 org.apache.shiro.session.Session 接口和标准的 javax.servlet.http.HttpSession 接口没有父子关系, 它们不能简单强转, 但是对于 Session 属性管理是相通的, 经我测试, Shiro 不管是采用 ServletContainerSessionManager 作为 session 管理器, 还是采用 DefaultWebSessionManager, 两套 session 对象的属性读写是相通的.
这为我们提供了极大的便利, 也就是说我们既可以使用标准的 HttpSession 对象来读写 session 属性, 也可以使用 Shiro 的 Session 对象来读写.
// HttpSession 主动写 Session 属性示例
@RequestMapping("/springWrite")
@ResponseBody
public String springWrite(HttpServletRequest httpRequest, HttpSession httpSession){
    httpSession.setAttribute("Spring_Attr", "Spring_Attr_Value");
    System.out.println(httpSession.getAttribute("Spring_Attr"));

    System.out.println("=======");
    Session session = SecurityUtils.getSubject()
            .getSession();
    System.out.println(session.getAttribute("Spring_Attr"));
    return "springWrite";
}

// Shiro Session 主动写 Session 属性示例
@RequestMapping("/shiroWrite")
@ResponseBody
public String shiroWrite(HttpServletRequest httpRequest, HttpSession httpSession){
    Session session = SecurityUtils.getSubject()
            .getSession();
    session.setAttribute("Shiro_Attr", "Shiro_Attr_value");
    System.out.println(session.getAttribute("Shiro_Attr"));

    System.out.println("=======");
    System.out.println(httpSession.getAttribute("Shiro_Attr"));
    return "shiroWrite";
}
下面是 shiro session 支持的方法:
    Session session = subject.getSession();
    session.getId()
    session.getTimeout())
    session.getStartTimestamp();
    session.getLastAccessTime();
    session.setAttribute("key", "123");
    session.removeAttribute("key");
    session.touch();
    session.stop();
在 J2SE 项目中, 使用 Subject.logout() 会自动调用 Session.stop() 方法来销毁会话, 如果在 web 中, 调用 javax.servlet.http.HttpSession.invalidate() 也会自动调用 Session.stop() 方法进行销毁 Shiro 的会话.
==================================
到底要不要让 Shiro 全面接管 Session 管理?
==================================
前面已经提到: Shiro = Spring Security + Spring Session, 在安全管理这块, 我觉得 Shiro 比 Spring Security 强太多了, Spring Security 搞的太复杂了. 现在的问题是, 要不要让 Shiro 全面接管 Session 管理?
推荐方案是 ServletContainerSessionManager + Spring Session, 也就是说 Session 管理还是交给 Spring Session, Session 属性操作还是使用标准的HttpSession注入对象来完成, 不太推荐使用 DefaultWebSessionManager 使用持久化 Session 信息.
说明如下:
1. 推荐 ServletContainerSessionManager 而不是 DefaultWebSessionManager, 这样就能更好利用 Spring Session 生态. 如果使用 DefaultWebSessionManager, 开箱即用的 SessionDAO 只有 MemorySessionDAO 和 开源的 shiro-redis (地址 http://alexxiyang.github.io/) , 生态要比 Spring Session 差.
比如, 我们我们
2. 有克制地使用 SecurityUtils.getSubject().getSession(), 虽然 Shiro Session 和标准 HttpSession 具有很好的互操作性, 但在视图方法中, 还是推荐使用 HttpSession 参数注入对象, 在 Shiro realm 实现类中, 如果要读写 session, 直接用 SecurityUtils.getSubject().getSession() 非常方便.
==================================
参考
==================================
使用 redis 进行基于 shiro 的 session 集群共享
http://www.cnblogs.com/sunshine-2015/p/5686750.html
shiro 实现 APP、web 统一登录认证和权限管理
http://www.cnblogs.com/sunshine-2015/p/5515429.html


 199
199


 被折叠的 条评论
为什么被折叠?
被折叠的 条评论
为什么被折叠?
 到【灌水乐园】发言


