


首先配置NDK路径:点击File-->Project Structure,如下图所示:
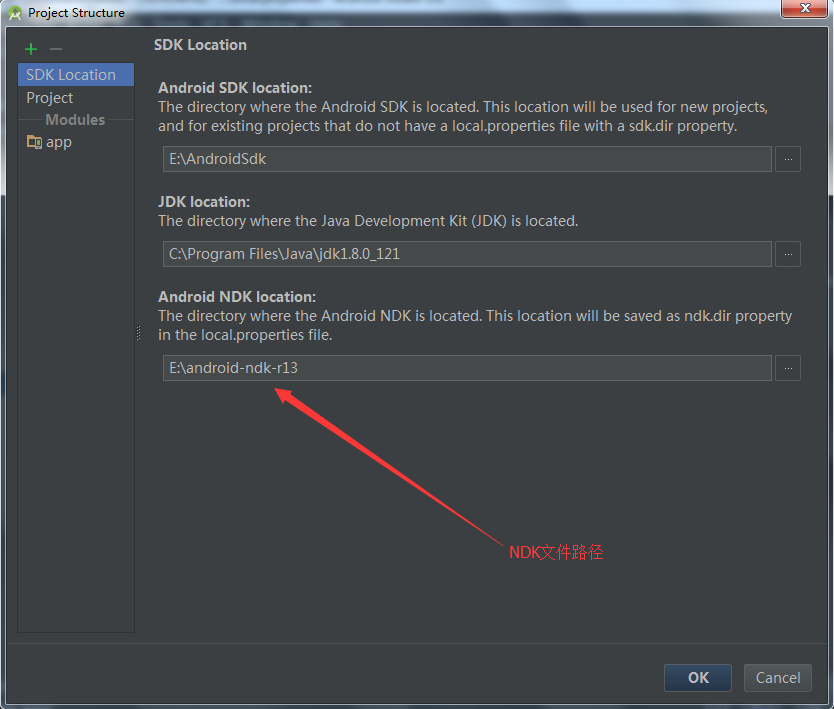
设置路径之后点击OK配置完成,会在项目的local.properties文件中生成以下两行信息:
ndk.dir=E\:\\android-ndk-r13 ->NDK路径
sdk.dir=E\:\\AndroidSdk ->SDK路径
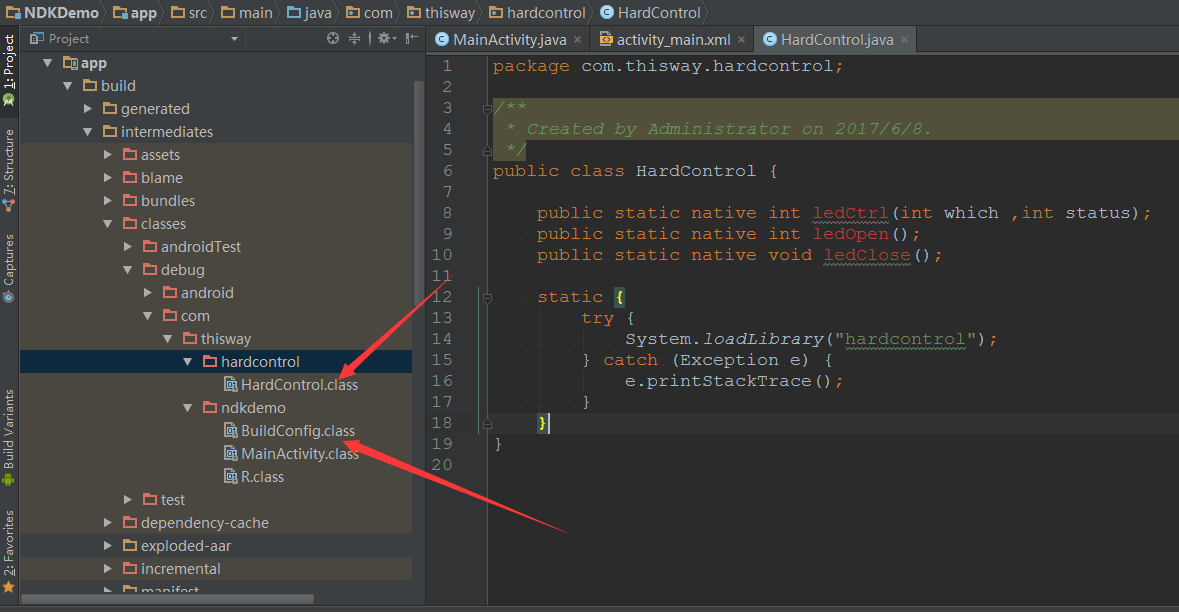
在app\src\main\java\包目录下新建文件夹hardcontrol,并在里面建立HardControl.java文件,文件的内容如下:
package com.thisway.hardlibrary;

public class HardControl{

    public static native int ledCtrl(int which ,int status); //声明本地函数
    public static native int ledOpen();  //声明本地函数
    public static native void ledClose();  //声明本地函数

    static {
        try {
            System.loadLibrary("hardcontrol");  //加载动态库并捕获异常
        } catch (Exception e) {
            e.printStackTrace();
        }
    }
}
MainActivity.java的代码如下:
package com.thisway.ndkdemo;

import android.support.v7.app.AppCompatActivity;
import android.os.Bundle;
import android.view.View;
import android.widget.Button;
import android.widget.CheckBox;
import android.widget.Toast;
import com.thisway.hardcontrol.HardControl;

public class MainActivity extends AppCompatActivity {

    private Button mButton = null;
    private CheckBox led1 = null;
    private CheckBox led2 = null;
    private CheckBox led3 = null;
    private CheckBox led4 = null;

    private MyOnClickListener mListener = new MyOnClickListener();

    private boolean isPress = false;
    private boolean isChecked = false;

    @Override
    protected void onCreate(Bundle savedInstanceState) {
        super.onCreate(savedInstanceState);
        setContentView(R.layout.activity_main);

        HardControl.ledOpen(); //调用C实现的对应本地函数

        mButton = (Button)findViewById(R.id.button);

        led1 = (CheckBox)findViewById(R.id.led1);
        led2 = (CheckBox)findViewById(R.id.led2);
        led3 = (CheckBox)findViewById(R.id.led3);
        led4 = (CheckBox)findViewById(R.id.led4);

        mButton.setOnClickListener(mListener);

        led1.setOnClickListener(mListener);
        led2.setOnClickListener(mListener);
        led3.setOnClickListener(mListener);
        led4.setOnClickListener(mListener);
    }

    class MyOnClickListener implements View.OnClickListener{
        @Override
        public void onClick(View v) {

            int id = v.getId();

            switch (id){
                case R.id.button:
                    if (isPress){
                        mButton.setText("ALL OFF");
                        isPress = false;

                        led1.setChecked(false);
                        led2.setChecked(false);
                        led3.setChecked(false);
                        led4.setChecked(false);
                    }else {
                        mButton.setText("ALL ON");
                        isPress = true;
                        led1.setChecked(true);
                        led2.setChecked(true);
                        led3.setChecked(true);
                        led4.setChecked(true);
                    }
                    break;
                case R.id.led1:
                    isChecked = led1.isChecked();
                    if (isChecked){
                        Toast.makeText(getApplicationContext(),"led1 on",Toast.LENGTH_SHORT).show();
                    }else {
                        Toast.makeText(getApplicationContext(),"led1 off",Toast.LENGTH_SHORT).show();
                    }
                    break;
                case R.id.led2:
                    isChecked = led2.isChecked();
                    if (isChecked){
                        Toast.makeText(getApplicationContext(),"led2 on",Toast.LENGTH_SHORT).show();
                    }else {
                        Toast.makeText(getApplicationContext(),"led2 off",Toast.LENGTH_SHORT).show();
                    }
                    break;
                case R.id.led3:
                    isChecked = led3.isChecked();
                    if (isChecked){
                        Toast.makeText(getApplicationContext(),"led3 on",Toast.LENGTH_SHORT).show();
                    }else {
                        Toast.makeText(getApplicationContext(),"led3 off",Toast.LENGTH_SHORT).show();
                    }
                    break;
                case R.id.led4:
                    isChecked = led4.isChecked();
                    if (isChecked){
                        Toast.makeText(getApplicationContext(),"led4 on",Toast.LENGTH_SHORT).show();
                    }else {
                        Toast.makeText(getApplicationContext(),"led4 off",Toast.LENGTH_SHORT).show();
                    }
                    break;
            }
        }
    }
}
布局文件activity_main的内容如下:
<?xml version="1.0" encoding="utf-8"?>
<LinearLayout xmlns:android="http://schemas.android.com/apk/res/android"
    xmlns:tools="http://schemas.android.com/tools"
    android:layout_width="match_parent"
    android:layout_height="match_parent"
    android:orientation="vertical"
    tools:context="com.thisway.ndkdemo.MainActivity">

    <Button
        android:id="@+id/button"
        android:layout_marginTop="10dp"
        android:layout_width="match_parent"
        android:layout_height="wrap_content"
        android:text="ALL OFF" />

    <CheckBox
        android:id="@+id/led1"
        android:layout_marginTop="10dp"
        android:layout_width="match_parent"
        android:layout_height="wrap_content"
        android:text="LED1" />
    <CheckBox
        android:id="@+id/led2"
        android:layout_marginTop="10dp"
        android:layout_width="match_parent"
        android:layout_height="wrap_content"
        android:text="LED2" />
    <CheckBox
        android:id="@+id/led3"
        android:layout_marginTop="10dp"
        android:layout_width="match_parent"
        android:layout_height="wrap_content"
        android:text="LED3" />
    <CheckBox
        android:id="@+id/led4"
        android:layout_marginTop="10dp"
        android:layout_width="match_parent"
        android:layout_height="wrap_content"
        android:text="LED4" />

</LinearLayout>
点击菜单栏的Build→Make Project,这一步的执行为了验证工程中并无其他错误,并生成.class字节码文件,其生成的字节码文件路径为工程目录下的\build\intermediates\classes\debug文件夹下
选择View→Tool Windows→Terminal后进入命令行窗口,在AndroidStduio打开该窗口的好处是路径直接从工程目录下开始的,然后我们需要进入到main\java目录下,然后使用javah -jni com.thisway.hardcontrol.HardControl 命令,可以看到在当前目录下生成的com_thisway_hardcontrol_HardControl.h文件;内容如下:
/* DO NOT EDIT THIS FILE - it is machine generated */
#include <jni.h>
/* Header for class com_thisway_hardcontrol_HardControl */

#ifndef _Included_com_thisway_hardcontrol_HardControl
#define _Included_com_thisway_hardcontrol_HardControl
#ifdef __cplusplus
extern "C" {
#endif
/*
 * Class:     com_thisway_hardcontrol_HardControl
 * Method:    ledCtrl
 * Signature: (II)I
 */
JNIEXPORT jint JNICALL Java_com_thisway_hardcontrol_HardControl_ledCtrl
  (JNIEnv *, jclass, jint, jint);

/*
 * Class:     com_thisway_hardcontrol_HardControl
 * Method:    ledOpen
 * Signature: ()I
 */
JNIEXPORT jint JNICALL Java_com_thisway_hardcontrol_HardControl_ledOpen
  (JNIEnv *, jclass);

/*
 * Class:     com_thisway_hardcontrol_HardControl
 * Method:    ledClose
 * Signature: ()V
 */
JNIEXPORT void JNICALL Java_com_thisway_hardcontrol_HardControl_ledClose
  (JNIEnv *, jclass);

#ifdef __cplusplus
}
#endif
#endif
在工程的main目录下新建一个名字为jni的目录,然后将刚才的 .h文件剪切到里面。在jni目录下新建一个c文件,取名HardControl.c 。然后编辑代码如下:
//
// Created by Administrator on 2017/6/10.
//
#include "com_thisway_hardcontrol_HardControl.h"
#include <android/log.h>

#define  LOG_TAG    "caihaitao"
#define  LOGI(...)  __android_log_print(ANDROID_LOG_INFO, LOG_TAG, __VA_ARGS__)
#define  LOGE(...)  __android_log_print(ANDROID_LOG_ERROR, LOG_TAG, __VA_ARGS__)

JNIEXPORT jint JNICALL Java_com_thisway_hardlibrary_HardControl_ledCtrl
(JNIEnv *env, jclass clazz, jint which, jint status)
{
    LOGI("ledCtrl %d, %d", which, status);
    return 0;
}

JNIEXPORT jint JNICALL Java_com_thisway_hardlibrary_HardControl_ledOpen
  (JNIEnv *env, jclass clazz)
{
    LOGI("ledOpen");
    return 0;
}

JNIEXPORT void JNICALL Java_com_thisway_hardlibrary_HardControl_ledClose
  (JNIEnv *env, jclass clazz)
{
    LOGI("ledClose");
}
接下来在app module目录下的build.gradle中设置库文件名(生成的so文件名)。找到gradle文件的defaultConfig这项,在里面添加如下内容:
ndk {
            moduleName "hardcontrol"//指定生成的so文件名
            abiFilters "armeabi", "armeabi-v7a", "x86"//cpu的类型
            ldLibs "log"  //使用的链接库
    }
在工程目录下的gradle.properties文件末尾加上android.useDeprecatedNdk=true;
执行Build->Rebuild Project 验证工程中有无其他错误;
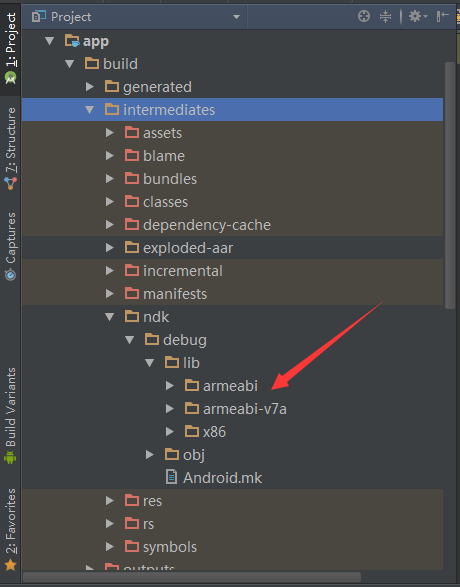
可以看到在\build\intermediates\ndk\debug\lib文件夹下生成三个文件夹,和不同的cpu对应;生成libhardcontrol.so文件;
将\build\intermediates\ndk\debug\lib文件夹拷贝到main目录下;接下来在app module目录下的build.gradle中设置.so文件的位置:
sourceSets {
    main {
        jniLibs.srcDirs = ['src/main/lib']
    }
}
现在可以点击运行app按钮。


 349
349


 被折叠的 条评论
为什么被折叠?
被折叠的 条评论
为什么被折叠?
 到【灌水乐园】发言


