


注意:本文需要使用Android Studio1.4 以上的版本。
为什么Android应用的测试很重要?
Android设备内存,CPU和电池都有限。应用的行为也外部因素有关,如连接性、系统利用等。因此调试、测试和优化Android应用非常重要。
Android的测试不可能覆盖所有Android设备,通常只覆盖典型设备。确保应用至少覆盖尽可能低的配置设备上使用和尽可能高的配置设备,例如像素密度、屏幕分辨率等。
2015年Android应用程的工具和框架的支持有巨大的改善。Android测试系统已经更新到基于JUnit4中,你可以在Java虚拟机或在Android运行时运行单元测试。此外谷歌推出了一款名为Espresso的用户界面测试框架。
Android自动化测试
Android应用的测试内容一般来说应该专注于测试应用的业务逻辑。建议:
70-80%的单元测试以确保您的代码的稳定性
20-30%的功能测试确保应用能运作
有交互的情况下还需要考虑跨应用测试
Android单元和instrumentation单元测试
Android的单元测试是基于JUnit的。可分为:
本地单元测试 - 可以在JVM上运行测试(速度快,优先考虑)。
Instrumented单元测试 - 需要Android系统
Android的Gradle插件支持在JVM上执行Android单元测试。它使用特殊版本的android.jar(也称为 Android mockable jar)支持单元测试,使所有字段,方法和类可用。任何调用到Android mockable JAR默认都是异常。快速但是不能测试安卓相关内容。Instrumented可测试Android API。

工程结构和测试文件夹
建议:
app/src/main/java - 源代码
app/src/test/java - 本地测试
app/src/androidTest/java - Instrumented单元测试
如果你这些约定,Android构建系统会自动在JVM上运行单元测试、在Android设备上运行安卓测试。
执行测试
指定测试类型:
查看测试执行:
如果看到"error duplicate files in path. Path in archive: LICENSE.txt"错误,修改app/gradle.build
android {
    packagingOptions {
    exclude 'LICENSE.txt'
    }
}
JVM单元测试
Android使用unit test这个术语描述本地JVM而非Android Runtime上运行的测试。
unit test测试组件功能。例如假设Android activity的一个按钮用于启动另一个activity。单元测试确定是否发出相应的intent,但部保证另一个activity已启动。
unit test依靠修改后的android.jar执行,这个jar文件中所有的final修饰符都被去掉。修改后允许使用mock库,如Mockito。默认这个android.jar中的所有方法抛出异常。这种缺省行为保证单元测试只会测试自己代码,不会依赖Android平台的任何特定行为。如果想使用Android平台的特定行为,可以使用mock框架替换相应调用。
单元测试约定的位置:app/src/test/目录,并需要添加相应配置到Gradle构建文件中:
dependencies {
    // Unit testing dependencies
    testCompile 'junit:junit:4.12'
    // Set this dependency if you want to use the Hamcrest matcher library
    testCompile 'org.hamcrest:hamcrest-library:1.3'
    // more stuff, e.g., Mockito
}使用gradlew test命令可运行单元测试。
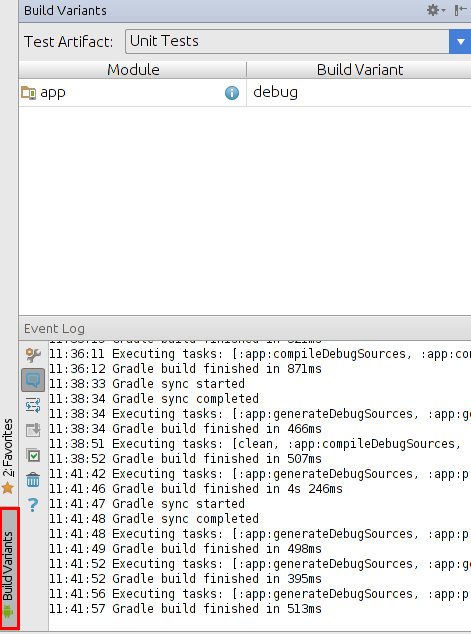
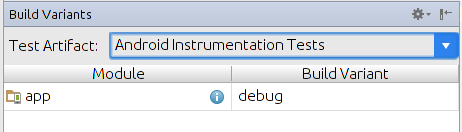
在Android Studio的Build Variants窗口的Test Artifact中选择Unit Tests,单元测试将在JVM上运行。

Android Studio有两种类型,可以在构建变量视图中选择。如果在该视图中选择单元测试,单元测试在JVM上执行。
从运行Android的工作室Android的测试
运行单元测试,先选择的单元测试,在项目窗口中的测试类单击右键并选择运行。
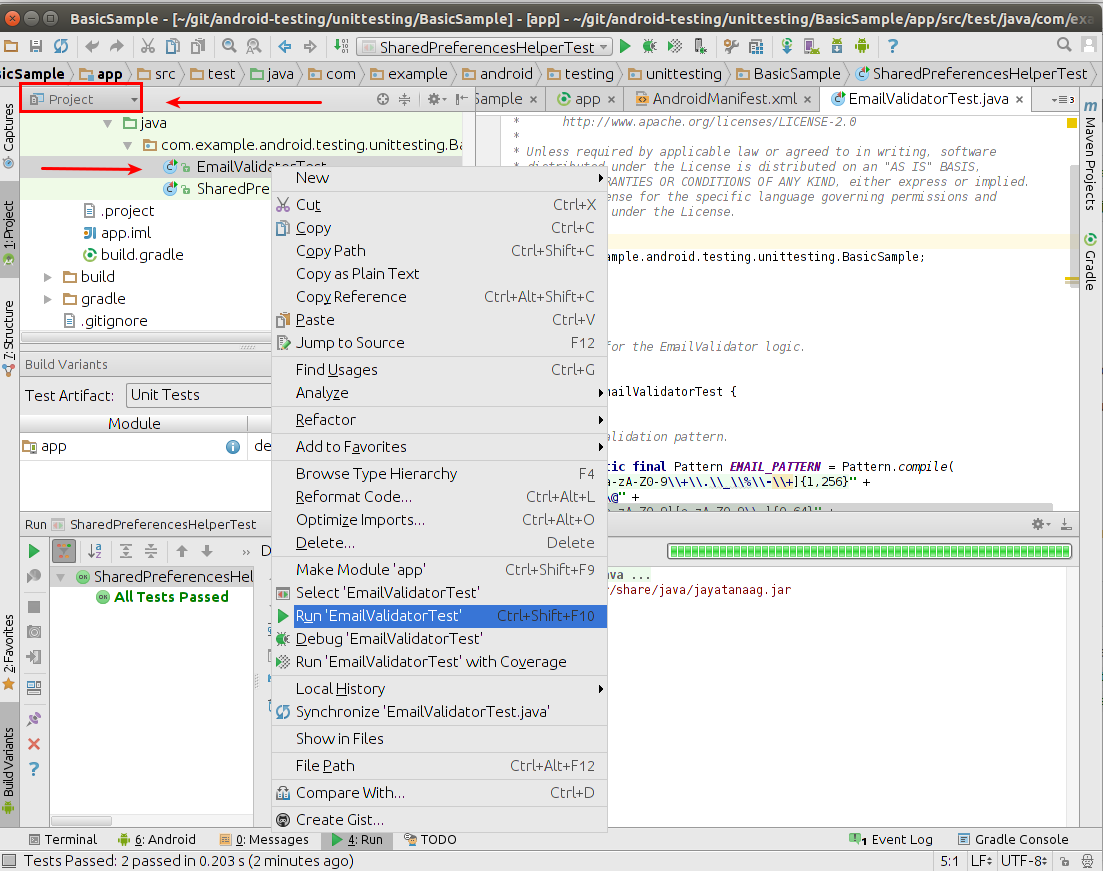
测试报告在app/build/reports/tests/debug/目录。index.html是测试概述,它链接到单个测试页。
也可以配置Gradle构建系统,让android.jar中的方法均返回缺省值而不是抛出异常:
android {
  // ...
  testOptions {
    unitTests.returnDefaultValues = true
  }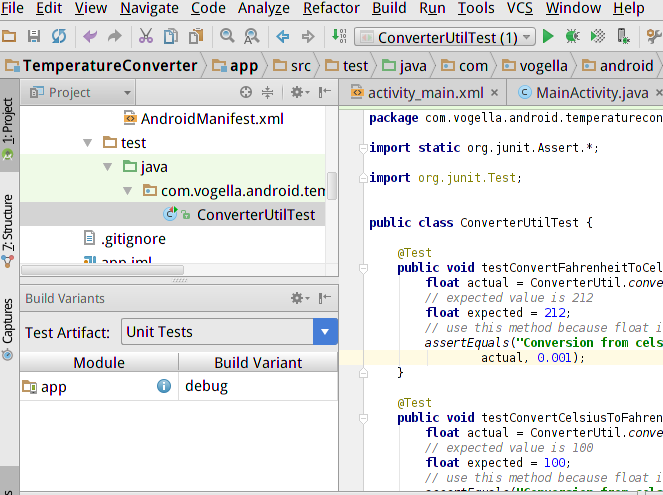
}在app/src/test/目录中为ConverterUtil类创建如下两个测试方法。
温度转换应用的unit test
在模块的app/build.gradle中添加依赖:testCompile 'junit:junit:4.12'
dependencies {
compile fileTree(dir: 'libs', include: ['*.jar'])
testCompile 'junit:junit:4.12'
compile 'com.android.support:appcompat-v7:23.1.1'
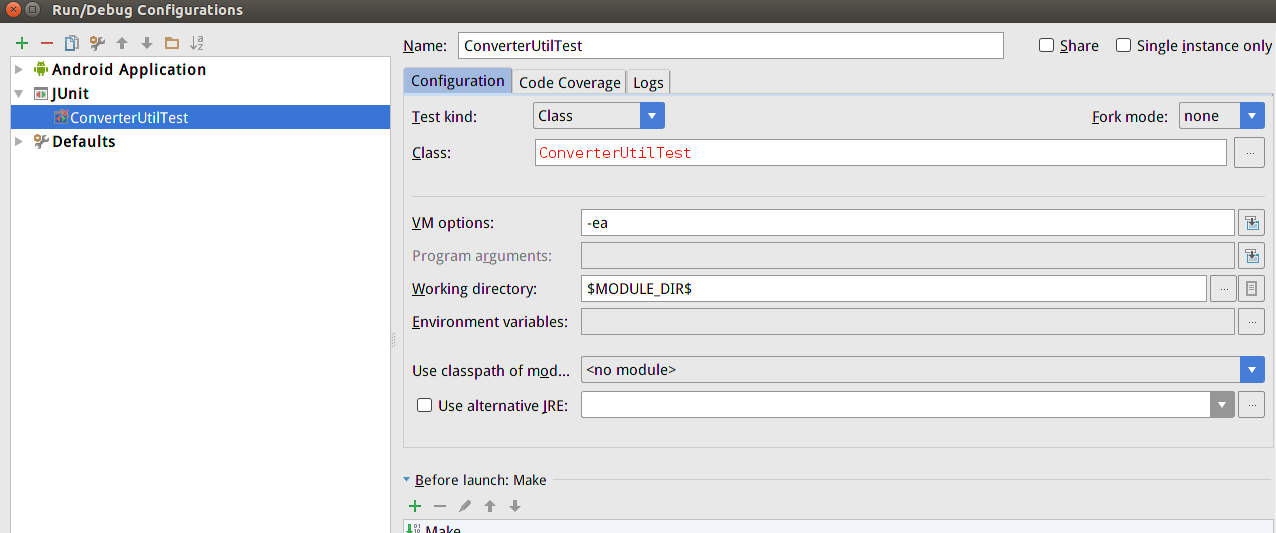
}在菜单栏选择"Run"->"Edit configuration", 增加Junit测试(第一次可能没有)。
然后为ConverterUtil添加unit test, 在左侧窗口双击ConverterUtil打开ConverterUtil.java, 在左侧窗口选中类定义中的ConverterUtil,右键弹出菜单中选择"Go To" -> "Test",选择"Create New Test":

生成的文件ConverterUtilTest.java如下:
package com.vogella.android.temperatureconverter;

import junit.framework.TestCase;
import org.junit.Test;
import static org.junit.Assert.*;

/**
 * Created by andrew on 15-11-8.
 */
public class ConverterUtilTest extends TestCase {

    @Test
    public void testConvertFahrenheitToCelsius() throws Exception {
    }

    @Test
    public void testConvertCelsiusToFahrenheit() throws Exception {
    }
}
修改文件ConverterUtilTest.java:
package com.vogella.android.temperatureconverter;
import static org.junit.Assert.*;
import static org.junit.Assert.*;
import org.junit.After;
import org.junit.Before;
import org.junit.Test;
import com.vogella.android.temperatureconverter.ConverterUtil;
public class ConverterUtilTest {
    @Test
    public void testConvertFahrenheitToCelsius() {
        float actual = ConverterUtil.convertCelsiusToFahrenheit(100);
        // expected value is 212
        float expected = 212;
        // use this method because float is not precise
        assertEquals("Conversion from celsius to fahrenheit failed", expected,
                actual, 0.001);
    }
    @Test
    public void testConvertCelsiusToFahrenheit() {
        float actual = ConverterUtil.convertFahrenheitToCelsius(212);
        // expected value is 100
        float expected = 100;
        // use this method because float is not precise
        assertEquals("Conversion from celsius to fahrenheit failed", expected,
                actual, 0.001);
    }
}
配置Build Variants为unit test:
在左侧窗口单击ConverterUtilTest.java, 在菜单栏选择"Run"->"Edit configuration", 配置Junit测试,这个窗口可以按ALT+Delete删除项目
更多参考资料:http://tools.android.com/tech-docs/unit-testing-support
执行:在左侧窗口右击ConverterUtilTest.java, 选择 "Run ConverterUtilTest"。

Instrumentation - 底层的Android测试API
Android的测试API提供钩子到Android的组件和应用生命周期。这些钩子即instrumentation API,它允许你的测试控制的生命周期和用户交互事件。
在正常情况下应用只反应生命周期和用户交互事件。例如Android的创建activity会调用onCreate()方法被调用您的活动。或用户按按钮或一个密钥和相应的代码被调用。通过instrumentation API这些事件。
InstrumentationTestRunner是Android测试的基础。它启动并加载测试方法。它通过instrumentation API与Android系统进行通信。如果你开始Android应用测试,Android系统杀死被测应用,然后加载一个新的实例。它不启动应用程序,这是的测试方法的责任。测试方法控制的应用组件的生命周期。TestRunner初始化时调用应用和在正常情况下应用只反应生命周期和用户交互事件。例如Android的创建activity会调用onCreate的onCreate()方法 和活动的onCreate()方法。
一般是调用Espresso,很少直接使用 instrumentation API。
依赖配置:
defaultConfig {
       ..... more stuff
        testInstrumentationRunner "android.support.test.runner.AndroidJUnitRunner"
    }

dependencies {
    // Unit testing dependencies
    androidTestCompile 'junit:junit:4.12'
    // Set this dependency if you want to use the Hamcrest matcher library
    androidTestCompile 'org.hamcrest:hamcrest-library:1.3'
    // more stuff, e.g., Mockito
}建议测试添加注解@RunWith(AndroidJUnit4.class)。 AndroidJUnit4扩展JUnit4,纯Junit4语法和ActivityTestRule不是必需的。但是Espresso测试混合ActivityTestRule需要。gradle的执行方式“gradlew connectedCheck"。Android Studio的Build Variants窗口的设置如下:
要运行单元测试,应保证选择的是”Android Instrumentation Tests”,右击待测试的类然后选择”Run”。测试报告输出到 app/build/reports/androidTests/connected/,index.html是测试概述,它链接到单个测试页。
添加mockito支持:
dependencies {
    testCompile 'junit:junit:4.12'
    // required if you want to use Mockito for unit tests
    testCompile 'org.mockito:mockito-core:1.+'
    // required if you want to use Mockito for Android instrumentation tests
    androidTestCompile 'org.mockito:mockito-core:1.+'
    androidTestCompile "com.google.dexmaker:dexmaker:1.2"
    androidTestCompile "com.google.dexmaker:dexmaker-mockito:1.2"
}
mockito完全可以替代安卓原有的各种mock方法。mockito实例:
在上面例子增加Util类:
package com.vogella.android.temperatureconverter;

import android.content.Context;
import java.io.BufferedWriter;
import java.io.FileOutputStream;
import java.io.IOException;

public class Util {

    public static void writeConfiguration(Context ctx) {
        BufferedWriter writer = null;
        try {
            FileOutputStream openFileOutput = ctx.openFileOutput("config.txt", Context.MODE_PRIVATE);
            openFileOutput.write("This is a test1.".getBytes());
            openFileOutput.write("This is a test2.".getBytes());
        } catch (Exception e) {
            throw new RuntimeException(e);
        } finally {
            if (writer != null) {
                try {
                    writer.close();
                } catch (IOException e) {
                    e.printStackTrace();
                }
            }
        }
    }
}
增加测试类:
package com.vogella.android.temperatureconverter;

import android.content.Context;
import org.junit.Before;
import org.junit.Test;
import org.junit.runner.RunWith;
import org.mockito.Mock;
import org.mockito.MockitoAnnotations;
import java.io.FileOutputStream;
import static org.junit.Assert.fail;
import static org.mockito.Matchers.any;
import static org.mockito.Matchers.anyInt;
import static org.mockito.Matchers.anyString;
import static org.mockito.Mockito.atLeast;
import static org.mockito.Mockito.times;
import static org.mockito.Mockito.verify;
import static org.mockito.Mockito.when;

public class TextContextOutputStream {

    @Mock
    Context context;

    @Mock
    FileOutputStream fileOutputStream;

    @Before
    public void init(){
        MockitoAnnotations.initMocks(this);
    }

    @Test
    public void writeShouldWriteTwiceToFileSystem() {
        try {
            when(context.openFileOutput(anyString(), anyInt())).thenReturn(fileOutputStream);
            Util.writeConfiguration(context);
            verify(context, times(1)).openFileOutput(anyString(), anyInt());
            verify(fileOutputStream, atLeast(2)).write(any(byte[].class));

        } catch (Exception e) {
            e.printStackTrace();
            fail();
        }
    }
}
参考资料:http://www.vogella.com/tutorials/AndroidTesting/article.html
http://www.sunmoonblog.com/blog/2015/06/10/android-testing/
其他测试基础介绍
Android 测试库的介绍参见:http://my.oschina.net/u/1433482/blog/602003。
Android testing API额外提供了MoreAsserts和ViewAsserts类。
注解@SmallTest, @MediumTest和@LargeTest可用于分组测试。Gradle支持选择部分分组执行测试,配置如下:
android {
//....
defaultConfig {
//....
testInstrumentationRunner "android.support.test.runner.AndroidJUnitRunner"
testInstrumentationRunnerArgument "size", "small"
}
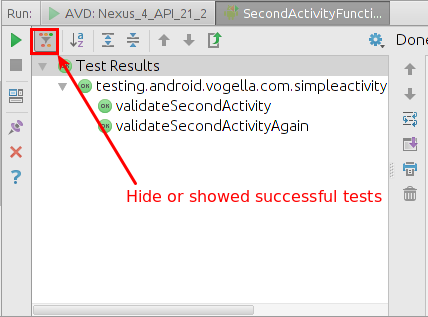
}注意Gradle 1.3.0以后支持,Android Studio在2015年还不支持。测试用例示例:
import android.test.suitebuilder.annotation.MediumTest;
import android.test.suitebuilder.annotation.SmallTest;
import org.junit.Test;

public class ExampleTest {

    @Test
    @SmallTest
    public void validateSecondActivity() {
        // Do something not so long...
    }

    @Test
    @MediumTest
    public void validateSecondActivityAgain() {
        // Do something which takes more time....
    }
}
注意上述代码不能执行。
测试过滤(Test filtering)主要针对需要依赖硬件或特殊SDK版本的测试。
注解@FlakyTest的tolerance属性可以配置重复测试的频率。
Activity的测试可以基于Espresso和UI Automator(https://pypi.python.org/pypi/uiautomator)。
Monkey是用于发送伪随机事件到您的设备的工具,可以指定软件包。例如,以下将发送2000随机事件到de.vogella.android.test.target包。
adb shell monkey -p de.vogella.android.test.target -v 2000Monkey有时会导致adb server问题。使用以下命令重新启动ADB服务器。
adb kill-server
adb start-server
您可以使用-s [seed]参数,确保事件生成的序列总是相同的。
更多资料参见 http://developer.android.com/intl/zh-cn/tools/help/monkey.html
其他开源框架:Robolectric(推荐)、roboguice、Robotium。
Android运行时测试基于ApplicationTestCase类。期待谷歌推出安卓的JUnit4规则。
InstrumentationTestRunner初始化时自动创建实例,在onCreate方法做异步处理需要考虑。
微博 http://weibo.com/cizhenshi 作者博客:http://my.oschina.net/u/1433482/ python测试开发精华群 291184506 PythonJava单元白盒测试 144081101
本文英文原文:http://www.vogella.com/tutorials/AndroidTesting/article.html
因为后面部分基于junit3介绍为主,暂时不完整翻译。可以参考中文翻译:http://www.sunmoonblog.com/blog/2015/06/10/android-testing/


 633
633


 被折叠的 条评论
为什么被折叠?
被折叠的 条评论
为什么被折叠?
 到【灌水乐园】发言


