


基于路由的点到点×××设置 (自动IKE)
点到点的***设置分为三种情况,一是两端都有固定的IP地址,二是一端有固定IP地址,另一端为动态的IP地址,三是两端都没有固定的IP地址。下面的实验中我们将使用DHCP自动分配地址的方式来模拟动态的IP地址情况。考虑到两端都没有固定地址的情况比较少,且设置较为复杂,所以不在初级设置中描述。
配置×××的前提有两个,一是两端的设备都能够分别访问到对端的外网接口,二是对于基于IPSec的×××来说,两端设备之间的路由设备不应阻挡UDP端口为500的数据包通过。
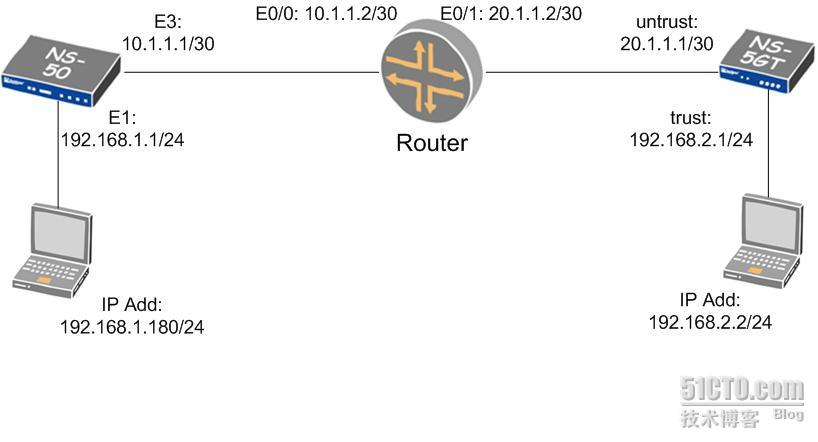
? 情况一 两端都有固定IP地址的×××
拓扑图如下:
点到点的***设置分为三种情况,一是两端都有固定的IP地址,二是一端有固定IP地址,另一端为动态的IP地址,三是两端都没有固定的IP地址。下面的实验中我们将使用DHCP自动分配地址的方式来模拟动态的IP地址情况。考虑到两端都没有固定地址的情况比较少,且设置较为复杂,所以不在初级设置中描述。
配置×××的前提有两个,一是两端的设备都能够分别访问到对端的外网接口,二是对于基于IPSec的×××来说,两端设备之间的路由设备不应阻挡UDP端口为500的数据包通过。
? 情况一 两端都有固定IP地址的×××
拓扑图如下:
Netscreen 5gt的配置
1. 接口
Network > Interfaces > Edit ( 对于Trust Interface )
Zone Name: Trust
Static IP: IP Address/Netmask: 192.168.2.1/24
Interface Mode: NAT
要更改5gt的trust接口地址,首先要把trust接口上的DHCP关掉。
Network > Interfaces > Edit ( 对于Untrust Interface )
Zone Name: Untrust
Static IP: IP Address/Netmask: 20.1.1.1/30
Interface Mode: Route
Network > Interfaces > New Tunnel IF:
Tunnel Interface Name: tunnel.1
36
Zone (VR): Trust (trust-vr)
Unnumbered: (选择)
Interface: Untrust (trust-vr)
2. 路由
Network > Routing > Routing Entries > trust-vr New: 输入以下内容,然后单击 OK:
Network Address/Netmask: 0.0.0.0/0
Gateway:
Interface: Untrust
Gateway IP Address: 20.1.1.2
Network > Routing > Routing Entries > trust-vr New: 输入以下内容,然后单击 OK:
Network Address/Netmask: 192.168.1.0/24
Gateway:
Interface: Tunnel.1
Gateway IP Address: 0.0.0.0
3. 地址
Objects > Addresses > List > New
Address Name: 5gt_LAN
IP Address/Domain Name:
IP / Netmask: 192.168.2.0/24
Zone: Trust
Objects > Addresses > List > New:
Address Name: 50_LAN
IP Address/Domain Name:
IP / Netmask: 192.168.1.0/24
Zone: Trust
4. ×××
×××s > AutoKey Advanced > Gateway > New:
Gateway Name: 5gt_to_50_gw
Security Level: Custom
Remote Gateway Type:
Static IP Address: (选择)
IP Address/Hostname: 10.1.1.1
Preshared Key: 123456 (要与对端一样)
Outgoing Interface: Untrust
> Advanced: 输入以下高级设置,然后单击 OK 返回基本 Gateway 配置页:
Security Level: Custom (选择)
Phase 1 Proposal (for Custom Security Level): pre-g2-3des-sha (要与对端一样)
37
Mode (Initiator): Main (ID Protection)
×××s > AutoKey IKE > New:
××× Name: 5gt_to_50_×××
Security Level: Custom
Remote Gateway: Predefined: (选择), 5gt_to_50_gw
> Advanced: 输入以下高级设置,然后单击 OK 返回基本 Gateway 配置页:
Security Level: Custom
Phase 2 Proposal (for Custom Security Level): g2-esp-des-md5 (要与对端一样)
Bind to: Tunnel Interface, tunnel.1 (选择)
××× monitor (选择)
5. 策略
注:5gt中默认有一条From Trust To Untrust,原地址为ANY,目标地址为ANY,服务为ANY的允许策略。其他型号均没有,需要手动添加。建议原地址为内网网段。
(可选)
Policies > (From: Trust, To: Trust) New: 输入以下内容,然后单击 OK:
Source Address:
Address Book Entry: (选择), 5gt_LAN
Destination Address:
Address Book Entry: (选择), 50_LAN
注:原地址一定要写地址段或主机地址,不能选ANY
Service: TELNET
Action: Deny
Logging (选择)
Position at Top: (选择)
完成
Netscreen 50的配置
1. 接口
Network > Interfaces > Edit ( 对于ethetnet 1 Interface )
Zone Name: Trust
Static IP: IP Address/Netmask: 192.168.1.1/24
Interface Mode: NAT
Network > Interfaces > Edit ( 对于ethetnet 3 Interface )
Zone Name: Untrust
Static IP: IP Address/Netmask: 10.1.1.1/30
Interface Mode: Route
Network > Interfaces > New Tunnel IF:
Tunnel Interface Name: tunnel.1
Zone (VR): Trust (trust-vr)
38
Unnumbered: (选择)
Interface: Ethernet 3 (trust-vr)
2. 路由
Network > Routing > Routing Entries > trust-vr New: 输入以下内容,然后单击 OK:
Network Address/Netmask: 0.0.0.0/0
Gateway:
Interface: ethernet 3
Gateway IP Address: 20.1.1.2
Network > Routing > Routing Entries > trust-vr New: 输入以下内容,然后单击 OK:
Network Address/Netmask: 192.168.2.0/24
Gateway:
Interface: Tunnel.1
Gateway IP Address: 0.0.0.0
3. 地址
Objects > Addresses > List > New
Address Name: 50_LAN
IP Address/Domain Name:
IP / Netmask: 192.168.1.0/24
Zone: Trust
Objects > Addresses > List > New:
Address Name: 5gt_LAN
IP Address/Domain Name:
IP / Netmask: 192.168.2.0/24
Zone: Trust
4. ×××
×××s > AutoKey Advanced > Gateway > New:
Gateway Name: 50_to_5gt_gw
Security Level: Custom
Remote Gateway Type:
Static IP Address: (选择)
IP Address/Hostname: 20.1.1.1
Preshared Key: 123456 (要与对端一样)
Outgoing Interface: Ethernet 3
> Advanced: 输入以下高级设置,然后单击 OK 返回基本 Gateway 配置页:
Security Level: Custom (选择)
Phase 1 Proposal (for Custom Security Level): pre-g2-3des-sha (要与对端一样)
Mode (Initiator): Main (ID Protection)
39
×××s > AutoKey IKE > New:
××× Name: 50_to_5gt_×××
Security Level: Custom
Remote Gateway: Predefined: (选择), 50_to_5gt_gw
> Advanced: 输入以下高级设置,然后单击 OK 返回基本 Gateway 配置页:
Security Level: Custom
Phase 2 Proposal (for Custom Security Level): g2-esp-des-md5 (要与对端一样)
Bind to: Tunnel Interface, tunnel.1 (选择)
××× monitor (选择)
5. 策略
Policies > (From: Trust, To: Untrust) New: 输入以下内容,然后单击 OK:
Source Address:
Address Book Entry: (选择), 50_LAN
Destination Address:
Address Book Entry: (选择), ANY
Service: ANY
Action: Permit
Logging (选择)
Position at Top: (选择)
完成
路由器的配置
Router#sh run
Building configuration...
Current configuration : 781 bytes
!
version 12.3
service timestamps debug datetime msec
service timestamps log datetime msec
no service password-encryption
!
hostname Router
!
boot-start-marker
boot-end-marker
!
!
no aaa new-model
ip subnet-zero
40
ip cef
!
!
ip audit po max-events 100
!
!
interface Ethernet0/0
ip address 10.1.1.2 255.255.255.252
full-duplex
!
interface Ethernet0/1
ip address 20.1.1.2 255.255.255.252
full-duplex
!
!
ip http server
no ip http secure-server
ip classless
!
!
line con 0
line aux 0
line vty 0 4
!
!
end
Router#
验证×××
在×××s > Monitor Status页面中,查看所建×××的状态,如下所示:
也可以在命令行模式下,使用get sa命令检查状态,如下所示:
ns5gt-> get sa
total configured sa: 1
HEX ID Gateway Port Algorithm SPI Life:sec kb Sta PID vsys
00000001< 10.1.1.1 500 esp:3des/sha1 4c5d7ae9 2088 unlim A/U -1 0
00000001> 10.1.1.1 500 esp:3des/sha1 c2d8a039 2088 unlim A/U -1 0
ns5gt->
41
ns50-> get sa
total configured sa: 1
HEX ID Gateway Port Algorithm SPI Life:sec kb Sta PID vsys
00000001< 20.1.1.1 500 esp:3des/sha1 c2d8a039 2124 unlim A/U -1 0
00000001> 20.1.1.1 500 esp:3des/sha1 4c5d7ae9 2124 unlim A/U -1 0
ns50->
此时,地址为192.168.1.180的主机应该能够Ping通192.168.2.2,反之亦然。由于在NS-5gt中设置过一条trust到trust的策略,所以在192.168.2.2的主机上不能telnet到192.168.1.1。
转载于:https://blog.51cto.com/dlnat/91772


 1137
1137


 被折叠的 条评论
为什么被折叠?
被折叠的 条评论
为什么被折叠?
 到【灌水乐园】发言


