


最近研究了一下日志收集,用于简单的日志收集和查看。首先架构比较简单,架构如图:
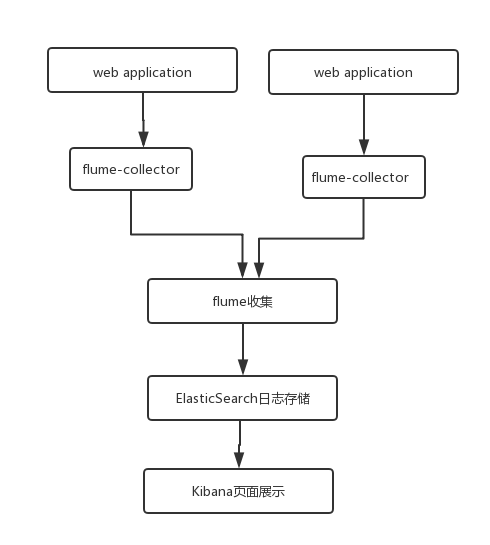
flume负责日志收集,然后将数据直接传送给elasticesearch,然后kibana 负责做展示。在某些复杂的结构中,可能会将flume收集的日志发送给Kafka,然后由kafka做分发,分发给不同的数据处理系统,本文是最简洁的方式。
flume两层agent配置如下链接
http://shiyanjun.cn/archives/1497.html
一、安装
我使用版本
apache-flume-1.7.0-bin 、elasticsearch-1.7.0、kibana-4.0.2-linux-x64
由于flume 对最新的elasticsearch没有支持,所以需要使用比较旧的ES。然后,如果要使用flume的sink为Elasticsearch,flume需要一些jar包,这些jar包可以在ES中找到
方法: 复制 elasticsearch-xx.xx/lib 中的这两个jar包 elasticsearch-1.7.0.jar 和 lucene-core-4.10.4.jar 到 apache-flume-xx.xx/lib/目录下。
1.配置flume
修改apache-flume-xxx-xxx/conf/flume-conf.properties文件,配置 flume的sources,sinks,channels.这些需要根据具体的业务逻辑来配置,下面我会解释我的业务和配置。
agent.sources = logsSrc
agent.channels = memoryChannel
agent.sinks = elasticsearch

# For each one of the sources, the type is defined
agent.sources.logsSrc.type = exec
# The channel can be defined as follows.
agent.sources.logsSrc.channels = memoryChannel
agent.sources.logsSrc.command=tail -F /data/tomcat/apache-tomcat-8029/logs/genoTypelog/genoTypelog.log
agent.sources.logsSrc.interceptors=i1 i2 i3
agent.sources.logsSrc.interceptors.i1.type=REGEX_EXTRACTOR
agent.sources.logsSrc.interceptors.i1.regex =([^\\s]*)\t([^\\s]*)\t([^\\s]*)\t([^\\s]*)\t([^\\s]*)\t([^\\s]*)\t([^\\s]*)\t([^\\s]*)\t(.*)
agent.sources.logsSrc.interceptors.i1.serializers = s1 s2 s3 s4 s5 s6 s7 s8 s9
agent.sources.logsSrc.interceptors.i1.serializers.s1.name = type
agent.sources.logsSrc.interceptors.i1.serializers.s2.name = productId
agent.sources.logsSrc.interceptors.i1.serializers.s3.name = barCode
agent.sources.logsSrc.interceptors.i1.serializers.s4.name = product
agent.sources.logsSrc.interceptors.i1.serializers.s5.name = id
agent.sources.logsSrc.interceptors.i1.serializers.s6.name = name
agent.sources.logsSrc.interceptors.i1.serializers.s7.name = rId
agent.sources.logsSrc.interceptors.i1.serializers.s8.name = type_new
agent.sources.logsSrc.interceptors.i1.serializers.s9.name = dateTime
agent.sources.logsSrc.interceptors.i2.type=org.apache.flume.interceptor.TimestampInterceptor$Builder
agent.sources.logsSrc.interceptors.i3.type=org.apache.flume.interceptor.HostInterceptor$Builder
agent.sources.logsSrc.interceptors.i3.hostHeader = host

agent.sinks.elasticsearch.channel = memoryChannel
agent.sinks.elasticsearch.type = org.apache.flume.sink.elasticsearch.ElasticSearchSink
agent.sinks.elasticsearch.hostNames = 192.168.30.249:9300
agent.sinks.elasticsearch.indexName = genotype_log_info_new
agent.sinks.elasticsearch.batchSize = 100
agent.sinks.elasticsearch.indexType = logs
agent.sinks.elasticsearch.clusterName = my-application
agent.sinks.elasticsearch.serializer = org.apache.flume.sink.elasticsearch.ElasticSearchLogStashEventSerializer


agent.channels.memoryChannel.type = memory
agent.channels.memoryChannel.capacity = 65536
日志格式如下
-- 201531 111-1142-5385 trait 563c633f0cf2009669d2fd08 创造能力 rs1800955 -- 2017-04-01 11:44:51 启动flume
$bin/flume-ng agent -c ./ -f flume-conf.properties -n agent -Dflume.root.logger=INFO,console以上是通过正则表达式提取日志文件每一项, 分割为不同字段存放到ES数据库
2.配置elasticsearch
编辑:elasticsearch-xxxxx/config/elasticsearch.yml文件。 主要修改如下:
# Cluster name identifies your cluster for auto-discovery. If you're running
# multiple clusters on the same network, make sure you're using unique names.
 cluster.name: my-application

# Node names are generated dynamically on startup, so you're relieved
# from configuring them manually. You can tie this node to a specific name:
 node.name: node-1

# Set the number of shards (splits) of an index (5 by default):
 index.number_of_shards: 5

# Set the number of replicas (additional copies) of an index (1 by default):
 index.number_of_replicas: 1

#设置节点之间交互的tcp端口,默认是9300
 transport.tcp.port: 9300

#设置是否压缩tcp传输时的数据,默认为false,不压缩
 transport.tcp.compress: true

#设置对外服务的http端口,默认为9200
  http.port: 9200
3. 配置kibana
修改kibana-xxx.xxx.xx/config/kibana.yml如下

主要修改kibanan监听port和host以及elasticsearch_url三个参数。
二 、Flume channel
1.文件Channel设置
| 参数名称 | 默认值 | 描述 |
| type | - | 类型名称 |
| checkpointDir | ~/.flume/file-channel/checkpoint | 检测点文件所存储的目录 |
| useDualCheckpoints | FALSE | 备份检测点如果设置为true,backupChec kpointDir必须设置 |
| backupCheckpointDir | – | 备份检测点的备份到所在的目录,不要与数据检测点或者目录重复 |
| dataDirs | ~/.flume/file-channel/data | 数据存储所在的目录设置 |
| transactionCapacity | 1000 | 事务容量的最大值设置 |
| checkpointInterval | 30000 | 检测点之间的时间值设置(单位微秒) |
| maxFileSize | 2146435071 | 一个单一日志的最大值设置(以字节为单位) |
| minimumRequiredSpace | 524288000 | 最小的请求闲置空间(以字节为单位) |
| capacity | 1000000 | 隧道的最大容量 |
| keep-alive | 3 | 一个存放操作的等待时间值(秒)设置 |
| write-timeout | 3 | 一个写操作的等待时间值(秒)设置 |
| checkpoint-timeout | 600 | Expert:一个检测点操作的等待时间值(秒)设置 |
| use-log-replay-v1 | FALSE | Expert: 使用老的回复逻辑 |
| use-fast-replay | FALSE | Expert: 回复不需要队列 |
| encryption.activeKey | – | 使用关键字名称去加密新数据 |
| encryption.cipherProvider | – | 密码提供者类型,支持的类型有: AESCTRNOPADDING |
| encryption.keyProvider | – | 关键字提供者类型,支持的类型有: JCEKSFILE |
| encryption.keyProvider.keyStoreFile | – | 存储关键字文件的路径 |
| encrpytion.keyProvider.keyStorePasswordFile | – | 存储关键字密钥文件的路径 |
| encryption.keyProvider.keys | – | 列出所有的关键字(比如,激活关键字设置历史) |
| encyption.keyProvider.keys.*.passwordFile | – | 可选关键字密钥文件的路径 |
更多信息,请参考下列资源。
http://flume.apache.org/FlumeUserGuide.html#file-channel
2.内存 Channel参数设置
| 参数名称 | 默认值 | 描述 |
| type | 隧道名称类型memory | |
| capacity | 100 | 存储在channel中的最大容量 |
| transactionCapacity | 100 | 从一个source中去或者给一个sink,每个事务中最大的事件数 |
| keep-alive | 3 | 对于添加或者删除一个事件的超时的秒钟 |
| byteCapacityBufferPercentage | 20 | 定义缓存百分比。 |
| byteCapacity | see description | 最大内存所有事件允许总字节数 |
更多信息,请参考下列资源。
http://flume.apache.org/FlumeUserGuide.html#memory-channel
三 、flume自定义拦截器和sink
用户可以自定义一些组件,将代码打包,放到flume的lib目录下。以后有时间会添加详细的 自定义方法。
1.flume拦截器
interceptors 可以理解为一个过滤器,通过配置可以收集到符合自己需要类型的日志.
官方提供的拦截器
Timestamp Interceptor
在event的header中添加一个key叫:timestamp,value为当前的时间戳
Host Interceptor
在event的header中添加一个key叫:host,value为当前机器的hostname或者ip
Regex Filtering Interceptor
通过正则来清洗或包含匹配的events。
Regex Extractor Interceptor
通过正则表达式来在header中添加指定的key,value则为正则匹配的部分.
Static Interceptor
可以在event的header中添加自定义的key和value。
例子:其中 i1 是 匹配正则 i2 是匹配类似 d:d:d 格式的日志
a1.sources.source1.interceptors=i1,i2
a1.sources.source1.interceptors.i1.type=regex_filter
a1.sources.source1.interceptors.i1.regex=\\{.*\\}

a1.sources.source1.interceptors.i2.type=regex_filter
a1.sources.source1.interceptors.i2.regex = (\\d):(\\d):(\\d)
a1.sources.source1.interceptors.i2.serializers = s1 s2 s3
a1.sources.source1.interceptors.i2.serializers.s1.name = one
a1.sources.source1.interceptors.i2.serializers.s2.name = two
a1.sources.source1.interceptors.i2.serializers.s3.name = three
Static Interceptor使用方法
agent.sources.sources1.interceptors.i1.type = static
agent.sources.sources1.interceptors.i1.preserveExisting = true
agent.sources.sources1.interceptors.i1.key = static_key
agent.sources.sources1.interceptors.i1.value = static_value
2. hdfs sink配置向项目详解
http://lxw1234.com/archives/2015/10/527.htm
flume hdfs sink需要的jar包,从hadoop安装包获取
commons-configuration-1.6.jar ,hadoop-auth.jar,hadoop-common.jar,hadoop-hdfs.jar
,hadoop-nfs.jar,htrace-core4.jar
项目使用配置案例,收集指定日志目录的日志,并且保存到hdfs供hive使用。
agent.sources = removeLogsSrc
agent.channels = memoryChannel
agent.sinks = hive

# For each one of the sources, the type is defined
agent.sources.removeLogsSrc.type = exec
# The channel can be defined as follows.
agent.sources.removeLogsSrc.channels = memoryChannel
agent.sources.removeLogsSrc.command=tail -F /data/tomcat/tomcat-online-8029/logs/removelog/removelog.log

agent.sinks.hive.channel = memoryChannel
agent.sinks.hive.type = hdfs
agent.sinks.hive.hdfs.writeFormat = Text
agent.sinks.hive.hdfs.fileType = DataStream
agent.sinks.hive.hdfs.useLocalTimeStamp = true
agent.sinks.hive.hdfs.filePrefix = removeLog_%Y%m%d
agent.sinks.hive.hdfs.path =hdfs://192.168.30.9:8020/user/hive/warehouse/removeLog
agent.sinks.hive.hdfs.inUseSuffix=.temp
#hdfs sink多长时间将临时文件滚动城最终目标文件们单位秒,如果为0则
agent.sinks.hive.hdfs.rollInterval=0
#默认值:1024 当临时文件达到该大小(单位:bytes)时,滚动成目标文件;如果设置成0,则表示不根据临时文件大小来滚动文件;
agent.sinks.hive.hdfs.rollSize=0
#默认值:10 当events数据达到该数量时候, 将临时文件滚动成目标文件; 如果设置成0,则表示不根据events数据来滚动文件;
agent.sinks.hive.hdfs.rollCount=0
#默认值:0  当目前被打开的临时文件在该参数指定的时间(秒)内,没有任何数据写入,则将该临时文件关闭并重命名成目
agent.sinks.hive.hdfs.idleTimeout=120
#默认值:100 每个批次刷新到HDFS上的events数量
agent.sinks.hive.hdfs.batchSize=100
agent.sinks.hive.hdfs.minBlockReplicas=1

# Other config values specific to each type of channel(sink or source)
# can be defined as well
# In this case, it specifies the capacity of the memory channel
agent.channels.memoryChannel.type = memory
agent.channels.memoryChannel.capacity = 65536

-- INSERT --


 3011
3011

 被折叠的 条评论
为什么被折叠?
被折叠的 条评论
为什么被折叠?
 到【灌水乐园】发言


