


1. 初衷
时常被问及“nova创建虚拟机的过程”,虽然大致是知道里面的过程的,但在某些场合之下,说“大致”知道往往决定了一场对话的无疾而终。要把这详细的内容给完整地说出来,有逻辑地说出来,还是需要细细斟酌一番的,那种“大致”的说辞就显得苍白了。毕竟作为从业者,详细地,深入地了解内部的整个过程应该是必须的基本功,这算是初衷吧。
2. 由一条命令引起的风波
nova --debug boot ubuntu_test --flavor 2 \
 --image cde1d850-65bb-48f6-8ee9-b990c7ccf158 \
 --num-instance 1 \
--nic net-id=cfa25cef-96c3-46f1-8522-d9518eb5a451这是一条创建虚拟机(实例)的命令,在命令中指定了新实例的名称:ubuntu_test,云主机类型:2,镜像:cde1d850-65bb-48f6-8ee9-b990c7ccf158,数量:1台,指定网络:cfa25cef-96c3-46f1-8522-d9518eb5a451。
这里要说明一下镜像和网络:


命令中的镜像网络通过这两个命令查询而来。
正如所看到的,命令中加了--debug参数,这可以让我们清楚看到在执行这个命令的过程中做了哪些具体操作。
下图就是我们执行创建实例后的过程
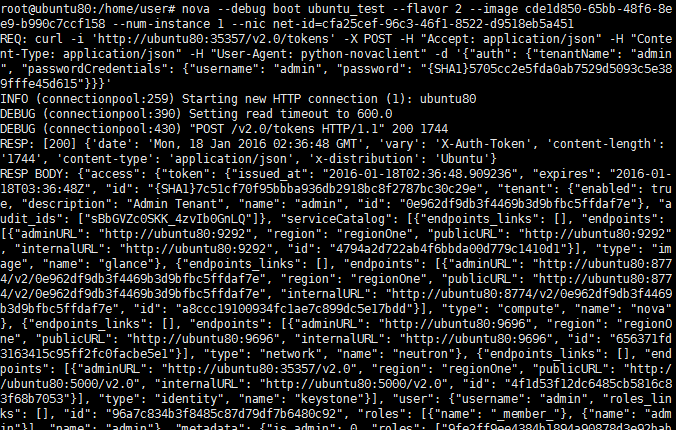
这里信息有点多啊,因此只好截了部分的图。详细信息整理后放在下面。并逐一分析。
3. debug输出的主要的请求
这里主要说明下面最重要的四条
3.1. 向keystone取得token
REQ:
curl \
 -i 'http://ubuntu80:35357/v2.0/tokens' -X POST -H "Accept: application/json" \
 -H "Content-Type: application/json" -H "User-Agent: python-novaclient"      \
 -d '{"auth": {"tenantName": "admin", "passwordCredentials": {"username": "admin", "password": "{SHA1}5705cc2e5fda0ab7529d5093c5e389fffe45d615"}}}'
3.2. 通过nova-api验证镜像
REQ:
curl
 -i 'http://ubuntu80:8774/v2/0e962df9db3f4469b3d9bfbc5ffdaf7e/images/cde1d850-65bb-48f6-8ee9-b990c7ccf158' \
 -X GET                        \
 -H "Accept: application/json"  \
 -H "User-Agent: python-novaclient" \
 -H "X-Auth-Project-Id: admin"      \
-H "X-Auth-Token: {SHA1}e87219521f61238b143fbb323b962930380ce022"
3.3. 通过nova-api验证云主机类型
REQ:
curl
 -i 'http://ubuntu80:8774/v2/0e962df9db3f4469b3d9bfbc5ffdaf7e/flavors/2' \
 -X GET -H "Accept: application/json" -H "User-Agent: python-novaclient" \
 -H "X-Auth-Project-Id: admin" \
-H "X-Auth-Token: {SHA1}e87219521f61238b143fbb323b962930380ce022"
3.4. 创建实例
REQ:
curl
 -i 'http://ubuntu80:8774/v2/0e962df9db3f4469b3d9bfbc5ffdaf7e/servers' \
 -X POST -H "Accept: application/json" \
 -H "Content-Type: application/json"   \
 -H "User-Agent: python-novaclient"    \
 -H "X-Auth-Project-Id: admin"         \
 -H "X-Auth-Token: {SHA1}e87219521f61238b143fbb323b962930380ce022" \
-d '{"server": {"name": "ubuntu_test", "imageRef": "cde1d850-65bb-48f6-8ee9-b990c7ccf158", "flavorRef": "2", "max_count": 1, "min_count": 1, "networks": [{"uuid": "cfa25cef-96c3-46f1-8522-d9518eb5a451"}]}}'
4. 从如何取得token说起
我们都知道35357是keystone的端口,问我为啥知道是keystone,好吧,我是通过端口查到的。
恩,是的,就是keystone,我们回到我们的主题,这里向keystone发送请求的时候,组织了这样的一个数据
{
    "auth": {
        "tenantName": "admin",
        "passwordCredentials": {
            "username": "admin",
            "password": "{SHA1}5705cc2e5fda0ab7529d5093c5e389fffe45d615"
        }
    }
}
把这个数据发给keystone,目的是为了获取一个token,就是一个钥匙,有了它,我们后面的操作就可以凭借这个钥匙畅通无阻了。那keystone是怎么处理的呢。
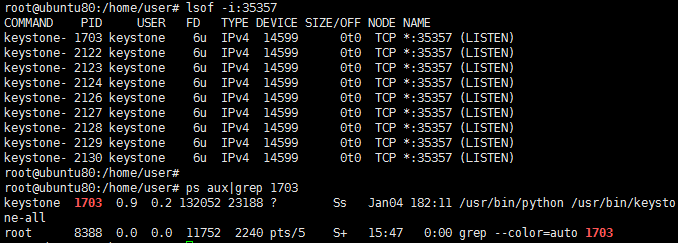
找到keystone的源码

看到token了吧,嗯嗯,就在那里面
nano token/controllers.py找到Auth类的authenticate方法
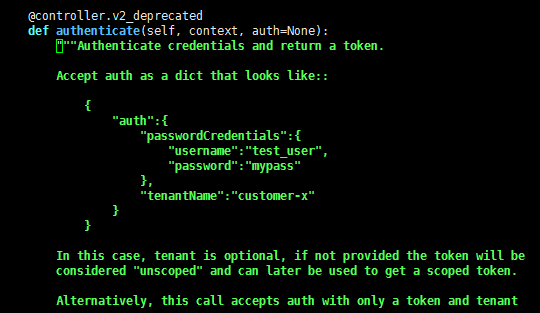
是不是跟上面给keystone的参数类似。这个方法一切顺利的话,在最后它会返回一个token(钥匙)。
keystone回复的是什么呢。
REQ:
curl \
 -i 'http://ubuntu80:35357/v2.0/tokens'  \
 -X POST -H "Accept: application/json"  \
 -H "Content-Type: application/json"     \
 -H "User-Agent: python-novaclient"      \
-d '{"auth": {"tenantName": "admin", "passwordCredentials": {"username": "admin", "password": "{SHA1}5705cc2e5fda0ab7529d5093c5e389fffe45d615"}}}'
INFO (connectionpool:259) Starting new HTTP connection (1): ubuntu80
DEBUG (connectionpool:390) Setting read timeout to 600.0
DEBUG (connectionpool:430) "POST /v2.0/tokens HTTP/1.1" 200 1744
RESP: [200] {'date': 'Mon, 18 Jan 2016 01:58:37 GMT', 'vary': 'X-Auth-Token', 'content-length': '1744', 'content-type': 'application/json', 'x-distribution': 'Ubuntu'}
RESP BODY: {"access": {"token": {"issued_at": "2016-01-18T01:58:37.093849", "expires": "2016-01-18T02:58:37Z", "id": "{SHA1}e87219521f61238b143fbb323b962930380ce022", "tenant": {"enabled": true, "description": "Admin Tenant", "name": "admin", "id": "0e962df9db3f4469b3d9bfbc5ffdaf7e"}, "audit_ids": ["RugmwI0_R3ysmpJ3zF8k4Q"]}, "serviceCatalog": [{"endpoints_links": [], "endpoints": [{"adminURL": "http://ubuntu80:9292", "region": "regionOne", "publicURL": "http://ubuntu80:9292", "internalURL": "http://ubuntu80:9292", "id": "4794a2d722ab4f6bbda00d779c1410d1"}], "type": "image", "name": "glance"}, {"endpoints_links": [], "endpoints": [{"adminURL": "http://ubuntu80:8774/v2/0e962df9db3f4469b3d9bfbc5ffdaf7e", "region": "regionOne", "publicURL": "http://ubuntu80:8774/v2/0e962df9db3f4469b3d9bfbc5ffdaf7e", "internalURL": "http://ubuntu80:8774/v2/0e962df9db3f4469b3d9bfbc5ffdaf7e", "id": "a8ccc19100934fc1ae7c899dc5e17bdd"}], "type": "compute", "name": "nova"}, {"endpoints_links": [], "endpoints": [{"adminURL": "http://ubuntu80:9696", "region": "regionOne", "publicURL": "http://ubuntu80:9696", "internalURL": "http://ubuntu80:9696", "id": "656371fd3163415c95ff2fc0facbe5e1"}], "type": "network", "name": "neutron"}, {"endpoints_links": [], "endpoints": [{"adminURL": "http://ubuntu80:35357/v2.0", "region": "regionOne", "publicURL": "http://ubuntu80:5000/v2.0", "internalURL": "http://ubuntu80:5000/v2.0", "id": "4f1d53f12dc6485cb5816c83f68b7053"}], "type": "identity", "name": "keystone"}], "user": {"username": "admin", "roles_links": [], "id": "96a7c834b3f8485c87d79df7b6480c92", "roles": [{"name": "_member_"}, {"name": "admin"}], "name": "admin"}, "metadata": {"is_admin": 0, "roles": ["9fe2ff9ee4384b1894a90878d3e92bab", "fc2574382dd74936b1bc85cc2110c3c2"]}}}
太乱了,整理一下,把回复的json抽出来
{
  "access": {
    "token": {
      "issued_at": "2016-01-18T01:58:37.093849",
      "expires": "2016-01-18T02:58:37Z",
      "id": "{SHA1}e87219521f61238b143fbb323b962930380ce022",
      "tenant": {
        "enabled": true,
        "description": "Admin Tenant",
        "name": "admin",
        "id": "0e962df9db3f4469b3d9bfbc5ffdaf7e"
      },
      "audit_ids": [
        "RugmwI0_R3ysmpJ3zF8k4Q"
      ]
    },
    "serviceCatalog": [
      {
        "endpoints_links": [ ],
        "endpoints": [
          {
            "adminURL": "http://ubuntu80:9292",
            "region": "regionOne",
            "publicURL": "http://ubuntu80:9292",
            "internalURL": "http://ubuntu80:9292",
            "id": "4794a2d722ab4f6bbda00d779c1410d1"
          }
        ],
        "type": "image",
        "name": "glance"
      },
      {
        "endpoints_links": [ ],
        "endpoints": [
          {
            "adminURL": "http://ubuntu80:8774/v2/0e962df9db3f4469b3d9bfbc5ffdaf7e",
            "region": "regionOne",
            "publicURL": "http://ubuntu80:8774/v2/0e962df9db3f4469b3d9bfbc5ffdaf7e",
            "internalURL": "http://ubuntu80:8774/v2/0e962df9db3f4469b3d9bfbc5ffdaf7e",
            "id": "a8ccc19100934fc1ae7c899dc5e17bdd"
          }
        ],
        "type": "compute",
        "name": "nova"
      },
      {
        "endpoints_links": [ ],
        "endpoints": [
          {
            "adminURL": "http://ubuntu80:9696",
            "region": "regionOne",
            "publicURL": "http://ubuntu80:9696",
            "internalURL": "http://ubuntu80:9696",
            "id": "656371fd3163415c95ff2fc0facbe5e1"
          }
        ],
        "type": "network",
        "name": "neutron"
      },
      {
        "endpoints_links": [ ],
        "endpoints": [
          {
            "adminURL": "http://ubuntu80:35357/v2.0",
            "region": "regionOne",
            "publicURL": "http://ubuntu80:5000/v2.0",
            "internalURL": "http://ubuntu80:5000/v2.0",
            "id": "4f1d53f12dc6485cb5816c83f68b7053"
          }
        ],
        "type": "identity",
        "name": "keystone"
      }
    ],
    "user": {
      "username": "admin",
      "roles_links": [ ],
      "id": "96a7c834b3f8485c87d79df7b6480c92",
      "roles": [
        {
          "name": "_member_"
        },
        {
          "name": "admin"
        }
      ],
      "name": "admin"
    },
    "metadata": {
      "is_admin": 0,
      "roles": [
        "9fe2ff9ee4384b1894a90878d3e92bab",
        "fc2574382dd74936b1bc85cc2110c3c2"
      ]
    }
  }
}看到了token中的id({SHA1}e87219521f61238b143fbb323b962930380ce022)。后面的操作都是要带上它。
5. 验证镜像和云主机类型
在第3节中可以看到这两条验证的请求,分别是验证镜像和云主机类型
3.2. 通过nova-api验证镜像
REQ:
curl \
-i 'http://ubuntu80:8774/v2/0e962df9db3f4469b3d9bfbc5ffdaf7e/images/cde1d850-65bb-48f6-8ee9-b990c7ccf158' \
-X GET -H "Accept: application/json" \
-H "User-Agent: python-novaclient"   \
-H "X-Auth-Project-Id: admin"        \
-H "X-Auth-Token: {SHA1}e87219521f61238b143fbb323b962930380ce022"
3.3. 通过nova-api验证云主机类型
REQ:
curl \
-i 'http://ubuntu80:8774/v2/0e962df9db3f4469b3d9bfbc5ffdaf7e/flavors/2' \
-X GET \
-H "Accept: application/json"      \
-H "User-Agent: python-novaclient" \
-H "X-Auth-Project-Id: admin"      \
-H "X-Auth-Token: {SHA1}e87219521f61238b143fbb323b962930380ce022"这两条请求,是类似的,通过阅读(《OpenStack中的API结构地图》http://my.oschina.net/crooner/blog/609419 )可以知道,它们的代码位于nova.api.openstack.compute中的images.py和flavors.py中的Controller。
转载请保留出处,谢谢!
nova创建虚拟机的过程(一): http://my.oschina.net/crooner/blog/632406
nova创建虚拟机的过程(二): http://my.oschina.net/crooner/blog/632851


 2468
2468

 被折叠的 条评论
为什么被折叠?
被折叠的 条评论
为什么被折叠?
 到【灌水乐园】发言


