


在上一篇中,我们分析了 Shiro Web 应用的入口 —— EnvironmentLoaderListener,它是一个 ServletContextListener,在 Web 容器启动的时候,它为我们创建了两个非常重要的对象:
WebSecurityManager:它是用于 Web 环境的 SecurityManager 对象,通过读取 shiro.ini 中 [main] 片段生成的,我们可以通过 SecurityUtils.getSecurityManager 方法获取该对象。
FilterChainResolver:它是 shiro.ini 中 [urls] 片段所配置的 Filter Chain 的解析器,可对一个 URL 配置一个或多个 Filter(用逗号分隔),Shiro 也为我们提供了几个默认的 Filter。
欢迎阅读《Shiro 源码分析》第一集: http://my.oschina.net/huangyong/blog/209339
在第二集中,我们就一起探索一下 Shiro Web 的第二个核心对象 —— ShiroFilter,它是在整个 Shiro Web 应用中请求的门户,也就是说,所有的请求都会被 ShiroFilter 拦截并进行相应的链式处理。
我们还是使用老套路,从 ShiroFilter 的继承体系开始吧:
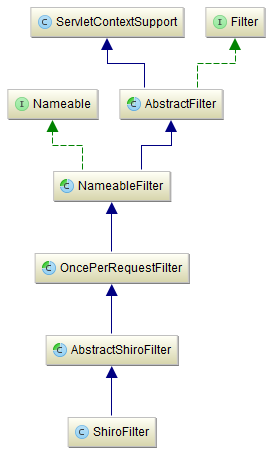
上图可见,ShiroFilter 往上竟然有五层,最上层是 Filter(即 javax.servlet.Filter),它是 Servlet 规范中的 Filter 接口,代码如下:
public interface Filter {

    void init(FilterConfig filterConfig) throws ServletException;

    void doFilter(ServletRequest request, ServletResponse response, FilterChain chain) throws IOException, ServletException;

    void destroy();
}
Filter 接口中的三个方法分别在 Filter 生命周期的三个时期内由 Web 容器来调用,分别是:初始化、执行、销毁。
相信这些内容对于做过 Java Web 开发的朋友而言,都是非常明了的,但与 Filter 接口同一级别下竟然还有一个名为 ServletContextSupport 的类,它又是起什么作用的呢?
打开 ServletContextSupport 的源码便知,它是 Shiro 为了封装 ServletContext 的而提供的一个类,代码如下:
/**
 * 封装 ServletContext
 */
public class ServletContextSupport {

    private ServletContext servletContext;

    public ServletContext getServletContext() {
        return servletContext;
    }

    public void setServletContext(ServletContext servletContext) {
        this.servletContext = servletContext;
    }

    @SuppressWarnings({"UnusedDeclaration"})
    protected String getContextInitParam(String paramName) {
        return getServletContext().getInitParameter(paramName);
    }

    private ServletContext getRequiredServletContext() {
        ServletContext servletContext = getServletContext();
        if (servletContext == null) {
            throw new IllegalStateException();
        }
        return servletContext;
    }

    @SuppressWarnings({"UnusedDeclaration"})
    protected void setContextAttribute(String key, Object value) {
        if (value == null) {
            removeContextAttribute(key);
        } else {
            getRequiredServletContext().setAttribute(key, value);
        }
    }

    @SuppressWarnings({"UnusedDeclaration"})
    protected Object getContextAttribute(String key) {
        return getRequiredServletContext().getAttribute(key);
    }

    protected void removeContextAttribute(String key) {
        getRequiredServletContext().removeAttribute(key);
    }

    @Override
    public String toString() {
        return toStringBuilder().toString();
    }

    protected StringBuilder toStringBuilder() {
        return new StringBuilder(super.toString());
    }
}通过这个类,我们可以方便的操纵 ServletContext 对象(使用其中的属性),那么这个 ServletContext 对象又是如何来初始化的呢?
不妨看看 Filter 与 ServletContextSupport 的子类 AbstractFilter 吧,代码如下:
/**
 * 初始化 ServletContext 并封装 FilterConfig
 */
public abstract class AbstractFilter extends ServletContextSupport implements Filter {

    protected FilterConfig filterConfig;

    public FilterConfig getFilterConfig() {
        return filterConfig;
    }

    public void setFilterConfig(FilterConfig filterConfig) {
        // 初始化 FilterConfig 与 ServletContext
        this.filterConfig = filterConfig;
        setServletContext(filterConfig.getServletContext());
    }

    protected String getInitParam(String paramName) {
        // 从 FilterConfig 中获取初始参数
        FilterConfig config = getFilterConfig();
        if (config != null) {
            return StringUtils.clean(config.getInitParameter(paramName));
        }
        return null;
    }

    public final void init(FilterConfig filterConfig) throws ServletException {
        // 初始化 FilterConfig
        setFilterConfig(filterConfig);
        try {
            // 在子类中实现该模板方法
            onFilterConfigSet();
        } catch (Exception e) {
            if (e instanceof ServletException) {
                throw (ServletException) e;
            } else {
                throw new ServletException(e);
            }
        }
    }

    protected void onFilterConfigSet() throws Exception {
    }

    public void destroy() {
    }
}
看到这个类的第一感觉就是,它对 FilterConfig 进行了封装,为什么要封装 FilterConfig 呢?就是想通过它来获取 ServletContext。可见,在 init 方法中完成了 FilterConfig 的初始化,并提供了一个名为 onFilterConfigSet 的模板方法,让它的子类去实现其中的细节。
在阅读 AbstractFilter 的子类 NameableFilter 的源码之前,不妨先看看 NameableFilter 实现了一个很有意思的接口 Nameable,代码如下:
/**
 * 确保实现该接口的类可进行命名(具有唯一的名称)
 */
public interface Nameable {

    void setName(String name);
}
仅提供了一个 setName 的方法,目的就是为了让其子类能够提供一个唯一的 Filter Name,如果子类不提供怎么办呢?
相信 Nameable 的实现类也就是 AbstractFilter 的子类 NameableFilter 会告诉我们想要的答案,代码如下:
/**
 * 提供 Filter Name 的 get/set 方法
 */
public abstract class NameableFilter extends AbstractFilter implements Nameable {

    private String name;

    protected String getName() {
        // 若成员变量 name 为空,则从 FilterConfig 中获取 Filter Name
        if (this.name == null) {
            FilterConfig config = getFilterConfig();
            if (config != null) {
                this.name = config.getFilterName();
            }
        }
        return this.name;
    }

    public void setName(String name) {
        this.name = name;
    }

    protected StringBuilder toStringBuilder() {
        String name = getName();
        if (name == null) {
            return super.toStringBuilder();
        } else {
            StringBuilder sb = new StringBuilder();
            sb.append(name);
            return sb;
        }
    }
}
看到了 NameableFilter 中的 getName 方法,我们应该清楚了,每个 Filter 必须有一个名字,可通过 setName 方法设置的,如果不设置就取该 Filter 默认的名字,也就是在 web.xml 中配置的 filter-name 了。此外,这里还通过一个 toStringBuilder 方法完成了类似 toString 方法,不过暂时还没什么用途,可能以后会有用。
以上这一切都是为了让每个 Filter 有一个名字,而且这个名字最好是唯一的(这一点在 Shiro 源码中没有得到控制)。此外,在 shiro.ini 的 [urls] 片段的配置满足一定规则的,例如:
[urls]
/foo = ssl, authc
等号左边的是 URL,右边的是 Filter Chian,一个或多个 Filter,每个 Filter 用逗号进行分隔。
对于 /foo 这个 URL 而言,可先后通过 ssl 与 authc 这两个 Filter。如果我们同时配置了两个 ssl,这个 URL 会被 ssl 拦截两次吗?答案是否定的,因为 Shiro 为我们提供了一个“一次性 Filter”的原则,也就是保证了每个请求只能被同一个 Filter 拦截一次,而且仅此一次。
这样的机制是如何实现的呢?我们不妨看看 NameableFilter 的子类 OncePerRequestFilter 吧,代码如下:
/**
 * 确保每个请求只能被 Filter 过滤一次
 */
public abstract class OncePerRequestFilter extends NameableFilter {

    // 已过滤属性的后缀名
    public static final String ALREADY_FILTERED_SUFFIX = ".FILTERED";

    // 是否开启过滤功能
    private boolean enabled = true;

    public boolean isEnabled() {
        return enabled;
    }

    public void setEnabled(boolean enabled) {
        this.enabled = enabled;
    }

    public final void doFilter(ServletRequest request, ServletResponse response, FilterChain filterChain) throws ServletException, IOException {
        // 获取 Filter 已过滤的属性名
        String alreadyFilteredAttributeName = getAlreadyFilteredAttributeName();
        // 判断是否已过滤
        if (request.getAttribute(alreadyFilteredAttributeName) != null) {
            // 若已过滤,则进入 FilterChain 中下一个 Filter
            filterChain.doFilter(request, response);
        } else {
            // 若未过滤,则判断是否未开启过滤功能(其中 shouldNotFilter 方法将被废弃,由 isEnabled 方法取代)
            if (!isEnabled(request, response) || shouldNotFilter(request)) {
                // 若未开启,则进入 FilterChain 中下一个 Filter
                filterChain.doFilter(request, response);
            } else {
                // 若已开启,则将已过滤属性设置为 true(只要保证 Request 中有这个属性即可)
                request.setAttribute(alreadyFilteredAttributeName, Boolean.TRUE);
                try {
                    // 在子类中执行具体的过滤操作
                    doFilterInternal(request, response, filterChain);
                } finally {
                    // 当前 Filter 执行结束需移除 Request 中的已过滤属性
                    request.removeAttribute(alreadyFilteredAttributeName);
                }
            }
        }
    }

    protected String getAlreadyFilteredAttributeName() {
        String name = getName();
        if (name == null) {
            name = getClass().getName();
        }
        return name + ALREADY_FILTERED_SUFFIX;
    }

    @SuppressWarnings({"UnusedParameters"})
    protected boolean isEnabled(ServletRequest request, ServletResponse response) throws ServletException, IOException {
        return isEnabled();
    }

    @Deprecated
    @SuppressWarnings({"UnusedDeclaration"})
    protected boolean shouldNotFilter(ServletRequest request) throws ServletException {
        return false;
    }

    protected abstract void doFilterInternal(ServletRequest request, ServletResponse response, FilterChain chain) throws ServletException, IOException;
}
如何确保每个请求只会被同一个 Filter 拦截一次呢?Shiro 提供了一个超简单的解决方案:在 Requet 中放置一个后缀为 .FILTERED 的属性,在执行具体拦截操作(即 doFilterInternal 方法)之前放入该属性,执行完毕后移除该属性。
在 Shiro 的 Filter Chian 配置中,如果我们想禁用某个 Filter,如何实现呢?OncePerRequestFilter 也为我们提供了一个 enabled 的属性,方便我们可以在 shiro.ini 中随时禁用某个 Filter,例如:
[main]
ssl.enabled = false

[urls]
/foo = ssl, authc
这样一来 ssl 这个 Filter 就被我们给禁用了,以后想开启 ssl 的话,完全不需要在 urls 配置中一个个手工来添加,只需把 ssl.enabled 设置为 true,或注释掉该行,或直接删除该行即可。
可见,OncePerRequestFilter 给我们提供了一个模板方法 doFilterInternal,在其子类中我们需要实现该方法的具体细节,那么谁来实现呢?不妨继续看下面的 AbstractShiroFilter 吧,代码如下:
/**
 * 确保可通过 SecurityUtils 获取 SecurityManager,并执行过滤器操作
 */
public abstract class AbstractShiroFilter extends OncePerRequestFilter {

    // 是否可以通过 SecurityUtils 获取 SecurityManager
    private static final String STATIC_INIT_PARAM_NAME = "staticSecurityManagerEnabled";

    private WebSecurityManager securityManager;
    private FilterChainResolver filterChainResolver;
    private boolean staticSecurityManagerEnabled;

    protected AbstractShiroFilter() {
        this.staticSecurityManagerEnabled = false;
    }

    public WebSecurityManager getSecurityManager() {
        return securityManager;
    }

    public void setSecurityManager(WebSecurityManager sm) {
        this.securityManager = sm;
    }

    public FilterChainResolver getFilterChainResolver() {
        return filterChainResolver;
    }

    public void setFilterChainResolver(FilterChainResolver filterChainResolver) {
        this.filterChainResolver = filterChainResolver;
    }

    public boolean isStaticSecurityManagerEnabled() {
        return staticSecurityManagerEnabled;
    }

    public void setStaticSecurityManagerEnabled(boolean staticSecurityManagerEnabled) {
        this.staticSecurityManagerEnabled = staticSecurityManagerEnabled;
    }

    // 这是 AbstractFilter 提供的在 init 时需要执行的方法
    protected final void onFilterConfigSet() throws Exception {
        // 从 web.xml 中读取 staticSecurityManagerEnabled 参数(默认为 false)
        applyStaticSecurityManagerEnabledConfig();
        // 初始化(在子类中实现)
        init();
        // 确保 SecurityManager 必须存在
        ensureSecurityManager();
        // 若已开启 static 标志,则将当前的 SecurityManager 放入 SecurityUtils 中,以后可以随时获取
        if (isStaticSecurityManagerEnabled()) {
            SecurityUtils.setSecurityManager(getSecurityManager());
        }
    }

    private void applyStaticSecurityManagerEnabledConfig() {
        String value = getInitParam(STATIC_INIT_PARAM_NAME);
        if (value != null) {
            Boolean b = Boolean.valueOf(value);
            if (b != null) {
                setStaticSecurityManagerEnabled(b);
            }
        }
    }

    public void init() throws Exception {
    }

    private void ensureSecurityManager() {
        // 首先获取当前的 SecurityManager,若不存在,则创建默认的 SecurityManager(即 DefaultWebSecurityManager)
        WebSecurityManager securityManager = getSecurityManager();
        if (securityManager == null) {
            securityManager = createDefaultSecurityManager();
            setSecurityManager(securityManager);
        }
    }

    protected WebSecurityManager createDefaultSecurityManager() {
        return new DefaultWebSecurityManager();
    }

    // 这是 OncePerRequestFilter 提供的在 doFilter 时需要执行的方法
    protected void doFilterInternal(ServletRequest servletRequest, ServletResponse servletResponse, final FilterChain chain) throws ServletException, IOException {
        Throwable t = null;
        try {
            // 返回被 Shiro 包装过的 Request 与 Response 对象
            final ServletRequest request = prepareServletRequest(servletRequest, servletResponse, chain);
            final ServletResponse response = prepareServletResponse(request, servletResponse, chain);
            // 创建 Shiro 的 Subject 对象
            final Subject subject = createSubject(request, response);
            // 使用异步的方式执行相关操作
            subject.execute(new Callable() {
                public Object call() throws Exception {
                    // 更新 Session 的最后访问时间
                    updateSessionLastAccessTime(request, response);
                    // 执行 Shiro 的 Filter Chain
                    executeChain(request, response, chain);
                    return null;
                }
            });
        } catch (ExecutionException ex) {
            t = ex.getCause();
        } catch (Throwable throwable) {
            t = throwable;
        }
        if (t != null) {
            if (t instanceof ServletException) {
                throw (ServletException) t;
            }
            if (t instanceof IOException) {
                throw (IOException) t;
            }
            throw new ServletException(t);
        }
    }

    @SuppressWarnings({"UnusedDeclaration"})
    protected ServletRequest prepareServletRequest(ServletRequest request, ServletResponse response, FilterChain chain) {
        ServletRequest toUse = request;
        if (request instanceof HttpServletRequest) {
            // 获取包装后的 Request 对象(使用 ShiroHttpServletRequest 进行包装)
            HttpServletRequest http = (HttpServletRequest) request;
            toUse = wrapServletRequest(http);
        }
        return toUse;
    }

    protected ServletRequest wrapServletRequest(HttpServletRequest orig) {
        return new ShiroHttpServletRequest(orig, getServletContext(), isHttpSessions());
    }

    protected boolean isHttpSessions() {
        return getSecurityManager().isHttpSessionMode();
    }

    @SuppressWarnings({"UnusedDeclaration"})
    protected ServletResponse prepareServletResponse(ServletRequest request, ServletResponse response, FilterChain chain) {
        ServletResponse toUse = response;
        if (!isHttpSessions() && (request instanceof ShiroHttpServletRequest) && (response instanceof HttpServletResponse)) {
            // 获取包装后的 Response 对象(使用 ShiroHttpServletResponse 进行包装)
            toUse = wrapServletResponse((HttpServletResponse) response, (ShiroHttpServletRequest) request);
        }
        return toUse;
    }

    protected ServletResponse wrapServletResponse(HttpServletResponse orig, ShiroHttpServletRequest request) {
        return new ShiroHttpServletResponse(orig, getServletContext(), request);
    }

    protected WebSubject createSubject(ServletRequest request, ServletResponse response) {
        return new WebSubject.Builder(getSecurityManager(), request, response).buildWebSubject();
    }

    @SuppressWarnings({"UnusedDeclaration"})
    protected void updateSessionLastAccessTime(ServletRequest request, ServletResponse response) {
        // 仅对本地 Session 做如下操作
        if (!isHttpSessions()) {
            // 获取 Subject(实际上是从 ThreadLocal 中获取的)
            Subject subject = SecurityUtils.getSubject();
            if (subject != null) {
                // 从 Subject 中获取 Session
                Session session = subject.getSession(false);
                if (session != null) {
                    // 更新 Session 对象的 lastAccessTime 属性
                    session.touch();
                }
            }
        }
    }

    protected void executeChain(ServletRequest request, ServletResponse response, FilterChain origChain) throws IOException, ServletException {
        // 获取 Shiro 代理后的 FilterChain 对象,并进行链式处理
        FilterChain chain = getExecutionChain(request, response, origChain);
        chain.doFilter(request, response);
    }

    protected FilterChain getExecutionChain(ServletRequest request, ServletResponse response, FilterChain origChain) {
        FilterChain chain = origChain;
        // 获取 FilterChainResolver,若不存在,则返回原始的 FilterChain
        FilterChainResolver resolver = getFilterChainResolver();
        if (resolver == null) {
            return origChain;
        }
        // 通过 FilterChainResolver 获取 ProxiedFilterChain
        FilterChain resolved = resolver.getChain(request, response, origChain);
        if (resolved != null) {
            chain = resolved;
        }
        return chain;
    }
}
这个 AbstractShiroFilter 类代码稍微有点长,因为它干了许多的事情,主要实现了两个模板方法:onFilterConfigSet 与 doFilterInternal,以上代码中均已对它们做了详细的注释。
其中,在 onFilterConfigSet 中实际上提供了一个框架,只是将 SecurityManager 放入 SecurityUtils 这个工具类中,至于具体行为还是放在子类的 init 方法中去实现,而这个子类就是 ShiroFilter,代码如下:
/**
 * 初始化过滤器
 */
public class ShiroFilter extends AbstractShiroFilter {

    @Override
    public void init() throws Exception {
        // 从 ServletContext 中获取 WebEnvironment(该对象已通过 EnvironmentLoader 创建)
        WebEnvironment env = WebUtils.getRequiredWebEnvironment(getServletContext());

        // 将 WebEnvironment 中的 WebSecurityManager 放入 AbstractShiroFilter 中
        setSecurityManager(env.getWebSecurityManager());

        // 将 WebEnvironment 中的 FilterChainResolver 放入 AbstractShiroFilter 中
        FilterChainResolver resolver = env.getFilterChainResolver();
        if (resolver != null) {
            setFilterChainResolver(resolver);
        }
    }
}
在 ShiroFilter 中只用做初始化的行为,就是从 WebEnvironment 中分别获取 WebSecurityManager 与 FilterChainResolver,其它的事情都由它的父类去实现了。
到此为止,ShiroFilter 的源码已基本分析完毕,当然还有些非常有意思的代码,这里没有进行分析,例如:
通过 ShiroHttpServletRequest 来包装 Request
通过 ShiroHttpServletResponse 来包装 Response
通过 Session 来代理 HttpSession
提供 FilterChain 的代理机制
使用 ThreadContext 来保证线程安全
这些有意思的代码,我就不继续分析了,留点滋味让大家去慢慢品尝吧!
最后需要补充说明的是,Shiro 的 Filter 架构体系是非常庞大的,这里仅对 ShiroFilter 进行了分析,整个 Filter 静态结构看起来是这样的:
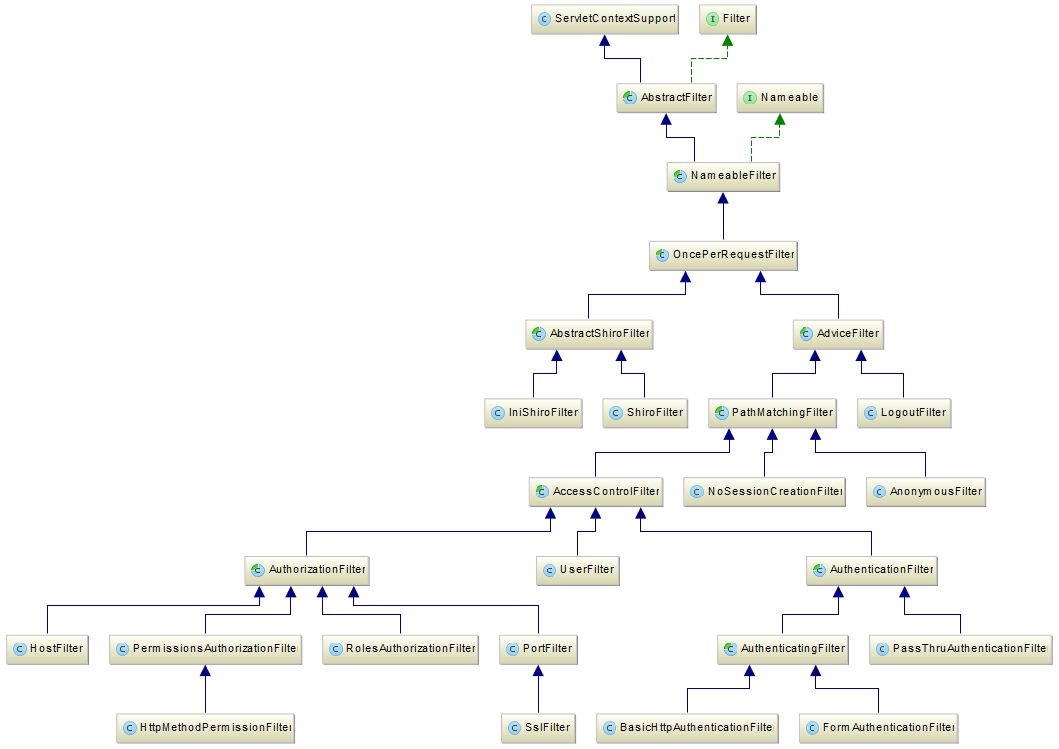
可见,在 OncePerRequestFilter 下有两个分支,本文只分析了 ShiroFilter 这个分支,另外还有一个 AdviceFilter 分支,它提供了 AOP 功能的 Filter,这些 Filter 就是 Shiro 为我们提供的默认 Filter:
以上这些 Filter 是如何实现的呢?有机会再与大家分享《Shrio 源码分析》,感谢您阅读本文!


 1985
1985


 被折叠的 条评论
为什么被折叠?
被折叠的 条评论
为什么被折叠?
 到【灌水乐园】发言


