


Linux下安装软件的方式有很多种其中常用的有三种:源码安装、RPM安装、yum安装针对于后两种的安装都比较方便,只要有rpm软件包就可以轻易安装,今天我来谈谈使用源码的方式来实现对apache软件的安装(原有的版本太低,想安装一个新版本),但是第一次安装的时候便遇到了很多问题,于是我便把这些问题记录下来了,相信一定会对你以后想安装新版本的apache服务器有帮助
首先你的去apache官网去下载最新版的源码包我下载的是httpd-2.4.4.tar.bz2,地址是http://httpd.apache.org/download.cgi#apache24
然后将源码解压到/usr/local/src目录下,方便以后的管理
tar -jxvf httpd-2.4.4.tar.bz2 -C /usr/local/src/
切换到相应目录
cd /usr/local/src/httpd-2.4.4/
源码安装三步走起:1)./configure 2) make 3) make install
./configure --prefix=/usr/local/apache 然后麻烦就出现了
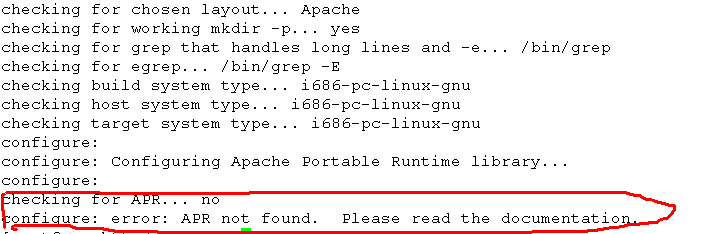
错误提示的很明显
checking for APR... no
configure: error: APR not found. Please read the documentation.
那就是缺少APR((Apache portable Run-time libraries,Apache可移植运行库),那就下载安装呗下载网址是http://apr.apache.org/ 你会看到
Apache Portable Runtime 1.4.6 Released
点击下载就是了apr-1.4.6.tar.gz,并且将其解压到/usr/local/src目录下
tar -zxvf apr-1.4.6.tar.gz -C /usr/local/src/
切换到目录下
cd /usr/local/src/apr-1.4.6/
当然这个运行库也是源码安装的,同样是三步曲,走起
./configure
make
make install
然后再切换到httpd的源码目录下再次执行./configure时加上apr的配置路径./configure --prefix=/usr/local/apache --with-apr=/usr/local/apr/bin/apr-1-config 你会发现又出现了问题

意思是APR-util包没有找到,如果你还有印象的话应该记得在我们下载apr的时候看见过这个工具包,于是我们可以去刚刚的那个网站去下载去http://apr.apache.org/ 你会看到
Apache Portable Runtime Utility 1.5.1 Released
下载安装就是了apr-util-1.5.1.tar.gz 先解压到/usr/local/src目录下
tar -zxvf apr-util-1.5.1.tar.gz -C /usr/local/src/
切换到源码目录下cd /usr/local/src/apr-util-1.5.1/
然后是老三步
./configure --with-apr=/usr/local/src/apr-1.4.6/apr-1-config(加上apr的路径)
make
make install
然后到httpd源码的目录下执行./configure --prefix=/usr/local/apache --with-apr=/usr/local/apr/bin/apr-1-config还会遇到问题

说pcre(Perl Compatible Regular Expressions是一个Perl库,包括 perl 兼容的正规表达式库)没发现,当然处理方法相同下载源码,解压,安装
下载地址http://sourceforge.net/projects/pcre/
unzip pcre-8.32.zip
cd pcre-8.32
./configure
make
make install
然后到httpd源码的目录下执行./configure --prefix=/usr/local/apache --with-apr=/usr/local/apr/bin/apr-1-config --with-pcre=/usr/local/pcre/
make && make install
一切安装完成之后我们还要涉及到一个httpd的运行管理问题,我模仿linux原有的管理脚本自己写了一个简易的管理脚本httpd内容如下:
#!/bin/bash
# chkconfig: 35 80 30
# description: Apache server
HTTPD=/usr/local/apache/bin/httpd
LOCKFILE='/var/lock/subsys/httpd'
. /etc/init.d/functions
function start(){
[ -e $LOCKFILE ] && echo "httpd is running ......." && exit
echo -n "httpd is starting ......"
sleep 1
$HTTPD -k start
}
function stop(){
echo -n "httpd is stoping......"
sleep 1
killproc $HTTPD &>/dev/null
[ $? -eq 0 ] && rm -rf $LOCKFILE && echo -e "\033[31m [ok] \033[0m" ||echo -e "\033[31m [fail] \033[0m"
}
function status(){
[ -e $LOCKFILE ]&& echo "httpd is running ......" || echo "httpd is stoped"
}
case $1 in
start)
start
;;
stop)
stop
;;
restart)
stop
start
;;
status)
status
;;
*)
echo "httpd Usage: {start|stop|restart}"
;;
esac之后将其拷贝到/etc/rc.d/init.d/目录下
cp httpd /etc/rc.d/init.d/
chkconfig --add httpd
chkconfig –level 35 httpd on
chkconfig --list httpd

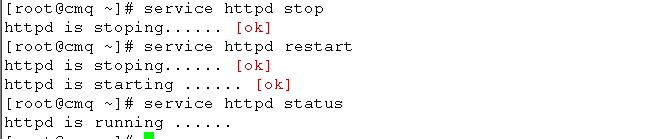
接下来就是测试了
service httpd start


然后在其他电脑上访问

到此全部工作已经完成,当然对于vsftp服务器同样能做,不过vsftp的安装方式比较简单,这里就不细说了,当然我也写了一个管理脚本,如果有兴趣的话可以读一读,内容如下
#!/bin/bash
# chkconfig: 35 83 30
# description: vsftpd server
VSFTPD='/usr/local/sbin/vsftpd'
LOCKFILE='/var/lock/subsys/ftp'
. /etc/init.d/functions
function start(){
[ -e $LOCKFILE ] && echo "vsftpd is running ......." && exit
echo -n "vsftpd is starting ......"
sleep 1
$VSFTPD &
}
function stop(){
echo -n "Vsftpd is stoping......"
sleep 1
killproc $VSFTPD &>/dev/null
}
function status(){
[ -e $LOCKFILE ]&& echo "vsftpd is running ......" || echo "vsftpd is stoped"
}
case $1 in
start)
start
;;
stop)
stop
;;
restart)
stop
start
;;
status)
status
;;
*)
echo "vsftp Usage: {start|stop|restart}"
;;
esac
在下一篇博客中我将会介绍一下mysql的安装配置,尽情期待。。。。。
转载于:https://blog.51cto.com/wnqcmq/1160274


 1516
1516


 被折叠的 条评论
为什么被折叠?
被折叠的 条评论
为什么被折叠?
 到【灌水乐园】发言


