android可拖动悬浮按钮,Android自定义可拖拽的悬浮按钮DragFloatingActionButton

悬浮按钮FloatingActionButton是Android 5.0系统添加的新控件,FloatingActionButton是继承至ImageView,所以FloatingActionButton拥有ImageView的所有属性。本文讲解的是一个实现了可拖拽的悬浮按钮,并为此添加了类似于qq的吸附边框的功能。在此之前,先了解下其简单的使用方式吧:

首先你得添加其依赖

compile 'com.android.support:design:25.3.1'

然后在布局文件中使用。

android:layout_width="wrap_content"

android:layout_height="wrap_content"

android:layout_gravity="right|bottom"

android:src="@drawable/ic_launcher"

/>

如图:

f90dfed1ec0efb1afbfa3b9f9dbe8f25.png

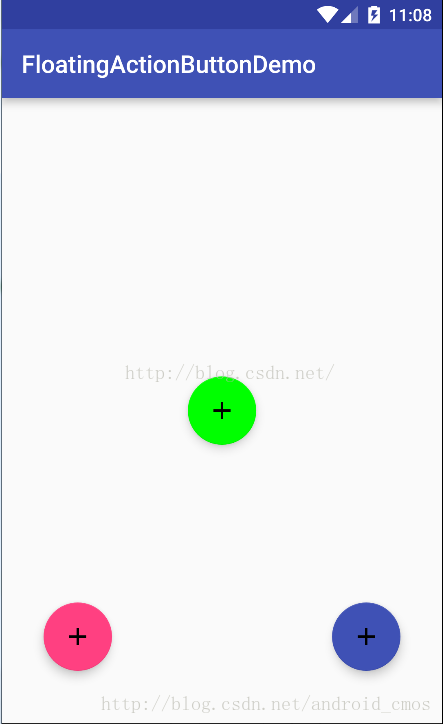
FloatingActionButton正常显示的情况下有个填充的颜色,有个阴影;点击的时候会有一个rippleColor,并且阴影的范围可以增大。其中:

1、填充的颜色默认使用就是style当中的colorAccent。

2、rippleColor默认取的是Theme当中的colorControlHighlight。

3、elevation和pressedTranslationZ,前者用户设置正常显示的阴影大小;后者是点击时显示的阴影大小。

好了,现在介绍本文的重点:可拖拽的,有吸附功能的悬浮按钮

先上代码。

import android.animation.ObjectAnimator;

import android.content.Context;

import android.support.design.widget.FloatingActionButton;

import android.util.AttributeSet;

import android.util.Log;

import android.view.MotionEvent;

import android.view.animation.DecelerateInterpolator;

public class DragFloatActionButton extends FloatingActionButton {

private int screenWidth;

private int screenHeight;

private int screenWidthHalf;

private int statusHeight;

private int virtualHeight;

public DragFloatActionButton(Context context) {

super(context);

init();

}

public DragFloatActionButton(Context context, AttributeSet attrs) {

super(context, attrs);

init();

}

public DragFloatActionButton(Context context, AttributeSet attrs, int defStyleAttr) {

super(context, attrs, defStyleAttr);

init();

}

private void init() {

screenWidth = ScreenUtils.getScreenWidth(getContext());

screenWidthHalf = screenWidth / 2;

screenHeight = ScreenUtils.getScreenHeight(getContex

  • 0
    点赞
  • 3
    收藏
    觉得还不错? 一键收藏
  • 0
    评论
提供的源码资源涵盖了安卓应用、小程序、Python应用和Java应用等多个领域,每个领域都包含了丰富的实例和项目。这些源码都是基于各自平台的最新技术和标准编写,确保了在对应环境下能够无缝运行。同时,源码中配备了详细的注释和文档,帮助用户快速理解代码结构和实现逻辑。 适用人群: 这些源码资源特别适合大学生群体。无论你是计算机相关专业的学生,还是对其他领域编程感兴趣的学生,这些资源都能为你提供宝贵的学习和实践机会。通过学习和运行这些源码,你可以掌握各平台开发的基础知识,提升编程能力和项目实战经验。 使用场景及目标: 在学习阶段,你可以利用这些源码资源进行课程实践、课外项目或毕业设计。通过分析和运行源码,你将深入了解各平台开发的技术细节和最佳实践,逐步培养起自己的项目开发和问题解决能力。此外,在求职或创业过程中,具备跨平台开发能力的大学生将更具竞争力。 其他说明: 为了确保源码资源的可运行性和易用性,特别注意了以下几点:首先,每份源码都提供了详细的运行环境和依赖说明,确保用户能够轻松搭建起开发环境;其次,源码中的注释和文档都非常完善,方便用户快速上手和理解代码;最后,我会定期更新这些源码资源,以适应各平台技术的最新发展和市场需求。
要实现可拖动悬浮按钮,可以使用Android中的WindowManager类和LayoutParams类。 首先,在你的Activity或Fragment中创建一个悬浮按钮,例如: ```java Button button = new Button(this); button.setText("悬浮按钮"); ``` 然后,使用WindowManager将该按钮添加到屏幕上,并设置其LayoutParams: ```java WindowManager.LayoutParams params = new WindowManager.LayoutParams( WindowManager.LayoutParams.WRAP_CONTENT, WindowManager.LayoutParams.WRAP_CONTENT, WindowManager.LayoutParams.TYPE_APPLICATION_OVERLAY, WindowManager.LayoutParams.FLAG_NOT_FOCUSABLE, PixelFormat.TRANSLUCENT ); params.gravity = Gravity.TOP | Gravity.START; params.x = 0; params.y = 0; WindowManager windowManager = (WindowManager) getSystemService(WINDOW_SERVICE); windowManager.addView(button, params); ``` 这里的LayoutParams设置了按钮的宽度和高度为自适应,类型为TYPE_APPLICATION_OVERLAY(表示悬浮在其他应用程序上方),不可获得焦点,透明度为半透明。gravity设置了按钮在屏幕上的位置,x和y设置了按钮的初始位置。 接下来,可以为按钮添加一个触摸监听器,以便用户可以通过拖动来移动按钮: ```java button.setOnTouchListener(new View.OnTouchListener() { private int initialX; private int initialY; private float initialTouchX; private float initialTouchY; @Override public boolean onTouch(View v, MotionEvent event) { switch (event.getAction()) { case MotionEvent.ACTION_DOWN: initialX = params.x; initialY = params.y; initialTouchX = event.getRawX(); initialTouchY = event.getRawY(); return true; case MotionEvent.ACTION_UP: return true; case MotionEvent.ACTION_MOVE: params.x = initialX + (int) (event.getRawX() - initialTouchX); params.y = initialY + (int) (event.getRawY() - initialTouchY); windowManager.updateViewLayout(button, params); return true; } return false; } }); ``` 在这个触摸监听器中,我们记录了按钮的初始位置和触摸位置,并在移动事件中更新了LayoutParams中的x和y值,并通过WindowManager的updateViewLayout方法更新了按钮的位置。 这样就可以实现一个可拖动悬浮按钮了。记得要在不需要的时候将其从屏幕上移除: ```java windowManager.removeView(button); ```

“相关推荐”对你有帮助么?

  • 非常没帮助
  • 没帮助
  • 一般
  • 有帮助
  • 非常有帮助
提交
评论
添加红包

请填写红包祝福语或标题

红包个数最小为10个

红包金额最低5元

当前余额3.43前往充值 >
需支付:10.00
成就一亿技术人!
领取后你会自动成为博主和红包主的粉丝 规则
hope_wisdom
发出的红包
实付
使用余额支付
点击重新获取
扫码支付
钱包余额 0

抵扣说明:

1.余额是钱包充值的虚拟货币,按照1:1的比例进行支付金额的抵扣。
2.余额无法直接购买下载,可以购买VIP、付费专栏及课程。

余额充值