


引言
Jetty通过Continunation将耗时的任务分发给应用线程去完成,使得自己可以抽身于Servlet请求线程,虽然降低了请求线程的压力,但是增加了应用线程的压力。
如果采用HttpClient的话将可以有效地解决应用线程的负担,理论上可以实现完全的“无阻塞”。那么HttpClient是什么呢?
HttpClient 是 Apache Jakarta Common下的子项目,可以用来提供高效的、最新的、功能丰富的支持 HTTP 协议的客户端编程工具包。HttpClient的实现有多个版本,Apache、JDK,这里主要是总结Jetty的HttpClient。
前面的总结涉及到了线程池和缓存池的应用,本文的HttpClient就是连接池的应用。
HttpClient结构
Jetty的HttpClient很“轻”,如果你对NIO那章最后一节关于Request和Response有所了解的话,理解HttpClient会更加轻松。HttpClient结构简单,思路比较清晰。
1、整体架构
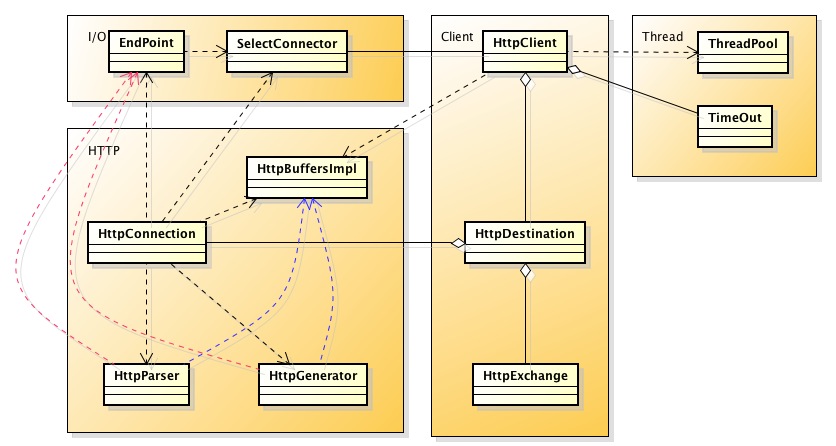
图中一共四个模块:
1)Thread:主要执行Select、TimeOut Task的轮询
2)IO:主要负责网络通信,读取和写入数据,这里是NIO
3)Client:意思是HttpClien核心的模块,与程序员接触的模块。
4)Http:与NIO那章节的意思一致,负责解析和生产Http协议的数据流。
接下来依据业务流程每个模块依次分析Client->IO->Http->IO,Thread。
2、样例
httpClient = new HttpClient();
httpClient.start();
ContentExchange exchange = new ContentExchange(true) {
    protected void onResponseComplete() throws IOException {
        if (getResponseStatus() == 200) {
            System.out.println("received");
        }
    }
    protected void onExpire() {
        System.out.println("time out");
    }
};
exchange.setMethod("GET");
exchange.setURL("www.1688.com?1=1");
httpClient.send(exchange);
3、Client
此Client并不是指的浏览器,意为服务器端的Client;另外谈谈exchange,奇怪的名字,注释里补充是封装了Request和Response的这么一个玩意,送出去Request,拿回来Response,所以叫做“交换”么。
1)依据Address从HttpClient中取得HttpDestination
public void send(HttpExchange exchange) throws IOException
    {
        boolean ssl = HttpSchemes.HTTPS_BUFFER.equalsIgnoreCase(exchange.getScheme());
        exchange.setStatus(HttpExchange.STATUS_WAITING_FOR_CONNECTION);
        HttpDestination destination = getDestination(exchange.getAddress(), ssl);
        destination.send(exchange);
}ex.scheduleTimeout(this);
AbstractHttpConnection connection = getIdleConnection();
if (connection != null)
{
send(connection, ex);
}
else
{
boolean startConnection = false;
synchronized (this)
{
if (_queue.size() == _maxQueueSize)
throw new RejectedExecutionException("Queue full for address " + _address);
_queue.add(ex);
if (_connections.size() + _pendingConnections < _maxConnections)
startConnection = true;
}
if (startConnection)
startNewConnection();
}
}if (!connection.send(exchange))
{
if (exchange.getStatus() <= HttpExchange.STATUS_WAITING_FOR_CONNECTION)
_queue.add(0, exchange);
returnIdleConnection(connection);
}4)时序如下:

4、I/O & Http
1)创建新的连接,注册到selector中,将destination 贴到key上以方便建立连接的时候生产EndPoint和HttpConnection。这里需要注意的一点是:将channel注册到了TimeOut队列中,主要是防止连接超时。需要区别于请求超时和闲置的连接超时两个概念。
public void startConnection( HttpDestination destination )
        throws IOException
    {
        SocketChannel channel = null;
        try
        {
            channel = SocketChannel.open();
            Address address = destination.isProxied() ? destination.getProxy() : destination.getAddress();
            channel.socket().setTcpNoDelay(true);

            if (_httpClient.isConnectBlocking())
            {
                channel.socket().connect(address.toSocketAddress(), _httpClient.getConnectTimeout());
                channel.configureBlocking(false);
                _selectorManager.register( channel, destination );
            }
            else
            {
                channel.configureBlocking(false);
                channel.connect(address.toSocketAddress());
                _selectorManager.register(channel,destination);
                ConnectTimeout connectTimeout = new ConnectTimeout(channel,destination);
                _httpClient.schedule(connectTimeout,_httpClient.getConnectTimeout());
                _connectingChannels.put(channel,connectTimeout);
            }
}A. doSelect(),注册读事件,生产EndPoint和HttpConnection
else if (change instanceof SocketChannel)
                        {
                            // Newly registered channel
                            final SocketChannel channel=(SocketChannel)change;
                            ch=channel;
                            key = channel.register(selector,SelectionKey.OP_READ,null);
                            SelectChannelEndPoint endpoint = createEndPoint(channel,key);
                            key.attach(endpoint);
                            endpoint.schedule();
                        }
protected SelectChannelEndPoint newEndPoint(SocketChannel channel, SelectSet selectSet, SelectionKey key) throws IOException
        {
            // We're connected, cancel the connect timeout
            Timeout.Task connectTimeout = _connectingChannels.remove(channel);
            if (connectTimeout != null)
                connectTimeout.cancel();
            if (LOG.isDebugEnabled())
                LOG.debug("Channels with connection pending: {}", _connectingChannels.size());

            // key should have destination at this point (will be replaced by endpoint after this call)
            HttpDestination dest=(HttpDestination)key.attachment();

            SelectChannelEndPoint scep = new SelectChannelEndPoint(channel, selectSet, key, (int)_httpClient.getIdleTimeout());
            AsyncEndPoint ep = scep;

            if (dest.isSecure())
            {
                LOG.debug("secure to {}, proxied={}",channel,dest.isProxied());
                ep = new UpgradableEndPoint(ep,newSslEngine(channel));
            }

            AsyncConnection connection = selectSet.getManager().newConnection(channel,ep, key.attachment());
            ep.setConnection(connection);

            AbstractHttpConnection httpConnection=(AbstractHttpConnection)connection;
            httpConnection.setDestination(dest);

            if (dest.isSecure() && !dest.isProxied())
                ((UpgradableEndPoint)ep).upgrade();

            dest.onNewConnection(httpConnection);

            return scep;
        }
C. dest.onNewConnection(),连接成功之后的后置处理器,需要将新的连接添加到连接池中。
public void onNewConnection(final AbstractHttpConnection connection) throws IOException
    {
        Connection q_connection = null;

        synchronized (this)
        {
            _pendingConnections--;
            //添加到连接池中
            _connections.add(connection);

            if (_newConnection > 0)
            {
                q_connection = connection;
                _newConnection--;
            }
            else if (_queue.size() == 0)
            {
                //加入闲置连接超时队列,但是这条件?下面有分析
                connection.setIdleTimeout();
                _idle.add(connection);
            }
            else
            {
                EndPoint endPoint = connection.getEndPoint();
                if (isProxied() && endPoint instanceof SelectConnector.UpgradableEndPoint)
                {
                    SelectConnector.UpgradableEndPoint proxyEndPoint = (SelectConnector.UpgradableEndPoint)endPoint;
                    HttpExchange exchange = _queue.get(0);
                    ConnectExchange connect = new ConnectExchange(getAddress(), proxyEndPoint, exchange);
                    connect.setAddress(getProxy());
                    send(connection, connect);
                }
                else
                {
                    HttpExchange exchange = _queue.remove(0);
                    send(connection, exchange);
                }
            }
        }

        if (q_connection != null)
        {
            try
            {
                _newQueue.put(q_connection);
            }
            catch (InterruptedException e)
            {
                LOG.ignore(e);
            }
        }
    }
3)已经到了发送数据的阶段,但发的是什么,其实是NIO那章节的内容了,这里简要介绍下
先看这段HttpConnection的handle调用(是client的那个包,别搞错了)
try
                {
                    // Should we commit the request?
                    if (!_generator.isCommitted() && exchange!=null && exchange.getStatus() == HttpExchange.STATUS_WAITING_FOR_COMMIT)
                    {
                        LOG.debug("commit {}",exchange);
                        progress=true;
                        commitRequest();
                    }

                    // Generate output
                    if (_generator.isCommitted() && !_generator.isComplete())
                    {
                        if (_generator.flushBuffer()>0)
                        {
                            LOG.debug("flushed");
                            progress=true;
}看下commit,对generator的操作最终会写入generator的header和buffer两个缓存中:
protected void commitRequest() throws IOException
    {
        synchronized (this)
        {
            _status=0;
            if (_exchange.getStatus() != HttpExchange.STATUS_WAITING_FOR_COMMIT)
                throw new IllegalStateException();

            _exchange.setStatus(HttpExchange.STATUS_SENDING_REQUEST);
            _generator.setVersion(_exchange.getVersion());

            String method=_exchange.getMethod();
            String uri = _exchange.getRequestURI();
            if (_destination.isProxied())
            {
                if (!HttpMethods.CONNECT.equals(method) && uri.startsWith("/"))
                {
                    boolean secure = _destination.isSecure();
                    String host = _destination.getAddress().getHost();
                    int port = _destination.getAddress().getPort();
                    StringBuilder absoluteURI = new StringBuilder();
                    absoluteURI.append(secure ? HttpSchemes.HTTPS : HttpSchemes.HTTP);
                    absoluteURI.append("://");
                    absoluteURI.append(host);
                    // Avoid adding default ports
                    if (!(secure && port == 443 || !secure && port == 80))
                        absoluteURI.append(":").append(port);
                    absoluteURI.append(uri);
                    uri = absoluteURI.toString();
                }
                Authentication auth = _destination.getProxyAuthentication();
                if (auth != null)
                    auth.setCredentials(_exchange);
            }

            _generator.setRequest(method, uri);
            _parser.setHeadResponse(HttpMethods.HEAD.equalsIgnoreCase(method));

            HttpFields requestHeaders = _exchange.getRequestFields();
            if (_exchange.getVersion() >= HttpVersions.HTTP_1_1_ORDINAL)
            {
                if (!requestHeaders.containsKey(HttpHeaders.HOST_BUFFER))
                    requestHeaders.add(HttpHeaders.HOST_BUFFER,_destination.getHostHeader());
            }

            Buffer requestContent = _exchange.getRequestContent();
            if (requestContent != null)
            {
                requestHeaders.putLongField(HttpHeaders.CONTENT_LENGTH, requestContent.length());
                _generator.completeHeader(requestHeaders,false);
                _generator.addContent(new View(requestContent),true);
                _exchange.setStatus(HttpExchange.STATUS_WAITING_FOR_RESPONSE);
            }
            else
            {
                InputStream requestContentStream = _exchange.getRequestContentSource();
                if (requestContentStream != null)
                {
                    _generator.completeHeader(requestHeaders, false);
                }
                else
                {
                    requestHeaders.remove(HttpHeaders.CONTENT_LENGTH);
                    _generator.completeHeader(requestHeaders, true);
                    _exchange.setStatus(HttpExchange.STATUS_WAITING_FOR_RESPONSE);
                }
            }
        }
    }
public int flushBuffer() throws IOException
    {
        try
        {

            if (_state == STATE_HEADER)
                throw new IllegalStateException("State==HEADER");

            prepareBuffers();

            if (_endp == null)
            {
                if (_needCRLF && _buffer!=null)
                    _buffer.put(HttpTokens.CRLF);
                if (_needEOC && _buffer!=null && !_head)
                    _buffer.put(LAST_CHUNK);
                _needCRLF=false;
                _needEOC=false;
                return 0;
            }

            int total= 0;

            int len = -1;
            int to_flush = flushMask();
            int last_flush;

            do
            {
                last_flush=to_flush;
                switch (to_flush)
                {
                    case 7:
                        throw new IllegalStateException(); // should never happen!
                    case 6:
                        len = _endp.flush(_header, _buffer, null);
                        break;
                    case 5:
                        len = _endp.flush(_header, _content, null);
                        break;
感觉这两段代码贴的都有点小儿科了,由于NIO章节里面对HttpClient的总结不多,这里补充下。
4)时序图

对于解析Response不总结了,最后解析的时候会根据数据流协议的格式回调HttpExchange的回调函数:OnResonseComplete之流,有兴趣的同学可以研究下,了解了之后对于学习HttpClient、HttpUnit感觉简单多了~
HttpClient的超时队列
如果要说最难以理解的地方非这里莫属了,这里让我辛苦好一阵子,没有注释,若干莫名其妙的变量看得你会疯的。不过看下来感觉设计还是蛮优雅的,有些地方可能是BUG,呵呵,这个不好说~也许是自己没理解透彻!
HttpClient维护了三份超时队列,保存在两份链表中。
A、超时请求队列,保存在_timeoutQ中。
B、超时连接队列,保存在_timeoutQ中。
C、空闲连接超时队列,保存在_idleTimeoutQ中。
1、这两份链表由HttpClient中一个线程每200ms轮询检查。
_threadPool.dispatch(new Runnable()
        {
            public void run()
            {
                while (isRunning())
                {
                    _timeoutQ.tick(System.currentTimeMillis());
                    _idleTimeoutQ.tick(_timeoutQ.getNow());
                    try
                    {
                        Thread.sleep(200);
                    }
                    catch (InterruptedException ignored)
                    {
                    }
                }
            }
        });
2、正常的请求情况下,连接池如何管理?
1)从连接池中取连接,如果没有,则建立连接
2)将连接加入连接池中
3.1)发出长连接请求,如果收到的报文也是长连接,则执行如下逻辑:
(1)若当前没有待处理的请求,则将该连接置于空闲队列中,并加入空闲连接超时队列中
(2)若当前有需要处理的请求,则将当前HttpConnection中的exchange替换为最新的,继续请求的执行。
3.2)反之,由于另一个服务器不支持长连接,则将该连接关闭并从连接池中移出。
下面一段代码是HttpConnection的handle时,描述的是长连接判断的选择逻辑:
if (_exchange==null && !isReserved())  // TODO how do we return switched connections?
_destination.returnConnection(this, !persistent);public void returnConnection(AbstractHttpConnection connection, boolean close) throws IOException
{
if (connection.isReserved())
connection.setReserved(false);
if (close)
{
try
{
connection.close();
}
catch (IOException e)
{
LOG.ignore(e);
}
}
if (!_client.isStarted())
return;
if (!close && connection.getEndPoint().isOpen())
{
synchronized (this)
{
if (_queue.size() == 0)
{
connection.setIdleTimeout();
_idle.add(connection);
}
else
{
HttpExchange ex = _queue.remove(0);
send(connection, ex);
}
this.notifyAll();
}
}
else
{
boolean startConnection = false;
synchronized (this)
{
_connections.remove(connection);
if (!_queue.isEmpty())
startConnection = true;
}
if (startConnection)
startNewConnection();
}
}上面的流程只是简化版,实际实现中考虑到了并发的情况,逻辑会稍微多一些,不过上述这种模式确实能够做到充分利用连接池的目的。
3、超时请求队列
1)何时加入队列
取得HttpConnection之前,HttpDestination的doSend()方法:
// Schedule the timeout here, before we queue the exchange
        // so that we count also the queue time in the timeout
        ex.scheduleTimeout(this);

        AbstractHttpConnection connection = getIdleConnection();
        if (connection != null)
        {
            send(connection, ex);
        }
        else
        {
2)何时退出队列
超时和接收到Response之后,代码是HttpConnection接收到Response解析完成之后的片段,HttpConnection的handle()方法:
if (complete)
                    {
                        boolean persistent = !failed && _parser.isPersistent() && _generator.isPersistent();
                        _generator.setPersistent(persistent);
                        reset();
                        if (persistent)
                            _endp.setMaxIdleTime((int)_destination.getHttpClient().getIdleTimeout());

                        synchronized (this)
                        {
                            exchange=_exchange;
                            _exchange = null;

                            // Cancel the exchange
                            if (exchange!=null)
                            {
                                exchange.cancelTimeout(_destination.getHttpClient());

                                // TODO should we check the exchange is done?
                            }
3)超时触发的动作
干掉该HttpExchange所持有的Connection,原因是Response随时可能回到来,而Connection也许已经被别的请求占用了。
为什么一定要干掉他呢?连接池的效率不是很降低很多,你可曾想过有替代方案,但是真实理由或许是这样:你并不知道另一个服务器是否支持长连接,因此保险的做法就是断开连接。
protected void exchangeExpired(HttpExchange exchange)
    {
        synchronized (this)
        {
            // We are expiring an exchange, but the exchange is pending
            // Cannot reuse the connection because the reply may arrive, so close it
            if (_exchange == exchange)
            {
                try
                {
                    _destination.returnConnection(this, true);
                }
                catch (IOException x)
                {
                    LOG.ignore(x);
                }
            }
        }
参数true的意思是直接关闭该connection,并移出连接池。
4、超时连接队列
1)何时加入队列
服务端connect另一个服务端之后即加入连接超时队列,Selector的startConnection()方法。
channel.configureBlocking(false);
                channel.connect(address.toSocketAddress());
                _selectorManager.register(channel,destination);
                ConnectTimeout connectTimeout = new ConnectTimeout(channel,destination);
                _httpClient.schedule(connectTimeout,_httpClient.getConnectTimeout());
                _connectingChannels.put(channel,connectTimeout);
2)何时退出队列
doSelect时发现有连接成功事件触发,创建连接的时候将其移除连接超时队列,doSelect方法调用。
if (connected)
                                {
                                    key.interestOps(SelectionKey.OP_READ);
                                    SelectChannelEndPoint endpoint = createEndPoint(channel,key);
                                    key.attach(endpoint);
                                    endpoint.schedule();
                                }
下面在生产endPoint中移除了该task。
protected SelectChannelEndPoint newEndPoint(SocketChannel channel, SelectSet selectSet, SelectionKey key) throws IOException
        {
            // We're connected, cancel the connect timeout
            Timeout.Task connectTimeout = _connectingChannels.remove(channel);
            if (connectTimeout != null)
                connectTimeout.cancel();
            if (LOG.isDebugEnabled())
                LOG.debug("Channels with connection pending: {}", _connectingChannels.size());

            // key should have destination at this point (will be replaced by endpoint after this call)
            HttpDestination dest=(HttpDestination)key.attachment();

            SelectChannelEndPoint scep = new SelectChannelEndPoint(channel, selectSet, key, (int)_httpClient.getIdleTimeout());
            AsyncEndPoint ep = scep;
3)超时触发的动作
关闭SocketChannel。
5、空闲连接超时队列
1)何时加入队列
前面2的代码可以看到,当请求结束需要回收的时候,判断如果没有待处理的请求则进入空闲连接超时队列。
2)何时退出队列
超时和再次被征用的时候,HttpDestination的doSend()方法。
public AbstractHttpConnection getIdleConnection() throws IOException
    {
        AbstractHttpConnection connection = null;
        while (true)
        {
            synchronized (this)
            {
                if (connection != null)
                {
                    _connections.remove(connection);
                    connection.close();
                    connection = null;
                }
                if (_idle.size() > 0)
                    connection = _idle.remove(_idle.size() - 1);
            }

            if (connection == null)
            {
                return null;
            }

            // Check if the connection was idle,
            // but it expired just a moment ago
            //在这里退出了超时队列
            if (connection.cancelIdleTimeout())
            {
                return connection;
            }
        }
3)超时触发的动作
下面的代码差不多是触发动作的全部了,对照可以看出,首先是关闭连接,其次是从连接池中移除,最后判断有没有最新的请求过来需要重新整一份。
public void returnIdleConnection(AbstractHttpConnection connection)
    {
        // TODO work out the real idle time;
        long idleForMs=connection!=null&&connection.getEndPoint()!=null?connection.getEndPoint().getMaxIdleTime():-1;
        connection.onIdleExpired(idleForMs);

        boolean startConnection = false;
        synchronized (this)
        {
            _idle.remove(connection);
            _connections.remove(connection);

            if (!_queue.isEmpty() && _client.isStarted())
                startConnection = true;
        }

        if (startConnection)
            startNewConnection();
    }
6、发现有个地方不是很优雅
逻辑是这样的:将请求置于请求超时队列中,然后取得空闲的连接处理请求.
/ Schedule the timeout here, before we queue the exchange
        // so that we count also the queue time in the timeout
        ex.scheduleTimeout(this);

        AbstractHttpConnection connection = getIdleConnection();
        if (connection != null)
        {
            send(connection, ex);
}protected void exchangeExpired(HttpExchange exchange)
{
// The exchange may expire while waiting in the
// destination queue, make sure it is removed
synchronized (this)
{
_queue.remove(exchange);//虽然不会报错,但是欠优雅
}
} HttpClient的初始化
发现越往后面写就越懒了,能贴代码尽量贴代码,图也懒得画了,其实贴代码是下下策。
这里的初始化指的是在Jetty的生命周期中HttpClient在何时start,置于所依赖的那些组件需要start前面第四章阐述过,是以addBean的方式先注册。
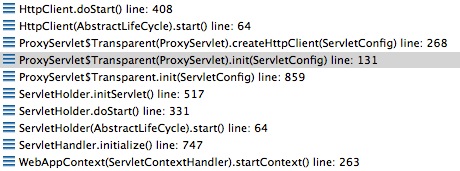
上图可以看到,在初始化ServletHolder时候,默认12个需要初始化,其中有一个servlet是:ProxyServlet,在初始化该servlet的时候创建HttpClient并初始化,你完全可以将这个servlet去掉,这样可以使得jetty更加轻便。这个servlet的具体作用即透明代理,下面的内容。
透明代理
在应用中主要的阻塞有两处,Read和Write。NIO可以有效地解决Read阻塞的情况,但是如果应用中过多的访问数据库、缓存,而那些缓存性能又不是很好的情况下,也许需要好一阵子才会向Channel去Write,这段时间便占了请求的线程池。
一种有效的解决方案就是采用Continunation(前文有总结),将耗时的处理交给应用线程并交出请求的线程,呆处理完之后,应用线程恢复该Request重新提交给server,此时客户端一直木有收到Response而保持着连接。其实想想有些ajax轮询的请求完全可以采用这种方式去实现,即可避免客户端频繁发送请求的窘境。但是压力都交给了应用线程似乎有些不太优雅。
如果结合HttpClient的方式去实现,那么应用线程的压力便得到了有效地解决。实现方式类似如此:将Continunation交给应用线程改为交给HttpClient(前文有总结),由HttpClient的doSelect来识别数据库、缓存的访问是否得到Response,进而将Continunation Resume掉,恢复原有的请求。
而Jetty已经提供了这样的实现,即ProxyServlet的子类Transparent,透明代理,实现如下:
public void service(ServletRequest req, ServletResponse res) throws ServletException, IOException
    {
            if (!continuation.isInitial())
                response.sendError(HttpServletResponse.SC_GATEWAY_TIMEOUT); // Need better test that isInitial
            else
            {

                String uri = request.getRequestURI();
                if (request.getQueryString() != null)
                    uri += "?" + request.getQueryString();

                HttpURI url = proxyHttpURI(request,uri);

                if (url == null)
                {
                    response.sendError(HttpServletResponse.SC_FORBIDDEN);
                    return;
                }

                HttpExchange exchange = new HttpExchange()
                {
                    @Override
                    protected void onResponseComplete() throws IOException
                    {
                        if (debug != 0)
                            _log.debug(debug + " complete");
                        continuation.complete();
                    }

                    @Override
                    protected void onResponseContent(Buffer content) throws IOException
                    {
                        if (debug != 0)
                            _log.debug(debug + " content" + content.length());
                        content.writeTo(out);
                    }
                    @Override
                    protected void onResponseHeader(Buffer name, Buffer value) throws IOException
                    {
                        String nameString = name.toString();
                        String s = nameString.toLowerCase();
                        if (!_DontProxyHeaders.contains(s) || (HttpHeaders.CONNECTION_BUFFER.equals(name) && HttpHeaderValues.CLOSE_BUFFER.equals(value)))
                        {
                            if (debug != 0)
                                _log.debug(debug + " " + name + ": " + value);

                            String filteredHeaderValue = filterResponseHeaderValue(nameString,value.toString(),request);
                            if (filteredHeaderValue != null && filteredHeaderValue.trim().length() > 0)
                            {
                                if (debug != 0)
                                    _log.debug(debug + " " + name + ": (filtered): " + filteredHeaderValue);
                                response.addHeader(nameString,filteredHeaderValue);
                            }
                        }
                        else if (debug != 0)
                            _log.debug(debug + " " + name + "! " + value);
                    }
                    @Override
                    protected void onExpire()
                    {
                        handleOnExpire(request,response);
                        continuation.complete();
                    }
                };
                exchange.setScheme(HttpSchemes.HTTPS.equals(request.getScheme())?HttpSchemes.HTTPS_BUFFER:HttpSchemes.HTTP_BUFFER);
                exchange.setMethod(request.getMethod());
                exchange.setURL(url.toString());
                exchange.setVersion(request.getProtocol());
                customizeContinuation(continuation);
                continuation.suspend(response);
                _client.send(exchange);

            }
        }
    }
上面的代码是删减版,贴出来核心的一些代码,参看上面的代码,有几个注意点:
1)逻辑都是将Continunation交给HttpClient,然后完成后唤醒最初的请求。
2)唤醒采用了complete的方法,前面的博客总结过,这种用法是不会走进server进去处理了,而是直接将已有的内容返还给客户端了,已有的内容哪里来的呢?
3)可以看到OnResponseContent的回调函数里面就将第三方服务器的response内容交给自己了,因而实现了“透明代理”。
4)一些超时队列的处理也是必不可少的,因为上面总结的缘故,所以没有贴出来。


 8427
8427


 被折叠的 条评论
为什么被折叠?
被折叠的 条评论
为什么被折叠?
 到【灌水乐园】发言


