


6月11日任务
12.13 Nginx防盗链
12.14 Nginx访问控制
12.15 Nginx解析php相关配置
12.16 Nginx代理
扩展
502问题汇总 http://ask.apelearn.com/question/9109
location优先级 http://blog.lishiming.net/?p=100
Nginx防盗链目录概要
- 配置如下,可以和上面的配置结合起来
location ~* ^.+\.(gif|jpg|png|swf|flv|rar|zip|doc|pdf|gz|bz2|jpeg|bmp|xls)$
{
    expires 7d;
    valid_referers none blocked server_names  *.test.com ;
    if ($invalid_referer) {
        return 403;
    }
    access_log off;
}
Nginx防盗链
- Nginx防盗链配置需要和不记录日志和过期时间结合在一起,因为都用到了“location”
- 打开配置文件 vim /usr/local/nginx/conf/vhost/test.com.conf
- 注释掉一些配置
   #location ~ .*\.(gif|jpg|jpeg|png|bmp|swf)$
    #{
    #      expires      7d;
    #      access_log off;
    #}
添加一些配置
location ~* ^.+.(gif|jpg|png|swf|flv|rar|zip|doc|pdf|gz|bz2|jpeg|bmp|xls)$
{
    expires 7d;        //过期时间7天
    valid_referers none blocked server_names  *.test.com ;   //定义一个白名单,referer就是指一些域名
    if ($invalid_referer) {                                        //如果不是白名单里的
        return 403;                                                   //返回403
    }
    access_log off;
}
最后结果如下
[root@yong-01 vhost]# vim test.com.conf
server
{
listen 80;
server_name test.com test1.com test2.com;
root /data/wwwroot/test.com;
if ($host != 'test.com' ) {
rewrite ^/(.*)$ http://test.com/$1 permanent;
}
#location ~ .*\.(gif|jpg|jpeg|png|bmp|swf)$
#{
# expires 7d;
# access_log off;
#}
location ~* ^.+\.(gif|jpg|png|swf|flv|rar|zip|doc|pdf|gz|bz2|jpeg|bmp|xls)$
{
expires 7d;
valid_referers none blocked server_names *.test.com ;
if ($invalid_referer) {
return 403;
}
access_log off;
}
location ~ .*\.(js|css)$
{
expires 12h;
access_log off;
}
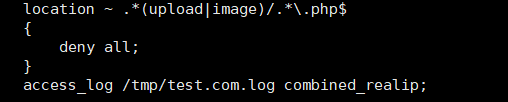
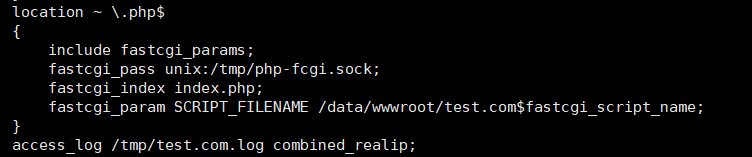
access_log /tmp/test.com.log combined_realip;
}
- 添加的配置中的 ~* 表示不区分大小写,另外防盗链的配置里面server_names可以不写照样
- 检查配置文件语法错误,并重新加载配置文件
[root@yong-01 vhost]# /usr/local/nginx/sbin/nginx -t
nginx: the configuration file /usr/local/nginx/conf/nginx.conf syntax is ok
nginx: configuration file /usr/local/nginx/conf/nginx.conf test is successful
[root@yong-01 vhost]# /usr/local/nginx/sbin/nginx -s reload
- 测试
[root@yong-01 vhost]# curl -x127.0.0.1:80 test.com/1.gif -I
HTTP/1.1 200 OK
Server: nginx/1.4.7
Date: Mon, 11 Jun 2018 12:20:35 GMT
Content-Type: image/gif
Content-Length: 10
Last-Modified: Sat, 09 Jun 2018 01:44:01 GMT
Connection: keep-alive
ETag: "5b1b30e1-a"
Expires: Mon, 18 Jun 2018 12:20:35 GMT
Cache-Control: max-age=604800
Accept-Ranges: bytes
- 测试防盗链,使用curl -e
[root@yong-01 vhost]# curl -e "http://www.baidu.com/1.txt" -x127.0.0.1:80 test.com/1.gif -I
HTTP/1.1 403 Forbidden
Server: nginx/1.4.7
Date: Mon, 11 Jun 2018 12:21:59 GMT
Content-Type: text/html
Content-Length: 168
Connection: keep-alive

[root@yong-01 vhost]# curl -e "http://www.test.com/1.txt" -x127.0.0.1:80 test.com/1.gif -I
HTTP/1.1 200 OK
Server: nginx/1.4.7
Date: Mon, 11 Jun 2018 12:22:11 GMT
Content-Type: image/gif
Content-Length: 10
Last-Modified: Sat, 09 Jun 2018 01:44:01 GMT
Connection: keep-alive
ETag: "5b1b30e1-a"
Expires: Mon, 18 Jun 2018 12:22:11 GMT
Cache-Control: max-age=604800
Accept-Ranges: bytes
- 再访问curl -e "http://www.baidu.com/1.txt" -x127.0.0.1:80 -I test.com/1.gif显示403,而在访问curl -e "http://www.test.com/1.txt" -x127.0.0.1:80 -I test.com/1.gif显示200,则表示防盗链配置成功
Nginx访问控制目录概要
- 需求:访问/admin/目录的请求,只允许某几个IP访问,配置如下:
location /admin/
{
    allow 192.168.180.134;
    allow 127.0.0.1;
    deny all;
}
- mkdir /data/wwwroot/test.com/admin/
- echo “test,test”>/data/wwwroot/test.com/admin/1.html
- -t && -s reload
- curl -x127.0.0.1:80 test.com/admin/1.html -I
- curl -x192.168.180.134:80 test.com/admin/1.html -I
- 可以匹配正则
location ~ .*(abc|image)/.*\.php$
{
        deny all;
}- 根据user_agent限制
if ($http_user_agent ~ 'Spider/3.0|YoudaoBot|Tomato')
{
      return 403;
}- deny all和return 403效果一样
Nginx访问控制
- Nginx访问控制,在平时运维网站的时候,经常会有一些请求不正常,或者故意的做一些限制,一些重要的内容禁止别人访问,就可以做一个白名单,只允许自己的公网IP或者自己公司内的公网IP去访问
- 编辑配置文件vim /usr/local/nginx/conf/vhost/test.com.conf
- 增加访问控制的代码
location /admin/
{
    allow 192.168.180.134;            //白名单
    allow 127.0.0.1;            //白名单
    deny all;        //全部deny
}
最后结果如下
[root@yong-01 vhost]# vim test.com.conf

server
{
    listen 80;
    server_name test.com test1.com test2.com;
    index index.html index.htm index.php;
    root /data/wwwroot/test.com;
    if ($host != 'test.com' ) {
        rewrite  ^/(.*)$  http://test.com/$1  permanent;
    }
    #location ~ .*\.(gif|jpg|jpeg|png|bmp|swf)$
    #{
    #      expires      7d;
    #      access_log off;
    #}
    location ~* ^.+\.(gif|jpg|png|swf|flv|rar|zip|doc|pdf|gz|bz2|jpeg|bmp|xls)$
    {
          expires 7d;
          valid_referers none blocked server_names  *.test.com ;
          if ($invalid_referer) {
             return 403;
          }
          access_log off;
    }

    location ~ .*\.(js|css)$
    {
          expires      12h;
          access_log off;
    }
    location /admin/
    {
    allow 192.168.180.134;
    allow 127.0.0.1;
    deny all;
    }
   access_log /tmp/test.com.log combined_realip;
}
- 然后检查配置文件语法错误,然后重新加载配置文件
[root@yong-01 vhost]# /usr/local/nginx/sbin/nginx -t
nginx: the configuration file /usr/local/nginx/conf/nginx.conf syntax is ok
nginx: configuration file /usr/local/nginx/conf/nginx.conf test is successful
[root@yong-01 vhost]# /usr/local/nginx/sbin/nginx -s reload
- 测试
[root@yong-01 vhost]# curl -e "http://www.test.com/1.txt" -x127.0.0.1:80 test.com/admin/ -I
HTTP/1.1 200 OK
Server: nginx/1.4.7
Date: Mon, 11 Jun 2018 12:48:05 GMT
Content-Type: text/html
Content-Length: 19
Last-Modified: Thu, 07 Jun 2018 14:25:33 GMT
Connection: keep-alive
ETag: "5b19405d-13"
Accept-Ranges: bytes

[root@yong-01 vhost]# curl -e "http://www.test.com/1.txt" -x192.168.180.134:80 test.com/admin/ -I
HTTP/1.1 200 OK
Server: nginx/1.4.7
Date: Mon, 11 Jun 2018 12:49:43 GMT
Content-Type: text/html
Content-Length: 19
Last-Modified: Thu, 07 Jun 2018 14:25:33 GMT
Connection: keep-alive
ETag: "5b19405d-13"
Accept-Ranges: bytes
- 查看日志文件,会看到访问的来源IP也是192.168.180.134,因为它是被允许的,在白名单之内,所以显示状态码为200
[root@yong-01 vhost]# cat /tmp/test.com.log
127.0.0.1 - [09/Jun/2018:09:45:28 +0800] test.com "/index.html" 200 "-" "curl/7.29.0"
127.0.0.1 - [11/Jun/2018:20:48:01 +0800] test.com "/admin/" 200 "http://www.test.com/1.txt" "curl/7.29.0"
127.0.0.1 - [11/Jun/2018:20:48:05 +0800] test.com "/admin/" 200 "http://www.test.com/1.txt" "curl/7.29.0"
192.168.180.134 - [11/Jun/2018:20:49:43 +0800] test.com "/admin/" 200 "http://www.test.com/1.txt" "curl/7.29.0"
- 查看IP,然后给ens37网卡配置IP
- 先查看ens37网卡是否连接,然后更改连接ens37网卡模式为仅主机连接模式
[root@yong-01 vhost]# ifconfig
ens33: flags=4163<UP,BROADCAST,RUNNING,MULTICAST>  mtu 1500
        inet 192.168.180.134  netmask 255.255.255.0  broadcast 192.168.180.255
        inet6 fe80::8004:45b5:96c5:3ca5  prefixlen 64  scopeid 0x20<link>
        ether 00:0c:29:29:2b:60  txqueuelen 1000  (Ethernet)
        RX packets 2816  bytes 250885 (245.0 KiB)
        RX errors 0  dropped 0  overruns 0  frame 0
        TX packets 1664  bytes 221897 (216.6 KiB)
        TX errors 0  dropped 0 overruns 0  carrier 0  collisions 0

ens37: flags=4163<UP,BROADCAST,RUNNING,MULTICAST>  mtu 1500
        inet 192.168.100.1  netmask 255.255.255.0  broadcast 192.168.100.255
        inet6 fe80::af5:df02:5a53:e408  prefixlen 64  scopeid 0x20<link>
        ether 00:0c:29:29:2b:6a  txqueuelen 1000  (Ethernet)
        RX packets 153  bytes 52046 (50.8 KiB)
        RX errors 0  dropped 0  overruns 0  frame 0
        TX packets 37  bytes 3246 (3.1 KiB)
        TX errors 0  dropped 0 overruns 0  carrier 0  collisions 0

lo: flags=73<UP,LOOPBACK,RUNNING>  mtu 65536
        inet 127.0.0.1  netmask 255.0.0.0
        inet6 ::1  prefixlen 128  scopeid 0x10<host>
        loop  txqueuelen 1  (Local Loopback)
        RX packets 200  bytes 17668 (17.2 KiB)
        RX errors 0  dropped 0  overruns 0  frame 0
        TX packets 200  bytes 17668 (17.2 KiB)
        TX errors 0  dropped 0 overruns 0  carrier 0  collisions 0
- 给ens37网卡自动获取IP,然后再来查看ens36的网卡IP地址为192.168.100.1
- 这时再来使用ens37网卡的IP来访问,会看到访问的admin目录为403
[root@yong-01 vhost]# curl -x192.168.100.1:80 test.com/admin/ -I
HTTP/1.1 403 Forbidden
Server: nginx/1.4.7
Date: Mon, 11 Jun 2018 12:58:12 GMT
Content-Type: text/html
Content-Length: 168
Connection: keep-alive
- 这时再来查看日志文件,会看到来源的IP为192.168.100.1,在配置文件中被没有被允许,所以为403
[root@yong-01 vhost]# !cat
cat /tmp/test.com.log
127.0.0.1 - [09/Jun/2018:09:45:28 +0800] test.com "/index.html" 200 "-" "curl/7.29.0"
127.0.0.1 - [11/Jun/2018:20:48:01 +0800] test.com "/admin/" 200 "http://www.test.com/1.txt" "curl/7.29.0"
127.0.0.1 - [11/Jun/2018:20:48:05 +0800] test.com "/admin/" 200 "http://www.test.com/1.txt" "curl/7.29.0"
192.168.100.1 - [11/Jun/2018:20:57:48 +0800] test.com "/admin/" 403 "http://www.test.com/1.txt" "curl/7.29.0"
192.168.100.1 - [11/Jun/2018:20:58:12 +0800] test.com "/admin/" 403 "-" "curl/7.29.0"
针对正则匹配
- 例子
- 网站被黑,数据库被盗窃,就是因为上传图片的目录没有做禁止解析php的操作,最终导致上传了一句话木马,php也能解析,所以网站就会被黑
- 只要能上传的目录,都要禁掉,禁止解析PHP
- 加以下代码,即可禁掉上传的目录解析PHP
location ~ .*(upload|image)/.*\.php$        //只要匹配upload,然后以php结尾的
{
        deny all;            //都禁掉
}
- 打开配置文件vim /usr/local/nginx/conf/vhost/test.com.conf,在access_log上面加上这一段
- 检查配置文件语法错误,并重新加载配置文件
[root@yong-01 vhost]# /usr/local/nginx/sbin/nginx -t
nginx: the configuration file /usr/local/nginx/conf/nginx.conf syntax is ok
nginx: configuration file /usr/local/nginx/conf/nginx.conf test is successful
[root@yong-01 vhost]# /usr/local/nginx/sbin/nginx -s reload
- 测试,首先是访问的那个目录,然后访问的php资源
- 创建一个upload目录,然后在创建一个php文件
[root@yong-01 vhost]# mkdir /data/wwwroot/test.com/upload
[root@yong-01 vhost]# echo "123456" > /data/wwwroot/test.com/upload/1.php
- 访问upload目录下的1.php文件,会看到是403状态码,被拒绝访问
[root@yong-01 vhost]# curl -x127.0.0.1:80 test.com/upload/1.php -I
HTTP/1.1 403 Forbidden
Server: nginx/1.4.7
Date: Mon, 11 Jun 2018 13:08:26 GMT
Content-Type: text/html
Content-Length: 168
Connection: keep-alive- 这时再upload目录下创建1.txt,再来测试访问
[root@yong-01 vhost]# echo "123456" > /data/wwwroot/test.com/upload/1.txt
[root@yong-01 vhost]# curl -x127.0.0.1:80 test.com/upload/1.txt
123456
- 查看访问日志cat /tmp/test.com.log 1.php是403 1.txt是200
[root@yong-01 vhost]# tail -5 /tmp/test.com.log
127.0.0.1 - [11/Jun/2018:21:08:21 +0800] test.com "/upload/1.php" 403 "-" "curl/7.29.0"
127.0.0.1 - [11/Jun/2018:21:08:26 +0800] test.com "/upload/1.php" 403 "-" "curl/7.29.0"
127.0.0.1 - [11/Jun/2018:21:08:52 +0800] test.com "/upload/1.txt" 200 "-" "curl/7.29.0"
127.0.0.1 - [11/Jun/2018:21:08:57 +0800] test.com "/upload/1.txt" 200 "-" "curl/7.29.0"
根据user_agent限制
- 如果你的网站被cc攻击,或者禁掉某些蜘蛛,如果你的网站想做一个被隐藏的网站,不想被别人搜索到,那么就可以将百度、谷歌、有道等这些蜘蛛封掉,没有任何蜘蛛爬到你的网站,也不将网址告诉任何人,那别人就无法知道你的站点,因为你的网站是被隐藏的。
- 只需要根据user_agent限制,添加以下代码
if ($http_user_agent ~ 'Spider/3.0|YoudaoBot|Tomato')
{
      return 403;
}
- deny all和return 403效果一样
- 打开配置文件vim /usr/local/nginx/conf/vhost/test.com.conf 添加以下代码

- 检查配置文件语法错误,并重新加载配置文件
[root@yong-01 vhost]# /usr/local/nginx/sbin/nginx -t
nginx: the configuration file /usr/local/nginx/conf/nginx.conf syntax is ok
nginx: configuration file /usr/local/nginx/conf/nginx.conf test is successful
[root@yong-01 vhost]# /usr/local/nginx/sbin/nginx -s reload
- 模拟user_agent,访问测试,会看到显示403
[root@yong-01 vhost]# curl -x127.0.0.1:80 test.com/admin/1.txt -I
HTTP/1.1 200 OK
Server: nginx/1.4.7
Date: Mon, 11 Jun 2018 13:16:38 GMT
Content-Type: text/plain
Content-Length: 5
Last-Modified: Mon, 11 Jun 2018 13:16:35 GMT
Connection: keep-alive
ETag: "5b1e7633-5"
Accept-Ranges: bytes

[root@yong-01 vhost]# curl -A "Tomatosfdas" -x127.0.0.1:80 test.com/admin/1.txt -I
HTTP/1.1 403 Forbidden
Server: nginx/1.4.7
Date: Mon, 11 Jun 2018 13:17:10 GMT
Content-Type: text/html
Content-Length: 168
Connection: keep-alive- deny all和return 403效果一样
- 如果访问的时候,改成小写再访问,则状态码为200,因为这个是严格匹配的
[root@yong-01 vhost]# curl -A "tomatosfdas" -x127.0.0.1:80 test.com/admin/1.txt -I
HTTP/1.1 200 OK
Server: nginx/1.4.7
Date: Mon, 11 Jun 2018 13:17:38 GMT
Content-Type: text/plain
Content-Length: 5
Last-Modified: Mon, 11 Jun 2018 13:16:35 GMT
Connection: keep-alive
ETag: "5b1e7633-5"
Accept-Ranges: bytes
- 如果想忽略大小写,在配置文件中的匹配符号后加 * 号即可
[root@yong-01 vhost]# vim test.com.conf

  if ($http_user_agent ~* 'Spider/3.0|YoudaoBot|Tomato')
    {
      return 403;
    }
- 在检查配置文件,并重新加载
[root@yong-01 vhost]# /usr/local/nginx/sbin/nginx -t
nginx: the configuration file /usr/local/nginx/conf/nginx.conf syntax is ok
nginx: configuration file /usr/local/nginx/conf/nginx.conf test is successful
[root@yong-01 vhost]# /usr/local/nginx/sbin/nginx -s reload
- 再来测试,会显示403
[root@yong-01 vhost]# curl -A "tomatosfdas" -x127.0.0.1:80 test.com/admin/1.txt -I
HTTP/1.1 403 Forbidden
Server: nginx/1.4.7
Date: Mon, 11 Jun 2018 13:19:29 GMT
Content-Type: text/html
Content-Length: 168
Connection: keep-alive
Nginx解析php相关配置目录概要
- 配置如下:
location ~ \.php$
    {
        include fastcgi_params;
        fastcgi_pass unix:/tmp/php-fcgi.sock;
        fastcgi_index index.php;
        fastcgi_param SCRIPT_FILENAME /data/wwwroot/test.com$fastcgi_script_name;
    }
- fastcgi_pass 用来指定php-fpm监听的地址或者socket
Nginx解析php相关配置
- 添加以下代码
location ~ \.php$
    {
        include fastcgi_params;
        fastcgi_pass unix:/tmp/php-fcgi.sock;        //写错这个路径,就会显示502
        fastcgi_index index.php;
        fastcgi_param SCRIPT_FILENAME /data/wwwroot/test.com$fastcgi_script_name;
    }
- 打开虚拟主机配置文件,因为现在test.com.conf还不能解析php,加代码添加到配置文件中
- 先创建一个php文件,在/data/wwwroot/test.com/目录下创建3.php
[root@yong-01 vhost]# vim /data/wwwroot/test.com/3.php
<?php
phpinfo();
- 测试访问3.php,会看到无法解析3.php文件,显示出了源码
[root@yong-01 vhost]# curl -x127.0.0.1:80 test.com/3.php
<?php
phpinfo();
- 这时候检查配置文件语法错误,并重新加载配置文件
[root@yong-01 vhost]# /usr/local/nginx/sbin/nginx -t
nginx: the configuration file /usr/local/nginx/conf/nginx.conf syntax is ok
nginx: configuration file /usr/local/nginx/conf/nginx.conf test is successful
[root@yong-01 vhost]# /usr/local/nginx/sbin/nginx -s reload
- 这时候再来访问3.php,会看到可以正常解析了
[root@yong-01 vhost]# curl -x127.0.0.1:80 test.com/3.php
- 若是解析php相关配置的 fastcgi_pass unix:/tmp/php-fcgi.sock; 这个路径被写错,会直接显示502,因为sock文件没有被找到
- 将配置文件改错后,重新加载后,再来访问3.php,会看到显示502状态码
[root@yong-01 vhost]# curl -x127.0.0.1:80 test.com/3.php
<html>
<head><title>502 Bad Gateway</title></head>
<body bgcolor="white">
<center><h1>502 Bad Gateway</h1></center>
<hr><center>nginx/1.4.7</center>
</body>
</html>
- 查看访问日志cat /usr/local/nginx/logs/nginx_error.log,会看到日志文件中会说没有这样的文件或目录
[root@yong-01 vhost]# cat /usr/local/nginx/logs/nginx_error.log
2018/06/11 21:44:48 [crit] 2348#0: *33 connect() to unix:/tmp/php-cgi.sock failed (2: No such file or directory) while connecting to upstream, client: 127.0.0.1, server: test.com, request: "GET HTTP://test.com/3.php HTTP/1.1", upstream: "fastcgi://unix:/tmp/php-cgi.sock:", host: "test.com"
- 在遇到502的问题时,需要查看你配置的地址是否正确,首先查看错误日志,然后根据错误日志中提示,查看这个文件是否存在,在查看cat /usr/local/php-fpm/etc/php-fpm.conf你定义的sock是什么,那么在nginx的配置文件中写什么
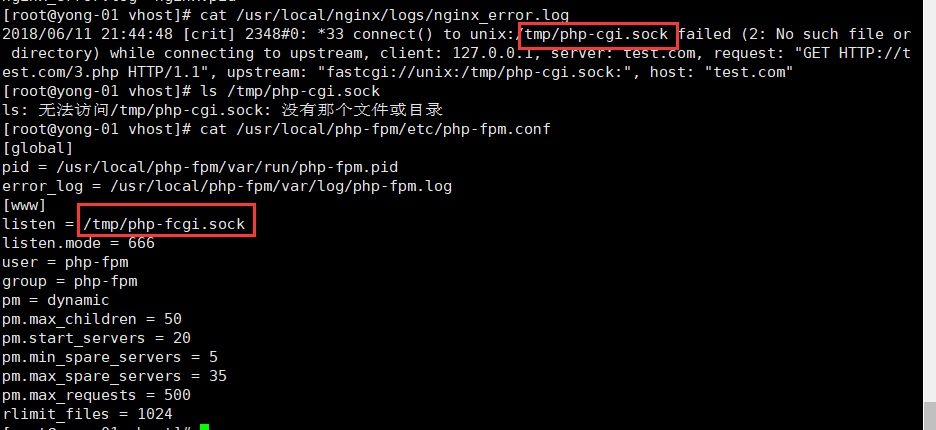
这两个地方的路径必须是一样的 不能错 否则就报502错误
- 这时再去配置文件中更改回来即可,所以只要配置文件中的 fastcgi_pass unix:/tmp/php-fcgi.sock; 地址错误,就会显示502
502的另一种情况
- 假设这时不监听sock,而去监听IP端口
- 首先更改配置vim /usr/local/php-fpm/etc/php-fpm.conf
- 将#listen = /tmp/php-fcgi.sock注释掉,增加listen = 127.0.0.1:9000
[root@yong-01 vhost]# vim /usr/local/php-fpm/etc/php-fpm.conf

[global]
pid = /usr/local/php-fpm/var/run/php-fpm.pid
error_log = /usr/local/php-fpm/var/log/php-fpm.log
[www]
#listen = /tmp/php-fcgi.sock
listen = 127.0.0.1:9000
listen.mode = 666
user = php-fpm
group = php-fpm
pm = dynamic
pm.max_children = 50
pm.start_servers = 20
pm.min_spare_servers = 5
pm.max_spare_servers = 35
pm.max_requests = 500
rlimit_files = 1024
- 重启php 命令为/etc/init.d/php-fpm restart,php重启也支持reload
[root@yong-01 vhost]# service php-fpm restart
Gracefully shutting down php-fpm . done
Starting php-fpm  done
- 检查php文件是否存在语法错误,重新加载下nginx的配置文件
[root@yong-01 vhost]# /usr/local/php-fpm/sbin/php-fpm -t
[11-Jun-2018 21:51:56] NOTICE: configuration file /usr/local/php-fpm/etc/php-fpm.conf test is successful

[root@yong-01 vhost]# /usr/local/nginx/sbin/nginx -s reload
- 查看监听端口是否为127.0.0.1:9000
[root@yong-01 vhost]# netstat -lntp
Active Internet connections (only servers)
Proto Recv-Q Send-Q Local Address           Foreign Address         State       PID/Program name
tcp        0      0 0.0.0.0:80              0.0.0.0:*               LISTEN      1178/nginx: master
tcp        0      0 0.0.0.0:22              0.0.0.0:*               LISTEN      1120/sshd
tcp        0      0 127.0.0.1:25            0.0.0.0:*               LISTEN      1477/master
tcp        0      0 127.0.0.1:9000          0.0.0.0:*               LISTEN      2497/php-fpm: maste
tcp6       0      0 :::22                   :::*                    LISTEN      1120/sshd
tcp6       0      0 ::1:25                  :::*                    LISTEN      1477/master
tcp6       0      0 :::3306                 :::*                    LISTEN      1431/mysqld
- 这时在来访问3.php,会看到显示为502
[root@yong-01 vhost]# curl -x127.0.0.1:80 test.com/3.php
<html>
<head><title>502 Bad Gateway</title></head>
<body bgcolor="white">
<center><h1>502 Bad Gateway</h1></center>
<hr><center>nginx/1.4.7</center>
</body>
</html>
- 查看配置文件会提示说文件不存在
- 这时候只需要在配置文件中做一个更改,在php配置那一块,注释掉unix,添加ip和端口
[root@yong-01 vhost]# vim test.com.conf
在php配置那一块,注释掉unix,添加ip和端口
        #fastcgi_pass unix:/tmp/php-fcgi.sock;
        fastcgi_pass 127.0.0.1:9000;
保存退出
- 检查语法错误,并重新加载配置文件
[root@yong-01 vhost]# /usr/local/nginx/sbin/nginx -t
nginx: the configuration file /usr/local/nginx/conf/nginx.conf syntax is ok
nginx: configuration file /usr/local/nginx/conf/nginx.conf test is successful
[root@yong-01 vhost]# /usr/local/nginx/sbin/nginx -s reload
- 再来访问3.php文件,会看到正常访问
[root@yong-01 vhost]# curl -x127.0.0.1:80 test.com/3.php
- 若是出现502,要检查下配置文件中的fastcgi_pass 这块是否nginx与php-fpm中所配置的地址是相匹配的
- PHP下的listen = /tmp/php-fcgi.sock这段配置很重要,决定了nginx是否能正确解析而不是502
- 当PHP配置文件 listen 使用sock时,那么对应的nginx配置文件下就必须使用 fastcgi_pass unix:/tmp/php-fcgi.sock;
- 当PHP配置文件listen 使用 IP加端口“127.0.0.1:9000”的时候,那么对应的nginx就要改成fastcgi_pass 127.0.0.1:9000;
- 配置文件中的 fastcgi_param SCRIPT_FILENAME 中的地址路径/data/wwwroot/test.com$fastcgi_script_name;与配置文件最上方的 root /data/wwwroot/test.com; 相对应起来
502的其他情况
- 在php5.4及以后的其他版本,有一个特点
- 更改监听为sock,取消监听IP和端口,注释掉listen.mode
- 更改php-fpm的配置文件,取消注释listen = /tmp/php-fcgi.sock,注释掉#listen = 127.0.0.1:9000和#listen.mode = 666
[root@yong-01 vhost]# vim /usr/local/php-fpm/etc/php-fpm.conf

[global]
pid = /usr/local/php-fpm/var/run/php-fpm.pid
error_log = /usr/local/php-fpm/var/log/php-fpm.log
[www]
listen = /tmp/php-fcgi.sock
#listen = 127.0.0.1:9000
#listen.mode = 666
user = php-fpm
group = php-fpm
pm = dynamic
pm.max_children = 50
pm.start_servers = 20
pm.min_spare_servers = 5
pm.max_spare_servers = 35
pm.max_requests = 500
rlimit_files = 1024
- 重新加载php
[root@yong-01 vhost]# /etc/init.d/php-fpm reload
Reload service php-fpm done- 查看sock文件的权限为660,属主和属组为root
[root@yong-01 vhost]# ll /tmp/php-fcgi.sock
srw-rw---- 1 root root 0 6月  11 21:57 /tmp/php-fcgi.sock
- 更改nginx虚拟主机配置文件,取消 fastcgi_pass unix:/tmp/php-fcgi.sock; 的注释,注释掉#fastcgi_pass 127.0.0.1:9000;
- fastcgi_pass unix:/tmp/php-fcgi.sock;这一行的配置是为了nginx去读sock文件
- 重新加载nginx配置文件
[root@yong-01 vhost]# /usr/local/nginx/sbin/nginx -s reload
- 这时候再来访问3.php,依然还是显示502
[root@yong-01 vhost]# curl -x127.0.0.1:80 test.com/3.php
<html>
<head><title>502 Bad Gateway</title></head>
<body bgcolor="white">
<center><h1>502 Bad Gateway</h1></center>
<hr><center>nginx/1.4.7</center>
</body>
</html>
- 查看访问日志文件,显示访问文件,权限被拒绝
[root@yong-01 vhost]# tail /usr/local/nginx/logs/nginx_error.log
2018/06/11 21:44:48 [crit] 2348#0: *33 connect() to unix:/tmp/php-cgi.sock failed (2: No such file or directory) while connecting to upstream, client: 127.0.0.1, server: test.com, request: "GET HTTP://test.com/3.php HTTP/1.1", upstream: "fastcgi://unix:/tmp/php-cgi.sock:", host: "test.com"
2018/06/11 21:53:20 [crit] 2523#0: *35 connect() to unix:/tmp/php-fcgi.sock failed (2: No such file or directory) while connecting to upstream, client: 127.0.0.1, server: test.com, request: "GET HTTP://test.com/3.php HTTP/1.1", upstream: "fastcgi://unix:/tmp/php-fcgi.sock:", host: "test.com"
2018/06/11 21:59:12 [crit] 2650#0: *39 connect() to unix:/tmp/php-fcgi.sock failed (13: Permission denied) while connecting to upstream, client: 127.0.0.1, server: test.com, request: "GET HTTP://test.com/3.php HTTP/1.1", upstream: "fastcgi://unix:/tmp/php-fcgi.sock:", host: "test.com"
- sock文件默认权限使660,root用户可以读,root用户组也是可读的,唯独其他用户不能去读
- 看到是由nobody的身份去读nginx的
[root@yong-01 vhost]# ps aux |grep nginx
root      1178  0.0  0.0  25584  1824 ?        Ss   19:51   0:00 nginx: master process /usr/local/nginx/sbin/nginx -c /usr/local/nginx/conf/nginx.conf
nobody    2649  0.0  0.1  27276  3600 ?        S    21:58   0:00 nginx: worker process
nobody    2650  0.0  0.2  27276  3848 ?        S    21:58   0:00 nginx: worker process
root      2672  0.0  0.0 112676   984 pts/0    R+   22:00   0:00 grep --color=auto nginx
- 这时临时改变权限为nobody
[root@yong-01 vhost]# chown nobody /tmp/php-fcgi.sock- 这时再去访问3.php会看到正常访问
[root@yong-01 vhost]# curl -x127.0.0.1:80 test.com/3.php
- 这就是因为nobody用户有读的权限,所以可以正常访问
- 在php-fpm的配置文件中定义listen.mode,就是为了让任何用户可以读
- 再去配置文件中取消listen.mode的注释
[root@yong-01 vhost]# vim /usr/local/php-fpm/etc/php-fpm.conf
listen.mode = 666
- 然后重启php-fpm的配置文件
[root@yong-01 vhost]# service php-fpm restart
Gracefully shutting down php-fpm . done
Starting php-fpm done- 查看文件的权限
[root@yong-01 vhost]# ll /tmp/php-fcgi.sock
srw-rw-rw- 1 root root 0 6月  11 22:02 /tmp/php-fcgi.sock
- 访问3.php会看到正常访问
[root@yong-01 vhost]# curl -x127.0.0.1:80 test.com/3.php -I
HTTP/1.1 200 OK
Server: nginx/1.4.7
Date: Mon, 11 Jun 2018 14:03:18 GMT
Content-Type: text/html; charset=UTF-8
Connection: keep-alive
X-Powered-By: PHP/5.6.30
Nginx代理目录概要

- cd /usr/local/nginx/conf/vhost
- vim proxy.conf //加入如下内容
server
{
    listen 80;
    server_name ask.apelearn.com;

    location /
    {
        proxy_pass      http://121.201.9.155/;
        proxy_set_header Host   $host;
        proxy_set_header X-Real-IP      $remote_addr;
        proxy_set_header X-Forwarded-For $proxy_add_x_forwarded_for;
    }
}
Nginx代理
- 需求:
- 用户需要访问web服务器,但用户因为各种原因没办法访问或者访问很慢(私网无访问、境内访问国外服务器),所以,就需要一个能访问web服务器的代理者,让用户通过代理服务器访问
- 解决方法
- 创建代理服务器
- 首先切换目录cd /usr/local/nginx/conf/vhost,新建一个配置文件vim proxy.conf
[root@yong-01 vhost]# vim proxy.conf

server
{
    listen 80;
    server_name ask.apelearn.com;                       //定义域名,论坛的网站
    location /
    {
        proxy_pass      http://121.201.9.155/;         //定义域名,论坛的IP
        proxy_set_header Host   $host;                   //定义访问的域名 为 $host =server_name ask.apelearn.com
        proxy_set_header X-Real-IP      $remote_addr;
        proxy_set_header X-Forwarded-For $proxy_add_x_forwarded_for;
    }
}- 配置文件中,没有了root,因为这是一个代理服务器,它不需要访问本地服务器上的任何文件
- 在配置完成后,这台虚拟机就可以访问ask.apelearn.com论坛了
- 检查配置文件语法错误,并重新加载配置文件
[root@yong-01 vhost]# /usr/local/nginx/sbin/nginx -t
nginx: the configuration file /usr/local/nginx/conf/nginx.conf syntax is ok
nginx: configuration file /usr/local/nginx/conf/nginx.conf test is successful
[root@yong-01 vhost]# /usr/local/nginx/sbin/nginx -s reload
- robots是针对蜘蛛的索引的一个列表,一般网站都会有robots
[root@yong-01 vhost]# curl ask.apelearn.com/robots.txt
#
# robots.txt for MiWen
#

User-agent: *

Disallow: /?/admin/
Disallow: /?/people/
Disallow: /?/question/
Disallow: /account/
Disallow: /app/
Disallow: /cache/
Disallow: /install/
Disallow: /models/
Disallow: /crond/run/
Disallow: /search/
Disallow: /static/
Disallow: /setting/
Disallow: /system/
Disallow: /tmp/
Disallow: /themes/
Disallow: /uploads/
Disallow: /url-*
Disallow: /views/
Disallow: /*/ajax/- 测试代理是否成功,指定本机的IP,也能去访问
[root@yong-01 vhost]# curl -x127.0.0.1:80  ask.apelearn.com/robots.txt
#
# robots.txt for MiWen
#

User-agent: *

Disallow: /?/admin/
Disallow: /?/people/
Disallow: /?/question/
Disallow: /account/
Disallow: /app/
Disallow: /cache/
Disallow: /install/
Disallow: /models/
Disallow: /crond/run/
Disallow: /search/
Disallow: /static/
Disallow: /setting/
Disallow: /system/
Disallow: /tmp/
Disallow: /themes/
Disallow: /uploads/
Disallow: /url-*
Disallow: /views/
Disallow: /*/ajax/
- 正常情况下,不去配置这个代理,是不可能通过本地访问到远程的站点的


 7939
7939

 被折叠的 条评论
为什么被折叠?
被折叠的 条评论
为什么被折叠?
 到【灌水乐园】发言


