tableView1.dataSource=selftableView1.delegate=self
var rowNum:Int=10func tableView(tableView:UITableView,numberOfRowsInSection section:Int) -> Int{return rowNum}
func tableView(tableView:UITableView,cellForRowAtIndexPath indexPath:NSIndexPath)->UITableViewCell {var cell=UITableViewCell(frame:CGRect(x:0,y:0,width:320,height:48))return cell}
然后在该类的Init的方法中对定义的组件进行布局,并加入到Cell中去
//// CityCell.swift// TableViewDemo1//// Created by Jasoncool on 15/9/9.// Copyright (c) 2015年 Jasoncool. All rights reserved.//import UIKitclass CityCell: UITableViewCell {var cityLabel:UILabel?var cityTextField:UITextField?var citySwitch:UISwitch?override init(style: UITableViewCellStyle, reuseIdentifier: String?) {super.init(style: style, reuseIdentifier: reuseIdentifier)//初始化子视图,子控件cityLabel = UILabel(frame: CGRect(x: 5, y: 5, width: 80, height: 40))cityTextField=UITextField(frame: CGRect(x: 90, y: 5, width: 80, height: 40))citySwitch = UISwitch(frame: CGRect(x: 200, y: 5, width: 80, height: 40))self.addSubview(cityLabel!)self.addSubview(cityTextField!)self.addSubview(citySwitch!)}required init(coder aDecoder: NSCoder) {fatalError("init(coder:) has not been implemented")}override func awakeFromNib() {super.awakeFromNib()// Initialization code}override func setSelected(selected: Bool, animated: Bool) {super.setSelected(selected, animated: animated)// Configure the view for the selected state}}
随后在ViewController中加入对应代码
func tableView(tableView: UITableView, cellForRowAtIndexPath indexPath: NSIndexPath) -> UITableViewCell{var cellId="sundyCell"//根据CellId寻找对应的Cell实例var cell:CityCell? = tableView1.dequeueReusableCellWithIdentifier(cellId) as? CityCell//如果实例为空则初始化该实例if(cell==nil){cell= CityCell(style: UITableViewCellStyle.Value1, reuseIdentifier: cellId)}//cell.backgroundColor=UIColor.grayColor()cell?.cityLabel?.text=citys[indexPath.row]cell?.cityTextField?.placeholder="测试...."cell?.citySwitch?.on=truecell?.imageView?.image=UIImage(named: "portal")cell?.textLabel?.text=citys[indexPath.row]cell?.detailTextLabel?.text="more....."cell?.accessoryType = UITableViewCellAccessoryType.DisclosureIndicator//加入Item的向右箭头return cell!}
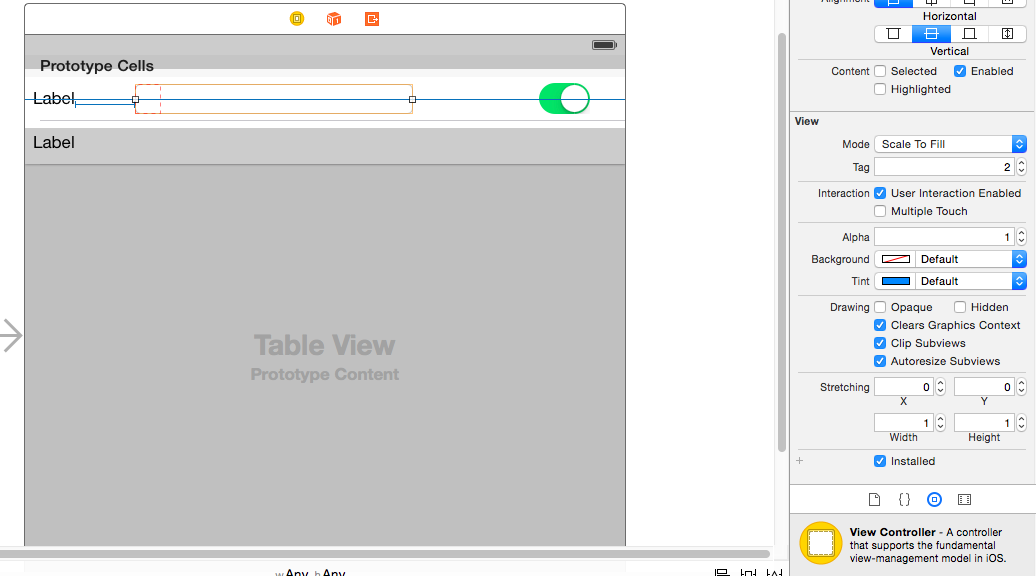
5.通过设置Tag并在StoryBoard中定义Cell界面

在StoryBoard中加入Tag的设置,并对Cell进行布局。
然后在ViewController中这么写
//// ViewController.swift// TableViewDemo1//// Created by Jasoncool on 15/9/9.// Copyright (c) 2015年 Jasoncool. All rights reserved.//import UIKitclass ViewController: UIViewController,UITableViewDelegate,UITableViewDataSource {@IBOutlet var tableView1: UITableView!var citys=["A","B","C","D","E"]override func viewDidLoad() {super.viewDidLoad()// Do any additional setup after loading the view, typically from a nib.tableView1.dataSource=selftableView1.delegate=self}func tableView(tableView: UITableView, numberOfRowsInSection section: Int) -> Int{return citys.count}func tableView(tableView: UITableView, cellForRowAtIndexPath indexPath: NSIndexPath) -> UITableViewCell{var cellId="sundyCell"var cell:UITableViewCell? = tableView1.dequeueReusableCellWithIdentifier(cellId) as? UITableViewCellif(cell==nil){cell=UITableViewCell(style: UITableViewCellStyle.Value1, reuseIdentifier: cellId)}var label1=cell?.viewWithTag(1) as! UILabelvar textField1=cell?.viewWithTag(2) as! UITextFieldvar switch1=cell?.viewWithTag(3) as! UISwitchlabel1.text=citys[indexPath.row]textField1.placeholder="test"switch1.on=truevar cell2:UITableViewCell? = tableView1.dequeueReusableCellWithIdentifier("sundyCell2") as? UITableViewCellvar label2 = cell2?.viewWithTag(1) as! UILabellabel2.text="战法地方啦的看法卡登仕狂蜂浪蝶疯狂的开发卡夫卡联发科"if(indexPath.row%2==0){return cell!}else{return cell2!}}override func didReceiveMemoryWarning() {super.didReceiveMemoryWarning()// Dispose of any resources that can be recreated.}}
6.TableView中加入Section和索引
//// ViewController.swift// TableViewDemo6//// Created by Jasoncool on 15/9/9.// Copyright (c) 2015年 Jasoncool. All rights reserved.//import UIKitclass ViewController: UIViewController,UITableViewDataSource,UITableViewDelegate {@IBOutlet var tableView1: UITableView!var provinces=["山西","云南","广西"]var cities = ["山西":["太原","临汾","晋城","太原","临汾","晋城","太原","临汾","晋城"],"云南":["昆明","大理","丽江","昆明","大理","丽江","昆明","大理","丽江"],"广西":["南宁","桂林","晋江","南宁","桂林","晋江","南宁","桂林","晋江"]]override func viewDidLoad() {super.viewDidLoad()// Do any additional setup after loading the view, typically from a nib.tableView1.dataSource=selftableView1.delegate=self}//返回每个Section中的行数func tableView(tableView: UITableView, numberOfRowsInSection section: Int) -> Int {var provinceName=provinces[section]return cities[provinceName]!.count}func tableView(tableView: UITableView, cellForRowAtIndexPath indexPath: NSIndexPath) -> UITableViewCell {var cellId="SundyCell"var cell:UITableViewCell? = tableView.dequeueReusableCellWithIdentifier(cellId) as? UITableViewCellif(cell == nil){cell=UITableViewCell(style: UITableViewCellStyle.Default, reuseIdentifier: cellId)}var proName=provinces[indexPath.section]cell?.textLabel?.text = cities[proName]![indexPath.row]cell?.accessoryType = UITableViewCellAccessoryType.DisclosureIndicatorreturn cell!}//返回Section的数量func numberOfSectionsInTableView(tableView: UITableView) -> Int {return provinces.count}//填写section的header信息func tableView(tableView: UITableView, titleForHeaderInSection section: Int) -> String?{return provinces[section]}//填写section的footer信息func tableView(tableView: UITableView, titleForFooterInSection section: Int) -> String?{return provinces[section]}//返回索引数组func sectionIndexTitlesForTableView(tableView: UITableView) -> [AnyObject]! {return provinces}override func didReceiveMemoryWarning() {super.didReceiveMemoryWarning()// Dispose of any resources that can be recreated.}}
(待续)
7.tableView的编辑操作
1) 在tableViewDataSource中的方法 canEditRowAtIndexPath 指定某一行或者多行进入编辑状态
2) 在tableViewDelegate中提供的方法editingStyleForRowAtIndexPath 返回的是 UITableViewCellEditingStyle
UITableViewCellEditingStyle :提供两种操作,插入和删除
enum UITableViewCellEditingStyle :Int{
case None
case Insert
case Delete
}
3)在tableViewDelegate中提供的方法titleForDeleteConfirmationButtonForRowAtIndexPath:删除确认按钮的文本显示
4)tableView组件提供的方法:setEditing 可以将一个TableView组件变为可编辑状态
5)在tableViewDataSource中的方法commitEditingStyle 提交编辑状态
具体的删除提交代码:
func tableView(tableView: UITableView, commitEditingStyle editingStyle: UITableViewCellEditingStyle, forRowAtIndexPath indexPath: NSIndexPath) {println(editingStyle.rawValue)println("操作的是:\(indexPath.row)")var proName=provinces[indexPath.section]cities[proName]?.removeAtIndex(indexPath.row)tableView1.deleteRowsAtIndexPaths([indexPath], withRowAnimation: UITableViewRowAnimation.Bottom)}


 541
541

 被折叠的 条评论
为什么被折叠?


