


由于Mule ESB提供的容器自身限制,使它不容易集成第三方库。为了解决这个问题,Mule提供了ESB项目与Spring框架的集成。但是这个集成在转换为Tomcat项目时会遇到一些问题,下面我会一一加以叙述。
ESB项目与spring的集成参考了Mule ESB的Spring集成文档,地址为
https://docs.mulesoft.com/mule-user-guide/v/3.8/using-spring-beans-as-flow-components
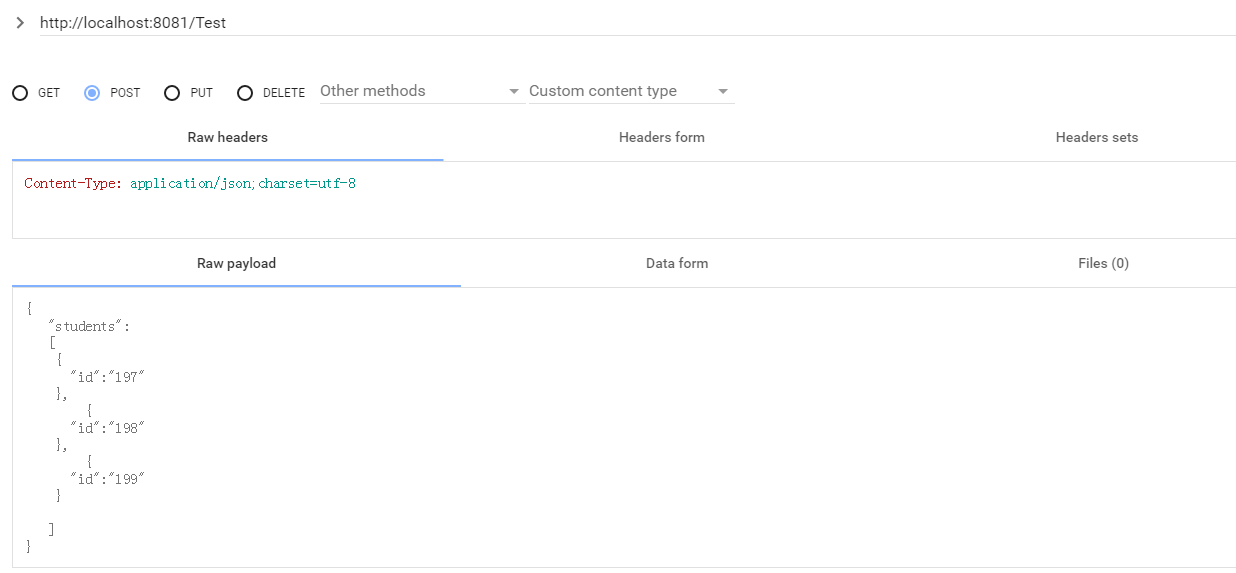
在前面的例子中请求的json报文是固定的,例如{"name":"张三","id":"197"},这样仅能处理单个用户,当我们想处理多个用户,每个用户有多个属性信息时就不是很方便。我们想仅仅提供一批需要处理的用户Id的json报文,例如
{
"students":
[
[
{
"id":"197"
},
{
"id":"198"
},
{
"id":"199"
}
]
]
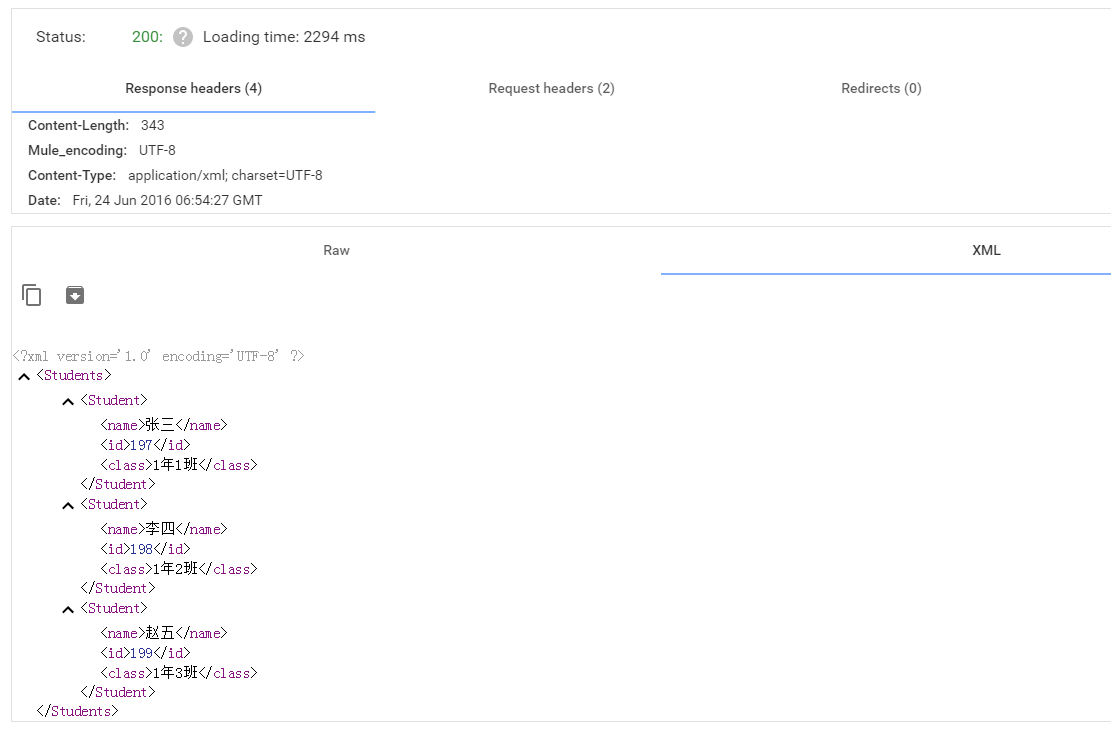
}ESB项目解析这样的json报文,根据id从数据库里读取这些学生的详细信息,再通过Data Weaver的转换为xml报文,输出以下的xml响应报文:
<?xml version="1.0" encoding="UTF-8" ?>
<Students>
	<Student>
		<name>张三</name>
		<id>197</id>
		<class>1年1班<class>
	</Student>
	<Student>
		<name>李四</name>
		<id>198</id>
		<class>1年2班</class>
	</Student>
	<Student>
		<name>赵五</name>
		<id>199</id>
		<class>1年3班</class>
	</Student>
</Students>
根据id从数据库里读取数据我们可以使用Mule ESB提供的jdbc connector,直接连接数据库执行sql查询,由于我们这里讨论spring集成,我们使用spring jdbc template进行访问。
ESB访问的数据库我们使用MySql 5.5,新建一个test数据库,编码集使用utf-8,再在这个数据库下新建一个students表,建表sql为
CREATE TABLE `students` (
  `ID` int(10) NOT NULL,
  `NAME` varchar(255) NOT NULL,
  `CLASS` varchar(255) NOT NULL,
  PRIMARY KEY (`ID`)
) ENGINE=InnoDB DEFAULT CHARSET=utf8;
初始化表数据的sql为
INSERT INTO `students` VALUES ('197', '张三', '1年1班');
INSERT INTO `students` VALUES ('198', '李四', '1年2班');
INSERT INTO `students` VALUES ('199', '赵五', '1年3班');
INSERT INTO `students` VALUES ('200', '王六', '1年4班');
INSERT INTO `students` VALUES ('201', '孙七', '2年1班');
这样就建立了ESB项目需要访问的数据库。
第二步需要在ESB项目中引入Spring Jdbc访问,我们首先恢复ESB项目的Maven支持,然后在pom文件中引入spring的库包(Mule ESB EE 3.8.0 M1版本自带Spring Framework版本为 4.1.6,如果用户想使用不同版本的Spring Framework,可以自行在pom文件中配置,这里我们使用最新的4.3.0 RELEASE版本)
<dependency>
    <groupId>org.springframework</groupId>
    <artifactId>spring-core</artifactId>
    <version>4.3.0.RELEASE</version>
</dependency>
<dependency>
    <groupId>org.springframework</groupId>
    <artifactId>spring-context</artifactId>
    <version>4.3.0.RELEASE</version>
</dependency>
<dependency>
    <groupId>org.springframework</groupId>
    <artifactId>spring-jdbc</artifactId>
    <version>4.3.0.RELEASE</version>
</dependency>
再定义Student类,对应studens表的单行记录
package com.mule.spring.entity;

public class Student
{
		private Integer id;
		private String name;
		private String className;
............
定义StudentService接口,定义根据Id列表从studens表读取student的Service层
package com.mule.spring.service;
import java.util.List;
import com.mule.spring.entity.Student;

public interface StudentService
{
		List<Student> getStudentsByIds(List<String> ids);
}
再定义StudentDao接口,定义根据Ids列表从students表读取student的Dao层,它的实现类使用spring jdbc template执行具体的查询命令,并且使用了我自定义的Mapper转换查询结果为Student类对象。
package com.mule.spring.service.impl;

@Service("studentService")
public class StudentServiceImpl implements StudentService {

	@Override
	public List<Student> getStudentsByIds(List<String> ids) {
		// TODO Auto-generated method stub
		return null;
	}
}


package com.mule.spring.dao;

public interface StudentDao
{
	List<Student> getStudentsByIds(List<String> ids);
}


package com.mule.spring.dao.impl;

@Component("studentDao")
public class StudentDaoImpl implements StudentDao {

	@Autowired
	private JdbcTemplate jdbcTemplate;

	@Override
	public List<Student> getStudentsByIds(List<String> ids)
	{
		String idListStr = Joiner.on(',').join(ids);
		String sql = "select * from students where id in (" + idListStr + ")";
		List<Student> studentList =jdbcTemplate.query(
				sql, new StudentMapper());

		return studentList;
	}
............
这里我们使用guava库用于从id列表获得id字符串,我们使用的guava版本是19.0
添加完访问Students表所需的Service和Dao类后,我们需要在流程中引入Service接口。
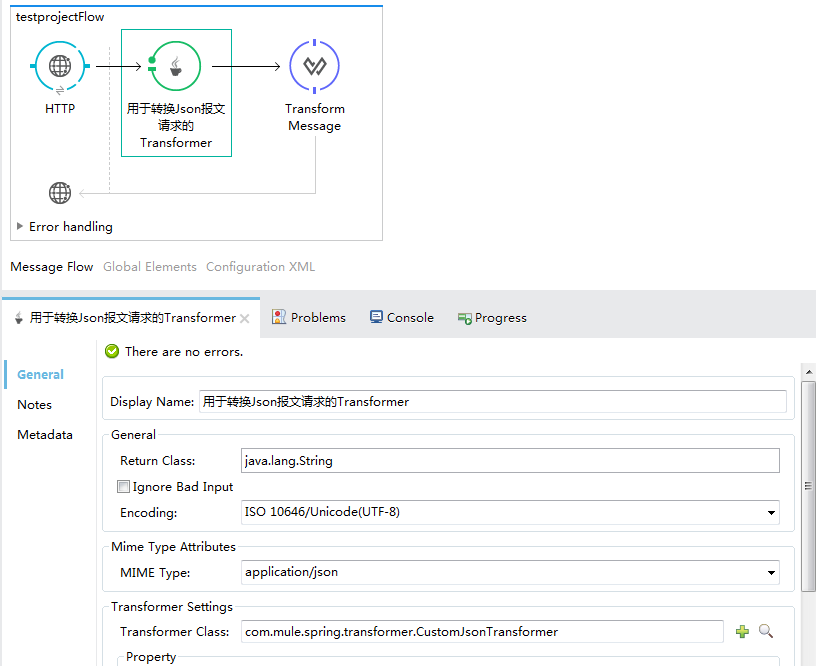
打开ESB项目流程图,我们在Http Listener节点和DataWeaver节点间拖入一个Java Transformer,自定义一个Customer类,继承自AbstractJsonTransformer,为了引入AbstractJsonTransformer接口,我们需要修改pom文件,添加mule-module-json jar包
<dependency>
    <groupId>com.google.guava</groupId>
    <artifactId>guava</artifactId>
    <version>19.0</version>
</dependency>
<dependency>
    <groupId>org.mule.modules</groupId>
    <artifactId>mule-module-json</artifactId>
    <version>${mule.version}</version>
    <scope>provided</scope>
</dependency>
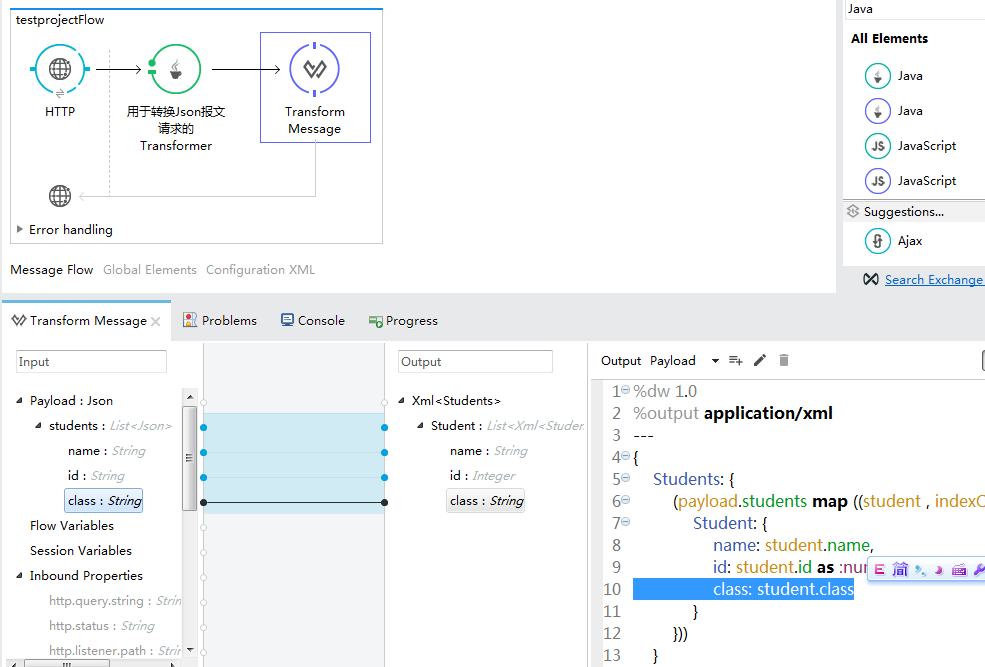
修改后的流程图和Data Weaver映射关系图如下所示
我们在自定义的Transformer中引入Service
public class CustomJsonTransformer extends AbstractJsonTransformer {

	@Autowired
    protected StudentService studentService;

	@Override
	public Object transformMessage(MuleMessage message, String outputEncoding) throws TransformerException {

		String transformJsonStr = null;

		 try {
	            String jsonMessage = message.getPayloadAsString();
	            //添加信息
	            JSONObject jsonMap = updateStudentInfos(jsonMessage);
	            transformJsonStr = jsonMap.toJSONString();
	        }
    .............


    private JSONObject updateStudentInfos(String originalJsonStr)
	{
			JSONObject studentsJsonObj = null;
			try
			{
				studentsJsonObj = JSONObject.parseObject(originalJsonStr);
				JSONArray studentMapArray =
							studentsJsonObj.getJSONArray("students");

				//从请求json报文中读取student的id列表
				List<String> idList = new ArrayList<String>();
		    	int length = studentMapArray.size();
		    	for(int i=0;i<length;i++)
		    	{
		    		JSONObject studentMap = studentMapArray.getJSONObject(i);
		    		String id = studentMap.getString("id");
		    		idList.add(id);
		    	}
		    	//根据student的id列表从数据库中读取student信息
				List<Student> studentList =
						studentService.getStudentsByIds(idList);

				//将student信息填充到json报文中。
				for(int j=0;j<length;j++)
		    	{
		    		JSONObject studentMap = studentMapArray.getJSONObject(j);
		    		Student student = studentList.get(j);
		    		String name = student.getName();
		    		String className = student.getClassName();
		    		studentMap.put("name", name);
		    		studentMap.put("class", className);
		    	}
				studentsJsonObj.put("students", studentMapArray);
			}
			catch(Exception ex)
			{
				ex.printStackTrace();
			}
			return studentsJsonObj;
我们先导入mysql connector库
<dependency>
    <groupId>mysql</groupId>
    <artifactId>mysql-connector-java</artifactId>
    <version>5.1.39</version>
</dependency>
再在src/main/app下新建一个conf文件夹,在下面新建applicationContext.xml文件

在src/main/resources下新建jdbc.properties文件
jdbc.driver=com.mysql.jdbc.Driver
jdbc.url=jdbc:mysql://localhost:3306/test?useUnicode=true&characterEncoding=utf8
jdbc.username=root
jdbc.password=admin
applicationContext.xml的内容为:
<beans xmlns="http://www.springframework.org/schema/beans"
    xmlns:xsi="http://www.w3.org/2001/XMLSchema-instance"
    xmlns:p="http://www.springframework.org/schema/p"
    xmlns:aop="http://www.springframework.org/schema/aop"
    xmlns:context="http://www.springframework.org/schema/context"
    xmlns:jee="http://www.springframework.org/schema/jee"
    xmlns:tx="http://www.springframework.org/schema/tx"
    xmlns:task="http://www.springframework.org/schema/task"
    xsi:schemaLocation="http://www.springframework.org/schema/aop http://www.springframework.org/schema/aop/spring-aop-4.0.xsd
    http://www.springframework.org/schema/beans http://www.springframework.org/schema/beans/spring-beans-4.0.xsd
    http://www.springframework.org/schema/context http://www.springframework.org/schema/context/spring-context-4.0.xsd
    http://www.springframework.org/schema/jee http://www.springframework.org/schema/jee/spring-jee-4.0.xsd
    http://www.springframework.org/schema/tx http://www.springframework.org/schema/tx/spring-tx-4.0.xsd
    http://www.springframework.org/schema/task http://www.springframework.org/schema/task/spring-task-4.0.xsd">

    <context:annotation-config/>
    <context:property-placeholder
		ignore-unresolvable="true" location="classpath*:/jdbc.properties" />

    <context:component-scan base-package="com.mule.spring">
		<context:include-filter type="regex"
                       expression="org.springframework.stereotype.Service" />
	</context:component-scan>

    <bean id="dataSource"
        class="org.springframework.jdbc.datasource.DriverManagerDataSource">
        <property name="driverClassName" value="${jdbc.driver}" />
        <property name="url" value="${jdbc.url}"/>
        <property name="username" value="${jdbc.username}" />
        <property name="password" value="${jdbc.password}" />
    </bean>

    <bean id="jdbcTemplate" class="org.springframework.jdbc.core.JdbcTemplate">
        <property name="dataSource" ref="dataSource"></property>
    </bean>
</beans>
最后在ESB项目流程文件中使用spring:import标签导入applicationContext.xml文件
<spring:beans>
       <spring:import resource="classpath:conf/applicationContext.xml"/>
</spring:beans>
到此为止,ESB项目便与Spring Framework集成在一起了,不过要运行这个ESB项目,需要将mysql connector jar文件拷贝到Mule ESB运行时的lib/opt目录下,否则在调用ESB接口时会出现No Suitable Driver的异常

最后运行ESB项目,通过Advanced Rest Client调用ESB接口
ESB项目启动时,mule-module-spring-config jar包中的SpringXmlConfigurationBuilder类会加载流程文件中import的applicationContext.xml文件,加载了Spring Context对象
MuleArtifactContext类对象(继承自AbstractXmlApplicationContext类),再加载流程文件中自身定义的元素,可以理解为MuleArtifactContext容器中包含了MuleContext容器,因此在查找Bean定义时,先从MuleContext容器中查找,再到父容器MuleArtifcatContext容器中查找,然而这两个Context容器的包容关系仅限于通过Mule ESB运行时环境启动ESB项目时才能构建,如果ESB项目改成了Web项目,这一关系将不复存在,接下来我们将看到这一点。


 1028
1028

 被折叠的 条评论
为什么被折叠?
被折叠的 条评论
为什么被折叠?
 到【灌水乐园】发言


