一、简介
 Apache Flume是一个分布式的、可靠的、可用的系统,可用于从不同的数据源中高效地收集、聚合和移动海量日志数据到集中式数据存储系统。
 ODPS Sink是基于ODPS DataHub Service开发的Flume插件,可以将Flume的Event数据导入到ODPS中。插件兼容Flume的原有功能特性,支持ODPS表自定义分区、且可以自动创建分区。
二、环境要求
1、JDK(1.6以上,推荐1.7)
2、Flume-NG 1.x
三、插件部署
1、下载ODPS Sink插件并解压:aliyun-odps-flume-plugin
2、Flume-NG 1.x下载:https://flume.apache.org/download.html
(1)下载 apache-flume-1.6.0-bin.tar.gz
(2)下载apache-flume-1.6.0-src.tar.gz
3、Flume的安装
(1) 解压apache-flume-1.6.0-src.tar.gz和apache-flume-1.6.0-bin.tar.gz
(2) 将apache-flume-1.6.0-src中的文件复制到apache-flume-1.6.0-bin中
4、部署ODPS Sink插件:将文件夹odps_sink移动到Apache Flume安装目录下:
$ mkdir {YOUR_APACHE_FLUME_DIR}/plugins.d
$mv odps_sink/ { YOUR_APACHE_FLUME_DIR }/plugins.d/
移动后,核验ODPS Sink插件是否已经在相应目录:
$ ls { YOUR_APACHE_FLUME_DIR}/plugins.d
odps_sink
部署完成后,只需要在Flume的配置文件中将sink的type字段配置为:
com.aliyun.odps.flume.sink.OdpsSink
即可使用
四、配置示例
例:将日志文件中的结构化数据进行解析,并上传到ODPS表中
需要上传的日志文件格式如下(每行为一条记录,字段之间逗号分隔):
test_basic.log
some,log,line1
some,log,line2
...
第一步、在ODPS 的 project创建ODPS Datahub表
建表语句如下所示:
CREATE TABLE hub_table_basic (col1 STRING, col2 STRING)
PARTITIONED BY (pt STRING)
INTO 1 SHARDS
HUBLIFECYCLE 1;
第二步、创建Flume作业配置文件:
在Flume安装目录的conf/文件夹下创建名为odps_basic.conf的文件,并输入内容如下:
odps_basic.conf
A single-node Flume configuration for ODPS
Name the components on this agent
a1.sources = r1
a1.sinks = k1
a1.channels = c1
Describe/configure the source
a1.sources.r1.type = exec
a1.sources.r1.command = cat {YOUR_LOG_DIRECTORY}/test_basic.log
Describe the sink
a1.sinks.k1.type = com.aliyun.odps.flume.sink.OdpsSink
a1.sinks.k1.accessID = {YOUR_ALIYUN_ODPS_ACCESS_ID}
a1.sinks.k1.accessKey = {YOUR_ALIYUN_ODPS_ACCESS_KEY}
a1.sinks.k1.odps.endPoint = http://service.odps.aliyun.com/api
a1.sinks.k1.odps.datahub.endPoint = http://dh.odps.aliyun.com
a1.sinks.k1.odps.project = {YOUR_ALIYUN_ODPS_PROJECT}
a1.sinks.k1.odps.table = hub_table_basic
a1.sinks.k1.odps.partition = 20150814
a1.sinks.k1.batchSize = 100
a1.sinks.k1.serializer = DELIMITED
a1.sinks.k1.serializer.delimiter = ,
a1.sinks.k1.serializer.fieldnames = col1,,col2
a1.sinks.k1.serializer.charset = UTF-8
a1.sinks.k1.shard.number = 1
a1.sinks.k1.shard.maxTimeOut = 60
a1.sinks.k1.autoCreatePartition = true
Use a channel which buffers events in memory
a1.channels.c1.type = memory
a1.channels.c1.capacity = 1000
a1.channels.c1.transactionCapacity = 1000
Bind the source and sink to the channel
a1.sources.r1.channels = c1
a1.sinks.k1.channel = c1
第三步:启动Flume
启动Flume并指定agent的名称和配置文件路径,-Dflume.root.logger=INFO,console选项可以将日志实时输出到控制台。
$ cd { YOUR_APACHE_FLUME_DIR}
$ bin/flume-ng agent -n a1 -c conf -f conf/odps_basic.conf -Dflume.root.logger=INFO,console
写入成功,显示日志如下:
...
Write success. Event count: 2
...
在ODPS Datahub表中即可查到数据;
多数据源上传到ODPS
多个数据上传到odps,只需要配置对应的source和channel,可以有一下几种上传方式:
(1) 多个source和一个channel和一个sink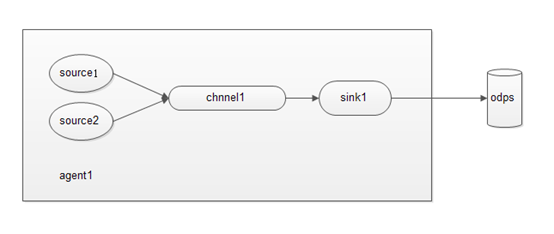
(2) 多个source和多个channel和一个sink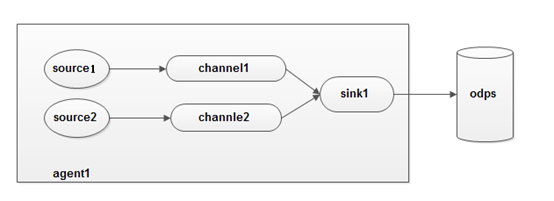
(3) 多个source,多个channel和多个sink,输出到多个地方存储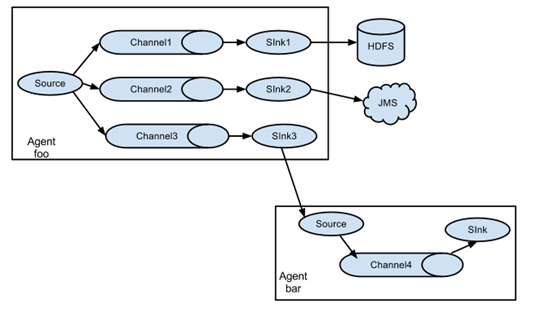
(4)多个agent的复杂情况: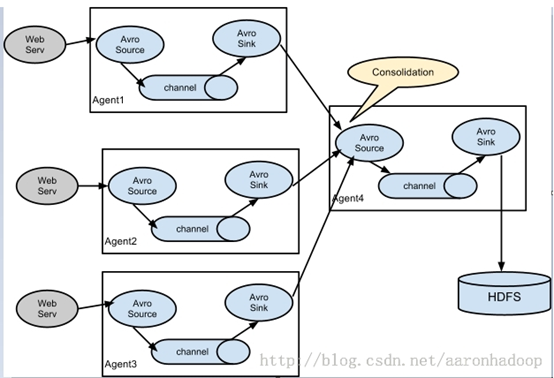
下面给出(1)中情况的配置:
odps_basic.conf
A single-node Flume configuration for ODPS
Name the components on this agent
a1.sources = r1 r2
a1.sinks = k1
a1.channels = c1
Describe/configure the source
a1.sources.r1.type = exec
a1.sources.r1.command = cat {YOUR_LOG_DIRECTORY}/test_basic.log
source2的配置
a1.sources.r2.type = exec
a1.sources.r2.command = cat {YOUR_LOG_DIRECTORY}/test_basic2.log
Describe the sink
a1.sinks.k1.type = com.aliyun.odps.flume.sink.OdpsSink
a1.sinks.k1.accessID = {YOUR_ALIYUN_ODPS_ACCESS_ID}
a1.sinks.k1.accessKey = {YOUR_ALIYUN_ODPS_ACCESS_KEY}
a1.sinks.k1.odps.endPoint = http://service.odps.aliyun.com/api
a1.sinks.k1.odps.datahub.endPoint = http://dh.odps.aliyun.com
a1.sinks.k1.odps.project = {YOUR_ALIYUN_ODPS_PROJECT}
a1.sinks.k1.odps.table = hub_table_basic
a1.sinks.k1.odps.partition = 20150814
a1.sinks.k1.batchSize = 100
a1.sinks.k1.serializer = DELIMITED
a1.sinks.k1.serializer.delimiter = ,
a1.sinks.k1.serializer.fieldnames = col1,,col2
a1.sinks.k1.serializer.charset = UTF-8
a1.sinks.k1.shard.number = 1
a1.sinks.k1.shard.maxTimeOut = 60
a1.sinks.k1.autoCreatePartition = true
Use a channel which buffers events in memory
a1.channels.c1.type = memory
a1.channels.c1.capacity = 1000
a1.channels.c1.transactionCapacity = 1000
Bind the source and sink to the channel
a1.sources.r1.channels = c1
a1.sinks.k1.channel = c1
source2的channel
a1.sources.r2.channels = c2
可能遇到的问题:
1、在数据sink阶段报错,数据无法传递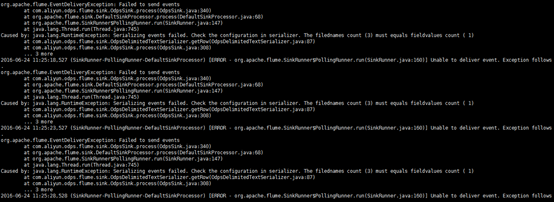
这个错误是由于数据的最上面加了一行注释,它默认读取改行导致数据的行数与配置文件中 配置的行数不一致,所以报上面这个错,删出上面的注释行问题就解决了。
2、OOM 问题:
flume 报错:
java.lang.OutOfMemoryError: GC overhead limit exceeded
或者:
java.lang.OutOfMemoryError: Java heap space
Exception in thread "SinkRunner-PollingRunner-DefaultSinkProcessor" java.lang.OutOfMemoryError: Java heap space
Flume 启动时的最大堆内存大小默认是 20M,线上环境很容易 OOM,因此需要你在 flume-env.sh 中添加 JVM 启动参数:
JAVA_OPTS="-Xms8192m -Xmx8192m -Xss256k -Xmn2g -XX:+UseParNewGC -XX:+UseConcMarkSweepGC -XX:-UseGCOverheadLimit"
然后在启动 agent 的时候一定要带上 -c conf 选项,否则 flume-env.sh 里配置的环境变量不会被加载生效


 967
967


 被折叠的 条评论
为什么被折叠?


