


Java后端开发经常需要面对管理多套环境,一般有三种环境:开发,测试,生产。
各个环境之间的参数各不相同,比如MySQL、Redis等不同环境的host不一样,若每个环境都手动替换环境很容易出错,Maven profile正是提供了配置多种环境的功能。
新建一个maven项目,没有任何代码,只有不同环境下的配置文件!

src/main/resources/dev 目录的properties是开发环境的配置项目
src/main/resources/test 目录的properties是测试环境的配置项目
src/main/resources/prd 目录的properties是生产环境的配置项目
接下来就是配置maven profile,如下,设定dev是默认激活的profile,此外根据具体的环境名称引入对应的资源文件夹。

<profiles>
    <profile>
        <id>dev</id>
        <properties>
            <profiles.activation>dev</profiles.activation>
        </properties>
        <activation>
            <activeByDefault>true</activeByDefault>
        </activation>
    </profile>

    <profile>
        <id>test</id>
        <properties>
            <profiles.activation>test</profiles.activation>
        </properties>
    </profile>
    <profile>
        <id>prd</id>
        <properties>
            <profiles.activation>prd</profiles.activation>
        </properties>
    </profile></profiles>
activeByDefault标签的值为true的话表示默认的profile,使用mvn install命令起作用的就是它,这里为dev
resources标签定义要包含的资源,在下面的配置下package阶段会把resources文件夹里的 ${profiles.activation}/* 文件打包
这里的${profiles.activation}由命令maven的-P选项指定,例:mvn install -Ptest 就是打包 test/* 即test目录下的所有文件
<build>
    <finalName>winner-mvn-profile</finalName>
    <resources>
        <resource>
            <directory>src/main/resources/${profiles.activation}</directory>
        </resource>
    </resources></build>
如果要把这些文件放在spring容器中呢?
<bean id="propertyConfigurer"
      class="org.springframework.beans.factory.config.PropertyPlaceholderConfigurer">
    <property name="ignoreUnresolvablePlaceholders" value="true"/>
    <property name="locations">
        <list>
            <value>classpath:environment.properties</value>
            <value>classpath:jdbc.properties</value>
        </list>
    </property></bean>
最后就是指定profile打包就OK了。
mvn clean package -P test
在Idea中也是很方便的:
开发环境:

看下打包结果

两个文件在classpath下!
测试环境呢?

打包结果

http://www.cnblogs.com/winner-0715/p/6378442.html
---------------------------------------------华丽分割线--------------------------------
在实际开发项目中,常常有几种环境,一般情况下最少有三种环境:开发、测试、正式。
各个环境之间的参数各不相同,比如MySQL、Redis等不同环境的host不一样,若每个环境都手动替换环境很容易出错,这里我们利用maven的profile功能切换环境。
本文的项目结构图:
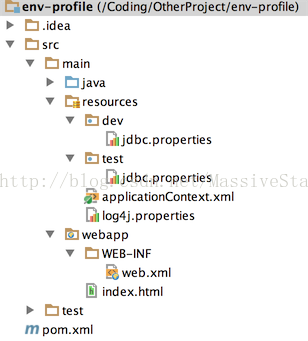
src/main/resources/dev 目录的properties是开发环境的配置项目
src/main/resources/test 目录的properties是测试环境的配置项目
在pom.xml定义环境的profile
<profiles>
<profile>
<id>dev</id>
<properties>
<profiles.activation>dev</profiles.activation>
</properties>
<activation>
<activeByDefault>true</activeByDefault>
</activation>
</profile>
<profile>
<id>test</id>
<properties>
<profiles.activation>test</profiles.activation>
</properties>
</profile>
</profiles>
activeByDefault标签的值为true的话表示默认的profile,使用mvn install命令起作用的就是它,这里为dev
resources标签定义要包含的资源,在下面的配置下package阶段会把resources文件夹里的 ${profiles.activation}/* 文件打包
这里的${profiles.activation}由命令maven的-P选项指定,例:mvn install -Ptest 就是打包 test/* 即test目录下的所有文件
<resources>
<resource>
<directory>src/main/resources</directory>
<!-- **/*.properties 是指包括根目录或子目录所有properties类型的文件 -->
<includes>
<include>**/*.properties</include>
<include>**/*.xml</include>
</includes>
<!-- 排除dev、test目录下的文件 -->
<excludes>
<exclude>dev/*</exclude>
<exclude>test/*</exclude>
</excludes>
</resource>
<resource>
<directory>src/main/resources</directory>
<!-- 包含,若没有指定则默认为 activeByDefault 标签定义的profile -->
<includes>
<include>${profiles.activation}/*</include>
</includes>
</resource>
</resources>
applicationContext.xml文件如下
[html] view plain copy print?![]()
![]()
<?xml version="1.0" encoding="UTF-8"?>
<beans xmlns="http://www.springframework.org/schema/beans"
xmlns:xsi="http://www.w3.org/2001/XMLSchema-instance"
xmlns:context="http://www.springframework.org/schema/context"
xsi:schemaLocation="http://www.springframework.org/schema/beans http://www.springframework.org/schema/beans/spring-beans-3.0.xsd
http://www.springframework.org/schema/context http://www.springframework.org/schema/context/spring-context-3.0.xsd" default-autowire="byType">
<!-- Annotation Config -->
<context:annotation-config/>
<!-- 取${profiles.activation:dev}表示取${profiles.activation}的值,若没有则指定dev -->
<bean id="propertyConfig"
class="org.springframework.beans.factory.config.PropertyPlaceholderConfigurer">
<property name="locations">
<list>
<value>classpath:${profiles.activation:dev}/jdbc.properties</value>
</list>
</property>
</bean>
</beans>
这里取${profiles.activation:dev}是取${profiles.activation}的值,若不存在,则默认为dev;
若值为dev,locations的值为classpath:dev/jdbc.properties。
${profiles.activation}是在web.xml里的context-param取值
<context-param>
<param-name>profiles.activation</param-name>
<param-value>${profiles.activation}</param-value>
</context-param>
值得注意的是,${profiles.activation}由于有默认值的存在,applicationContext.xml不需要启动web容器去读取web.xml中的${profiles.activation},
这有效的保障了使用JUnit进行单元测试,也就是说在maven的test目录里的测试用例可以正常运行。
现在的问题就成了如何把maven里激活的profile值传进来,使用maven-war-plugin能在maven install的时期会设置web.xml占位符值${}的值
<plugin>
<groupId>org.apache.maven.plugins</groupId>
<artifactId>maven-war-plugin</artifactId>
<configuration>
<warName>${profiles.activation}</warName>
<!-- 激活spring profile -->
<webResources>
<resource>
<filtering>true</filtering>
<directory>src/main/webapp</directory>
<includes>
<include>**/web.xml</include>
</includes>
</resource>
</webResources>
<warSourceDirectory>src/main/webapp</warSourceDirectory>
<webXml>src/main/webapp/WEB-INF/web.xml</webXml>
</configuration>
</plugin>
所有文件配置完毕,使用 mvn install -P{profile} 命令打包war
example:
1、mvn install 没有指定profile,默认为dev
2、mvn install -Ptest -Dmaven.test.skip=true 指定profile为test并跳过测试
在使用tomcat部署时,先使用maven的命令切换至目标环境,然后tomcat的目标目录设置为编译后的target/${project.actifact}目录(大多数IDE比如eclipse和IDEA都是这样)
http://blog.csdn.net/massivestars/article/details/53510586
-----------------------------------华丽分割线-----------------------
<project xmlns="http://maven.apache.org/POM/4.0.0" xmlns:xsi="http://www.w3.org/2001/XMLSchema-instance"
xsi:schemaLocation="http://maven.apache.org/POM/4.0.0 http://maven.apache.org/maven-v4_0_0.xsd">
<modelVersion>4.0.0</modelVersion>
<groupId>book</groupId>
<artifactId>book</artifactId>
<packaging>war</packaging>
<version>1.0</version>
<name>book</name>
<repositories>
<repository>
<id>eap</id>
<url>http://maven.repository.redhat.com/techpreview/all</url>
<releases>
<enabled>true</enabled>
</releases>
<snapshots>
<enabled>true</enabled>
</snapshots>
</repository>
</repositories>
<pluginRepositories>
<pluginRepository>
<id>eap</id>
<url>http://maven.repository.redhat.com/techpreview/all</url>
<releases>
<enabled>true</enabled>
</releases>
<snapshots>
<enabled>true</enabled>
</snapshots>
</pluginRepository>
</pluginRepositories>
<properties>
<project.build.sourceEncoding>UTF-8</project.build.sourceEncoding>
<maven.compiler.source>1.6</maven.compiler.source>
<maven.compiler.target>1.6</maven.compiler.target>
<package.environment>local</package.environment>
</properties>
<dependencies>
<dependency>
<groupId>mysql</groupId>
<artifactId>mysql-connector-java</artifactId>
<version>5.1.25</version>
</dependency>
<!--各种依赖包-->
</dependencies>
<profiles>
<profile>
<id>local</id>
<properties>
<package.environment>local</package.environment>
</properties>
<activation>
<activeByDefault>true</activeByDefault>
</activation>
</profile>
<profile>
<id>product</id>
<properties>
<package.environment>product</package.environment>
</properties>
</profile>
</profiles>
<build>
<finalName>book</finalName>
<resources>
<resource>
<directory>src/main/resources</directory>
<filtering>true</filtering>
<excludes>
<exclude>local/*</exclude>
<exclude>product/*</exclude>
<exclude>public/*</exclude>
</excludes>
</resource>
</resources>
<plugins>
<plugin>
<groupId>org.apache.maven.plugins</groupId>
<artifactId>maven-war-plugin</artifactId>
<version>2.1.1</version>
<configuration>
<archive>
<addMavenDescriptor>false</addMavenDescriptor>
</archive>
<warName>book</warName>
<webResources>
<resource>
<directory>src/main/resources/${package.environment}</directory>
<targetPath>WEB-INF/classes</targetPath>
<filtering>true</filtering>
</resource>
<resource>
<directory>src/main/resources/public</directory>
<targetPath>WEB-INF/classes</targetPath>
<filtering>true</filtering>
</resource>
<!--<resource>-->
<!--<directory>${project.build.directory}/classes</directory>-->
<!--<includes>-->
<!--<include>**/*.properties</include>-->
<!--<include>**/*.xml</include>-->
<!--</includes>-->
<!--</resource>-->
</webResources>
</configuration>
</plugin>
</plugins>
</build>
</project>
其中, 我们注意的地方: 我解释一下:
<profiles>
<profile>
<id>local</id>
<properties>
<package.environment>local</package.environment>
</properties>
<activation>
<activeByDefault>true</activeByDefault>
</activation>
</profile>
<profile>
<id>product</id>
<properties>
<package.environment>product</package.environment>
</properties>
</profile>
</profiles>
这里就是不同的resources文件夹, 我这里只区分本地 产品; 设置为true的就是默认被激活的. 所以后面打包默认就是本地;
<resources>
<resource>
<directory>src/main/resources</directory>
<filtering>true</filtering>
<excludes>
<exclude>local/*</exclude>
<exclude>product/*</exclude>
<exclude>public/*</exclude>
</excludes>
</resource>
</resources>
这里就是我的资源文件, public里面存放我的公用的, 比如Spring的配置文件, 就是本地与产品都一样的;local 与 product一看就知道了;
<plugin>
<groupId>org.apache.maven.plugins</groupId>
<artifactId>maven-war-plugin</artifactId>
<version>2.1.1</version>
<configuration>
<archive>
<addMavenDescriptor>false</addMavenDescriptor>
</archive>
<warName>book</warName>
<webResources>
<resource>
<directory>src/main/resources/${package.environment}</directory>
<targetPath>WEB-INF/classes</targetPath>
<filtering>true</filtering>
</resource>
<resource>
<directory>src/main/resources/public</directory>
<targetPath>WEB-INF/classes</targetPath>
<filtering>true</filtering>
</resource>
<!--<resource>-->
<!--<directory>${project.build.directory}/classes</directory>-->
<!--<includes>-->
<!--<include>**/*.properties</include>-->
<!--<include>**/*.xml</include>-->
<!--</includes>-->
<!--</resource>-->
</webResources>
</configuration>
</plugin>
这里就是war的插件了,
${package.environment}
就是动态指定文件夹了.
<filtering>true</filtering>
这里一定需要设置为true才行.
然后就差不多了. 最后执行 mvn clean ; mvn compile; mvn package; 这里是Maven的生命周期, 其他介绍的文章太多了, 我就不再具体讲. 如果说我要打product的war包;
mvn clean ; mvn compile; mvn -Pproduct package;
那就激活了product 的资源文件;
就这样子, 很简单吧~
转载于:https://blog.51cto.com/xiaok007/1907509


 1209
1209

 被折叠的 条评论
为什么被折叠?
被折叠的 条评论
为什么被折叠?
 到【灌水乐园】发言


