Nginx----基础篇
ngnix基本特性
nginx 常用的方式 web server web reverse proxy cacahe
轻量级更适合现代互联网架构
基本功能
能够实现服务静态资源,能缓存打开的文件描述符,文件下次访问时速度加快
反向代理服务器能实现缓存,负载均衡等功能
特性:
支持fastCGI
模块化机制非DSO机制,支持多种过滤器例如:gzip,ssi和图像大小调整
支持SSL
扩展功能
能实现基于名称和IP做虚拟主机
支持keepalived
支持平滑配置文件更新和版本升级
支持访问日志定制,支持使用 日志缓存以提高性能
支持url rewrite
支持路径别名
支持基于ip及用户的认证基于htpasswd实现
原生支持速率限制,并发数限制等
Nginx基本架构
一个master,生成一个或多个work每个work关联所需的filter
基于事件驱动:kqueue ,epoll, /dev/poll
支持消息通知机制:select,poll,rt singnle
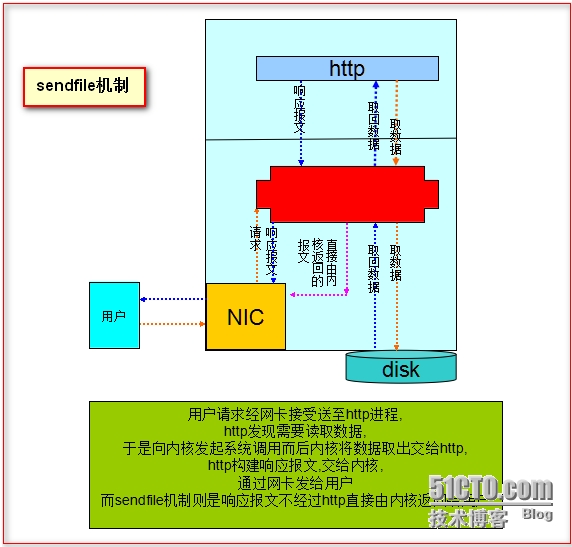
支持sendfile,sendfile64
支持文件的AIO(异步IO)
支持mmap:直接将硬盘空间分页映射成内存空间
Ngnix的模块:
核心模块
标准http模块 默认安装的模块
可选的http模块 默认都是不安装的
邮件模块
第三方模块
安装配置
官方文档站点:http://wiki.nginx.org/Main
编译安装和rpm epel源或官方下载安装源
编译环境准备
yum groupinstall “Development Tools” “Server Platform Development”
yum install pcre-devel
nginx的配置文件
main配置段
http配置段
mail配置段
配置参数需要以分号结尾 语法格式: 参数名 值1 [值2];
还支持使用变量:模块的内置变量和用户自定义变量: set var_name value
通常而言ngnix基本配置类别
用于调试,定位问题
正常运行的必备配置
优化性能的配置
事件类配置
Worker进程通常以普通用户身份运行:nginx:nginx
首先添加用户useradd -r ngnix
./configure \
--prefix=/usr \
--sbin-path=/usr/sbin/nginx \
--conf-path=/etc/nginx/nginx.conf \
--error-log-path=/var/log/nginx/error.log \
--http-log-path=/var/log/nginx/access.log \
--pid-path=/var/run/nginx/nginx.pid \
--lock-path=/var/lock/nginx/nginx.lock \
--user=nginx \
--group=nginx \
--with-http_ssl_module \
--with-http_flv_module \
--with-http_stub_status_module \
--with-http_gzip_static_module \
--http-client-body-temp-path=/var/tmp/nginx/client \
--http-proxy-temp-path=/var/tmp/nginx/proxy \
--http-fastcgi-temp-path=/var/tmp/nginx/fcgi \
--http-uwsgi-temp-path=/var/tmp/nginx/uwsgi \
--http-scgi-temp-path=/var/tmp/nginx/scgi \
--with-pcre
Make && make install启动选项:
[root@localhost nginx-1.6.2]# nginx -h
nginx version: nginx/1.6.2
Usage: nginx [-?hvVtq] [-s signal] [-c filename] [-p prefix] [-g directives]

Options:
  -?,-h         : this help
  -v           : show version and exit
  -V           : show version and configure options then exit
  -t            : test configuration and exit
  -q            ;suppress non-error messages during configuration testing
  -s signal     : send signal to a master process: stop, quit, reopen, reload 可以实现平滑启动
  -p prefix     : set prefix path (default: /usr/)
  -c filename   : set configuration file (default: /etc/nginx/nginx.conf)
  -g directives : set global directives out of configuration file
配置文件语法检测
[root@localhost nginx-1.6.2]# nginx -t
nginx: the configuration file /etc/nginx/nginx.conf syntax is ok
nginx: [emerg] mkdir() "/var/tmp/nginx/client" failed (2: No such file or directory)
nginx: configuration file /etc/nginx/nginx.conf test failed
根据错误创建目录
[root@localhost nginx-1.6.2]# mkdir -pv /var/tmp/nginx/client
mkdir: created directory `/var/tmp/nginx'
mkdir: created directory `/var/tmp/nginx/client'
[root@localhost nginx-1.6.2]# nginx -t
nginx: the configuration file /etc/nginx/nginx.conf syntax is ok
nginx: configuration file /etc/nginx/nginx.conf test is successful
启动nginx
[root@localhost nginx-1.6.2]# nginx
[root@localhost nginx-1.6.2]# ss -tnl | grep "80"
LISTEN     0      128                       *:80                       *:*
查看启动的nginx进程
[root@localhost nginx-1.6.2]# ps aux | grep "nginx"
root      6331  0.0  0.2  44864  1140 ?        Ss   11:03   0:00 nginx: master process nginx
nginx     6332  0.0  0.3  45316  2000 ?        S    11:03   0:00 nginx: worker process
root 6347 0.0 0.1 103248 852 pts/0 S+ 11:06 0:00 grep nginx正如上面所诉当前启动了一个master和一个worker并且master以root执行 worker则以nginx用户执行
默认打开配置文件没有语法高亮显示为了支持语法高亮
http://www.vim.org/scripts/script.php?script_id=1886
install details |
Download nginx.vim to ~/.vim/syntax/, and then add this line to ~/.vim/filetype.vim: |
Nginx的配置
正常运行的必备配置
1,user usr_name [group_name] 也可编译时指定
2,pid /path/pid_file 指定pid文件 也可在编译时指定
3,worker_rlimit_nofile 指定一个worker所能打开的最大文件句柄数
4,worker_rlimit_sigpending 设定每个用户能够发往worker进程的信号数量
性能相关的配置
1,worker_processes worker进程的个数 一般来讲此值等于cpu核心数减去1
2,worker_cpu_affinity cpu掩码 cpu亲缘性 尽量避免进程上下文切换
例如:worker_cpu_affinity 000001 000010 000100 001000 010000 100000 表示分别绑定在6颗cpu上
3,ssl_engine device 在存在ssl硬件加速器的服务器上使用指定的ssl硬件加速设备
4,timer_resolution 时间 单位为ms 每次内核事件调用返回时,都会使用gettimeofday()来更新nginx缓存时钟;早期时这个系统代价很大每次返回都调用会影响系统性能 所以此选项用于定义每隔多长时间才会由gettimeofday()更新一次缓存时钟:x86_64系统上,gettimeofday()代价很小不启用也可以
5,worker_oriority nice值 -20--19之间的值
事件相关的配置
1,accept_mutex [on|off] 是否打开nginx上master调度worker的负载均衡锁 此锁能使多个worker进程轮流的,序列的与新的客户端建立连接,而通常当一个worker进程负载达到其上限的7/8,master就尽可能不讲请求调度至此woorker 默认是打开的
2,lock_file /path/lock_file
定义1锁文件是哪个
3,accept_mutex_delay 初始值ms accept锁模式中一个worker进程为取得accept锁的等待时间,如果某worker进程在否次试图取得锁时失败,至少要等待定义的时长,默认500ms
4,multi_accept on|off 是否允许一次性的响应多个用户请求 默认是off
5,use 事件模型[epoll|rtsig|select|poll] rtsig为实时信号处理
定义使用的事件类型建议让nginx自动选择
6,worker_connections num 每个worker能够响应的最大请求数
用于调试,定位问题:只调试nginx时使用
1,Daemon [on|off]
是否让nginx运行于后台,默认为on调试时可以设置为off,是的调试时信息输出至控制台
2,master_process [on|off]
是否以master/worker模式运行nginx 默认为on 调试时设为off以方便追踪
3,error_log /path/err_log level
错误日志文件及其级别;调试时可以使
用debug级别,但在编译时必须使用--with-debug功能默认为error级别
Nginx的http功能
必须使用虚拟主机来配置站点:每个虚拟主机使用一个server段 server { }
多个虚拟主机的共享配置或非虚拟主机选项必须配置在server段外
总体格式
http {
Directive value;
..........
Server {

}
Server {

}
.............
}
常用参数
server {} 定义一个虚拟主机:nginx支持使用基于主机名和IP的虚拟主机
1,Listen address [:port]
listen port
listen unix:socket
Listen Default_server:定义此server为http中默认的server,如果所有的server中没有任何一个listen 使用此参数那么第一个server为默认server
Rcvbuf=size:接收缓冲大小
Sndbuf=size:发送缓冲大小
Ssl: https server
2,server_name [name] 设定主机名 可跟多个主机名ngnix收到一个用户请求时,会取出其首部的server的值,而后跟众server比较
比较的方式
[1] 先做精确匹配 www.centod.com
[2] 左侧通配符匹配 *.centod.com
[3]右侧通配符匹配 www.*
[4]正则表达式匹配 ~^\.centod\.com$
3,server_name_hash_bucket_size 32|64|128 为了快速查找主机查找,nginx使用hash表保存主机名
4,location [=|~|~*|^~] uri {.....}
Location @name {......}
作用:允许根据uri的需要来匹配指定的各location进行访问配置 ,匹配到时就被location魁块中的配置所处理
=:精确匹配
~:正则表达式模式匹配,匹配时区分大小写
~*:正则表达式模式匹配,匹配时忽略大小写
^~:只需前半部匹配即可,不检查正则表达式
匹配优先级:字符字面量最精确匹配,正则表达式检索(若多个匹配到被第一个匹配),按字符字面量
Location中使用的指令[文件路径定义]
1,root path :设置web资源路径:用于指定请求的根文档路径
location / {
root /www/htdocs
}
localtion ^~ /p_w_picpath {
root /web
}
若访问http://www.baidu.com/则是访问的文件在主机的/www/htdocs这个目录下
若访问http://www.baidu.com/p_w_picpath则访问的文件在/web/p_w_picpath这个目录的下的文件
2,alias path
只能用于location中,用于路径别名
例如localtion ^~ /p_w_picpath {
alias /web
}
若访问http://www.baidu.com/p_w_picpath则访问的是/web下的文件
3,index .....file
定义默认主页 可跟多个值从左至右匹配
4,error_page code ....... [=[response]] Uri
当对于某个请求返回错误时,如果匹配上error_page指令中设定的code,则跳至error_page指定的页面
例如 error_page 404=200 /error.html
5,try_files path1 [path2......] uri;
依次寻找指定文件都没有则到uri
网络连接相关的设置
1,keepalived_timeout time; 设置保持连接的超时时间,默认时间是75s
2,keepalived_requests n; 在一次长连接上允许承载的最大请求数
3,keepalive_disable [msi6|safari|none] :对指定的浏览器禁止使用长连接因为有些老的浏览器不支持长连接
4,tcp_nodelay on|off 对keepalived连接是否使用TCP_NODELAY选项 等待报文合并就叫delay 通常设置为on否则用户请求得到的应答有可能是找不到
5,client_header_timeout time 读取http请求的首部的超时时间
6,client_bady_timeout time 读取实体的超时时间 两个默认都是60
7,send_timeout time 发送响应的超时时长
对客户端请求的限制:
1,limit_except method ........{....} :除了指定的方法都可以使用
示例:limit_except GET {
Allow 172.16.0.0/16;
Deny all;
}
2,client_max_body_size SIZE;实体的最大值 常用于限定客户端所能请求的最大实体值,根据请求首部的content_length来做检测 上传限制等 避免无用的传输
3,limit_rate speed;限制客户端每秒传输的字节数,默认为0,表示不限制 也可写成40k
4,limit_rate_after time;nginx向客户端发送响应的报文时,如果超出了此处指定的时长,则后续发送过程开始限速
文件操作的优化:
1,senfile on|off 是否启用sendfi功能
2,aio on|off 是否启用aio
3,open_file_cache max=n [inactive=time]|off 是否打开文件缓存功能
max:指定缓存条目的最大值 当满了后将根据LRU算法进行置换 LRU最近最少使用算法
Inactive:若缓存在指定时长内没有被访问过则自动删除 默认为60s
缓存的信息包括:文件句柄 ,文件大小和上次修改的时间,已经打开的目录结构,没有找到或没有访问权限的信息也会缓存
4,open_file_cache_errors on|off 是否缓存文件找不到货没有权限的访问等相关信息
5,open_file_cache_valid time;多长时间检查一次缓存中的条目是否超出非活动时间,默认60s
6,open_file_cache_min_use num;在inactive指定的时长内被访问此处指定的次数的,才不会被删除
对客户端请求的特殊处理
1,ignore_invalid_heards on|off;是否忽略不合法的http首部 默认为on off表示出现不合法的拒绝响应
2,log_not_found on|off;当用户访问的资源没有找到是否将信息记录到错误日志中
3,resovler address; 指定nginx使用的dns服务器地址
4,resolver_timeout time;指定dns解析的超时时长 默认30s
5,server_tokens on|off 是否显示错误页面中的nginx的版本号
http核心模块的内置变量
$uri : 当前请求的uri
$host:请求报文中的host首部,如果请求中没有host首部,则以处理此请求的虚拟主机的主机名代替
$request_uri:请求的uri,带完整参数
$hostname:nginx服务运行在的主机的主机名
$remote_addr:客户端IP
$remote_port:客户端port
$remote_user;使用用户认证时客户端用户输入的用户名
$request_filename:用户请求中的uri经过本地的root或alias转换后的本地文件的文件路径
$request_mothod:请求方法
$server_addr:服务器地址
$server_name:服务器名称
$server_port:服务器端口
$server_protocol:服务器向客户端发送的协议的版本
$scheme:在请求中使用的scheme ,如https://www.google.com/中的https
$http_HEARD:匹配请求报文中指定的HEARD,如$http_host请求报文中的host首部
$sent_http_HEARD:匹配响应报文中指定的HEARD
$document_root:当前请求映射到的root请求项
Nginx基础应用
创建两个虚拟主机
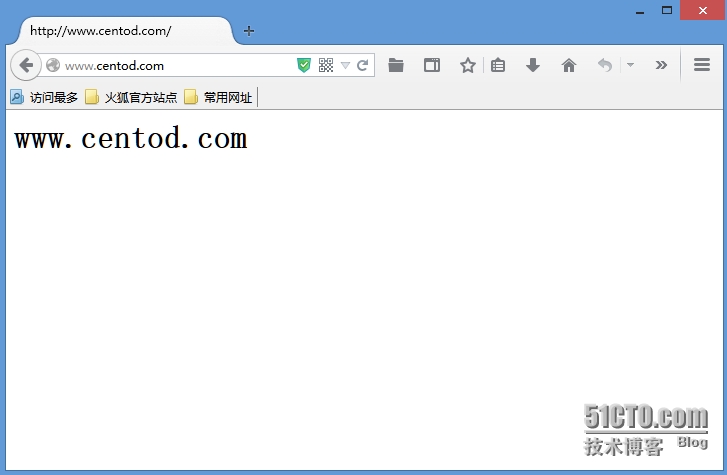
www.centod.com 主页文件 /www/centod/index.html 内容为www.centod.com
www.centoc.com 主页文件 /www/centoc/index.html 内容为www.centoc.com
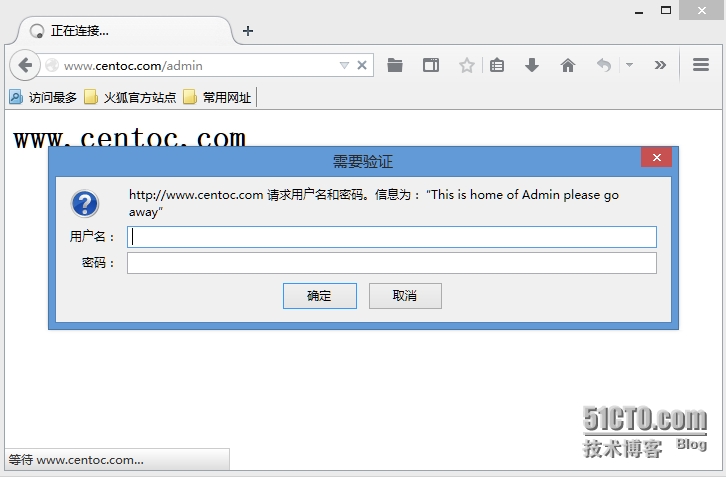
并且设置管理员主页为/admin/index.html 内容为 admin area
配置文件如下
worker_processes  1;
events {
    worker_connections  1024;
}
http {
    include       mime.types;
    default_type  application/octet-stream;
    sendfile        on;

  keepalive_timeout  65;


    server {
        listen       80;
        server_name  www.centod.com;
        location / {
            root   /www/centod;
            index  index.html index.htm;
        }
        error_page   500 502 503 504  /50x.html;
        location = /50x.html {
            root   html;
        }
    }

        server {
               listen 80;
               server_name www.centoc.com;
               root /www/centoc;
               location / {
                     index index.html;
                     }
               location /admin {
                     auth_basic   "This is home of Admin please go away";
                     auth_basic_user_file  /etc/nginx/.htpasswd;
                     index index.html
                     }

               }
创建目录及所需的文件
mkdir /www/{centod,centoc}/ -pv
[root@node2 nginx]# touch /www/{centod,centoc}/index.html
[root@node2 nginx]# vim /www/centod/index.html
[root@node2 nginx]# vim /www/centoc/index.html
[root@node2 nginx]# mkdir /www/centoc/admin
[root@node2 nginx]# vim /www/centoc/admin/index.html
创建认证文件
[root@node2 nginx]# htpasswd -m -c /etc/nginx/.htpasswd centoc
启动nginx
客户端修改host文件使之能够解析两个域名
172.16.101.200 www.centod.com
172.16.101.200 www.centoc.com
客户端测试
防盗链需要两条指令
1,定义符合的引用
Valid_referers none|blocked |server_names|string.....;
2,定义不符合的引用
If ($invalid_referer) {
Rewrite
}
If用法比较操作符 == ~ ~* !
If测试操作 -d -f -e -x
URL重写
Rewrite regex replacement [flag]
查找regex[正则表达式]替换成replacement
Falg: 1,last:一旦停止被当前规则匹配并重写后立即停止检查后续的其他rewrire规则,而通过重写后的规则重新发起请求
2,break:一旦停止被当前规则匹配并重写后立即停止检查后续的其他rewrire规则,而后继续由nginx进行后续的操作
3,redirect:返回302临时重定向
4,permanent:返回301永久重定向
示例:location /download/ {
rewrite ^(/download/.*)/media/(.*)\..*$ $1/media/$2.mp3 break;
}
会陷入死循环 nginx最多循环10次,然后返回500错误
为了防止死循环,一般将rewrite写在location中时都要使用break获奖rewerite写在if上下文中
rewrite_log on|off :是否将重写工程写在错误日志中:默认为notice级别 默认为off 打开会影响性能
Return code:用于结束rewrite规则,并为用户返回状态码,可以使用的状态码有 204 400 402-406 500-504等
If用法
If (condition) { }
防盗链的实现与重写
假设http://www.centoc.com/p_w_picpaths/1.gpg不允许来自于其他站点引用则如下方法实现
首先创建使用到的资源
[root@node2 nginx]# mkdir /www/centoc/p_w_picpaths 放入图片1.jpg
[root@node2 p_w_picpaths]# mkdir /www/centoc/error
[root@node2 p_w_picpaths]# vim /www/centoc/error/index.html在centoc虚拟主机中添加如下location
location ~*\.(jpg|gif|png|jpeg)$ {
                     valid_referers  none blocked www.centoc.com *.centoc.com ~\.baidu\.;
                     if ($invalid_referer) {
                        rewrite ^/  http://www.centoc.com/error/index.html last;
                        }
}编辑centod主页文件
<h1> www.centod.com </h1>
<img src="http://www.centoc.com/p_w_picpaths/1.jpg"
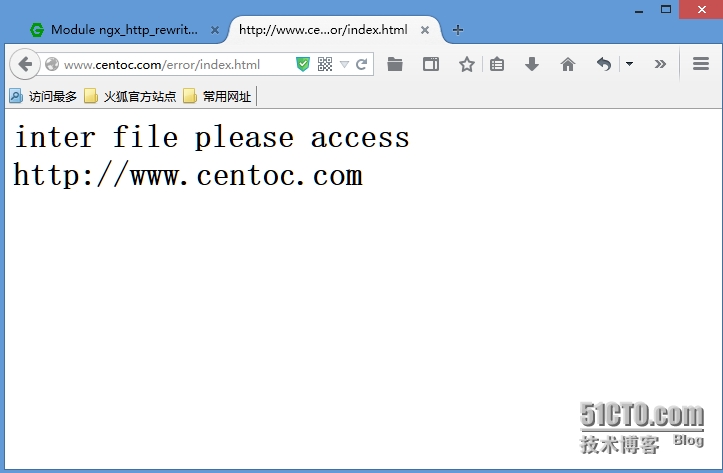
编辑www.centoc.com/error/index.html
<h1> inter file please access http://www.centoc.com </h1>
重新载入nginx配置文件
实验如下图
www.centoc.com可正常访问
点击查看图像会显示我们定义好的资源
证明www.centod.com无法盗用www.centoc.com网站资源
转载于:https://blog.51cto.com/centod/1555521


 5160
5160


 被折叠的 条评论
为什么被折叠?


