


前端时间在工作中需要配置zabbix,配置起来特别的麻烦。当时想用ZABBIX API来搞,但是一直没时间,最近有时间来研究研究,并记下笔记,以便复用!
在python3爬虫中,我喜欢用request 模块,所以这里也用request来弄!
首先贴上zabbix官网和中文官网的地址:
https://www.zabbix.com/documentation/3.4/manual/api/reference/item/object
https://www.zabbix.com/documentation/3.4/zh/manual/api 任何时候任何难题在官网上几乎都能找到答案,只是花费的时间多少问题了。
首先,我们想用利用zabbix的restful api来访问zabbix,肯定是需要登陆认证的。在zabbix的后续操作中,必须要有一个TOKEN,这也是官方介绍的:官方上实现的方法如下
{
    "jsonrpc": "2.0",
    "method": "user.login",
    "params": {
        "user": "Admin",
        "password": "zabbix"
    },
    "id": 1,
    "auth": null
}
-
jsonrpc- API使用的JSON-RPC协议的版本; Zabbix API实现JSON-RPC版本2.0; (必须的) -
method- 调用的API方法; -
params- 将被传递给API方法的参数; -
id- 请求的任意标识符; 这个的id需要特别理解下,我之前一直不是很理解。这里的id其实就是一个标志,设置多少无所谓,主要是做返回标志用,也就是这里设置多少,返回数据也会有一个相同的ID 用来标志这个返回对应那个请求! -
auth-用户认证令牌; 因为我们还没有一个,它的设置null。
了解了之后我们构造一个请求函数----目的是获取token
    def __init__():
        self.url = 'http://192.168.230.164/zabbix/api_jsonrpc.php'
        self.headers = {'Content-Type': 'application/json'}
        auth = {
            "jsonrpc": "2.0",
            "method": "user.login",
            "params": {
                "user": "Admin", ###验证
                "password":"zfno11"
            },
            "id": 1,
            "auth":None,
        }
        response = requests.post(self.url, data=json.dumps(auth), headers=self.headers)
        authid = json.loads(response.text)['result']  ### auth的id  也就是token
OK 我们已经获取了TOKEN 了接下来就可以为所欲为了!
第二步我们获取所有主机list信息(其实也可以去数据库里面取--但是如果去数据库里面取 还得写数据库函数 输入账号密码等等等。。。。)这里我们假设第一步获取的ID(TOKEN)为AAAAA
    def get_hosts():
        neirong={
            "jsonrpc": "2.0",
            "method": "host.get",
            "params": {
                "output": [
                    "hostid",
                    "host"
                ],
                "selectInterfaces": [
                    "interfaceid",
                    "ip"
                ]
            },
            "id": 2,
            "auth": ”AAA“
        }
        response = requests.post(self.url, data=json.dumps(neirong), headers=self.headers)
        print(response.text)
这里就会返回类似如下的列表:
{"jsonrpc":"2.0","result":[{"hostid":"10255","host":"QH-PS-IM-qq65","interfaces":[{"interfaceid":"3","ip":"192.168.230.165"}]},{"hostid":"10084","host":"Zabbix server","interfaces":[{"interfaceid":"1","ip":"1
27.0.0.1"}]}],"id":2}
我们发现了返回了两台主机(我这里只有两台)第一台hostid 10255 hostname:QH-PS-IM-qq65 interfaceid:3 注意这里的interfacse很重要 因为以后对主机项的操作(比如添加item)就需要这个玩意儿。。 我在这里卡了很久 以为这个不重要 官网的说法如下:
| interfaceid (required) | string | ID of the item's host interface. Used only for host items. Optional for Zabbix agent (active), Zabbix internal, Zabbix trapper, Dependent item, Zabbix aggregate, database monitor and calculated items. |
第三步:创建主机ITEM
机上上一步我们说到了创建主机 item,我们就来创建一个 上一步我们已经获取到了 主机的 hostid 10255 interfaceid 3 这两个是添加item必须的对于创建item官网的实例为:
{
    "jsonrpc": "2.0", "method": "item.create", "params": { "name": "Free disk space on $1", "key_": "vfs.fs.size[/home/joe/,free]", "hostid": "10084", "type": 0, "value_type": 3, "interfaceid": "1", "delay": 30 }, "auth": "0424bd59b807674191e7d77572075f33", "id": 3 }
好了 我们稍稍改一下:
def item_create(): neirong ={ "jsonrpc": "2.0", "method": "item.create", "params": { "name": "Free disk space on $1", "key_": "vfs.fs.size[/boot,pused]", "hostid": "10255", "type": 0, "value_type": 0, "interfaceid": "3", "delay": 5 }, "auth": authid , "id": 3 } response1 = requests.post(self.url, data=json.dumps(neirong), headers=self.headers)print(response1.text) print("OK")
这里面的type value_type的意思可以去官网详细看看 我这里设置的是0 0 也就是代表 zabbix_agent float 相信有zabbix基础的同学是秒懂
接下来我们去zabbix图形化界面上看一看吧:


而且有数据。。完美!!!
OK 我们知道我们一般创建一个监控项之后都会对这个监控项添加图形!
第四步:创建监控项图形
我们上一步创建了监控项,那么返回值是什么么? 我们最后print(response1.text)发现如下:
{"jsonrpc":"2.0","result":{"itemids":["28257"]},"id":3}
这里面的itemids非常重要,我们添加这个监控项对于的图形就需要用到他!
直接上代码
    def graf_create(self, authid):
        neirong = {
                "jsonrpc": "2.0",
                "method": "graph.create",
                "params": {
                    "name": "test1",
                    "width": 900,
                    "height": 200,
                    "gitems": [
                        {
                            "itemid": "28257",
                            "color": "00AA00"
                        }
                    ]
                },
                "auth": authid,
                "id": 4
            }

        response1 = requests.post(self.url, data=json.dumps(neirong), headers=self.headers)
        print(response1)
        print(response1.text)
        print("OK")
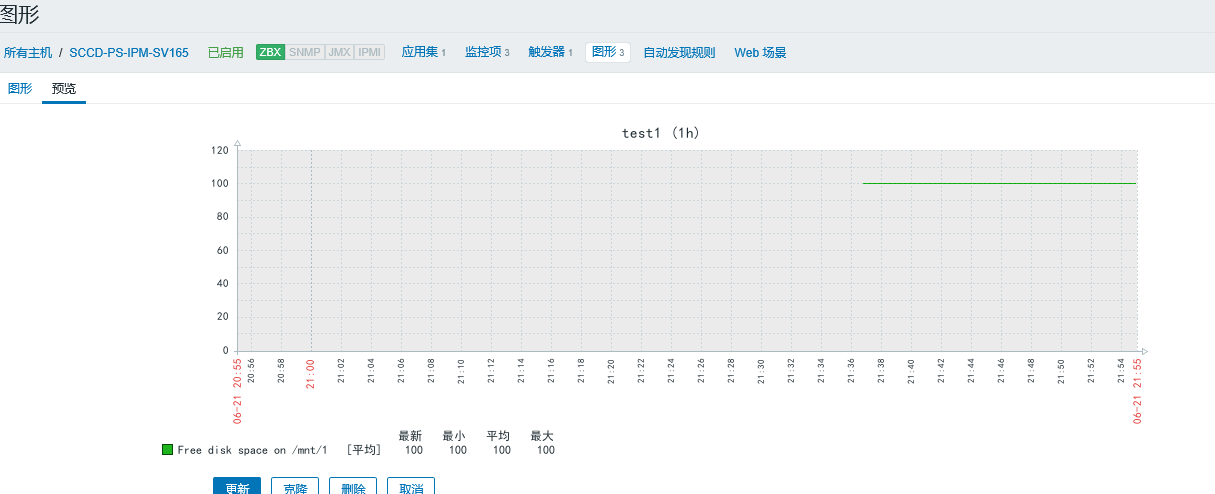
有数据并且OK


 3026
3026


 被折叠的 条评论
为什么被折叠?
被折叠的 条评论
为什么被折叠?
 到【灌水乐园】发言


