


安卓中的缓存包括两种情况即内存缓存与磁盘缓存,其中内存缓存主要是使用LruCache这个类,其中内存缓存我在【安卓中的缓存策略系列】安卓缓存策略之内存缓存LruCache中已经进行过详细讲解,如看官还没看过此博客,建议看官先去看一下。
我们知道LruCache可以让我们快速的从内存中获取用户最近使用过的Bitmap,但是我们无法保证最近访问过的Bitmap都能够保存在缓存中,像类似GridView等需要大量数据填充的控件很容易就会用完整个内存缓存。另外,我们的应用可能会被类似打电话等行为而暂停导致退到后台,因为后台应用可能会被杀死,那么内存缓存就会被销毁,缓存的Bitmap也就不存在了。一旦用户恢复应用的状态,那么应用就需要重新处理那些图片,另外某些情况下即使用户退出整个APP后重新打开该APP其缓存的图片应该还能被显示出来,显然此种情况下使用内存缓存是做不到的。
而磁盘缓存可以用来保存那些已经处理过的Bitmap,它还可以减少那些不在内存缓存中的Bitmap的加载次数。磁盘缓存主要涉及到DiskLruCache这个类。下面从源码的角度详细讲解DiskLruCache这个类,然后在此基础上讲解如何使用DiskLruCache,让读者知其然更知其所以然。
一DiskLruCache类:
首先我们来看一下其构造函数
 private DiskLruCache(File directory, int appVersion, int valueCount, long maxSize) {
        this.directory = directory;
        this.appVersion = appVersion;
        this.journalFile = new File(directory, JOURNAL_FILE);
        this.journalFileTmp = new File(directory, JOURNAL_FILE_TMP);
        this.valueCount = valueCount;
        this.maxSize = maxSize;
    }
 public static DiskLruCache open(File directory, int appVersion, int valueCount, long maxSize)
            throws IOException {
        if (maxSize <= 0) {
            throw new IllegalArgumentException("maxSize <= 0");
        }
        if (valueCount <= 0) {
            throw new IllegalArgumentException("valueCount <= 0");
        }

        // prefer to pick up where we left off
        DiskLruCache cache = new DiskLruCache(directory, appVersion, valueCount, maxSize);
        if (cache.journalFile.exists()) {
            try {
                cache.readJournal();
                cache.processJournal();
                cache.journalWriter = new BufferedWriter(new FileWriter(cache.journalFile, true),
                        IO_BUFFER_SIZE);
                return cache;
            } catch (IOException journalIsCorrupt) {
//                System.logW("DiskLruCache " + directory + " is corrupt: "
//                        + journalIsCorrupt.getMessage() + ", removing");
                cache.delete();
            }
        }

        // create a new empty cache
        directory.mkdirs();
        cache = new DiskLruCache(directory, appVersion, valueCount, maxSize);
        cache.rebuildJournal();
        return cache;
}其中第一个参数maxSize也可以指定选择data下的当前应用的目录(此时的缓存路径为/data/data/<application package>/cache),所以通常我们先判断是否存在SD卡,如果存在则使用SD卡缓存,否则选择data下的当前应用的目录缓存。具体代码如下:
public File getDiskCacheDir(Context context, String uniqueName) {
	String cachePath;
	if (Environment.MEDIA_MOUNTED.equals(Environment.getExternalStorageState())
			|| !Environment.isExternalStorageRemovable()) {
		cachePath = context.getExternalCacheDir().getPath();
	} else {
		cachePath = context.getCacheDir().getPath();
	}
	return new File(cachePath + File.separator + uniqueName);
}
在open函数中可以看到首先会调用DiskLruCache的构造函数,在该构造函数中创建了journalFile,journalFileTmp这两个文件,然后判断journalFile是否存在,如果存在则
调用cache.readJournal();读取journal日志文件,然后调用 cache.processJournal();处理日志文件,该函数的作用就是计算初始化的大小和收集缓存文件中的垃圾文件( Computes the initial size and collects garbage as a part of opening the cache),删除Dirty记录(Dirty entries are assumed to be inconsistent and will be deleted),即垃圾文件.这个概念与数据库中的读取脏数据是差不多的,讲到这里就不得不为读者讲解一下DiskLruCache的日志文件的格式。格式如下(注:此图来源于网络,向贡献该图的人表示感谢)
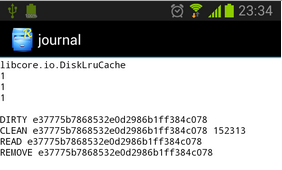
其中的前五行基本上是固定的,表示DiskLruCache日志文件的头部数据,第一行是个固定的字符串“libcore.io.DiskLruCache”,意味着我们使用的是DiskLruCache,
第二行是DiskLruCache的版本号,这个值是恒为1的。第三行是应用程序的版本号,这个值与我们在open()方法里传入的版本号是相同的。第四行是valueCount,这个值也是在open()方法中传入的,通常情况下都为1。第五行是一个空行。空行过后才是日志文件的内容:
接下来是一个以DIRTY开头的行,其后的一串数字表示的是存入的数据的key,如果读者了解数据库的话,知道一般DIRTY表示的是脏数据,这是因为当我们每次向磁盘缓存中写入一条数据时都会向journal文件中写入一条DIRTY记录,表示我们正准备写入一条缓存数据,但不知结果如何。当调用commit()方法表示写入缓存成功,这时会向journal中写入一条CLEAN记录,意味着这条“脏”数据被“洗干净”,它不再是脏数据,当调用abort()方法表示写入缓存失败,这时会向journal中写入一条REMOVE记录。也就是说,每一行DIRTY的key,后面都应该有一行对应的CLEAN或者REMOVE的记录,否则这条数据就是“脏”的,会被自动删除掉。另外以READ开头的行表示我们从缓存中读取了一条数据,这时会向日志文件中添加一个READ记录。
这样我们就可以理解上面讲述的 cache.processJournal()函数处理日志文件的过程,即该函数会清除只出现DIRTY但未出现CLEAN或REMOVE的记录,即出现CLEAN且没被REMOVE的记录才会保存下来,然后通过cache.journalWriter = new BufferedWriter(new FileWriter(cache.journalFile, true), IO_BUFFER_SIZE);将CLEAN的记录保存到日志文件中,最后返回该cache。
第二种情况是如果cache.journalFile不存在,相当于初次创建cahce文件,则会创建一个空的cache,代码如下:
        directory.mkdirs();
        cache = new DiskLruCache(directory, appVersion, valueCount, maxSize);
cache.rebuildJournal(); private synchronized void rebuildJournal() throws IOException {
if (journalWriter != null) {
journalWriter.close();
}
Writer writer = new BufferedWriter(new FileWriter(journalFileTmp), IO_BUFFER_SIZE);
writer.write(MAGIC);
writer.write("\n");
writer.write(VERSION_1);
writer.write("\n");
writer.write(Integer.toString(appVersion));
writer.write("\n");
writer.write(Integer.toString(valueCount));
writer.write("\n");
writer.write("\n");
for (Entry entry : lruEntries.values()) {
if (entry.currentEditor != null) {
writer.write(DIRTY + ' ' + entry.key + '\n');
} else {
writer.write(CLEAN + ' ' + entry.key + entry.getLengths() + '\n');
}
}
writer.close();
journalFileTmp.renameTo(journalFile);
journalWriter = new BufferedWriter(new FileWriter(journalFile, true), IO_BUFFER_SIZE);
}接下来我们看一下DiskLruCache中的重要方法:
首先来看一下关于添加缓存的edit方法。
 public Editor edit(String key) throws IOException {
        return edit(key, ANY_SEQUENCE_NUMBER);
    }

    private synchronized Editor edit(String key, long expectedSequenceNumber) throws IOException {
        checkNotClosed();
        validateKey(key);
        Entry entry = lruEntries.get(key);
        if (expectedSequenceNumber != ANY_SEQUENCE_NUMBER
                && (entry == null || entry.sequenceNumber != expectedSequenceNumber)) {
            return null; // snapshot is stale
        }
        if (entry == null) {
            entry = new Entry(key);
            lruEntries.put(key, entry);
        } else if (entry.currentEditor != null) {
            return null; // another edit is in progress
        }

        Editor editor = new Editor(entry);
        entry.currentEditor = editor;

        // flush the journal before creating files to prevent file leaks
        journalWriter.write(DIRTY + ' ' + key + '\n');
        journalWriter.flush();
        return editor;
}如果获取的entry不为空,则代表不是初次存入该key的缓存,则判断entry.currentEditor是否为空,如果不为空则表示当前缓存entry正在被edit,此时将直接返回null,即DiskLruCache不允许同时edit一个缓存对象。注意entry.currentEditor不为空的前提是entry不为空。
如果如果获取的entry不为空同时entry.currentEditor为空,则会根据entyr构造Editor对象editor,然后将该editor的值赋给entry.currentEditor,然后调用journalWriter.write(DIRTY + ' ' + key + '\n');向日志文件中写入一个DIRTY行,表示该记录正在被操作。最后返回该editor。通过该editor的 public OutputStream newOutputStream(int index)方法可以得到缓存文件输出流。通过该文件输出流就可以将缓存写入到磁盘上保存起来,最后必须调用editor的commit()来提交写入操作,这样才真真正正的把记录写入到磁盘缓存上了。
再来看一下获取缓存的get方法:
 public synchronized Snapshot get(String key) throws IOException {
        checkNotClosed();
        validateKey(key);
        Entry entry = lruEntries.get(key);
        if (entry == null) {
            return null;
        }


        if (!entry.readable) {
            return null;
        }


        /*
         * Open all streams eagerly to guarantee that we see a single published
         * snapshot. If we opened streams lazily then the streams could come
         * from different edits.
         */
        InputStream[] ins = new InputStream[valueCount];
        try {
            for (int i = 0; i < valueCount; i++) {
                ins[i] = new FileInputStream(entry.getCleanFile(i));
            }
        } catch (FileNotFoundException e) {
            // a file must have been deleted manually!
            return null;
        }


        redundantOpCount++;
        journalWriter.append(READ + ' ' + key + '\n');
        if (journalRebuildRequired()) {
            executorService.submit(cleanupCallable);
        }


        return new Snapshot(key, entry.sequenceNumber, ins);
    }
同样可以看到get方法也是同步的,它的作用就是根据key返回一个Snapshot对象,可以看到在该方法中同样先调用 validateKey(key);进行合法性检测,如果合法则通过key获取缓存entry,如果entry为空或当前不可读则返回null,否则根据valueCountd的值创建valueCount个文件输入流,这些文件输入流的源即为entry中CLEAN记录的缓存,即 ins[i] = new FileInputStream(entry.getCleanFile(i));然后调用journalWriter.append(READ + ' ' + key + '\n');向缓存日志文件中写入一个READ记录行,最后通过key和文件输入流数组来构造一个Snapshot对象,将其返回。当该值返回后会将其移动到缓存队列的头部(If a value is returned, it is moved to the head of the LRU queue)
得到Snapshot对象后,通过该对象的public InputStream getInputStream(int index)方法可以获取到缓存的文件输入流,通过该文件输入流即可将缓存的记录转换为Bitmap对象。
二DiskLruCache的使用
同样DiskLruCache的使用也主要包括上个模块,即创建磁盘缓存,向磁盘缓存中添加记录,从缓存中获取记录。下面先简单介绍这三个模块的使用,然后结合LruCache和DiskLruCache给出安卓缓存策略的完整代码。
创建缓存:创建缓存主要使用的是open函数:public static DiskLruCache open(File directory, int appVersion, int valueCount, long maxSize)
public File getDiskCacheDir(Context context, String uniqueName) {
	String cachePath;
	if (Environment.MEDIA_MOUNTED.equals(Environment.getExternalStorageState())
			|| !Environment.isExternalStorageRemovable()) {
		cachePath = context.getExternalCacheDir().getPath();
	} else {
		cachePath = context.getCacheDir().getPath();
	}
	return new File(cachePath + File.separator + uniqueName);
}

	public int getAppVersion(Context context) {
		try {
			PackageInfo info = context.getPackageManager().getPackageInfo(context.getPackageName(), 0);
			return info.versionCode;
		} catch (NameNotFoundException e) {
			e.printStackTrace();
		}
		return 1;
	}


     DiskLruCache mDiskLruCache = null;
     try {
	File cacheDir = getDiskCacheDir(context, "bitmap");
	if (!cacheDir.exists()) {
		cacheDir.mkdirs();
	}
	mDiskLruCache = DiskLruCache.open(cacheDir, getAppVersion(context), 1, 10 * 1024 * 1024);
       } catch (IOException e) {
	e.printStackTrace();
      }
写入缓存:写入缓存主要是通过DiskLruCache.Editor类来完成的,该类是通过DiskLruCache的edit()方法来获取的。通常写入磁盘缓存是从网络上获取然后写入缓存的,因此我们得定义一个线程从网络上获取图片。
public String hashKeyFromUrl(String key) {
	String cacheKey;
	try {
		final MessageDigest mDigest = MessageDigest.getInstance("MD5");
		mDigest.update(key.getBytes());
		cacheKey = bytesToHexString(mDigest.digest());
	} catch (NoSuchAlgorithmException e) {
		cacheKey = String.valueOf(key.hashCode());
	}
	return cacheKey;
}

private String bytesToHexString(byte[] bytes) {
	StringBuilder sb = new StringBuilder();
	for (int i = 0; i < bytes.length; i++) {
		String hex = Integer.toHexString(0xFF & bytes[i]);
		if (hex.length() == 1) {
			sb.append('0');
		}
		sb.append(hex);
	}
	return sb.toString();
}


new Thread(){
	@Override
	public void run() {
		try {
			String imageUrl = "http://www.baidu.com/logo.jpg";
			String key = hashKeyFromUrl(imageUrl);
			DiskLruCache.Editor editor = mDiskLruCache.edit(key);
			if (editor != null) {
				OutputStream outputStream = editor.newOutputStream(DISK_CACHE_INDEX);
				if (downloadUrlToStream(imageUrl, outputStream)) {
					editor.commit();
				} else {
					editor.abort();
				}
			}
			mDiskLruCache.flush();
		} catch (IOException e) {
			e.printStackTrace();
		}
	}
}.start();

private boolean downloadUrlToStream(String urlString, OutputStream outputStream) {
	HttpURLConnection urlConnection = null;
	BufferedOutputStream out = null;
	BufferedInputStream in = null;
	try {
		final URL url = new URL(urlString);
		urlConnection = (HttpURLConnection) url.openConnection();
		in = new BufferedInputStream(urlConnection.getInputStream(), 8 * 1024);
		out = new BufferedOutputStream(outputStream, 8 * 1024);
		int b;
		while ((b = in.read()) != -1) {
			out.write(b);
		}
		return true;
	} catch (final IOException e) {
		e.printStackTrace();
	} finally {
		if (urlConnection != null) {
			urlConnection.disconnect();
		}
		try {
			if (out != null) {
				out.close();
			}
			if (in != null) {
				in.close();
			}
		} catch (final IOException e) {
			e.printStackTrace();
		}
	}
	return false;
}然后通过mDiskLruCache.edit(key);通过key构造一个Editor对象,然后editor.newOutputStream(DISK_CACHE_INDEX)获取文件输出流(DISK_CACHE_INDEX通常指定为0),然后将该输出流和网络上图片的Url作为参数传递给downloadUrlToStream(String urlString, OutputStream outputStream) 函数,该函数的作用是通过制定的图片的Url和OutputStream 将网络上的图片通过outputStream写入到本地文件中,这里传入的是DiskLruCache的输出流,所以就将其写入到了磁盘缓存中。注意该操作要在一个子线程中进行,下载完成之后还用调用editor的commit方法才能将其真真正正写入缓存。如果下载过程出现错误,则会通过Editor的abort()函数来回退整个操作。
获取缓存:获取缓存主要是通过public synchronized Snapshot get(String key) 函数来完成的。代码如下:
try {
	String imageUrl = "http://www.baidu.com/logo.jpg";
	String key = hashKeyFromUrl(imageUrl);
	DiskLruCache.Snapshot snapShot = mDiskLruCache.get(key);

	if (snapShot != null) {
		FileInputStream fis =(FileInputStream)snapShot.getInputStream(DISK_CACHE_INDEX);
		Bitmap bitmap = BitmapFactory.decodeStream(fis);//注意此种方式未对网络上获取的图片进行压缩处理
		mImage.setImageBitmap(bitmap);
	}
} catch (IOException e) {
	e.printStackTrace();
}好了,以上就是本人理解的关于DiskLruCache相关的知识点,看官如果觉得不错,请记得点击下方的“顶”或“赞”按钮给我一点小小的鼓励哦 ,看官也可以看看我的其它博客的文章哦!


 926
926

 被折叠的 条评论
为什么被折叠?
被折叠的 条评论
为什么被折叠?
 到【灌水乐园】发言


