在silverlight 中,我们可以通过js事件绑定方法addEventListener,往xaml文件中的UIElement元素上绑定事件js事件,也可以通过直接属性赋值的方法来将事件绑定到UIElement元素上,比如下面的语法声明:
<
Rectangle
x:Name
=" "
MouseEnter
="onMouseEnter"
 />
/>
 "
MouseEnter
="onMouseEnter"
 />
/>
本人比较喜欢前者的定义方法,主要是因为其灵活性和支持prototype式的代码结构。下面就通过一个获取鼠标当前坐标位置的例子,来说明一下如果使用js事件绑定。
首先我们需要定义一个Silverlight JScript 文件,并将其命名为MoveScene.xaml,如下图所示:
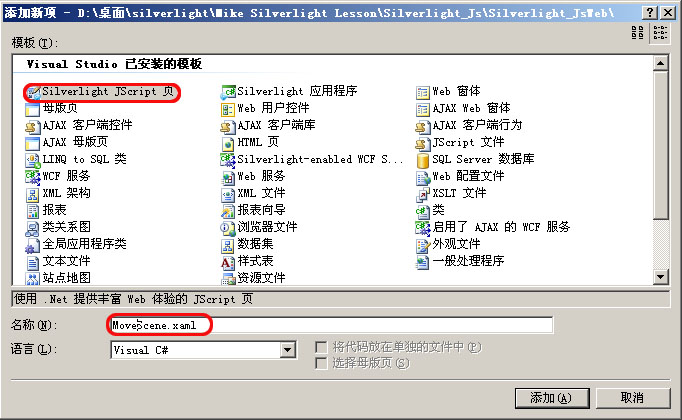
这时系统会生成两个文件,一个是同名的MoveScene.xaml,而另一个就是其绑定的js文件:
MoveScene.js。我们可以将相应的代码放入这两个文件中,其中xaml代码如下:

这时系统会生成两个文件,一个是同名的MoveScene.xaml,而另一个就是其绑定的js文件:
MoveScene.js。我们可以将相应的代码放入这两个文件中,其中xaml代码如下:
<
Canvas
xmlns
="http://schemas.microsoft.com/client/2007"
xmlns:x ="http://schemas.microsoft.com/winfx/2006/xaml"
Width ="300" Height ="300" x:Name ="rootCanvas" Background ="pink" >
< Ellipse x:Name ="MouseEllipse"
Height ="100" Width ="100"
Canvas.Left ="30" Canvas.Top ="30" Fill ="Red" />
< TextBlock x:Name ="Status" Canvas.Top ="140" MouseLeftButtonDown ="onMouseLeftButtonUp" />
</ Canvas >
上面代码中定义了两个元素:
1. Ellipse元素, 名称为:MouseEllipse, 该元素将会绑定鼠标事件。
2. TextBlock元素,名称为:Status,该元素会显示当前鼠标在MouseEllipse元素中的位置。
下面就是关于鼠标事件绑定的代码(因系统已为我们生成了一个简单的初始化代码,我们仅需放入相应的事件绑定代码即可),取终代码结构如下( MoveScene.js):
1. Ellipse元素, 名称为:MouseEllipse, 该元素将会绑定鼠标事件。
2. TextBlock元素,名称为:Status,该元素会显示当前鼠标在MouseEllipse元素中的位置。
下面就是关于鼠标事件绑定的代码(因系统已为我们生成了一个简单的初始化代码,我们仅需放入相应的事件绑定代码即可),取终代码结构如下( MoveScene.js):
Silverlight_JsWeb.MoveScene
=
function
()
{
}
Silverlight_JsWeb.MoveScene.prototype =
{
handleLoad: function (plugIn, userContext, rootElement)
{
this .plugIn = plugIn;
// 按钮事件挂钩示例: 查找按钮,然后附加事件处理程序
var MouseEllipse = rootElement.findName( " MouseEllipse " );
MouseEllipse.addEventListener( " MouseMove " , Silverlight.createDelegate( this , this .handleMouseMove));
MouseEllipse.addEventListener( " MouseLeave " , Silverlight.createDelegate( this , this .handleMouseLeave));
MouseEllipse.addEventListener( " MouseLeftButtonUp " , Silverlight.createDelegate( this , this .handleMouseLeftButtonUp));
},
// 鼠标移入处理程序
handleMouseMove: function (sender, mouseEventArgs)
{
sender.Fill = " Coral " ;
var currX = mouseEventArgs.getPosition( null ).x;
var currY = mouseEventArgs.getPosition( null ).y;
var Status = sender.findName( " Status " );
Status.Text = " x: " + currX + " y: " + currY;
},
// 鼠标离开处理程序
handleMouseLeave: function (sender, mouseEventArgs)
{
sender.Fill = " Teal " ;
},
// 鼠标左键单击处理程序
handleMouseLeftButtonUp: function (sender, mouseEventArgs)
{
sender.Fill = " Blue " ;
alert( " x: " + mouseEventArgs.getPosition( null ).x +
" y: " + mouseEventArgs.getPosition( null ).y);
}
}
{
}
Silverlight_JsWeb.MoveScene.prototype =
{
handleLoad: function (plugIn, userContext, rootElement)
{
this .plugIn = plugIn;
// 按钮事件挂钩示例: 查找按钮,然后附加事件处理程序
var MouseEllipse = rootElement.findName( " MouseEllipse " );
MouseEllipse.addEventListener( " MouseMove " , Silverlight.createDelegate( this , this .handleMouseMove));
MouseEllipse.addEventListener( " MouseLeave " , Silverlight.createDelegate( this , this .handleMouseLeave));
MouseEllipse.addEventListener( " MouseLeftButtonUp " , Silverlight.createDelegate( this , this .handleMouseLeftButtonUp));
},
// 鼠标移入处理程序
handleMouseMove: function (sender, mouseEventArgs)
{
sender.Fill = " Coral " ;
var currX = mouseEventArgs.getPosition( null ).x;
var currY = mouseEventArgs.getPosition( null ).y;
var Status = sender.findName( " Status " );
Status.Text = " x: " + currX + " y: " + currY;
},
// 鼠标离开处理程序
handleMouseLeave: function (sender, mouseEventArgs)
{
sender.Fill = " Teal " ;
},
// 鼠标左键单击处理程序
handleMouseLeftButtonUp: function (sender, mouseEventArgs)
{
sender.Fill = " Blue " ;
alert( " x: " + mouseEventArgs.getPosition( null ).x +
" y: " + mouseEventArgs.getPosition( null ).y);
}
}
这里面有两个方法需要着重介绍一下:
addEventListener 该方法用于向指定的元素绑定相应的方法。其函数声明如下:
addEventListener 该方法用于向指定的元素绑定相应的方法。其函数声明如下:
object.AddEventListener(eventName, functionReference)
其参数:
eventName表示事件的名称,string类型(如KeyDown等)。
functionReference ,表示事件处理方法的引用,Object类型(通常采用Silverlight.createDelegate方法创建)。
eventName表示事件的名称,string类型(如KeyDown等)。
functionReference ,表示事件处理方法的引用,Object类型(通常采用Silverlight.createDelegate方法创建)。
该方法的使用已如上面代码所声明的那样:
MouseEllipse.addEventListener(
"
MouseMove
"
, Silverlight.createDelegate(
this
,
this
.handleMouseMove));
这样我们就将
handleMouseMove方法绑定到了MouseEllipse元素的
MouseMove事件上。
另外一个要介绍的方法是FindName,其函数声明如下:
另外一个要介绍的方法是FindName,其函数声明如下:
retval
=
object.FindName(name)
其name即是在XAML中元素的名称,它返回该元素的引用(有点像我们经常使用的 getElementById).
通过该方法我们就可以该XMAL中的元素了。
目前我们只是完成了相应的代码声明工作。仅下面就是创建该silverlight对象的代码(因为要演示三种鼠标应用场景,所以这里采用了参数化的方式来简化代码, 文件 CreateSilverlight.js):
目前我们只是完成了相应的代码声明工作。仅下面就是创建该silverlight对象的代码(因为要演示三种鼠标应用场景,所以这里采用了参数化的方式来简化代码, 文件 CreateSilverlight.js):
//
Instance:实例名称
// Source:资源文件名称
// ParentElement:相应的父元素名称
// PluginID: 插件名称
function createSilverlight(Instance, Source, ParentElement, PluginID)
{
var scene = Instance;
Silverlight.createObjectEx({
source: Source,
parentElement: ParentElement,
id: PluginID,
properties: {
width: ' 300 ' ,
height: ' 300 ' ,
version: ' 2.0 ' ,
isWindowless: ' true ' ,
background: ' aliceblue ' ,
framerate: ' 24 ' ,
version: ' 2.0 '
},
events: {
// 注意此处的代码使用方式,它将相应的prototype实例和相应方法
// 绑定到onLoad事件上
onLoad: Silverlight.createDelegate(scene, scene.handleLoad),
onError: function (sender, args) {
var errorDiv = document.getElementById( " errorLocation " );
if (errorDiv != null ) {
var errorText = args.errorType + " - " + args.errorMessage;
if (args.ErrorType == " ParserError " ) {
errorText += " <br>File: " + args.xamlFile;
errorText += " , line " + args.lineNumber;
errorText += " character " + args.charPosition;
}
else if (args.ErrorType == " RuntimeError " ) {
errorText += " <br>line " + args.lineNumber;
errorText += " character " + args.charPosition;
}
errorDiv.innerHTML = errorText;
}
}
},
initParams: null , // 初始化参数
context: null
});
}
到这里我们仅需要在HTM文件中写入下面的js代码,便可创建对象了:
createSilverlight(
new
Silverlight_JsWeb.MoveScene(),
" xaml/MoveScene.xaml " ,
document.getElementById( " SilverlightControlHost_Move " ),
" MouseMove " );
" xaml/MoveScene.xaml " ,
document.getElementById( " SilverlightControlHost_Move " ),
" MouseMove " );
其运行结果如下图所示:
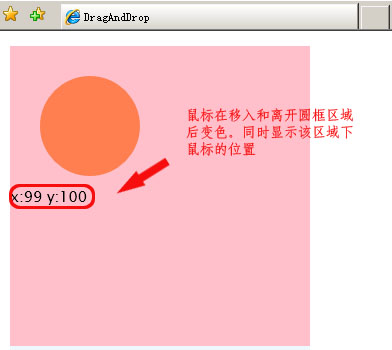
上面介绍和鼠标MOVE事件的处理方法。下面介绍一下鼠标元素拖动的方法:
其JS声明如下(DragAdnDrop.js):

上面介绍和鼠标MOVE事件的处理方法。下面介绍一下鼠标元素拖动的方法:
其JS声明如下(DragAdnDrop.js):
//
通过使用全局变量来记录鼠标的位置和是否停止拖动等信息
// 当前是否设置鼠标捕获
var isMouseCaptured;
// 全局位置变量
var mouseVerticalPosition;
var mouseHorizontalPosition;
Silverlight_JsWeb.DragDrop = function ()
{
}
Silverlight_JsWeb.DragDrop.prototype =
{
handleLoad: function (plugIn, userContext, rootElement)
{
this .plugIn = plugIn;
// 按钮事件挂钩示例: 查找按钮,然后附加事件处理程序
var DragRec = rootElement.findName( " DragRec " );
DragRec.addEventListener( " MouseLeftButtonDown " , Silverlight.createDelegate( this , this .handleMouseLeftButtonDown));
DragRec.addEventListener( " MouseMove " , Silverlight.createDelegate( this , this .handleMouseMove));
DragRec.addEventListener( " MouseLeftButtonUp " , Silverlight.createDelegate( this , this .handleMouseLeftButtonUp));
},
// 鼠标左键单击处理程序
handleMouseLeftButtonDown: function (sender, mouseEventArgs)
{
// 获取当前鼠标左键按下的位置
mouseVerticalPosition = mouseEventArgs.getPosition( null ).y;
mouseHorizontalPosition = mouseEventArgs.getPosition( null ).x;
isMouseCaptured = true ;
sender.CaptureMouse();
},
// 鼠标离开处理程序
handleMouseMove: function (sender, mouseEventArgs)
{
var item = sender;
if (isMouseCaptured)
{
// 计算当前对象的位置.
var deltaV = mouseEventArgs.getPosition( null ).y - mouseVerticalPosition;
var deltaH = mouseEventArgs.getPosition( null ).x - mouseHorizontalPosition;
var newTop = deltaV + item[ " Canvas.Top " ];
var newLeft = deltaH + item[ " Canvas.Left " ];
// 对鼠标选中的元素设置新的移动位置.
item[ " Canvas.Top " ] = newTop;
item[ " Canvas.Left " ] = newLeft;
// 更新全局位置变量.
mouseVerticalPosition = mouseEventArgs.getPosition( null ).y;
mouseHorizontalPosition = mouseEventArgs.getPosition( null ).x;
}
},
// 鼠标左键松开处理程序
handleMouseLeftButtonUp: function (sender, mouseEventArgs)
{
isMouseCaptured = false ;
sender.ReleaseMouseCapture();
mouseVerticalPosition = - 1 ;
mouseHorizontalPosition = - 1 ;
}
}
上面代码中有两个方法要说明一下:
retval
=
object.CaptureMouse()
该方法的调用者object即是支持被拖动的元素,当元素对象支持拖动时,该方法调用返回true
与上面方法相对应的是 object. ReleaseMouseCapture(), 它会放弃对当前元素的鼠标捕获操作。
其最终的运行结果如下:
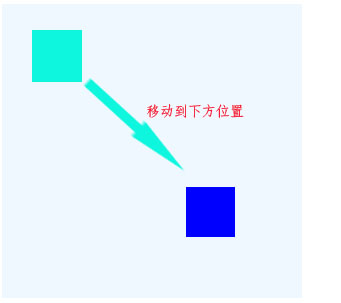
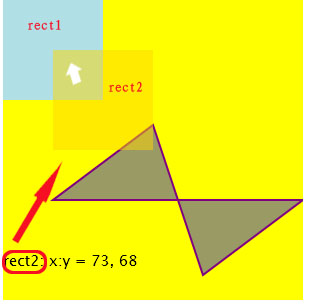
前两个DEMO是对鼠标基本事件的操作。下面将会演示一下UIElement的Bubble问题。写过IE脚本的朋友应该都会知道这个元素冒泡的问题这个问题有时我们希望发生的,有时即是我们不希望看到了。在XMAL中,先声明元素在整个Canvas的最下面,而后声明的元素在最上面。这样当我们将鼠标从上面的元素移入到下面的元素时,就会出现下图中所显示的结果(注意在两个元素交叉区域时下方所显示的元素名称):
与上面方法相对应的是 object. ReleaseMouseCapture(), 它会放弃对当前元素的鼠标捕获操作。
其最终的运行结果如下:

前两个DEMO是对鼠标基本事件的操作。下面将会演示一下UIElement的Bubble问题。写过IE脚本的朋友应该都会知道这个元素冒泡的问题这个问题有时我们希望发生的,有时即是我们不希望看到了。在XMAL中,先声明元素在整个Canvas的最下面,而后声明的元素在最上面。这样当我们将鼠标从上面的元素移入到下面的元素时,就会出现下图中所显示的结果(注意在两个元素交叉区域时下方所显示的元素名称):

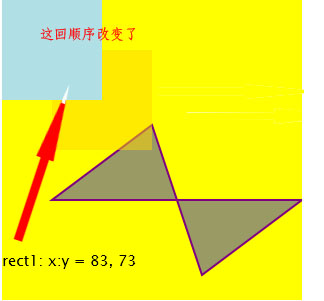
因为rect2是在rect1之后声明的,所以在交叉区域显示的是rect2。当然我们可以通过在相应元素中设置Canvas.ZIndex 属性来改变这里顺序,如下所示:
<
Rectangle
x:Name ="Rect1"
Width ="100" Height ="100"
Fill ="PowderBlue" Canvas.ZIndex ="3" />
< Rectangle
x:Name ="Rect2"
Canvas.Top ="50" Canvas.Left ="50"
Width ="100" Height ="100"
Fill ="Gold" Opacity ="0.5" Canvas.ZIndex ="2" />
< Polygon x:Name ="Polygon1"
Points ="50,200 150,125 200,275 300,200" Stroke ="Purple" StrokeThickness ="2" Canvas.ZIndex ="1" >
< Polygon.Fill >
< SolidColorBrush Color ="Blue" Opacity ="0.4" />
</ Polygon.Fill >
</ Polygon >
这样我们就可以控件鼠标事件的响应顺序了,如下图。
好了,今天的内容就到这里了。
本文转自 daizhenjun 51CTO博客,原文链接:http://blog.51cto.com/daizhj/86308,如需转载请自行联系原作者


 632
632

 被折叠的 条评论
为什么被折叠?


