


Spring概述
Spring 是一个开源框架,是为了解决企业应用程序开发复杂性而创建的。框架的主要优势之一就是其分层架构,分层架构允许您选择使用哪一个组件,同时为 J2EE 应用程序开发提供集成的框架。简单来说,Spring是一个分层的JavaSE/EE full-stack(一站式) 轻量级开源框架。
优点
- 低侵入式设计,代码污染极低
- 独立于各种应用服务器,基于Spring框架的应用,可以真正实现Write Once,Run Anywhere的承诺
- Spring的DI机制降低了业务对象替换的复杂性,提高了组件之间的解耦
- Spring的AOP支持允许将一些通用任务如安全、事务、日志等进行集中式管理,从而提供了更好的复用
- Spring的ORM和DAO提供了与第三方持久层框架的良好整合,并简化了底层的数据库访问
- Spring并不强制应用完全依赖于Spring,开发者可自由选用Spring框架的部分或全部
Spring的IoC
IOC(inversion of control)的中文解释是“控制反转”,作用是将对象的创建反转给spring框架来创建和管理。
优点
在IoC环境中,资源不由使用资源的双方管理,而由不使用资源的第三方管理,即Spring的IoC来管理,这可以带来很多好处。第一,资源集中管理,实现资源的可配置和易管理。第二,降低了使用资源双方的依赖程度,降低开发过程中的耦合度
IoC的演变过程
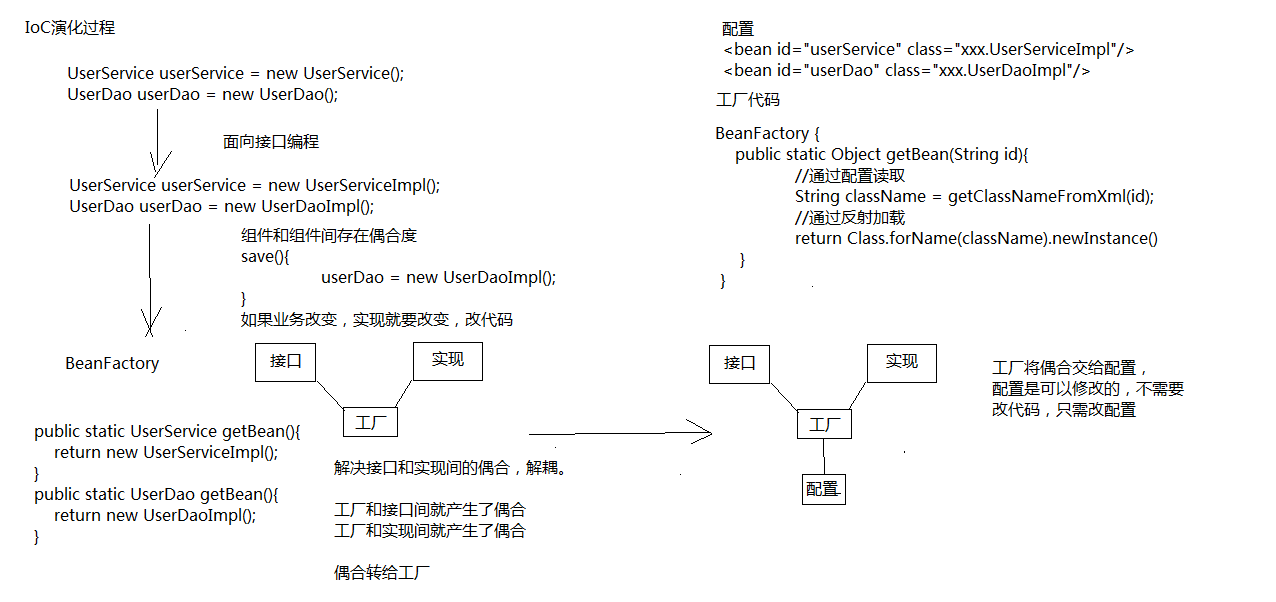
IoC的作用就是将所有的类交给Spring框架来管理.
Spring Ioc基本环境搭建
1. 下载Spring环境
-
官网: https://spring.io/ 提供Spring框架及其相关产品的介绍和使用情况
-
spring仓库: https://repo.spring.io/ 提供独立版下载
2. 拷贝jar包
-
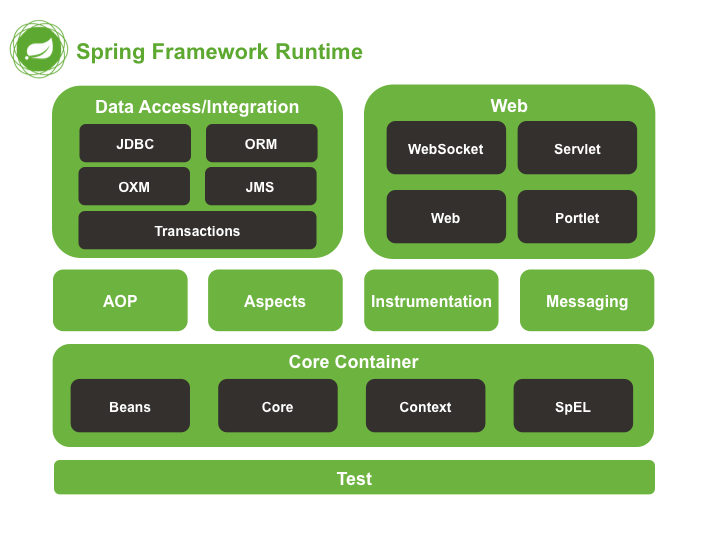
搭建基本的spring环境,取决于spring 核心容器的构建依赖,即Beans,Core,Context,SpEL
4个模块。
4个核心模块分别对应spring-beans-xx.jar,spring-core-xx.jar,spring-context-xx.jar,spring-context-support.xx.jar,spring-expression-xx.jar五个jar环境启动问题:环境启动会会缺失日志系统。
- 导入jcl的日志jar
- 导入log4j.properties文件
3. 编写接口以及实现类
- 接口
public interface UserService { void login(); } - 实现
public class UserServiceImpl implements UserService {
@Override
public void login() {
	System.out.println("调用用户登录的逻辑.....");
}
}
4. 编写Spring的配置文件
-
<?xml version="1.0" encoding="UTF-8"?>
<beans xmlns="http://www.springframework.org/schema/beans"
xmlns:xsi="http://www.w3.org/2001/XMLSchema-instance"
xsi:schemaLocation="http://www.springframework.org/schema/beans
    http://www.springframework.org/schema/beans/spring-beans.xsd ">
<!-- 装配一个bean -->
<bean id="userService" class="org.itpx.spring.service.impl.UserServiceImpl"></bean>
</beans>
注意:xml schema头信息的添加
5. Spring 框架启动加加载配置代码
- 在测试类中去调用
// 加载spring启动配置
ApplicationContext context = new ClassPathXmlApplicationContext("spring.xml");
// 执行我们自己的逻辑
UserService service = (UserService) context.getBean("userService");
service.login();
// 释放资源
((ClassPathXmlApplicationContext) context).close();
通过ApplicationContext获取bean
Spring 日志系统配置
- jcl方案的配置
- slf4j配置方案
XmlBeanFactory
- XmlBeanFactory是Spring的早期版本,目前已经被废弃
BeanFactory beanFactory = new XmlBeanFactory(new ClassPathResource("applicationContext.xml")); - ApplicationContext加载方式是框架启动时就开始创建所有的bean
-
XmlBeanFactory加载方式是用到bean时再加载
在开发过程中,通过时间换空间的方式解决加载问题。
- 先加载,启动慢,但是每次使用快
- 后加载,启动快,在使用时会有滞后
- 综合考虑,程序启动的时长用户关心程度不高,但运行时效率用户比较关心。
Dependency Injection
依赖注入,Spring的IoC提供管理bean的方式,也提供了给bean注入值的功能。
 <!-- 配置Bean -->
 <bean id="userService" class="org.itpx.spring.service.impl.UserServiceImpl">
	<!-- 为bean注入参数 -->
	<property name="name" value="张三" />
 </bean>
Spring 配置文件
schema头文件的本地配置
- 定位到eclipse中的菜单
Window->Preferences->XML->XML Catalog页面中 - 添加
User Specified Entries Location为spring环境解压包中schma对应版本的xsdKey为 头文件中带网址的xsd后缀的网络路径-
Key type为Schema location例如:
<?xml version="1.0" encoding="UTF-8"?>
<beans xmlns="http://www.springframework.org/schema/beans"
	xmlns:xsi="http://www.w3.org/2001/XMLSchema-instance"
	xsi:schemaLocation="http://www.springframework.org/schema/beans
      http://www.springframework.org/schema/beans/spring-beans.xsd">
</beans>
Key: 为http://www.springframework.org/schema/beans/spring-beans.xsd
Bean标签中核心属性
Bean标签是用来定义需要装配的java类
-
id和name属性: 起到标识对象的作用
- id属性用来配置bean的名称,具有唯一性
- id属性中不能出现特殊字符
- name属性用来配置bean的名称,具有唯一性
- name属性中可以出现特殊字符
- id属性等价于name属性
- 开发中习惯用id属性
-
class属性:用来配置类的全路径,方便spring框架反射创建对象
-
scope属性: 用来描述bean的作用范围
- singleton: 默认值,单例模式。spring创建bean对象时会以单例方式创建。
- prototype: 多例模式。spring创建bean对象时会以多例模式创建。
- request: 针对Web应用。spring创建对象时,会将此对象存储到request作用域。
- session: 针对Web应用。spring创建对象时,会将此对象存储到session作用域。
- globalSession: 针对Web应用,单点登录环境下,非单点登录环境时,等同session作用域。
-
init-method属性:spring为bean初始化提供的回调方法
- destroy-method属性:spring为bean销毁时提供的回调方法
- 销毁方法针对的都是单例bean
Spring实例化bean的方式
1. 构造方法的实例化
 <!-- 配置Bean -->
 <bean id="userService" class="org.itpx.spring.service.impl.UserServiceImpl">
	<!-- 为bean注入参数 -->
	<property name="name" value="张三" />
 </bean
2. 静态工厂实例化的方法
- spring 配置
<!-- 静态工厂方法 --> <bean id="userService" class="org.itpx.spring.factory.UserServiceStaticFactory" factory-method="getBean"> <property name="name" value="张三"></property> </bean> - 静态工厂类
1public class UserServiceStaticFactory { public static UserService getBean() { return new UserServiceImpl(); } }
3. 实例工厂实例化的方法
- spring 配置
<!-- 实例化工厂的方式 --> <bean id="userService" factory-bean="userServiceFactory" factory-method="getBean"> <property name="name" value="张三" /> </bean> <!-- 工厂实例 --> <bean id="userServiceFactory" class="org.itpx.spring.factory.UserServiceInstanceFactory"></bean> -
静态工厂类
-
public class UserServiceInstanceFactory {
public UserService getBean() {
	return new UserServiceImpl();
}
}
Spring的属性注入
常规属性注入
-
构造方法的注入
 <!-- 配置Bean -->
 <bean id="userService" class="org.itpx.spring.service.impl.UserServiceImpl">
	<!-- 通过构造函数注入参数 -->
	<constructor-arg name="name" value="李四" />
 </bean>
public UserServiceImpl(String name) { this.name = name; } -
set方法的注入
 <!-- 配置Bean -->
 <bean id="userService" class="org.itpx.spring.service.impl.UserServiceImpl">
	<!-- 通过属性的set方法注入数据 -->
	<property name="name" value="王五" />
 </bean>
public void setName(String name) { this.name = name; } -
对象属性注入
-
单一对象
<!-- 配置Bean -->
 <bean id="userService" class="org.itpx.spring.service.impl.UserServiceImpl">
<!-- 通过属性的set方法注入对象数据 -->
<property name="userDao" ref="userDao" />
 </bean>
 <bean id="userDao" class="org.itpx.spring.dao.impl.UserDaoImpl"></bean>
数组
-
<!-- 配置Bean --> <bean id="userService" class="org.itpx.spring.service.impl.UserServiceImpl"> <!-- 通过set方法为对象注入数组类型的数据 --> <property name="numbers"> <array> <value>123</value> <value>223</value> <value>323</value> </array> </property> </bean> - List对象
<!-- 配置Bean --> <bean id="userService" class="org.itpx.spring.service.impl.UserServiceImpl"> <!-- 通过set方法为对象注入list类型的数据 --> <property name="list"> <list> <value>123</value> <value>223</value> <value>323</value> </list> </property> </bean> - Map对象
<!-- 配置Bean --> <bean id="userService" class="org.itpx.spring.service.impl.UserServiceImpl"> <!-- 通过set方法为对象注入map类型的数据 --> <property name="map"> <map> <entry key="a" value="张三"></entry> <entry key="b" value="李四"></entry> </map> </property> </bean> - properties
 <!-- 配置Bean -->
 <bean id="userService" class="org.itpx.spring.service.impl.UserServiceImpl">
<!-- 通过set方法为对象注入properties类型的数据 -->
<property name="properties">
	<props>
		<prop key="a">aaa</prop>
		<prop key="b">bbb</prop>
		<prop key="c">ccc</prop>
	</props>
</property>
 </bean>
-
P名称空间的属性注入
通过直接写属性名的方式注入属性值。
- 引入p命名空间
xmlns:p="http://www.springframework.org/schema/p"
使用
<!-- 配置Bean -->
 <bean id="userService" class="org.itpx.spring.service.impl.UserServiceImpl"
	p:name="王六">
 </bean>
C名称空间的属性注入
通过直接写构造参数名的方式注入属性值。
- 引入c命名空间
xmlns:c="http://www.springframework.org/schema/c" - 使用
 <!-- 配置Bean -->
 <bean id="userService" class="org.itpx.spring.service.impl.UserServiceImpl"
	c:name="赵八">
 </bean>
Spring EL的属性注入
-
通过EL方式替换
ref属性 引用其他对象<!-- 配置Bean --> <bean id="userService" class="org.itpx.spring.service.impl.UserServiceImpl"> <property name="userDao" value="#{userDao}" /> </bean> <bean id="userDao" class="org.itpx.spring.dao.impl.UserDaoImpl"></bean> -
EL方式结合p命名空间使用
<bean id="user" class="org.itpx.spring.service.User" p:idCard="#{idCard}">
</bean>
<bean id="idCard" class="org.itpx.spring.service.IDCard" p:id="sss"></bean>
Spring和servlet项目整合
-
jar包
4个核心模块
spring-beans-xx.jar,spring-core-xx.jar,spring-context-xx.jar,spring-context-support.xx.jar,spring-expression-xx.jar五个jar1个web模块
spring-web-xx.jar -
在web.xml中配置spring框架加载启动
<listener>
	<listener-class>org.springframework.web.context.ContextLoaderListener</listener-class>
</listener>
<context-param>
	<param-name>contextConfigLocation</param-name>
	<param-value>classpath:applicationContext.xml</param-value>
</context-param>
在web.xml中配置listener去监听servlet的启动,启动时,让spring框架也启动,用来接管项目中的对象创建。
注意:
spring默认加载的是WEB-INF下的applicationContext.xml文件。如果需要更改,则要在web.xml中配置上下文参数context-param: contextConfigLocationparam-value: classpath:applicationContext.xml
-
业务代码实现
- 在spring配置中管理组件,创建和依赖注入
<!-- 配置业务组件 --> <bean id="userService" class="org.itpx.spring.service.impl.UserServiceImpl"> <!-- 注入业务层的依赖 --> <property name="userDao" ref="userDao"></property> </bean> <!-- 配置数据持久组件 --> <bean id="userDao" class="org.itpx.spring.dao.impl.UserDaoImpl"></bean> -
在代码中获得组件
// 获取上下文
WebApplicationContext context = WebApplicationContextUtils.findWebApplicationContext(getServletContext());


 269
269

 被折叠的 条评论
为什么被折叠?
被折叠的 条评论
为什么被折叠?
 到【灌水乐园】发言


