


虽然说app与网络打交道比较多但是本地存储数据库sqlite还是有它很重要的责任
那来一起学习一下sqlite吧
android的存储方式有如下几种
http://blog.csdn.net/a351945755/article/details/50900652
等我有时间就整理下
sharedpreferences
文件存储
sqlite数据库
contentprovider
网络
我们来看看sqlite
他通过SQLiteOpenHelper这个抽象类;来创建和打开数据库
public class DBHelper extends SQLiteOpenHelper {
    private static final String DATA_NAME = "jaytang.db";
    private static final int version = 1;// 版本
    private static final String TAG = "DBHelper";// 版本

    public DBHelper(Context context) {
        super(context, DATA_NAME, null, version);
        // TODO Auto-generated constructor stub
    }

    /**
     * 数据库第一次创建时回调该方法,一般做数据库的初始化操作 建表,添加数据等 SQLiteDatabase:增删查改
     */
    @Override
    public void onCreate(SQLiteDatabase db) {
        // TODO Auto-generated method stub
        Log.v(TAG, "创建表");
        db.execSQL("create table t_book(_id integer primary key autoincrement,name text,price integer)");
    }

    @Override
    public void onUpgrade(SQLiteDatabase db, int oldVersion, int newVersion) {
        // TODO Auto-generated method stub

    }

}
重写一个DBhelper来继承SQLiteOpenHelper
并重写他里面的方法;在oncreate方法里面新建一个表
db.execSQL("create table t_book(_id integer primary key autoincrement,name text,price integer)");
这样我们就新建了一个表了
可以在 project Explorer里面查看我们新建的数据库jaytang.db
再来写一个工具类来实现数据库的增删查改方法
通过数据库的辅助类SQLiteDatabase来操作
/**
 * 操作数据库的工具类
 *
 * @author Jay-Tang
 *
 */
public class DButils {
    public static final String TABLE = "t_book";
    public static final String ID = "id";
    public static final String NAME = "name";
    public static final String PRICE = "price";
    private DBHelper dbhelper;

    public DButils(Context context) {
        dbhelper = new DBHelper(context);

    }

    // 保存操作
    public int save(ContentValues values) {
        // 通过数据库的辅助类来获取SQliteDatabase
        // 没有设置成全局因为每个操作都要用
        SQLiteDatabase db = dbhelper.getWritableDatabase();
        /**
         * 插入一条记录 表名 空字段回调:目的在于拼sql语句时不报错 第三个参数是键值对 插入字段的key和value
         */
        long id = db.insert(TABLE, null, values);
        db.close();
        return (int) id;
    }

    // 删除操作
    public int delete(int id) {
        int effectNum = 0;
        SQLiteDatabase db = dbhelper.getWritableDatabase();
        /**
         * 删除操作 表 条件 条件操作 源码是拼串构成的
         */
        effectNum = db.delete(TABLE, ID + "=?",
                new String[] { String.valueOf(id) });
        db.close();
        return effectNum;
    }

    // 更新要求ContentValues传一个id过来
    public int update(ContentValues values) {
        // 更新那个位置就传那个位置的id过来
        String id = values.getAsString(ID);
        // 影响的行数
        int effecNums = 0;
        SQLiteDatabase db = dbhelper.getWritableDatabase();
        effecNums = db.update(TABLE, values, ID + "=" + id, null);
        db.close();
        return effecNums;
    }

    // 查询
    public Cursor findcursor() {
        SQLiteDatabase db = dbhelper.getReadableDatabase();
        Cursor cursor = db.query(TABLE, null, null, null, null, null, null,
                "price disc");
        return cursor;
        // 假如是返回游标不嫩关闭数据库
    }

    // 查询,返回的是list<map>
    public List<Map<String, Object>> find() {
        List<Map<String, Object>> data = null;
        SQLiteDatabase db = dbhelper.getReadableDatabase();
        Cursor cursor = db.query(TABLE, null, null, null, null, null, null,
                "price disc");
        // 假如有数据
        if (cursor.getCount() > 0) {
            data = new ArrayList<Map<String, Object>>();
        }
        // 遍历游标,把数据存放在list中
        while (cursor.moveToNext()) {
            Map<String, Object> map = new HashMap<String, Object>();
            map.put(ID, cursor.getInt(cursor.getColumnIndex(ID)));
            map.put(NAME, cursor.getInt(cursor.getColumnIndex(NAME)));
            map.put(PRICE, cursor.getInt(cursor.getColumnIndex(PRICE)));
            data.add(map);
        }
        db.close();
        return data;
    }

    public void pay() {

    }

}
上面的工具类DButils能基本实现增删改查的效果
//工具类是可以复用的 所以尽量写好,并且进行单元测试
布局文件如下
<LinearLayout xmlns:android="http://schemas.android.com/apk/res/android"
    xmlns:tools="http://schemas.android.com/tools"
    android:layout_width="match_parent"
    android:layout_height="match_parent"
    android:orientation="vertical" >

    <TextView
        android:layout_width="wrap_content"
        android:layout_height="wrap_content"
        android:layout_gravity="center"
        android:layout_marginTop="10dp"
        android:text="书籍管理系统"
        android:textColor="#0000ff"
        android:textSize="22sp" />

    <LinearLayout
        android:layout_width="fill_parent"
        android:layout_height="wrap_content"
        android:gravity="center_vertical"
        android:orientation="horizontal" >

        <TextView
            style="@style/MyTitleStyle"
            android:text="编号" />

        <TextView
            style="@style/MyTitleStyle"
            android:layout_weight="2"
            android:text="书名" />

        <TextView
            style="@style/MyTitleStyle"
            android:text="价格" />

        <ImageView
            android:layout_width="30dp"
            android:layout_height="30dp"
            android:src="@drawable/ic_menu_delete"
            android:visibility="invisible" />
    </LinearLayout>

    <ListView
        android:id="@android:id/list"
        android:layout_width="match_parent"
        android:layout_height="0dp"
        android:layout_weight="1"
        android:divider="#0000ff"
        android:dividerHeight="2dp" >
    </ListView>

    <LinearLayout
        android:layout_width="match_parent"
        android:layout_height="wrap_content" >

        <EditText
            android:id="@+id/name_et"
            android:layout_width="0dp"
            android:layout_height="wrap_content"
            android:layout_weight="2"
            android:hint="书名" />

        <EditText
            android:id="@+id/price_et"
            android:layout_width="0dp"
            android:layout_height="wrap_content"
            android:layout_weight="1"
            android:hint="价格"
            android:inputType="number" />

        <Button
            android:layout_width="wrap_content"
            android:layout_height="wrap_content"
            android:onClick="add"
            android:text="添加" />
    </LinearLayout>

</LinearLayout>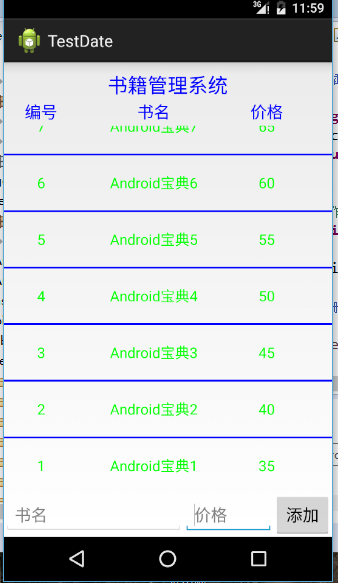


 604
604


 被折叠的 条评论
为什么被折叠?
被折叠的 条评论
为什么被折叠?
 到【灌水乐园】发言


