


参考资料
github官网给出的tutorial;
tutorial
rendering-a-route
hashHistory
You should get the same screen as before, but this time with some junk in the URL. We're using
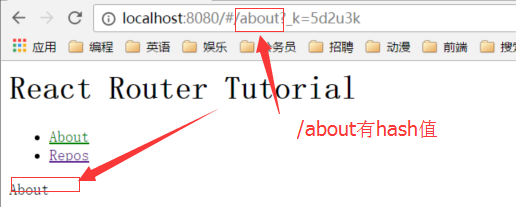
hashHistory--it manages the routing history with the hash portion of the url. It's got that extra junk to shim some behavior the browser has natively when using real urls. We'll change this to use real urls later and lose the junk, but for now, this works great because it doesn't require any server-side configuration.
说明:hashHistory管理的是url的hash部分,通过hash值匹配url
navigating-with-link
Link
Perhaps the most used component in your app is
Link.
说明: Link. 也是一个组件,通过他方便我们找到路由其他部分
import { Link } from 'react-router'
<li><Link to="/about">About</Link></li>
nested-routes
Nested UI and Nested URLs
Have you ever noticed your app is just a series of boxes inside boxes inside boxes? Have you also noticed your URLs tend to be coupled to that nesting? For example given this url,
/repos/123, our components would probably look like this:<App> {/* / */} <Repos> {/* /repos */} <Repo/> {/* /repos/123 */} </Repos> </App>And our UI something like:
         +-------------------------------------+
         | Home Repos About                    | <- App
         +------+------------------------------+
         |      |                              |
Repos -> | repo |  Repo 1                      |
         |      |                              |
         | repo |  Boxes inside boxes          |
         |      |  inside boxes ...            | <- Repo
         | repo |                              |
         |      |                              |
         | repo |                              |
         |      |                              |
         +------+------------------------------+
React Router embraces this by letting you nest your routes, which automatically becomes nested UI.
说明:嵌套ui(路由,router可以理解为一个组件)
 <Route path="/" component={App}>
      {/* make them children of `App` */}
      <Route path="/repos" component={Repos}/>
      <Route path="/about" component={About}/>
    </Route>
Next, render children inside of App.
// modules/App.js
// ...
  render() {
    return (
      <div>
        <h1>React Router Tutorial</h1>
        <ul role="nav">
          <li><Link to="/about">About</Link></li>
          <li><Link to="/repos">Repos</Link></li>
        </ul>

        {/* add this */}
        {this.props.children}

      </div>
    )
  }
// ...
Alright, now go click the links and notice that the App component continues to render while the child route's component gets swapped around as this.props.children :)
说明:嵌套组件配置之后,App就可以管理子组件Repos,About了。
{this.props.children}显示的就是url对应的子组件的内容。
index.js只是配置路由关系而已,不处理应用的呈现关系。呈现关系是由url决定的。
比如 http://localhost:8080/,应用找的是app这个组件,然后根据这个组件的route,呈现自己的层级关系。
The best way to build large things is to stitch small things together.大而化小,化繁为简。
What happens if you move the About route outside of App?,如果将about放回原处。
app不控制about组件。点击about连接还是页面跳转
Active Links
Active Styles
<li><Link to="/about" activeStyle={{ color: 'red' }}>About</Link></li>
说明:多个样式,使用json格式
<li><Link to="/about" activeStyle={{color:'red',fontSize:'30px'}}>About</Link></li>
注意font-size变成驼峰。或者使用
<li><Link to="/about" activeStyle={{"color":'red',"font-size":'30px'}}>About</Link></li>
双引号key格式
Active Class Name
<li><Link to="/about" activeClassName="active">About</Link></li>
Nav Link Wrappers
navLink封装。
NavLink.js
// modules/NavLink.js
import React from 'react'
import { Link } from 'react-router'

export default React.createClass({
  render() {
    return <Link {...this.props} activeClassName="active"/>
  }
})
Now you can go change your links to NavLinks.
// modules/App.js
import NavLink from './NavLink'

// ...

<li><NavLink to="/about">About</NavLink></li>
<li><NavLink to="/repos">Repos</NavLink></li>
Params
URL Params
These URLs would match a route path like this:
/repos/:userName/:repoName
说明:The parts that start with : are URL parameters whose values will be parsed out and made available to route components onthis.props.params[name].
通过this.props.params[name].取得参数。例如应用中配置的 <Route path="/repos/:userName/:repoName" component={Repo}/>那么可以根据{this.props.params.repoName}找到对应的repoName,例如
http://localhost:8080/#/repos/reactjs/react-router,得到的结果就是react-router,如果{this.props.params.userName}得到的就是reactjs了。
More Nesting
nest the Repo route under the Repos route. Then go render this.props.children in Repos.
// index.js
// ...
<Route path="/repos" component={Repos}>
  <Route path="/repos/:userName/:repoName" component={Repo}/>
</Route>
// Repos.js
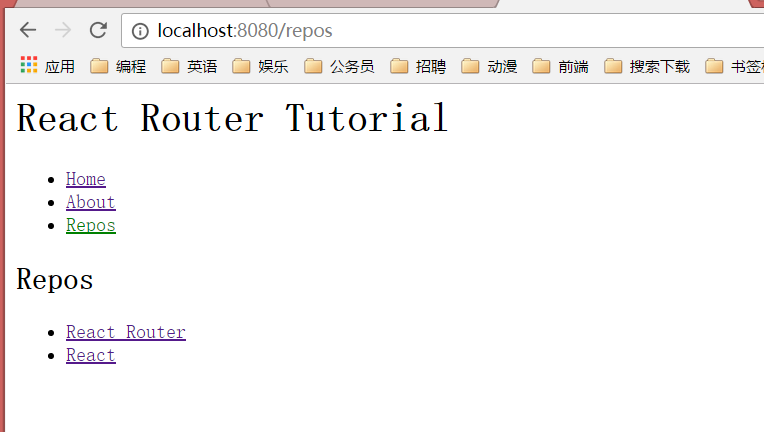
// ...
<div>
<h2>Repos</h2>
<ul>
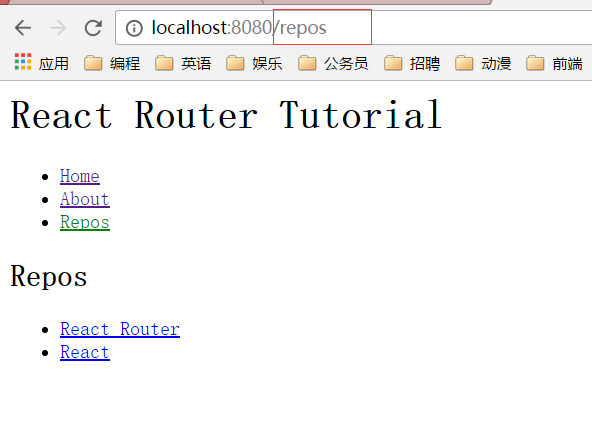
<li><Link to="/repos/reactjs/react-router">React Router</Link></li>
<li><Link to="/repos/facebook/react">React</Link></li>
</ul>
{/* will render `Repo.js` when at /repos/:userName/:repoName */}
{this.props.children}
</div>
说明:定义route层级关系之后,利用this.props.children显示子组件内容.如上定义了repos>repo之后,在父组件repos里面,利用this.props.children就可以显示(预览)子组件的内容了。
Active Links
Notice how both the /repos link up top and the individual repo links are both active? When child routes are active, so are the parents.
说明:子组件active之后,父组件如果设置了active,也相应的会被active了。
Index Routes
When we visit / in this app it's just our navigation and a blank page.
if we have any children in App, and if not, render Home:
说明:根目录 / 指定。
// modules/App.js
import Home from './Home'

// ...
<div>
  {/* ... */}
  {this.props.children || <Home/>}
</div>
//...
如果url有渲染子组件,那么就显示子组件内容。如果没有就显示home组件。如
url:http://localhost:8080/#/?_k=sn17mk 为根目录,后面没有带hash,那么显示的内容为
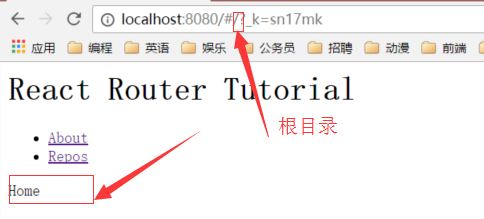
如果有hash值的话,显示就是对应的子组件内容了。
另一种处理方式,就是代码和结构分离,利用配置的方式去指定。
indexRoute
<Route path="/" component={App}>
      {/* add it here, as a child of `/` */}
      <IndexRoute component={Home}/>
      <Route path="/about" component={About}/>
    </Route>
Index Links
如果使用普通的自定义navlink的方式。
<li><NavLink to="/">Home</NavLink></li>
这种方式,当url为/xx的时候。/根目录也会被active,使用下面的两种方式就可以避免了。
IndexLink
// App.js
import { IndexLink } from 'react-router'

// ...
<li><IndexLink to="/" activeClassName="active">Home</IndexLink></li>
使用这个IndexLink标签而不是使用自定义的NavLink标签是为了防止activeClass 找父route的时候对/根目录都active了。
onlyActiveOnIndex
这种方式也可以达到上面效果。
<li><Link to="/" activeClassName="active" onlyActiveOnIndex={true}>Home</Link></li>
这两种方式都可以
clean-urls
The URLs in our app right now are built on a hack: the hash. It's the default because it will always work, but there's a better way.
Modern browsers let JavaScript manipulate the URL without making an http request, so we don't need to rely on the hash (
#) portion of the url to do routing, but there's a catch (we'll get to it later).
可以不以来hash来制定url,现代浏览器可以制定url,不需要请求http服务。
Configuring Browser History
browserHistory
Open up index.js and import browserHistory instead of hashHistory.
// index.js
// ...
// bring in `browserHistory` instead of `hashHistory`
import { Router, Route, browserHistory, IndexRoute } from 'react-router'

render((
  <Router history={browserHistory}>
    {/* ... */}
  </Router>
), document.getElementById('app'))
利用 browserHistory instead of hashHistory.来指定页面跳转
使用browserHistory之后链接地址就不需要hash值了,为常见的链接了。客户端js可以改变url显示,不需要向服务器发送请求。
但是如果刷新会出现
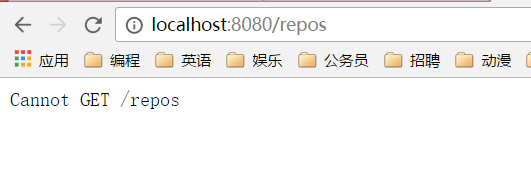 因为这个链接是客户端链接,可以理解为是一个假连接,或者是hash的一种变换。
Configuring Your Server
Your server needs to deliver your app no matter what URL comes in, because your app, in the browser, is manipulating the URL. Our current server doesn't know how to handle the URL.
The Webpack Dev Server has an option to enable this. Open up package.json and add --history-api-fallback.
"start": "webpack-dev-server --inline --content-base . --history-api-fallback"
We also need to change our relative paths to absolute paths in index.html since the URLs will be at deep paths and the app, if it starts at a deep path, won't be able to find the files.
<!-- index.html -->
<!-- index.css -> /index.css -->
<link rel="stylesheet" href="/index.css">

<!-- bundle.js -> /bundle.js -->
<script src="/bundle.js"></script>
Stop your server if it's running, then npm start again. Look at those clean URLs :)
需要配置package.json,让服务器知道如何处理请求,另外也要修改index.html里面的index.css,bundle.js路径,需要将相对路径--》绝对路径
 刷新可以,深层次链接的话,比如点repos的子连接,刷新也可以了。★★★★★html里面的js,css一定要改相对路径为绝对路径。
productionish-server
None of this has anything to do with React Router
react router与服务器无关。为了更接近实际,
配置生产环境。
注意看文档是怎么配置的。
注意,这里配置运行环境的时候window要使用cmd命令窗口,不能使用powershell,或者使用类unix的bash环境(比如git bash),就可以直接使用命令了。
NODE_ENV=production npm start
# For Windows users:
# SET "NODE_ENV=production" && npm start
按照示例代码,把index.html和index.css都要挪到public文件夹(正式环境发布文件夹,压缩后的代码都会放在这里。)
其他代码也是按照示例去修改。
navigating
Navigating Programatically
While most navigation happens with
Link, you can programmatically navigate around an application in response to form submissions, button clicks, etc.
链接操作。再提交表单,或者点击事件的时候页面url的变迁有两种方式
1.使用 browserHistory
browserHistory.push(path)
这种方式有个弊端就是链接必须是history认识的,不然没有办法作用。比如在demo中输入了userName:2,pwd:3;url:http://localhost:8080/repos/2/3 url就没有作用了。页面跳转,history找不到这个url。显示为空了。
2.
You can also use the router that Router provides on "context". First, you ask for context in the component, and then you can use it:
export default React.createClass({

  // ask for `router` from context
  contextTypes: {
    router: React.PropTypes.object
  },

  // ...

  handleSubmit(event) {
    // ...
    this.context.router.push(path)
  },

  // ..
})
使用router提供的context上下文对象。使用这种方式,即使上面的url也可以正常显示。
server-rendering
server渲染主要通过服务端利用模板,渲染给客户端。注意数据同步的问题。
相关配置,直接参考doc文档。
doc
要点参考
RouteConfiguration
Decoupling the UI from the URL
分离ui和url配置。
<Router>
    <Route path="/" component={App}>
      {/* Show the dashboard at / */}
      <IndexRoute component={Dashboard} />
      <Route path="about" component={About} />
      <Route path="inbox" component={Inbox}>
        <Route path="messages/:id" component={Message} />
      </Route>
    </Route>
  </Router>
上面的配置inbox下面再配置message组件,ui和url融合在一起。
如果要分离的话使用下面的方式,这样类似分模块,可以一层一层细分route
<Router>
    <Route path="/" component={App}>
      <IndexRoute component={Dashboard} />
      <Route path="about" component={About} />
      <Route path="inbox" component={Inbox} />

      {/* Use /messages/:id instead of /inbox/messages/:id */}
      <Route component={Inbox}>
        <Route path="messages/:id" component={Message} />
      </Route>
    </Route>
  </Router>
这种方式访问的话,就不能使用/inbox/messages/:id 访问方式了,而是要使用/messages/123456,这样的方式去访问了。要解决这个问题,需要用到下面的Preserving urls
Preserving URLs
redirect
Wait a minute ... we just changed a URL! That's not cool. Now everyone who had a link to /inbox/messages/5 has a broken link. :(
Not to worry. We can use a <Redirect> to make sure that URL still works!
前面ui和url分离了。导致url需要变化,如果我们不想改变url访问路径,这里使用redirect来处理。
<Router>
    <Route path="/" component={App}>
      <IndexRoute component={Dashboard} />
      <Route path="about" component={About} />

      <Route path="inbox" component={Inbox}>
        {/* Redirect /inbox/messages/:id to /messages/:id */}
        <Redirect from="messages/:id" to="/messages/:id" />
      </Route>

      <Route component={Inbox}>
        <Route path="messages/:id" component={Message} />
      </Route>
    </Route>
  </Router>
Now when someone clicks on that link to /inbox/messages/5 they'll automatically be redirected to /messages/5. ?
url还是会变化,不过是框架自己去变化的。
Enter and Leave Hooks
Routes may also define
onEnterandonLeavehooks that are invoked once a transition has been confirmed. These hooks are useful for various things like requiring auth when a route is entered and saving stuff to persistent storage before a route unmounts.During a transition,
onLeavehooks run first on all routes we are leaving, starting with the leaf route on up to the first common ancestor route. Next,onEnterhooks run starting with the first parent route we're entering down to the leaf route.Continuing with our example above, if a user clicked on a link to
/aboutfrom/messages/5, the following hooks would run in this order:
onLeaveon the/messages/:idrouteonLeaveon the/inboxrouteonEnteron the/aboutroute
这两个钩子,可以用于权限认证。在一个transition变迁过程(从一个urlA--》另一个urlB)中,onLeave先跑,从urlA叶子节点跑到父亲节点,然后跳转urlB,从urlB的父亲节点跑到根结节。
Configuration with Plain Routes
以json对象的方式书写路由关系
const routes = {
  path: '/',
  component: App,
  indexRoute: { component: Dashboard },
  childRoutes: [
    { path: 'about', component: About },
    {
      path: 'inbox',
      component: Inbox,
      childRoutes: [{
        path: 'messages/:id',
        onEnter: ({ params }, replace) => replace(`/messages/${params.id}`)
      }]
    },
    {
      component: Inbox,
      childRoutes: [{
        path: 'messages/:id', component: Message
      }]
    }
  ]
}

render(<Router routes={routes} />, document.body)
Route Matching
路由匹配
A route has three attributes that determine whether or not it "matches" the URL:
- nesting and
- its
path- its precedence
Nesting
React Router uses the concept of nested routes to let you declare nested sets of views that should be rendered when a given URL is invoked. Nested routes are arranged in a tree-like structure. To find a match, React Router traverses the route configdepth-first searching for a route that matches the URL.
Path Syntax
A route path is a string pattern that is used to match a URL (or a portion of one). Route paths are interpreted literally, except for the following special symbols:
:paramName– matches a URL segment up to the next/,?, or#. The matched string is called a param()– Wraps a portion of the URL that is optional*– Matches all characters (non-greedy) up to the next character in the pattern, or to the end of the URL if there is none, and creates asplatparam**- Matches all characters (greedy) until the next/,?, or#and creates asplatparam<Route path="/hello/:name"> // matches /hello/michael and /hello/ryan <Route path="/hello(/:name)"> // matches /hello, /hello/michael, and /hello/ryan <Route path="/files/*.*"> // matches /files/hello.jpg and /files/hello.html <Route path="/**/*.jpg"> // matches /files/hello.jpg and /files/path/to/file.jpgIf a route uses a relative
path, it builds upon the accumulatedpathof its ancestors. Nested routes may opt-out of this behavior by using an absolutepath.Precedence
Finally, the routing algorithm attempts to match routes in the order they are defined, top to bottom. So, when you have two sibling routes you should be sure the first doesn't match all possible
paths that can be matched by the later sibling. For example, don't do this:<Route path="/comments" ... /> <Redirect from="/comments" ... />查找关系是从上到下找,所以后面配置的url会比前面的有作用。
Histories
There are three types of histories you'll come across most often, but note that anyone can build a custom history implementation for consumption with React Router.
You import them from the React Router package:
// JavaScript module import
import { browserHistory } from 'react-router'
Then pass them into your
<Router>:render( <Router history={browserHistory} routes={routes} />, document.getElementById('app') )
browserHistory
Browser history is the recommended history for browser application with React Router. It uses the History API built into the browser to manipulate the URL, creating real URLs that look like example.com/some/path.
网站推荐方式,使用browserHistory,这样可以显示适合爬虫的url
使用这种方式需要配置server.
Configuring Your Server
Your server must be ready to handle real URLs. When the app first loads at / it will probably work, but as the user navigates around and then hits refresh at /accounts/23 your web server will get a request to /accounts/23. You will need it to handle that URL and include your JavaScript application in the response.
使用这种方式,点击刷新的时候,因为刷新动作是客户端向浏览器放松请求,需要server 响应,如果没有配置server,那么无法响应,页面要就无法显示了。
An express app might look like this:
const express = require('express')
const path = require('path')
const port = process.env.PORT || 8080
const app = express()

// serve static assets normally
app.use(express.static(__dirname + '/public'))

// handle every other route with index.html, which will contain
// a script tag to your application's JavaScript file(s).
app.get('*', function (request, response){
  response.sendFile(path.resolve(__dirname, 'public', 'index.html'))
})

app.listen(port)
console.log("server started on port " + port)
If you're using nginx, use the try_files directive:
server {
  ...
  location / {
    try_files $uri /index.html;
  }
}
This lets nginx serve static asset files and serves your index.html file when another file isn't found on the server.
There is also a similar approach for Apache servers. Create an .htaccess file in your folder's root:
RewriteBase /
RewriteRule ^index\.html$ - [L]
RewriteCond %{REQUEST_FILENAME} !-f
RewriteCond %{REQUEST_FILENAME} !-d
RewriteRule . /index.html [L]
IE8, IE9 Support
We feature detect to see if we can use the browser's native window.history API. If not, any call to transition around the app will result in a full page reload, which allows you to build your app and have a better experience for newer browsers, but still support old ones.
You might wonder why we don't fall back to hash history; the problem is that URLs become non-deterministic. If a visitor on hash history shares a URL with a visitor on browser history, and then they share that back, we end up with a terrible cartesian product of infinite potential URLs.
hashHistory
Hash history uses the hash (#) portion of the URL, creating routes that look like example.com/#/some/path.
Should I use hashHistory?
Hash history works without configuring your server, so if you're just getting started, go ahead and use it. In general, though, production web applications should use browserHistory for the cleaner URLs, and for support for server-side rendering, which is impossible with hashHistory.
Additionally, as mentioned above, some older browsers do not support the HTML5 History API. If it's important to you to not use full page reloads for navigation on those older browsers, then you will also need to use hashHistory.
What is that ?_k=ckuvup junk in the URL?
When a history transitions around your app with push or replace, it can store "location state" that doesn't show up in the URL on the new location, think of it a little bit like post data in an HTML form.
The DOM API that hash history uses to transition around is simply window.location.hash = newHash, with no place to store location state. But, we want all histories to be able to use location state, so we shim it by creating a unique key for each location and then store that state in session storage. When the visitor clicks "back" and "forward" we now have a mechanism to restore the location state.
hashHistory不适用于一般的网站开发或者服务端渲染(服务端无法取到hash值),hash后面的参数作用是为了前进后退的时候可以正确定位hash。
createMemoryHistory
Memory history doesn't manipulate or read from the address bar. This is how we implement server rendering. It's also useful for testing and other rendering environments (like React Native).
It's a bit different than the other two histories because you have to create one, it is this way to facilitate testing:
const history = createMemoryHistory(location)
createMemoryHistory 主要用于测试,或者原生应用react native.
Customize your history further
If you'd like to further customize the history options or use other enhancers from history you can use useRouterHistory.
Be aware that useRouterHistory already pre-enhances your history factory with the useQueries and useBasename enhancers from history.
用法再找例子查阅。
Index Routes and Index Links
Index Routes
<Router>
  <Route path="/" component={App}>
    <IndexRoute component={Home}/>
    <Route path="accounts" component={Accounts}/>
    <Route path="statements" component={Statements}/>
  </Route>
</Router>
指定站点根目录。default页面。
Index Redirects
Suppose you want to redirect / to /welcome. To do this, you need to set up an index route that does the redirect. To do this, use the <IndexRedirect> component:
<Route path="/" component={App}>
  <IndexRedirect to="/welcome" />
  <Route path="welcome" component={Welcome} />
  <Route path="about" component={About} />
</Route>
重定向 / to /welcome.使用 <IndexRedirect> 组件
This is equivalent to setting up an index route with just an onEnter hook that redirects the user. You would set this up with plain routes as:
const routes = [{
  path: '/',
  component: App,
  indexRoute: { onEnter: (nextState, replace) => replace('/welcome') },
  childRoutes: [
    { path: 'welcome', component: Welcome },
    { path: 'about', component: About }
  ]
}]
当访问/的时候就会重定向到/welcome了。
Index Links
If you were to <Link to="/">Home</Link> in this app, it would always be active since every URL starts with /. This is a problem because we'd like to link to Home but only be active if Home is rendered.
To have a link to / that is only active when the Home route is rendered, use <IndexLink to="/">Home</IndexLink>.
DynamicRouting
React Router does all of its path matching and component fetching asynchronously, which allows you to not only load up the components lazily, but also lazily load the route configuration. You really only need one route definition in your initial bundle, the router can resolve the rest on demand.
动态路由配置。
Routes may define getChildRoutes, getIndexRoute, and getComponents methods. These are asynchronous and only called when needed. We call it "gradual matching". React Router will gradually match the URL and fetch only the amount of route configuration and components it needs to match the URL and render.
Coupled with a smart code splitting tool like webpack, a once tiresome architecture is now simple and declarative.
const CourseRoute = {
  path: 'course/:courseId',

  getChildRoutes(partialNextState, callback) {
    require.ensure([], function (require) {
      callback(null, [
        require('./routes/Announcements'),
        require('./routes/Assignments'),
        require('./routes/Grades'),
      ])
    })
  },

  getIndexRoute(partialNextState, callback) {
    require.ensure([], function (require) {
      callback(null, {
        component: require('./components/Index'),
      })
    })
  },

  getComponents(nextState, callback) {
    require.ensure([], function (require) {
      callback(null, require('./components/Course'))
    })
  }
}
Confirming Navigation
You can prevent a transition from happening or prompt the user before leaving a route with a leave hook.
const Home = withRouter(
  React.createClass({

    componentDidMount() {
      this.props.router.setRouteLeaveHook(this.props.route, this.routerWillLeave)
    },

    routerWillLeave(nextLocation) {
      // return false to prevent a transition w/o prompting the user,
      // or return a string to allow the user to decide:
      if (!this.state.isSaved)
        return 'Your work is not saved! Are you sure you want to leave?'
    },

    // ...

  })
)
Note that this example makes use of the withRouter higher-order component introduced in v2.4.0.
确认跳转。
Server Rendering
Server rendering is a bit different than in a client because you'll want to:
- Send
500responses for errors- Send
30xresponses for redirects- Fetch data before rendering (and use the router to help you do it)
To facilitate these needs, you drop one level lower than the
<Router>API with:
matchto match the routes to a location without renderingRouterContextfor synchronous rendering of route components
Async Routes
客户端使用异步路由,需要配置。
History Singletons
Because the server has no DOM available, the history singletons (browserHistory and hashHistory) do not function on the server. Instead, they will simply return undefined.
You should be sure to only use the history singletons in client code. For React Components, this means using them only in lifecycle functions like componentDidMount, but not in componentWillMount. Most events, such as clicks, can only happen in the client, as the server has no DOM available to trigger them. So, using the history singletons is a valid option in that case. Knowing what code should run on the server and on the client is important to using React in a universal app, so make sure you're familiar with these concepts even if you aren't using React Router.
And don't feel discouraged! History singletons are a great convenience method to navigate without setting up this.contextor when you're not inside of a React component. Simply take care to only use them in places the server will not try to touch.
history只能用于客户端,不能用于服务端(服务端没有dom api)
Component Lifecycle
It's important to understand which lifecycle hooks are going to be called on your route components to implement lots of different functionality in your app. The most common thing is fetching data.
There is no difference in the lifecycle of a component in the router as just React itself. Let's peel away the idea of routes, and just think about the components being rendered at different URLs.
了解生命周期,主要是获取数据的时候,route的生命周期和react的生命周期一样。
例子看示例。注意根目录/一直管理组件变化。
Navigating Outside of Components
Navigating Outside of Components
While you can use
this.props.routerfromwithRouterto navigate around, many apps want to be able to navigate outside of their components. They can do that with the history the app gives toRouter.// Your main file that renders a <Router>: import { Router, browserHistory } from 'react-router' import routes from './app/routes' render( <Router history={browserHistory} routes={routes} />, mountNode )// Somewhere like a Redux middleware or Flux action: import { browserHistory } from 'react-router' // Go to /some/path. browserHistory.push('/some/path') // Go back to previous location. browserHistory.goBack()
操作导航。
Minimizing Bundle Size
Instead, the bindings exported from react-router are also available in react-router/lib. When using CommonJS modules, you can import directly from react-router/lib to avoid pulling in unused modules.
Assuming you are transpiling ES2015 modules into CommonJS modules, instead of:
import { Link, Route, Router } from 'react-router'
use:
import Link from 'react-router/lib/Link'
import Route from 'react-router/lib/Route'
import Router from 'react-router/lib/Router'
The public API available in this manner is defined as the set of imports available from the top-level react-router module. Anything not available through the top-level react-router module is a private API, and is subject to change without notice.
版本压缩。
example
reactjs101;git部分clone文件夹参考这里。


 1714
1714

 被折叠的 条评论
为什么被折叠?
被折叠的 条评论
为什么被折叠?
 到【灌水乐园】发言


