


Configuring Voice VLAN
This chapter describes how to configure the voice VLAN feature on your switch. Voice VLAN is referred to as an auxiliary VLAN in the Catalyst 6000 family switch documentation.

Note ![]() For complete syntax and usage information for the commands used in this chapter, refer to the
For complete syntax and usage information for the commands used in this chapter, refer to the
Catalyst 2950 Desktop Switch Command Reference for this release.
This chapter consists of these sections:
Understanding Voice VLAN
The voice VLAN feature enables access ports to carry IP voice traffic from an IP phone. The switch can connect to a Cisco 7960 IP Phone and carry IP voice traffic. Because the sound quality of an IP phone call can deteriorate if the data is unevenly transmitted, the switch supports quality of service (QoS) based on IEEE 802.1P class of service (CoS). QoS uses classification and scheduling to send network traffic from the switch in a predictable manner. For more information on QoS, see "Configuring QoS." The Cisco 7960 IP Phone is a configurable device, and you can configure it to forward traffic with an 802.1P priority. You can configure the switch to trust or override the traffic priority assigned by a Cisco 7960 IP Phone.
The Cisco 7960 IP Phone contains an integrated three-port 10/100 switch. The ports are dedicated connections to these devices:
•![]() Port 1 connects to the switch or other voice-over-IP (VoIP) device.
Port 1 connects to the switch or other voice-over-IP (VoIP) device.
•![]() Port 2 is an internal 10/100 interface that carries the IP phone traffic.
Port 2 is an internal 10/100 interface that carries the IP phone traffic.
•![]() Port 3 connects to a PC or other device.
Port 3 connects to a PC or other device.
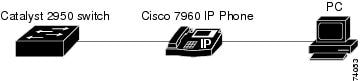
Figure 15-1 shows one way to connect a Cisco 7960 IP Phone.
Figure 15-1 Cisco 7960 IP Phone Connected to a Switch
For deployment examples that use voice VLANs, see the "Network Configuration Examples" section.
Configuring Voice VLAN
This section describes how to configure voice VLAN on access ports. It contains this configuration information:
•![]() Default Voice VLAN Configuration
Default Voice VLAN Configuration
•![]() Configuring a Port to Connect to a Cisco 7960 IP Phone
Configuring a Port to Connect to a Cisco 7960 IP Phone
Default Voice VLAN Configuration
The voice VLAN feature is disabled by default.
When the voice VLAN feature is enabled, untagged traffic is sent according to the default CoS priority of the port.
The CoS value is trusted for 802.1P or 802.1Q tagged traffic.
Configuration Guidelines
These are the voice VLAN configuration guidelines:
•![]() You should configure voice VLAN on access ports.
You should configure voice VLAN on access ports.
•![]() The Port Fast feature is automatically enabled when voice VLAN is configured. When you disable voice VLAN, the Port Fast feature is not automatically disabled.
The Port Fast feature is automatically enabled when voice VLAN is configured. When you disable voice VLAN, the Port Fast feature is not automatically disabled.
•![]() If you enable port security on a voice VLAN port and if there is a PC connected to the IP phone, you should set the maximum allowed secure addresses on the port to more than 1.
If you enable port security on a voice VLAN port and if there is a PC connected to the IP phone, you should set the maximum allowed secure addresses on the port to more than 1.
•![]() You cannot configure static secure MAC addresses in the voice VLAN.
You cannot configure static secure MAC addresses in the voice VLAN.
•![]() Voice VLAN ports can also be these port types:
Voice VLAN ports can also be these port types:
–![]() Dynamic access port. See the "Configuring Dynamic Access Ports on VMPS Clients" section for more information.
Dynamic access port. See the "Configuring Dynamic Access Ports on VMPS Clients" section for more information.
–![]() Secure port. See the "Enabling Port Security" section for more information.
Secure port. See the "Enabling Port Security" section for more information.
–![]() 802.1X authenticated port. See the "Enabling 802.1X Authentication" section for more information.
802.1X authenticated port. See the "Enabling 802.1X Authentication" section for more information.
–![]() Protected port. See the "Configuring Protected Ports" section for more information.
Protected port. See the "Configuring Protected Ports" section for more information.
Configuring a Port to Connect to a Cisco 7960 IP Phone
Because a Cisco 7960 IP Phone also supports a connection to a PC or other device, a port connecting the switch to a Cisco 7960 IP Phone can carry mixed traffic.
You can configure the port to carry voice traffic in one of these ways:
•![]() Configuring Ports to Carry Voice Traffic in 802.1Q Frames
Configuring Ports to Carry Voice Traffic in 802.1Q Frames
•![]() Configuring Ports to Carry Voice Traffic in 802.1P Priority Tagged Frames
Configuring Ports to Carry Voice Traffic in 802.1P Priority Tagged Frames
You can configure the IP phone to carry data traffic in one of these ways:
•![]() Overriding the CoS Priority of Incoming Data Frames
Overriding the CoS Priority of Incoming Data Frames
•![]() Configuring the IP Phone to Trust the CoS Priority of Incoming Data Frames
Configuring the IP Phone to Trust the CoS Priority of Incoming Data Frames
Configuring Ports to Carry Voice Traffic in 802.1Q Frames
Beginning in privileged EXEC mode, follow these steps to configure a port to carry voice traffic in 802.1Q frames for a specific VLAN:
To remove voice VLAN, use the no switchport voice vlan interface configuration command or the switchport voice vlan none interface configuration command.
Configuring Ports to Carry Voice Traffic in 802.1P Priority Tagged Frames
Beginning in privileged EXEC mode, follow these steps to configure a port to instruct the IP phone to give voice traffic a higher priority and to forward all traffic through the native VLAN.
To return the port to its default setting, use the no switchport voice vlan interface configuration command.
Overriding the CoS Priority of Incoming Data Frames
You can connect a PC or other data device to a Cisco 7960 IP Phone port. The PC can generate packets with an assigned CoS value. You can configure the switch to override the priority of frames arriving on the IP phone port from connected devices.
Beginning in privileged EXEC mode, follow these steps to override the CoS priority received from the nonvoice port on the Cisco 7960 IP Phone:
Use the no switchport voice vlan interface configuration command or the switchport priority extend none interface configuration command to return the port to its default setting.
Configuring the IP Phone to Trust the CoS Priority of Incoming Data Frames
You can connect a PC or other data device to a Cisco 7960 IP Phone port. The PC can generate packets with an assigned CoS value. You can configure the switch to trust the priority of frames arriving on the IP phone port from connected devices.
Beginning in privileged EXEC mode, follow these steps to trust the CoS priority received from the
nonvoice port on the Cisco 7960 IP Phone:
To return the port to its default setting, use the no switchport voice vlan interface configuration command or the switchport priority extend noneinterface configuration command.
Displaying Voice VLAN
To display voice VLAN for an interface, use the show interfaces interface-id switchport privileged EXEC command.
For detailed information about the fields in the display, refer to the Catalyst 2950 Desktop Switch Command Reference for this release.
转载于:https://blog.51cto.com/jasonliping/1176088


 被折叠的 条评论
为什么被折叠?
被折叠的 条评论
为什么被折叠?
 到【灌水乐园】发言


