Nexus是常用的私用Maven服务器,一般是公司内部使用。
Nexus安装设置
#1.Nexus下载
下载地址:http://www.sonatype.org/nexus/go/
下载后的文件:nexus-2.11.4-01-bundle.zip
安装:直接解压到某个目录即可
解压后,会有两个目录:nexus-2.11.4-01
sonatype-work :私服的默认仓库
1.1 将bin目录添加到环境变量中
D:\JavaDev\nexus-2.11.4\nexus-2.11.4-01\bin
1.2 配置java文件的路径
打开D:\JavaDev\nexus-2.11.4\nexus-2.11.4-01\bin\jsw\conf\wrapper.conf文件
修改wrapper.java.command=java为你的java.exe文件的路径
例如:
wrapper.java.command=D:\Program Files\Java\jdk1.7.0_07\bin\java
1.3 启动nexus
先安装:nexus install
然后启动:nexus start
C:\Users\Administrator>nexus install
wrapper | nexus installed.
C:\Users\Administrator>nexus start
wrapper | Starting the nexus service...
wrapper | Waiting to start...
wrapper | nexus started.
C:\Users\Administrator>
Nexus常用功能就是:指定私服的中央地址、将自己的Maven项目指定到私服地址、从私服下载中央库的项目索引、从私服仓库下载依赖组件、将第三方项目jar上传到私服供其他项目组使用。 开启Nexus服务后访问url地址http://localhost:8081/nexus/(推荐使用自己的ip地址),之后登录系统,用户名密码分别是:admin/admin123.
2.配置mexus
nexus默认是关闭远程索引下载功能的。开启的方式: 点击Administration菜单下面的Repositories,将这三个仓库Apache Snapshots,Codehaus Snapshots,Maven Central的 Download Remote Indexes修改为true。然后在这三个仓库上分别右键,选择Re-index,这样Nexus就会去下载远程的索引文件。
3.仓库管理
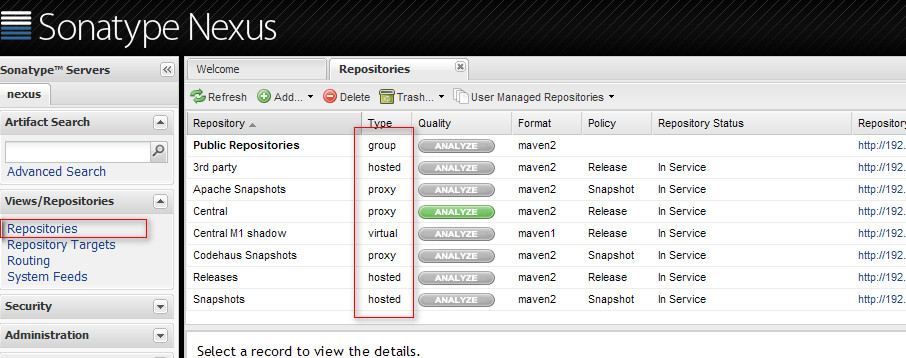
以管理员用户登陆然后点击左边导航菜单Administration下面的Repositories。Nexus提供了三种不同的仓库。 (1)代理仓库 一个代理仓库是对远程仓库的一个代理。默认情况下,Nexus自带了如下配置的代理仓库: Apache Snapshots 这个仓库包含了来自于Apache软件基金会的快照版本。http://people.apache.org/repo/m2-snapshot-repository Codehaus Snapshots 这个仓库包含了来自于Codehaus的快照版本。 http://snapshots.repository.codehaus.org/ Central Maven Repository 这是中央Maven仓库(发布版本)。 http://repo1.maven.org/maven2/ (2)宿主仓库 一个宿主仓库是由Nexus托管的仓库。Maven自带了如下配置的宿主仓库。 3rd Party 这个宿主仓库应该用来存储在公共Maven仓库中找不到的第三方依赖。这种依赖的样例有:你组织使用的,商业的,私有的类库如Oracle JDBC驱动。 Releases 这个宿主仓库是你组织公布内部发布版本的地方。 Snapshots 这个宿主仓库是你组织发布内部快照版本的地方。 (3)虚拟仓库 一个虚拟仓库作为Maven 1的适配器存在。Nexus自带了一个central-m1虚拟仓库
##4. 管理组 组是Nexus一个强大的特性,它允许你在一个单独的URL中组合多个仓库。Nexus自带了两个组:public和public-snapshots。public组中组合了三个宿主仓库:3rd Party, Releases, 和Snapshots,还有中央Maven仓库。而public-snapshots组中组合了Apache Snapshots和Codehaus Snapshots仓库。
##5.下载Maven项目索引 项目索引是为了使用者能够在私服站点查找依赖使用的功能
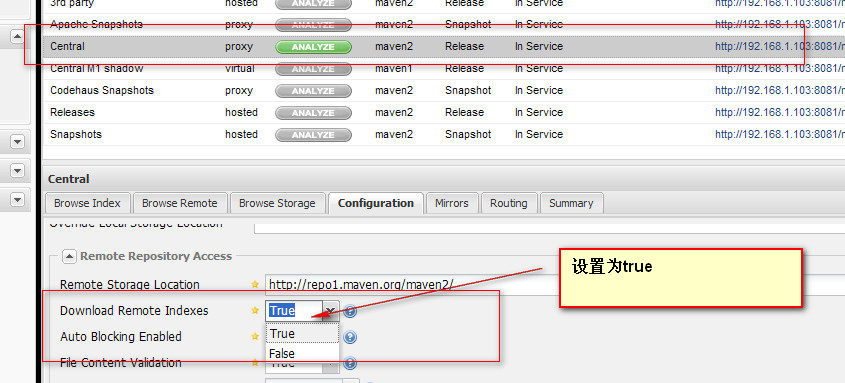
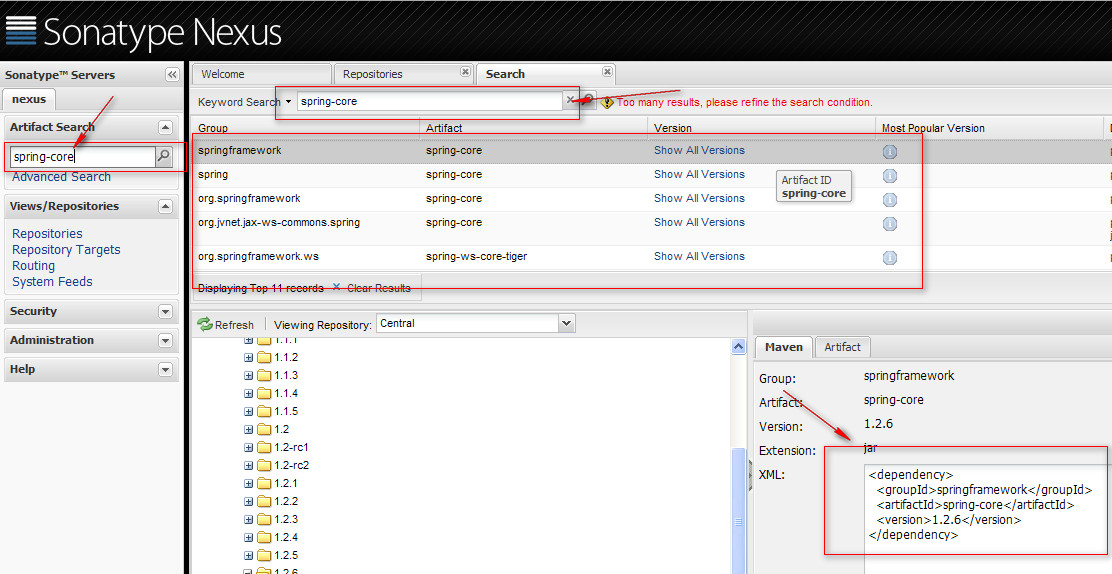
保存后后台会运行一个任务,点击菜单栏的Scheduled Tasks选项即可看到有个任务在RUNNING。 下载完成后,Maven索引就可以使用了,在搜索栏输入要搜索的项,就可以查到相关的信息。例如spring-core
就可以检索出它的相关信息,包括怎么配置依赖信息。
只有指定本项目才在私服下载组件的配置
##1.指定仓库
<repositories>
        <repository>
            <id>nexus</id>
            <name>nexus</name>
            <url>http://192.168.1.103:8081/nexus/content/groups/public/</url>
            <releases>
                <enabled>true</enabled>
            </releases>
            <snapshots>
                <enabled>true</enabled>
            </snapshots>
        </repository>
    </repositories>
##2.指定插件仓库
<pluginRepositories>
        <pluginRepository>
            <id>nexus</id>
            <name>nexus</name>
            <url>http://192.168.1.103:8081/nexus/content/groups/public/</url>
            <releases>
                <enabled>true</enabled>
            </releases>
            <snapshots>
                <enabled>true</enabled>
            </snapshots>
        </pluginRepository>
    </pluginRepositories>
如果希望Nexus相对Maven的其他项目也生效的话。需要修改全局的settings.xml文件
//用户登录必填
<server>
  <id>releases</id>  **//id要与pom.xml中关联私服的id相同**
  <username>admin</username>
  <password>admin123</password>
</server>
<server>
  <id>Snapshots</id>
  <username>admin</username>
  <password>admin123</password>
</server>

<profiles>
   <profile>
     <id>nexus</id>
     <repositories>
       <repository>
           <id>nexus</id>
           <name>local private nexus</name>
           <url>http://localhost:8081/nexus/content/groups/public</url>
       </repository>
     </repositories>
   </profile>
   <profile>
     <id>nexus-snapshots</id>
     <repositories>
       <repository>
           <id>nexus-snapshots</id>
           <name>local private nexus snapshots</name>
           <url>http://localhost:8081/nexus/content/groups/public-snapshots</url>
       </repository>
     </repositories>
   </profile>
 </profiles>

 <activeProfiles>  //激活profile
    <activeProfile>nexus</activeProfile>
    <activeProfile>nexus-snapshots</activeProfile>
 </activeProfiles>
##3.部署构件至Nexus
要部署构件至Nexus,在distributionManagement中提供仓库URL,然后运行mvn deploy。Maven会通过一个简单的HTTP PUT将项目POM和构件推入至你的Nexus安装。需要配置你项目POM中distributionManagement部分的repository。
<distributionManagement>
  <repository>
    <id>releases</id> ** //要与maven   settings.xml中设置权限的id相同**
    <name>Internal Releases</name>
    <url>http://localhost:8081/nexus/content/repositories/releases</url>
  </repository>
  <snapshotRepository>
    <id>Snapshots</id>
    <name>Internal Snapshots</name>
    <url>http://localhost:8081/nexus/content/repositories/snapshots</url>
  </snapshotRepository>
</distributionManagement>
##4.发布项目
clean deploy
在控制台发布成功
然后进入到私服上的仓库中,看一下确实存在刚刚发布的项目
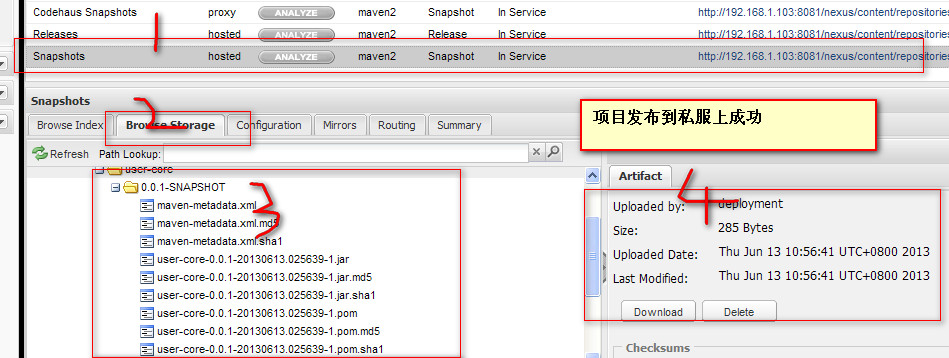
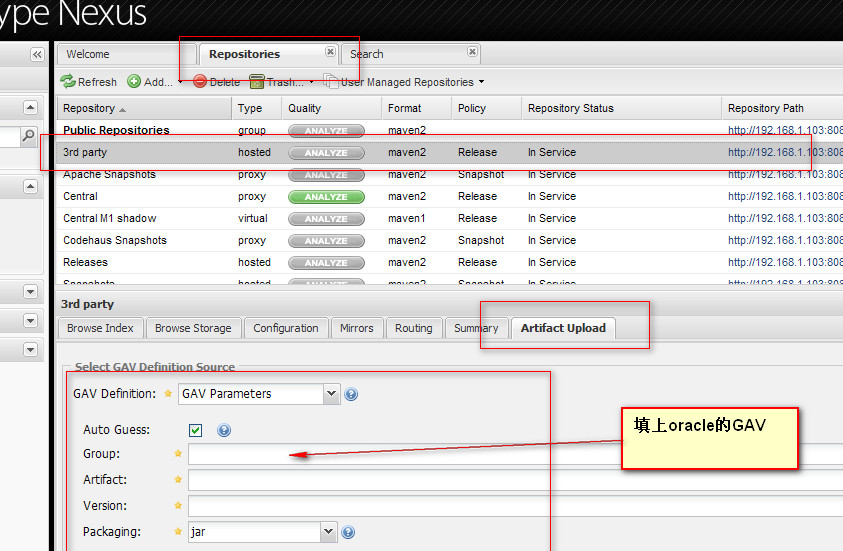
##5.上传第三方jar
#maven之Nexus的配置【setting.xml配置镜像<mirror>】
启动了nexus服务后,本地仓库下载jar包都是从nexus里下载,如果nexus里没有,nexus会与maven的中央仓库打交道,然后下载对应的依赖包。当关闭了nexus服务后,本地仓库就会跳过nexus,直接去maven中央仓库下载依赖包了。
如果我们不希望本地仓库直接去maven中央仓库下载,而必须要从nexus里下载依赖包,如果nexus里没有对应的依赖包,就下载不了。
要实现这种效果,需要在setting里配置镜像(<mirror>),让所有的仓库都从这个镜像的url(仓库)中下载依赖。
setting里配置了镜像以后,本地仓库就不再与nexus打交道了,而是直接与镜像中配置的的url(仓库)进行打交道。
这里说明一下,不管是在pom.xml里配置了<repositories>去指向nexus仓库,还是在setting.xml里配置<profile>去指向nexus仓库,当从本地仓库去下载依赖的时候,如果nexus里找不到对应的依赖包,会默认的去maven仓库里下载。即使是nexus服务关闭了,本地仓库还是会去maven中央仓库下载对应依赖包。这是maven里面的默认配置(maven-model-builder-3.3.3.jar里pom-4.0.0.xml文件配置了id为central的中央仓库)。
配置镜像后,下载依赖包的流程为: 如果没有把默认的central仓库配置到镜像里,
<mirror>
      <id>mirrorId</id>
      <!--表示访问哪些工厂时需要使用镜像-->
      <mirrorOf>xxx</mirrorOf>
      <name>Human Readable Name for this Mirror.</name>
      <url>http://localhost:8081/nexus/content/groups/public/</url>
    </mirror>
流程如下:
(1)配置了镜像后,当要下载依赖时,第一步:找到setting.xml中激活的profile下repository里id为xxx的配置,而xxx已经配置在里镜像里
(2)这时会去到到镜像里的url(仓库)里下载依赖
(3)当发现镜像里配置的url(仓库)里下载不到对应的依赖时,会自动去找到maven中默认的id为central,url为中央仓库地址的repository配置,因为central没有配置在镜像中,所以此时可以直接去到maven中央仓库下载依赖包。 结果如下图所示:
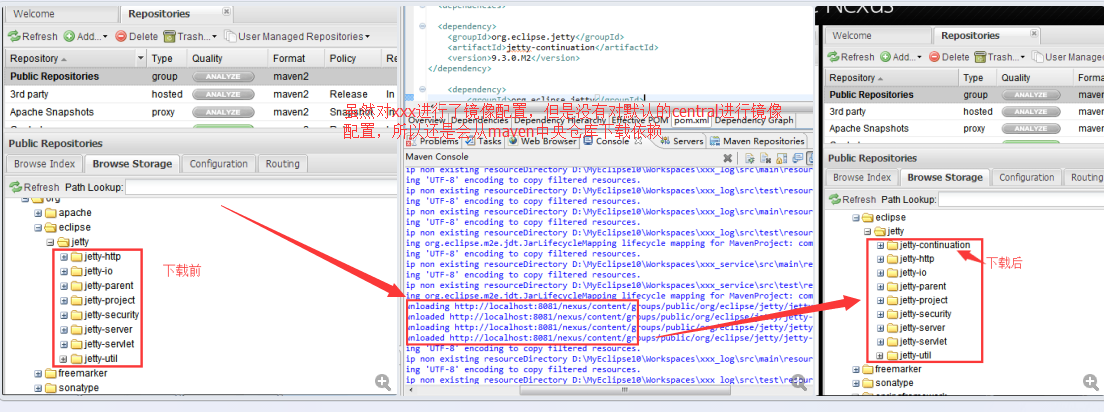
如果已经把默认的central仓库配置到镜像里,
</pre><pre name="code" class="html"><mirror>
      <id>mirrorId</id>
      <!--表示访问哪些工厂时需要使用镜像-->
      <!--<mirrorOf>xxx,central</mirrorOf> -->
      <mirrorOf>*</mirrorOf> <!--一般用*号-->
      <name>Human Readable Name for this Mirror.</name>
      <url>http://localhost:8081/nexus/content/groups/public/</url>
    </mirror>
流程如下:
(1)配置了镜像后,当要下载依赖时,第一步:找到setting.xml中激活的profile下repository里id为xxx的配置,而xxx已经配置在里镜像里
(2)这个时候会去到到镜像里的url(仓库)里下载依赖 (3)当发现镜像里配置的url(仓库)里下载不到对应的依赖时,会自动去找到maven中默认的id为central,url为中央仓库地址的repository配置,
(4)此时central配置在镜像中,所以这次是去到到镜像里的url(仓库)里下载依赖了。而不会去访问maven中央仓库了。


 410
410


 被折叠的 条评论
为什么被折叠?


