


一、配置Maven依赖
主要加入SpringBoot和Druid还有MySQL的核心JAR即可。
<?xml version="1.0" encoding="UTF-8"?>
<project xmlns="http://maven.apache.org/POM/4.0.0"
         xmlns:xsi="http://www.w3.org/2001/XMLSchema-instance"
         xsi:schemaLocation="http://maven.apache.org/POM/4.0.0 http://maven.apache.org/xsd/maven-4.0.0.xsd">
    <modelVersion>4.0.0</modelVersion>

    <groupId>springboot.example</groupId>
    <artifactId>springboot-druid</artifactId>
    <version>1.0-SNAPSHOT</version>
    <description>使用Druid连接池提高数据库访问性能</description>

    <parent>
        <groupId>org.springframework.boot</groupId>
        <artifactId>spring-boot-starter-parent</artifactId>
        <version>1.5.8.RELEASE</version>
    </parent>

    <dependencies>
        <dependency>
            <groupId>org.springframework.boot</groupId>
            <artifactId>spring-boot-starter-web</artifactId>
        </dependency>

        <!-- springboot操作数据库依赖 -->
        <dependency>
            <groupId>org.springframework.boot</groupId>
            <artifactId>spring-boot-starter-data-jpa</artifactId>
        </dependency>

        <!-- mysql连接驱动 -->
        <dependency>
            <groupId>mysql</groupId>
            <artifactId>mysql-connector-java</artifactId>
            <scope>runtime</scope>
        </dependency>

        <!-- Druid连接池 -->
        <dependency>
            <groupId>com.alibaba</groupId>
            <artifactId>druid</artifactId>
            <version>1.1.5</version>
        </dependency>

        <!-- 测试 -->
        <dependency>
            <groupId>org.springframework</groupId>
            <artifactId>spring-test</artifactId>
            <version>4.3.7.RELEASE</version>
        </dependency>

        <dependency>
            <groupId>junit</groupId>
            <artifactId>junit</artifactId>
            <version>4.12</version>
            <scope>test</scope>
        </dependency>
    </dependencies>

</project>
二、编写Druid配置文件
Spring Boot的数据源配置默认类型是org.apache.tomcat.jdbc.pool.DataSource,为了使用Druid连接池,可以将数据源类型更换为com.alibaba.druid.pool.DruidDataSource,具体如下代码所示。其中,url,username,password是连接MySQL服务器的配置参数,其他一些参数是设定Druid的工作方式。在resources文件夹下面建立application.yml文件,输入下面的代码完成配置。
spring:
  datasource:
    type: com.alibaba.druid.pool.DruidDataSource
    driver-class-name: com.mysql.jdbc.Driver
    url: jdbc:mysql://192.168.25.125:3306/springboot?characterEncoding=utf8
    username: root
    password: root
    # 初始化大小,最小,最大
    initialSize: 5
    minIdle: 5
    maxActive: 20
    # 配置获取连接等待超时的时间(毫秒)
    maxWait: 60000
    # 配置间隔多久才进行一次检测,检测需要关闭的空闲连接,单位是毫秒
    timeBetweenEvictionRunsMillis: 60000
    # 配置有一个连接在连接池中的最小生存时间,单位是毫秒
    minEvictableIdleTimeMillis: 300000
    validationQuery: SELECT 1 FROM DUAL
    testWhileIdle: true
    testOnBorrow: false
    testOnReturn: false
    # 打开PSCache,指定每个连接上PSCache的大小
    poolPreparedStatements: true
    maxPoolPreparedStatementPerConnectionSize: 20
    # 配置监控统计拦截的filters,去掉后监控界面sql将无法统计,'wall'用于防火墙
    filters: stat, wall, log4j
    # 通过connectProperties属性来打开mergeSql功能,慢SQL记录
    connectionProperties: druid.stat.mergeSql=true;druid.stat.slowSqlMillis=5000
来个:application.properties配置的。
# spring datasource connection 112.126.90.223
spring.datasource.url=jdbc\:mysql\://127.0.0.1:3306/test
spring.datasource.username=root
spring.datasource.password=m123
spring.datasource.driver-class-name=com.mysql.jdbc.Driver


# db pool
# 初始化大小,最小,最大
spring.datasource.initialSize=5
spring.datasource.minIdle=5
spring.datasource.maxActive=20
# 配置获取连接等待超时的时间
spring.datasource.maxWait=60000
# 配置间隔多久才进行一次检测,检测需要关闭的空闲连接,单位是毫秒
spring.datasource.timeBetweenEvictionRunsMillis=60000
# 配置一个连接在池中最小生存的时间,单位是毫秒
spring.datasource.minEvictableIdleTimeMillis=300000
spring.datasource.validationQuery=SELECT 1 FROM DUAL
spring.datasource.testWhileIdle=true
spring.datasource.testOnBorrow=false
spring.datasource.testOnReturn=false
# 打开PSCache,并且指定每个连接上PSCache的大小
spring.datasource.poolPreparedStatements=true
spring.datasource.maxPoolPreparedStatementPerConnectionSize=20

# 配置监控统计拦截的filters,去掉后监控界面sql无法统计,'wall'用于防火墙
spring.datasource.filters=stat,wall,logback
# 通过connectProperties属性来打开mergeSql功能;慢SQL记录
spring.datasource.connectionProperties=druid.stat.mergeSql=true;druid.stat.slowSqlMillis=5000
#下面配置说明请参考Druid Github Wiki,配置_StatViewServlet配置
spring.datasource.druid.stat-view-servlet.allow=127.0.0.1
spring.datasource.druid.stat-view-servlet.login-username=druid
spring.datasource.druid.stat-view-servlet.login-password=m123上面配置中的filters:stat表示已经可以使用监控过滤器了,这时结合定义一个过滤器,就可以用来监控数据库的使用情况。
三、开启监控功能
开启Druid的监控功能,可以在应用运行期间,通过监控提供的多维度数据来分析使用数据库的运行情况,从而可以调整程序设计,以达到优化数据库访问性能的目的。接下来定义一个监控服务器和一个过滤器,监控服务器设定了访问监控后台的连接地址为“/druid/*”,设定了访问数据库的白名单和黑名单,即通过访问者IP地址来控制访问来源,增加了数据库的安全设置,还设置了一个用来登录监控后台的账户和密码。
代码如下:
import java.sql.SQLException;
import java.util.HashMap;
import java.util.Map;

import javax.sql.DataSource;

import org.springframework.aop.framework.autoproxy.BeanNameAutoProxyCreator;
import org.springframework.boot.bind.RelaxedPropertyResolver;
import org.springframework.boot.web.servlet.FilterRegistrationBean;
import org.springframework.boot.web.servlet.ServletRegistrationBean;
import org.springframework.context.EnvironmentAware;
import org.springframework.context.annotation.Bean;
import org.springframework.context.annotation.Configuration;
import org.springframework.core.env.Environment;
import org.springframework.transaction.annotation.EnableTransactionManagement;

import com.alibaba.druid.pool.DruidDataSource;
import com.alibaba.druid.support.http.StatViewServlet;
import com.alibaba.druid.support.http.WebStatFilter;
import com.alibaba.druid.support.spring.stat.DruidStatInterceptor;

@Configuration
@EnableTransactionManagement
/**
 * Druid的DataResource配置类 凡是被Spring管理的类,实现接口 EnvironmentAware 重写方法 setEnvironment
 * 可以在工程启动时, 获取到系统环境变量和application配置文件中的变量。
 * 还有一种方式是采用注解的方式获取 @value("${变量的key值}") 获取application配置文件中的变量。 这里采用第一种要方便些
 *
 * @author:whh
 * @date:2018年5月2日下午11:24:36
 * @jdk: 1.8
 */
public class DruidDataSourceConfig implements EnvironmentAware {

	private RelaxedPropertyResolver propertyResolver;

	public void setEnvironment(Environment env) {
		this.propertyResolver = new RelaxedPropertyResolver(env, "spring.datasource.");
	}

	@Bean
	public DataSource dataSource() {
		DruidDataSource datasource = new DruidDataSource();
		datasource.setUrl(propertyResolver.getProperty("url"));
		datasource.setDriverClassName(propertyResolver.getProperty("driver-class-name"));
		datasource.setUsername(propertyResolver.getProperty("username"));
		datasource.setPassword(propertyResolver.getProperty("password"));
		datasource.setInitialSize(Integer.valueOf(propertyResolver.getProperty("initialSize")));
		datasource.setMinIdle(Integer.valueOf(propertyResolver.getProperty("minIdle")));
		datasource.setMaxWait(Long.valueOf(propertyResolver.getProperty("maxWait")));
		datasource.setMaxActive(Integer.valueOf(propertyResolver.getProperty("maxActive")));
		datasource.setMinEvictableIdleTimeMillis(Long.valueOf(propertyResolver.getProperty(
				"minEvictableIdleTimeMillis")));
		try {
			datasource.setFilters("stat,wall");
		} catch (SQLException e) {
			e.printStackTrace();
		}
		return datasource;
	}

	/**
	 * 访问地址:http://ip:port/druid/index.html
	 * @author:spinach
	 * @date:2018年5月2日下午11:25:25
	 * @return
	 */
	@Bean
	public ServletRegistrationBean druidServlet() {
		ServletRegistrationBean servletRegistrationBean = new ServletRegistrationBean();
		servletRegistrationBean.setServlet(new StatViewServlet());
		servletRegistrationBean.addUrlMappings("/druid/*");
		Map<String, String> initParameters = new HashMap<String, String>();
		 initParameters.put("loginUsername", "druid");// 用户名
		 initParameters.put("loginPassword", "m123");// 密码
		initParameters.put("resetEnable", "false");// 禁用HTML页面上的“Reset All”功能
		 initParameters.put("allow", "127.0.0.1"); // IP白名单 (没有配置或者为空,则允许所有访问)
		 initParameters.put("deny", "192.168.20.38");// IP黑名单
		// (存在共同时,deny优先于allow)
		servletRegistrationBean.setInitParameters(initParameters);
		return servletRegistrationBean;
	}
	/**
	 * 写法二:
	 */
	public ServletRegistrationBean druidServlet2() {
		/**** 写法二 **/
		ServletRegistrationBean servletRegistrationBean = new ServletRegistrationBean(new StatViewServlet(), "/druid/*");
		// 添加IP白名单
		servletRegistrationBean.addInitParameter("allow", "192.168.25.125,127.0.0.1");
		// 添加IP黑名单,当白名单和黑名单重复时,黑名单优先级更高
		servletRegistrationBean.addInitParameter("deny", "192.168.25.123");
		// 添加控制台管理用户
		servletRegistrationBean.addInitParameter("loginUsername", "druid");
		servletRegistrationBean.addInitParameter("loginPassword", "123456");
		// 是否能够重置数据
		servletRegistrationBean.addInitParameter("resetEnable", "false");
		return servletRegistrationBean;

	}

	@Bean
	public FilterRegistrationBean filterRegistrationBean() {
		FilterRegistrationBean filterRegistrationBean = new FilterRegistrationBean();
		filterRegistrationBean.setFilter(new WebStatFilter());
		// 添加过滤规则
		filterRegistrationBean.addUrlPatterns("/*");
		 // 忽略过滤格式
		filterRegistrationBean.addInitParameter("exclusions", "*.js,*.gif,*.jpg,*.bmp,*.png,*.css,*.ico,/druid/*");
		return filterRegistrationBean;
	}

	/**
	 * 按照BeanId来拦截配置 用来bean的监控
	 * @author:wanghh
	 * @date:2018年5月2日下午11:27:25
	 * @return
	 */
	@Bean(value = "druid-stat-interceptor")
	public DruidStatInterceptor DruidStatInterceptor() {
		DruidStatInterceptor druidStatInterceptor = new DruidStatInterceptor();
		return druidStatInterceptor;
	}

	@Bean
	public BeanNameAutoProxyCreator beanNameAutoProxyCreator() {
		BeanNameAutoProxyCreator beanNameAutoProxyCreator = new BeanNameAutoProxyCreator();
		beanNameAutoProxyCreator.setProxyTargetClass(true);
		// 设置要监控的bean的id
		// beanNameAutoProxyCreator.setBeanNames("sysRoleMapper","loginController");
		beanNameAutoProxyCreator.setInterceptorNames("druid-stat-interceptor");
		return beanNameAutoProxyCreator;
	}

}
在配置一个Spring Boot应用入口程序:
import org.springframework.boot.SpringApplication;
import org.springframework.boot.autoconfigure.EnableAutoConfiguration;
import org.springframework.boot.autoconfigure.SpringBootApplication;
import org.springframework.context.annotation.ComponentScan;

/**
 * @author wanghh
 */
@SpringBootApplication
@ComponentScan(value = {"com.**.springboot"})
@MapperScan("com.**.springboot.**.mapper")
@EnableAutoConfiguration
public class MainApplication {

    public static void main(String[] args) {
        SpringApplication.run(MainApplication.class, args);
    }
}直接运行main()方法就开启了监控功能,打开浏览器,
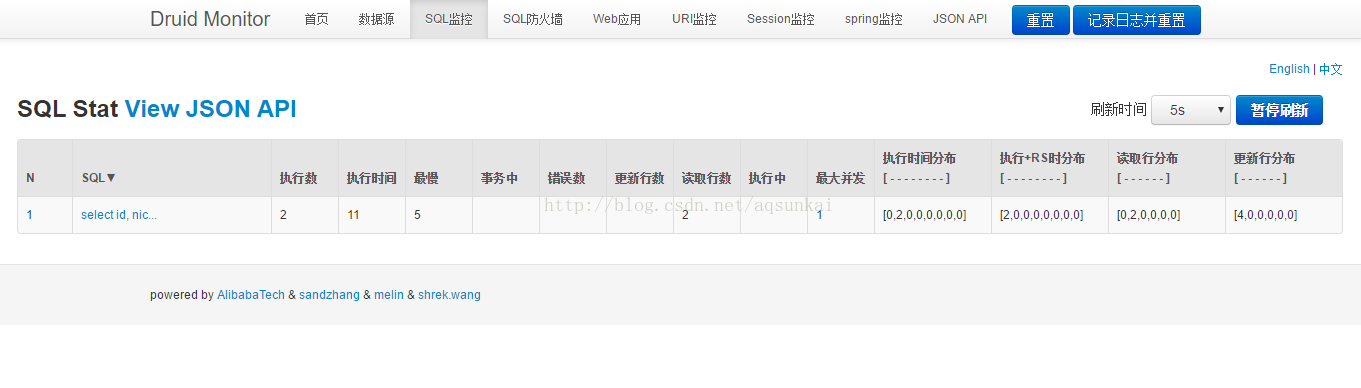
可以通过网址http://localhost:8080/druid/index.html打开监控台,输入在配置类中设置的账户druid和密码123456登录就可以查看SQL使用情况了。
后台执行在控制台上输出:
在页面上输入http://localhost:8080/druid/index.html 可以看到监控到的sql语句执行情况:
四:遇到的问题
4.1:过滤器引起的SQL注入问题。将配置的wall去掉
当我们在项目中使用了druid连接池进行数据源的管理,并且配置了如下监控
spring.datasource.filters: stat,wall,log4j
在执行程序拼接的SQL时,xml中使用的是${sql}进行执行的,这种方式会报如下错误:
2018-07-08 15:09:04.826 [http-nio-7073-exec-1] ERROR o.a.c.c.C.[.[localhost].[/].[dispatcherServlet] - Servlet.service() for servlet [dispatcherServlet] in context with path [] threw exception [Request processing failed; nested exception is org.springframework.jdbc.UncategorizedSQLException:
### Error updating database.  Cause: java.sql.SQLException: sql injection violation, class com.alibaba.druid.sql.ast.statement.SQLCommentStatement not allow : COMMENT ON TABLE RULE_EXECUTE_PLAN IS '规则执行'
### SQL: COMMENT ON TABLE RULE_EXECUTE_PLAN IS '规则执行'
### Cause: java.sql.SQLException: sql injection violation, class com.alibaba.druid.sql.ast.statement.SQLCommentStatement not allow : COMMENT ON TABLE RULE_EXECUTE_PLAN IS '规则执行'
; uncategorized SQLException for SQL []; SQL state [null]; error code [0]; sql injection violation, class com.alibaba.druid.sql.ast.statement.SQLCommentStatement not allow : COMMENT ON TABLE RULE_EXECUTE_PLAN IS '规则执行'; nested exception is java.sql.SQLException: sql injection violation, class com.alibaba.druid.sql.ast.statement.SQLCommentStatement not allow : COMMENT ON TABLE RULE_EXECUTE_PLAN_201808 IS '规则执行计划'] with root cause
这个错误告诉你,这种方式会造成SQL注入,当你又不得不用这种方式时,最简单粗暴的方式就是将配置的wall去掉。


 1093
1093

 被折叠的 条评论
为什么被折叠?
被折叠的 条评论
为什么被折叠?
 到【灌水乐园】发言


