


上次我们完成了日志模块的配置和基础增删改查类,下面我们根据用户的需求来正式开发项目的业务模块。
下面我们主要来开发系统用户管理的模块
我们有用户的功能说明书,打开功能说明书来看看这个模块需要什么功能:
功能说明
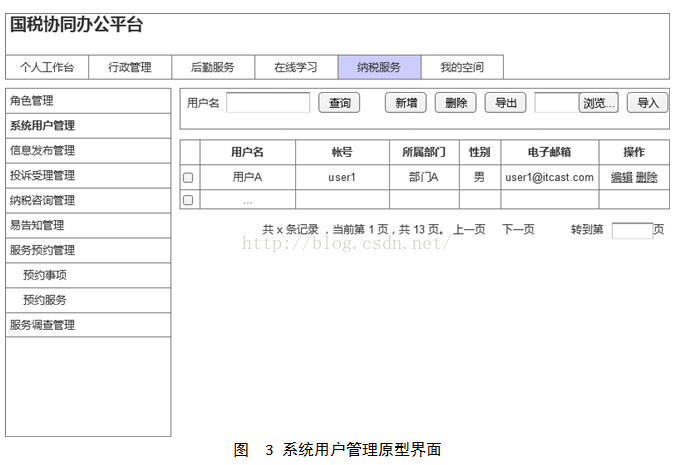
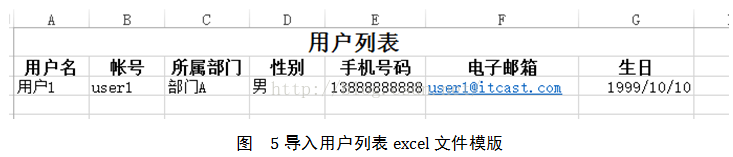
用户管理:可以根据用户名查询系统用户;在页面中点击“新增”可以添加用户、点击删除可以批量删除选中的用户。“导出”则导出所有的用户列表到excel文件中并弹出下载提示框给用户下载;“导入”将需要用户将本地的用户列表按照一定格式将excel中的用户导入到系统中(导入用户的密码默认为123456)。在用户列表中显示用户名、帐号、所属部门、性别、电子邮箱、操作;其中操作列中包括编辑、删除两个功能;点击“编辑”则编辑用户信息,删除则删除该用户。
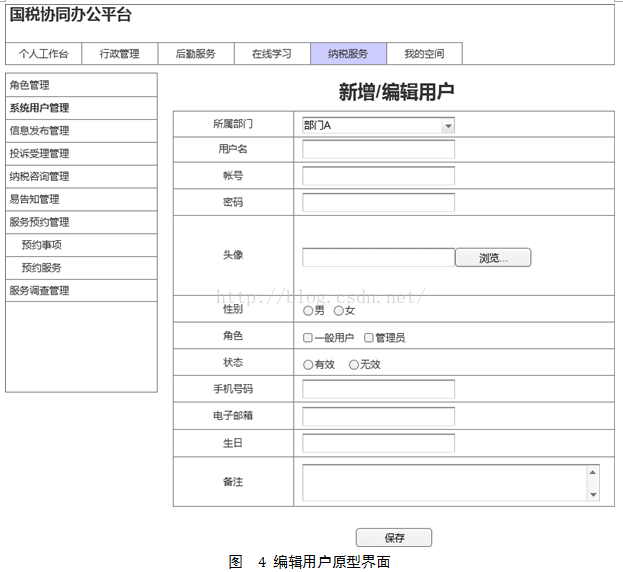
编辑用户:编辑用户的所属部门(部门A/B)、用户名、帐号、密码、性别、角色(一般用户、管理员)、手机号码、电子邮箱、生日、备注。
我们的角色分配以后在进行讲解,这次我们主要做user的单表增删改查。
我们新建一个实体类user:
接下来写我们的映射文件:
接下来编写我们的Dao层:
实现类:
接下来写我们的Service业务层:
实现类:
记下来写我们的Action层:
首先来分析,一个CRUD的Action中包含:
(1)列表页面
(2)跳转到新增页面
(3)保存新增
(4)跳转到编辑界面
(5)保存编辑
(6)删除
(7)批量删除
所以:
加下来写我们User的user-struts.xml和user-spring.xml配置文件:
先在总的spring配置文件中加:
然后编写user-spring.xml:
接下来配置struts的配置文件user-struts.xml:
然后将user-struts.xml加入到总配置文件中:
至此我们后台全部工作完成。
接下来将美工给我们的前台页面引入(js/css/jsp/),因为我们每一个jsp页面都要使用一些相同的js和css,所以我们先把这些引入写在一个header中,然后在每个页面头部引用它,就可以防止代码冗余,同时使修改更容易:
heander.jsp(放在了common文件夹下):
我们在其他所有需要引入这些配置的页面使用静态引入:
我们把项目运行之后,看一下我们这个页面:

下面我们主要来开发系统用户管理的模块
我们有用户的功能说明书,打开功能说明书来看看这个模块需要什么功能:
功能说明
用户管理:可以根据用户名查询系统用户;在页面中点击“新增”可以添加用户、点击删除可以批量删除选中的用户。“导出”则导出所有的用户列表到excel文件中并弹出下载提示框给用户下载;“导入”将需要用户将本地的用户列表按照一定格式将excel中的用户导入到系统中(导入用户的密码默认为123456)。在用户列表中显示用户名、帐号、所属部门、性别、电子邮箱、操作;其中操作列中包括编辑、删除两个功能;点击“编辑”则编辑用户信息,删除则删除该用户。
编辑用户:编辑用户的所属部门(部门A/B)、用户名、帐号、密码、性别、角色(一般用户、管理员)、手机号码、电子邮箱、生日、备注。
我们的角色分配以后在进行讲解,这次我们主要做user的单表增删改查。
我们新建一个实体类user:
package cn.edu.hpu.tax.user.entity;

import java.io.Serializable;
import java.util.Date;

public class User implements Serializable{
	private String id;
	private String name;

	private String account;
	private String password;
	//所属部门
	private String dept;
	//头像(相对地址)
	private String headImg;
	//性别
	private boolean gender;
	private String email;
	private String mobile;
	//备注
	private String memo;
	private Date birthday;
	private String state;

	//用户状态
	public final static String USER_STATE_VALID = "1";//有效
	public final static String USER_STATE_INVALID = "0";//无效

	public User() {

	}
	public User(String id, String name, String account, String password, String dept, String headImg, boolean gendar, String email, String mobile, String memo, Date birthday, String state) {
		this.id = id;
		this.name = name;
		this.account = account;
		this.password = password;
		this.dept = dept;
		this.headImg = headImg;
		this.gender = gendar;
		this.email = email;
		this.mobile = mobile;
		this.memo = memo;
		this.birthday = birthday;
		this.state = state;
	}
	//get与set方法省略
}
接下来写我们的映射文件:
<?xml version="1.0" encoding="utf-8"?>
<!DOCTYPE hibernate-mapping PUBLIC "-//Hibernate/Hibernate Mapping DTD 3.0//EN"
"http://hibernate.sourceforge.net/hibernate-mapping-3.0.dtd">


<hibernate-mapping>
	<class name="cn.edu.hpu.tax.user.entity.User" table="user">
		<id name="id" type="java.lang.String">
			<column name="id" length="32" />
			<generator class="uuid.hex" />
		</id>
		<property name="name" type="java.lang.String">
			<column name="name" length="20" not-null="true" />
		</property>
		<property name="dept" type="java.lang.String">
			<column name="dept" length="20" not-null="true" />
		</property>
		<property name="account" type="java.lang.String">
			<column name="account" length="50" not-null="true" />
		</property>
		<property name="password" type="java.lang.String">
			<column name="password" length="50" not-null="true" />
		</property>
		<property name="headImg" type="java.lang.String">
			<column name="headImg" length="100" />
		</property>
		<property name="gender" type="java.lang.Boolean">
			<column name="gender" />
		</property>
		<property name="email" type="java.lang.String">
			<column name="email" length="50" />
		</property>
		<property name="mobile" type="java.lang.String">
			<column name="mobile" length="20" />
		</property>
		<property name="birthday" type="java.util.Date">
			<column name="birthday" length="10" />
		</property>
		<property name="state" type="java.lang.String">
			<column name="state" length="1" />
		</property>
		<property name="memo" type="java.lang.String">
			<column name="memo" length="200" />
		</property>
	</class>


</hibernate-mapping>
接下来编写我们的Dao层:
package cn.edu.hpu.tax.user.dao;

import cn.edu.hpu.tax.core.dao.BaseDao;
import cn.edu.hpu.tax.user.entity.User;

public interface UserDao extends BaseDao<User>{

}
实现类:
package cn.edu.hpu.tax.user.dao.impl;

import cn.edu.hpu.tax.core.dao.impl.BaseDaoImpl;
import cn.edu.hpu.tax.user.dao.UserDao;
import cn.edu.hpu.tax.user.entity.User;

public class UserDaoImpl extends BaseDaoImpl<User> implements UserDao{


}
接下来写我们的Service业务层:
package cn.edu.hpu.tax.user.service;

import java.io.Serializable;
import java.util.List;

import cn.edu.hpu.tax.user.entity.User;


public interface UserService {
	//新增
	public void save(User user);
	//更新
	public void update(User user);
	//根据id删除
	public void delete(Serializable id);
	//根据id查找
	public User findObjectById(Serializable id);
	//查找列表
	public List<User> findObjects();
}
实现类:
package cn.edu.hpu.tax.user.service.impl;

import java.io.Serializable;
import java.util.List;

import javax.annotation.Resource;

import org.springframework.stereotype.Service;

import cn.edu.hpu.tax.user.dao.UserDao;
import cn.edu.hpu.tax.user.entity.User;
import cn.edu.hpu.tax.user.service.UserService;

@Service("userService")
public class UserServiceImpl implements UserService{


	@Resource
	private UserDao userDao;

	@Override
	public void save(User user) {
		userDao.save(user);
	}


	@Override
	public void update(User user) {
		userDao.update(user);
	}

	@Override
	public void delete(Serializable id) {
		userDao.delete(id);
	}


	@Override
	public User findObjectById(Serializable id) {
		return userDao.findObjectById(id);
	}


	@Override
	public List<User> findObjects() {
		return userDao.findObjects();
	}


}
记下来写我们的Action层:
首先来分析,一个CRUD的Action中包含:
(1)列表页面
(2)跳转到新增页面
(3)保存新增
(4)跳转到编辑界面
(5)保存编辑
(6)删除
(7)批量删除
所以:
package cn.edu.hpu.tax.user.action;

import java.util.List;

import javax.annotation.Resource;

import cn.edu.hpu.tax.user.entity.User;
import cn.edu.hpu.tax.user.service.UserService;

import com.opensymphony.xwork2.ActionSupport;

public class UserAction extends ActionSupport{

	@Resource
	private UserService userService;
	private List<User> userList;
	private User user;

	//列表页面
	public String listUI(){
		userList=userService.findObjects();
		return "listUI";
	}
	//跳转到新增页面
	public String addUI(){
		return "addUI";
	}
	//保存新增
	public String add(){
		if(user!=null){
			userService.save(user);
		}
		return listUI();
	}
	//跳转到编辑界面
	public String editUI(){
		if(user!=null && user.getId()!=null){
			user=userService.findObjectById(user.getId());
		}
		return "editUI";
	}
	//保存编辑
	public String edit(){
		if(user!=null){
			userService.update(user);
		}
		return listUI();
	}
	//删除
	public String delete(){
		if(user!=null && user.getId()!=null){
			userService.delete(user.getId());
		}
		return listUI();
	}
	//批量删除
	public String deleteSelected(){
		return listUI();
	}


	public UserService getUserService() {
		return userService;
	}
	public void setUserService(UserService userService) {
		this.userService = userService;
	}
	public List<User> getUserList() {
		return userList;
	}
	public void setUserList(List<User> userList) {
		this.userList = userList;
	}
	public User getUser() {
		return user;
	}
	public void setUser(User user) {
		this.user = user;
	}
}加下来写我们User的user-struts.xml和user-spring.xml配置文件:
先在总的spring配置文件中加:
<!-- 用来注入sessionFactory的抽象类 -->
<bean id="xDao" abstract="true">
	<property name="sessionFactory" ref="sessionFactory"></property>
</bean>
然后编写user-spring.xml:
<?xml version="1.0" encoding="UTF-8"?>
<beans xmlns="http://www.springframework.org/schema/beans"
	xmlns:xsi="http://www.w3.org/2001/XMLSchema-instance" xmlns:p="http://www.springframework.org/schema/p"
	xmlns:context="http://www.springframework.org/schema/context"
	xmlns:aop="http://www.springframework.org/schema/aop" xmlns:tx="http://www.springframework.org/schema/tx"
	xsi:schemaLocation=" http://www.springframework.org/schema/beans http://www.springframework.org/schema/beans/spring-beans-3.0.xsd
	http://www.springframework.org/schema/aop http://www.springframework.org/schema/aop/spring-aop-3.0.xsd
	http://www.springframework.org/schema/tx http://www.springframework.org/schema/tx/spring-tx-3.0.xsd
	http://www.springframework.org/schema/context http://www.springframework.org/schema/context/spring-context-3.0.xsd">

    <!-- 继承了注入sessionFactory的抽象类,不用反复出入sessionFactory -->
    <bean id="userDao" class="cn.edu.hpu.tax.user.dao.impl.UserDaoImpl" parent="xDao"></bean>

    <!-- 扫描Service -->
    <context:component-scan base-package="cn.edu.hpu.tax.user.service.impl"></context:component-scan>
</beans>
接下来配置struts的配置文件user-struts.xml:
<?xml version="1.0" encoding="UTF-8" ?>
<!DOCTYPE struts PUBLIC
	"-//Apache Software Foundation//DTD Struts Configuration 2.3//EN"
	"http://struts.apache.org/dtds/struts-2.3.dtd">


<struts>
	<package name="user-action" namespace="/tax" extends="struts-default">
		<action name="user_*" class="cn.edu.hpu.tax.user.action.UserAction" method="{1}">
			<result name="{1}">/WEB-INF/jsp/tax/user/{1}.jsp</result>
		</action>
	</package>
</struts>
然后将user-struts.xml加入到总配置文件中:
<!-- 包含user的struts配置文件 -->
<include file="cn/edu/hpu/tax/user/conf/user-struts.xml"/>
至此我们后台全部工作完成。
接下来将美工给我们的前台页面引入(js/css/jsp/),因为我们每一个jsp页面都要使用一些相同的js和css,所以我们先把这些引入写在一个header中,然后在每个页面头部引用它,就可以防止代码冗余,同时使修改更容易:
heander.jsp(放在了common文件夹下):
<%@ page language="java" import="java.util.*" pageEncoding="utf-8"%>
<%@ taglib prefix="s" uri="/struts-tags"%>
<%
    pageContext.setAttribute("basePath", request.getContextPath()+"/") ;
%>
<script type="text/javascript" src="${basePath}js/jquery/jquery-1.10.2.min.js"></script>
<link href="${basePath}css/skin1.css" rel="stylesheet" type="text/css" />
我们在其他所有需要引入这些配置的页面使用静态引入:
<%@include file="/common/header.jsp" %>我们的用户列表界面:
<%@ page contentType="text/html;charset=UTF-8" language="java" %>
<html>
<head>
    <title>用户管理</title>
    <%@include file="/common/header.jsp" %>
    <script type="text/javascript">
      	//全选、全反选
		function doSelectAll(){
			// jquery 1.6 前
			//$("input[name=selectedRow]").attr("checked", $("#selAll").is(":checked"));
			//prop jquery 1.6+建议使用
			$("input[name=selectedRow]").prop("checked", $("#selAll").is(":checked"));
		}
    </script>
</head>
<body class="rightBody">
<form name="form1" action="" method="post" enctype="multipart/form-data">
    <div class="p_d_1">
        <div class="p_d_1_1">
            <div class="content_info">
                <div class="c_crumbs"><div><b></b><strong>用户管理</strong></div> </div>
                <div class="search_art">
                    <li>
                        用户名:<s:textfield name="user.name" cssClass="s_text" id="userName"  cssStyle="width:160px;"/>
                    </li>
                    <li><input type="button" class="s_button" value="搜 索" οnclick="doSearch()"/></li>
                    <li style="float:right;">
                        <input type="button" value="新增" class="s_button" οnclick="doAdd()"/>
                        <input type="button" value="删除" class="s_button" οnclick="doDeleteAll()"/>
                        <input type="button" value="导出" class="s_button" οnclick="doExportExcel()"/>
                    	<input name="userExcel" type="file"/>
                        <input type="button" value="导入" class="s_button" οnclick="doImportExcel()"/>


                    </li>
                </div>


                <div class="t_list" style="margin:0px; border:0px none;">
                    <table width="100%" border="0">
                        <tr class="t_tit">
                            <td width="30" align="center"><input type="checkbox" id="selAll" οnclick="doSelectAll()" /></td>
                            <td width="140" align="center">用户名</td>
                            <td width="140" align="center">帐号</td>
                            <td width="160" align="center">所属部门</td>
                            <td width="80" align="center">性别</td>
                            <td align="center">电子邮箱</td>
                            <td width="100" align="center">操作</td>
                        </tr>

                            <tr bgcolor="f8f8f8">
                                <td align="center"><input type="checkbox" name="selectedRow" value=""/></td>
                                <td align="center">xxx</td>
                                <td align="center"></td>
                                <td align="center"></td>
                                <td align="center"></td>
                                <td align="center"></td>
                                <td align="center">
                                    <a href="javascript:doEdit(id)">编辑</a>
                                    <a href="javascript:doDelete(id)">删除</a>
                                </td>
                            </tr>

                    </table>
                </div>
            </div>
        <div class="c_pate" style="margin-top: 5px;">
		<table width="100%" class="pageDown" border="0" cellspacing="0"
			cellpadding="0">
			<tr>
				<td align="right">
                 	总共1条记录,当前第 1 页,共 1 页
                            <a href="#">上一页</a>  <a href="#">下一页</a>
					到 <input type="text" style="width: 30px;" οnkeypress="if(event.keyCode == 13){doGoPage(this.value);}" min="1"
					max="" value="1" />
			    </td>
			</tr>
		</table>
        </div>
        </div>
    </div>
</form>


</body>
</html>
我们把项目运行之后,看一下我们这个页面:
现在还是什么都没有的状态,我们下一次完善我们的这些操作包括输出信息。
源代码在下一篇文章中:http://blog.csdn.net/acmman/article/details/49331915
转载请注明出处:http://blog.csdn.net/acmman/article/details/49329509


 214
214

 被折叠的 条评论
为什么被折叠?
被折叠的 条评论
为什么被折叠?
 到【灌水乐园】发言


