


一.普通通知
这是最常见通知样式,如下图
默认样式,包括一个标题和一个内容,内容只显示一行 ,多余的内容会以省略号替代。
效果图:(第三行内容在低版本不一定显示)

//为了版本兼容 选择V7包下的NotificationCompat进行构造
NotificationCompat.Builder builder = new NotificationCompat.Builder(this);
//Ticker是状态栏显示的提示
 builder.setTicker("简单Notification") ;
//第一行内容 通常作为通知栏标题
 builder.setContentTitle("标题") ;
//第二行内容 通常是通知正文
 builder.setContentText("通知内容") ;
//第三行内容 通常是内容摘要什么的 在低版本机器上不一定显示
 builder.setSubText("这里显示的是通知第三行内容!");
 //ContentInfo 在通知的右侧 时间的下面 用来展示一些其他信息
 //builder.setContentInfo("2");
 //number设计用来显示同种通知的数量和ContentInfo的位置一样,如果设置了ContentInfo则number会被隐藏
builder.setNumber(2);
 //可以点击通知栏的删除按钮删除
builder.setAutoCancel(true);
 //系统状态栏显示的小图标
 builder.setSmallIcon(R.mipmap.ic_launcher);
 //下拉显示的大图标
 builder.setLargeIcon(BitmapFactory.decodeResource(getResources(),R.drawable.push));
 Intent intent = new Intent(this,SettingsActivity.class);
 PendingIntent pIntent = PendingIntent.getActivity(this,1,intent,0);
 //点击跳转的intent
 builder.setContentIntent(pIntent);
 //通知默认的声音 震动 呼吸灯
 builder.setDefaults(NotificationCompat.DEFAULT_ALL);
 Notification notification = builder.build();
 (NotificationManager) getSystemService(NOTIFICATION_SERVICE).notify(TYPE_Normal,notification);
注意:
build内提供了很多设置,但是在不同的系统版本显示有很多差异,使用时需要注意
- setTicker 通知到来时低版本上会在系统状态栏显示一小段时间 5.0以上版本好像没有用了
- setContentInfo和setNumber同时使用 number会被隐藏
- setSubText显示在通知栏的第三行文本,在低版本上不显示,比如4.0系统
- setVibrate设置震动 参数是个long[]{震动时长,间隔时长,震动时长,间隔时长…}单位毫秒 设置提醒声音 setSound(Uri sound) 一般默认的就好
- builder.setLights()设置呼吸灯的颜色 并不是所有颜色都被支持 个人感觉没什么用
- 清除通知栏特定通知 manager.cancel(id) id即为manger.notify()的第一个参数
二.下载进度的通知
效果图:

 NotificationCompat.Builder builder = new NotificationCompat.Builder(this);
        builder.setSmallIcon(R.mipmap.ic_launcher);
        builder.setLargeIcon(BitmapFactory.decodeResource(getResources(),R.drawable.push));
        //禁止用户点击删除按钮删除
        builder.setAutoCancel(false);
        //禁止滑动删除
        builder.setOngoing(true);
        //取消右上角的时间显示
        builder.setShowWhen(false);
        builder.setContentTitle("下载中..."+progress+"%");
        builder.setProgress(100,progress,false);
        //builder.setContentInfo(progress+"%");
        builder.setOngoing(true);
        builder.setShowWhen(false);
        Intent intent = new Intent(this,DownloadService.class);
        intent.putExtra("command",1);
        Notification notification = builder.build();
        (NotificationManager) getSystemService(NOTIFICATION_SERVICE).notify(MainActivity.TYPE_Progress,notification);
注意事项
1. setProgress的第三个bool类型的参数表示progressbar的Indeterminate属性 指是否使用不确定模式
2. 高版本上progressbar的进度值可以在setContentInfo显示,但是低版本上使用这个属性会导致progressbar不显示,setContentText一样
三.BigTextStyle通知
点击(不同机型的操作可能不同)后展开可显示大段文字内容的通知
效果图
点击前 (不同机型的操作可能不同,一些机型是两只手指同时向上向下拉,一些是直接下拉)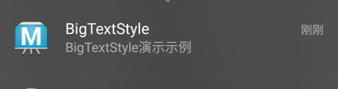
操作后:

 NotificationCompat.Builder builder = new NotificationCompat.Builder(this);
        builder.setContentTitle("BigTextStyle");
        builder.setContentText("BigTextStyle演示示例");
        builder.setSmallIcon(R.mipmap.ic_launcher);
        builder.setLargeIcon(BitmapFactory.decodeResource(getResources(),R.drawable.notification));
        android.support.v4.app.NotificationCompat.BigTextStyle style = new android.support.v4.app.NotificationCompat.BigTextStyle();
        style.bigText("这里是点击通知后要显示的正文,可以换行可以显示很长很长很长很长很长很长很长很长很长很长很长很长很长很长很长很长很长很长");
        style.setBigContentTitle("点击后的标题");
        //SummaryText没什么用 可以不设置
        style.setSummaryText("末尾只一行的文字内容");
        builder.setStyle(style);
        builder.setAutoCancel(true);
        Intent intent = new Intent(this,SettingsActivity.class);
        PendingIntent pIntent = PendingIntent.getActivity(this,1,intent,0);
        builder.setContentIntent(pIntent);
        builder.setDefaults(NotificationCompat.DEFAULT_ALL);
        Notification notification = builder.build();
        (NotificationManager) getSystemService(NOTIFICATION_SERVICE).notify(TYPE_BigText,notification);
注意事项
1. 使用类 android.support.v4.app.NotificationCompat.BigTextStyle
2. 在低版本系统上只显示点击前的普通通知样式 如4.4可以点击展开,在4.0系统上就不行
3. 点击前后的ContentTitle、ContentText可以不一致,bigText内容可以自动换行 好像最多5行的样子
四.InboxStyle(展开操作同上)
与bigTextStyle类似,点击(操作可能不同)前显示普通通知样式,点击后展开
效果图 (点击后) 
代码举例
    public void inBoxStyle(){
        NotificationCompat.Builder builder = new NotificationCompat.Builder(this)
        builder.setContentTitle("InboxStyle")
        builder.setContentText("InboxStyle演示示例")
        builder.setSmallIcon(R.mipmap.ic_launcher)
        builder.setLargeIcon(BitmapFactory.decodeResource(getResources(),R.drawable.notification))
        android.support.v4.app.NotificationCompat.InboxStyle style = new android.support.v4.app.NotificationCompat.InboxStyle()
        style.setBigContentTitle("BigContentTitle")
                .addLine("第一行,第一行,第一行,第一行,第一行,第一行,第一行")
                .addLine("第二行")
                .addLine("第三行")
                .addLine("第四行")
                .addLine("第五行")
                .setSummaryText("SummaryText")
        builder.setStyle(style)
        builder.setAutoCancel(true)
        Intent intent = new Intent(this,SettingsActivity.class)
        PendingIntent pIntent = PendingIntent.getActivity(this,1,intent,0)
        builder.setContentIntent(pIntent)
        builder.setDefaults(NotificationCompat.DEFAULT_ALL)
        Notification notification = builder.build()
        manger.notify(TYPE_Inbox,notification)
    }
注意事项
1. 使用类android.support.v4.app.NotificationCompat.InboxStyle
2. 每行内容过长时并不会自动换行
3. addline可以添加多行 但是多余5行的时候每行高度会有截断
4. 同BigTextStyle 低版本上系统只能显示普通样式
五.BigPictureStyle(展开操作同上)
点击后可以显示一个大图的通知
效果图(点击后) 
代码举例
public void bigPictureStyle(){
        NotificationCompat.Builder builder = new NotificationCompat.Builder(this)
        builder.setContentTitle("BigPictureStyle")
        builder.setContentText("BigPicture演示示例")
        builder.setSmallIcon(R.mipmap.ic_launcher)
        builder.setDefaults(NotificationCompat.DEFAULT_ALL)
        builder.setLargeIcon(BitmapFactory.decodeResource(getResources(),R.drawable.notification))
        android.support.v4.app.NotificationCompat.BigPictureStyle style = new android.support.v4.app.NotificationCompat.BigPictureStyle()
        style.setBigContentTitle("BigContentTitle")
        style.setSummaryText("SummaryText")
        style.bigPicture(BitmapFactory.decodeResource(getResources(),R.drawable.small))
        builder.setStyle(style)
        builder.setAutoCancel(true)
        Intent intent = new Intent(this,ImageActivity.class)
        PendingIntent pIntent = PendingIntent.getActivity(this,1,intent,0)
        //设置点击大图后跳转
        builder.setContentIntent(pIntent)
        Notification notification = builder.build()
        manger.notify(TYPE_BigPicture,notification)
    }
注意事项
1. 使用类android.support.v4.app.NotificationCompat.BigPictureStyle
2. style.bigPicture传递的是个bitmap对象 所以也不应该传过大的图 否则会oom
3. 同BigTextStyle 低版本上系统只能显示普通样式
六.hangup横幅通知(系统通知设置关闭了应用的横幅通知则不会显示)
类似于手机QQ消息的通知,不显示在通知栏而是以横幅的模式显示在其他应用上方
效果图 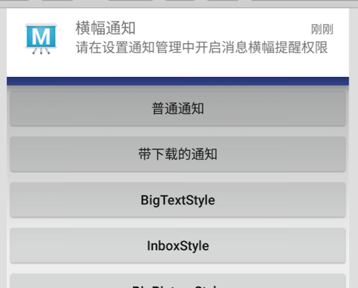
代码示例
NotificationCompat.Builder builder = new NotificationCompat.Builder(this)
        builder.setContentTitle("横幅通知")
        builder.setContentText("请在设置通知管理中开启消息横幅提醒权限")
        builder.setDefaults(NotificationCompat.DEFAULT_ALL)
        builder.setSmallIcon(R.mipmap.ic_launcher)
        builder.setLargeIcon(BitmapFactory.decodeResource(getResources(),R.drawable.notification))
        Intent intent = new Intent(this,ImageActivity.class)
        PendingIntent pIntent = PendingIntent.getActivity(this,1,intent,0)
        builder.setContentIntent(pIntent)
        //这句是重点
        builder.setFullScreenIntent(pIntent,true)
        builder.setAutoCancel(true)
        Notification notification = builder.build()
        manger.notify(TYPE_Hangup,notification)
注意事项
1. 此种效果只在5.0以上系统中有效
2. mainfest中需要添加<uses-permission android:name="android.permission.SYSTEM_ALERT_WINDOW" />
3. 很可能还需要在设置开启横幅通知权限(在设置通知管理中)
4. 在部分改版rom上可能会直接弹出应用而不是显示横幅
七、播放通知
主要是用来关联音频播放服务的,点击后不会自动消失,通知栏的清空也不可用
效果图
点击前 
点击展开后 
在4.0系统上的效果 不能展开但是可以最多显示3个按钮外加一个CancelButton 
代码示例
    private void mediaStyle(){
        NotificationCompat.Builder builder = new NotificationCompat.Builder(this)
        builder.setContentTitle("MediaStyle")
        builder.setContentText("Song Title")
        builder.setSmallIcon(R.mipmap.ic_launcher)
        builder.setLargeIcon(BitmapFactory.decodeResource(getResources(),R.drawable.notification))
        builder.setDefaults(NotificationCompat.DEFAULT_ALL)
        Intent intent = new Intent(this,ImageActivity.class)
        PendingIntent pIntent = PendingIntent.getActivity(this,1,intent,0)
        builder.setContentIntent(pIntent)
        //第一个参数是图标资源id 第二个是图标显示的名称,第三个图标点击要启动的PendingIntent
        builder.addAction(R.drawable.ic_previous_white,"",null)
        builder.addAction(R.drawable.ic_stop_white,"",null)
        builder.addAction(R.drawable.ic_play_arrow_white_18dp,"",pIntent)
        builder.addAction(R.drawable.ic_next_white,"",null)
        NotificationCompat.MediaStyle style = new NotificationCompat.MediaStyle()
        style.setMediaSession(new MediaSessionCompat(this,"MediaSession",
                new ComponentName(MainActivity.this,Intent.ACTION_MEDIA_BUTTON),null).getSessionToken())
        //CancelButton在5.0以下的机器有效
        style.setCancelButtonIntent(pIntent)
        style.setShowCancelButton(true)
        //设置要现实在通知右方的图标 最多三个
        style.setShowActionsInCompactView(2,3)
        builder.setStyle(style)
        builder.setShowWhen(false)
        Notification notification = builder.build()
        manger.notify(TYPE_Media,notification)
    }
注意事项
1. 使用类v7包下的NotificationCompat.MediaStyle
2. addAction方法并普通样式也可以用,使用后普通通知可以点击展开,展开部分会显示一排添加的图标,并且可以给每个图标设置不同的点击事件
3. 最多可以添加5哥action 并排显示在点击展开的部分
4. setShowActionsInCompactView的参数是添加的action在所有action组成的数组中的下标,从0开始
5. setShowActionsInCompactView设置的action会显示在点击前的通知的右侧,低版本上也可以显示
6. setShowCancelButton(true)会在通知的右上部分显示一个删除图标 5.0以下有效
八.自定义通知栏布局(高度是系统固定的,如果文字过多也会显示不全)
其实就是设置一个romateViews
演示效果 
代码示例
    //command是自定义用来区分各种点击事件的
    private void sendCustomerNotification(int command){
        NotificationCompat.Builder builder = new NotificationCompat.Builder(this)
        builder.setContentTitle("Notification")
        builder.setContentText("自定义通知栏示例")
        builder.setSmallIcon(R.mipmap.ic_launcher)
        //builder.setLargeIcon(BitmapFactory.decodeResource(getResources(),R.drawable.push))
        builder.setAutoCancel(false)
        builder.setOngoing(true)
        builder.setShowWhen(false)
        RemoteViews remoteViews = new RemoteViews(getPackageName(),R.layout.notification_template_customer)
        remoteViews.setTextViewText(R.id.title,"Notification")
        remoteViews.setTextViewText(R.id.text,"song"+index)
        if(command==CommandNext){
            remoteViews.setImageViewResource(R.id.btn1,R.drawable.ic_pause_white)
        }else if(command==CommandPlay){
            if(playerStatus==StatusStop){
                remoteViews.setImageViewResource(R.id.btn1,R.drawable.ic_pause_white)
            }else{
                remoteViews.setImageViewResource(R.id.btn1,R.drawable.ic_play_arrow_white_18dp)
            }
        }
        Intent Intent1 = new Intent(this,MediaService.class)
        Intent1.putExtra("command",CommandPlay)
        //getService(Context context, int requestCode, @NonNull Intent intent, @Flags int flags)
        //不同控件的requestCode需要区分开 getActivity broadcoast同理
        PendingIntent PIntent1 =  PendingIntent.getService(this,5,Intent1,0)
        remoteViews.setOnClickPendingIntent(R.id.btn1,PIntent1)

        Intent Intent2 = new Intent(this,MediaService.class)
        Intent2.putExtra("command",CommandNext)
        PendingIntent PIntent2 =  PendingIntent.getService(this,6,Intent2,0)
        remoteViews.setOnClickPendingIntent(R.id.btn2,PIntent2)

        Intent Intent3 = new Intent(this,MediaService.class)
        Intent3.putExtra("command",CommandClose)
        PendingIntent PIntent3 =  PendingIntent.getService(this,7,Intent3,0)
        remoteViews.setOnClickPendingIntent(R.id.btn3,PIntent3)

        builder.setContent(remoteViews)
        Notification notification = builder.build()
        manger.notify(MainActivity.TYPE_Customer,notification)
    }
布局文件
<?xml version="1.0" encoding="utf-8"?>
<linearlayout xmlns:android="http://schemas.android.com/apk/res/android" android:id="@+id/status_bar_latest_event_content" android:layout_width="match_parent" android:layout_height="64dp" android:gravity="center_vertical" android:orientation="horizontal"></linearlayout>
    <imageview android:id="@+id/icon" android:layout_width="64dp" android:layout_height="50dp" android:scaletype="fitCenter" android:src="@drawable/push"></imageview>
    <linearlayout android:orientation="vertical" android:paddingright="8dp" android:paddingend="8dp" android:paddingtop="2dp" android:paddingbottom="2dp" android:layout_width="0dp" android:layout_weight="1" android:layout_height="wrap_content"></linearlayout>

        <textview android:id="@+id/title" android:textappearance="@style/TextAppearance.StatusBar.EventContent.Title" android:layout_width="fill_parent" android:layout_height="wrap_content" android:singleline="true" android:layout_marginleft="2dp" android:layout_marginstart="2dp" android:paddingtop="6dp" android:paddingbottom="6dp" android:ellipsize="marquee" android:fadingedge="horizontal" android:layout_weight="1" android:text="Title"></textview>

        <textview android:id="@+id/text" android:textappearance="@style/TextAppearance.StatusBar.EventContent" android:layout_width="wrap_content" android:layout_height="wrap_content" android:layout_marginleft="2dp" android:layout_marginstart="2dp" android:singleline="true" android:text="Content" android:ellipsize="marquee" android:fadingedge="horizontal"></textview>

    <linearlayout android:id="@+id/media_actions" android:layout_width="wrap_content" android:layout_height="match_parent" android:layout_gravity="center_vertical|end" android:orientation="horizontal" android:layoutdirection="ltr"></linearlayout>
        <imagebutton style="?android:attr/borderlessButtonStyle" android:id="@+id/btn1" android:layout_width="48dp" android:layout_height="match_parent" android:layout_marginleft="2dp" android:layout_marginright="2dp" android:layout_weight="1" android:src="@drawable/ic_play_arrow_white_18dp" android:gravity="center"></imagebutton>
        <imagebutton style="?android:attr/borderlessButtonStyle" android:id="@+id/btn2" android:layout_width="48dp" android:layout_height="match_parent" android:layout_marginleft="2dp" android:layout_marginright="2dp" android:layout_weight="1" android:src="@drawable/ic_next_white" android:gravity="center"></imagebutton>
        <imagebutton style="?android:attr/borderlessButtonStyle" android:id="@+id/btn3" android:layout_width="48dp" android:layout_height="match_parent" android:layout_marginleft="2dp" android:layout_marginright="2dp" android:layout_weight="1" android:src="@drawable/abc_ic_clear_mtrl_alpha" android:gravity="center"></imagebutton>


    <imageview android:id="@+id/end_padder" android:layout_width="6dp" android:layout_height="match_parent"></imageview>
注意事项
1. 不同控件 PendingIntent.getXXX的requestCode不能相同
2. RemoteViews的具体用法请自行百度 这里就不展开说明了
3. 自定义布局的高需要是64dp 没有为什么 官方给的
4. 需要更改通知栏布局的时候 其实就是以同一个NotifyId发个新的通知 替换掉老的
5. LargeIcon可以不设置,但是smallIcon和title需要设置,不然通知不能显示
6. LargeIcon如果设置了并且自定义布局内相同位置还有一个icon的画在低版本系统上可能会都显示,高版本不会显示LargeIcon


 3563
3563

 被折叠的 条评论
为什么被折叠?
被折叠的 条评论
为什么被折叠?
 到【灌水乐园】发言


