


1、添加依赖
<!-- activeMQ -->
<dependency>
    <groupId>org.springframework.boot</groupId>
    <artifactId>spring-boot-starter-activemq</artifactId>
</dependency>
<!-- activeMQ的连接池 -->
<dependency>
    <groupId>org.apache.activemq</groupId>
    <artifactId>activemq-pool</artifactId>
</dependency>
2、application.properties配置
spring.activemq.broker-url=tcp://localhost:61616
spring.activemq.user=admin
spring.activemq.password=admin
#queue和topic不能同时使用(我不会同时使用),使用topic的时候,把下面这行解除注释
#spring.jms.pub-sub-domain=true
spring.activemq.pool.enabled=false
spring.activemq.pool.max-connections=50
3、生产者
import javax.jms.Destination;
import javax.jms.Queue;
import javax.jms.Topic;
import org.springframework.beans.factory.annotation.Autowired;
import org.springframework.jms.core.JmsMessagingTemplate;
import org.springframework.web.bind.annotation.RequestMapping;
import org.springframework.web.bind.annotation.RestController;

@RestController
public class ProducerController {

    @Autowired
    private JmsMessagingTemplate jmsMessagingTemplate;

    @Autowired
    private Queue queue;

    @Autowired
    private Topic topic;

    /*
     * 消息生产者
     */
    @RequestMapping("/sendQueueMsg")
    public void sendQueueMsg(String msg) {
        this.jmsMessagingTemplate.convertAndSend(this.queue, msg);
    }

    @RequestMapping("/sendTopicMsg")
    public void sendTopicMsg(String msg) {
        // 指定消息发送的目的地及内容
        System.out.println("@@@@@@@@@@@@@@" + msg);
        this.jmsMessagingTemplate.convertAndSend(this.topic, msg);
    }
}
4、消费者
import org.springframework.jms.annotation.JmsListener;
import org.springframework.web.bind.annotation.RestController;

@RestController
public class ConsumerController {

    /**
     * 监听和读取queue消息
     * @param message
     */
    @JmsListener(destination="active.queue")
    public void readActiveQueue(String message) {
        System.out.println("接受到:" + message);
        //TODO something
    }

    /**
     * 监听和读取topic消息
     * @param message
     */
    @JmsListener(destination="active.topic")
    public void readActiveTopic(String message) {
        System.out.println("接受到:" + message);
        //TODO something
    }
}
5、发布/订阅的主题名称
import javax.jms.Queue;
import javax.jms.Topic;

import org.apache.activemq.command.ActiveMQQueue;
import org.apache.activemq.command.ActiveMQTopic;
import org.springframework.context.annotation.Bean;
import org.springframework.context.annotation.Configuration;
import org.springframework.jms.annotation.EnableJms;

@Configuration
@EnableJms
public class JmsConfig {

    private static final String QUEUE_NAME = "active.queue";

    private static final String TOPIC_NAME = "active.topic";


    @Bean
    public Queue queue(){
        return new ActiveMQQueue(QUEUE_NAME);
    }

    @Bean
    public Topic topic(){
        return new ActiveMQTopic(TOPIC_NAME);
    }
}
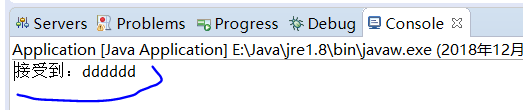
测试
浏览器输入:
http://localhost:8080/sendQueueMsg?msg=dddddd


 1818
1818


 被折叠的 条评论
为什么被折叠?
被折叠的 条评论
为什么被折叠?
 到【灌水乐园】发言


