


前言
ActiveMQ作为几大常用消息中间件广泛应用于应用市场,而springboot更是近几年最流行的快速开发框架,今天来看看,他们是怎么整合的。
版本要求: JDK 1.8, Springboot 2.1.3
前奏
开发的时候,我们又多种方式来配置消息的发送端与接收端,那么,如果当一个客户端既是发送端又是接收端的时候,通过传统的配置就会发现代码重复度太高,不符合代码高复用性的开发思想,那么这个时候我我们应该考虑的是如何将消息的传递与发送通过汇总,统一管理的形式。那么这个时候我们只需要把此消息的单独应用拓展成消息中心的形式即可,怎么做?新建通用消息中心模块,作为三方JAR打入需要使用的客户端,接收端。
搭建准备
POM
        <!-- ActiveMQ -->
		<dependency>
			<groupId>org.springframework.boot</groupId>
			<artifactId>spring-boot-starter-activemq</artifactId>
		</dependency>
		<dependency>
			<groupId>org.apache.activemq</groupId>
			<artifactId>activemq-pool</artifactId>
		</dependency>
导入MQ依赖,打包的时候记得exec一下,以免和主项目JAR包冲突
<classifier>exec</classifier>
YML
spring:
    activemq:
        user: admin
        password: admin
        broker-url: tcp://localhost:61616
        pool:
            enabled: true
            max-connections: 20

#ActiveMQ
ActiveMQ:
    queueName: test-queue
    queueName2: test-queue2
    queueName3: test-queue3
    topicName: test-topic
    topicName2: test-topic2
application-mq.yml,这个文件名字可以随意写,此文件中只需要定义MQ的链接属性以及队列与主题名称,在主项目中通过加载YML形式将这些参数运用到具体项目中,不需要在每个项目中配置一遍,唯一的要求就是所有的项目中用到的队列已经主题都是由该消息中心管理,也就是配置的队列名与主题名
   ActiveMQ:
    queueName: test-queue
    queueName2: test-queue2
    queueName3: test-queue3
    topicName: test-topic
    topicName2: test-topic2
消息中心核心配置
package com.plough.ploughCommon.utils.mq;

import org.apache.activemq.ActiveMQConnectionFactory;
import org.springframework.beans.factory.annotation.Qualifier;
import org.springframework.beans.factory.annotation.Value;
import org.springframework.context.annotation.Bean;
import org.springframework.context.annotation.Configuration;
import org.springframework.jms.config.DefaultJmsListenerContainerFactory;
import org.springframework.jms.config.JmsListenerContainerFactory;
import org.springframework.jms.core.JmsMessagingTemplate;
import org.springframework.jms.core.JmsTemplate;
import org.springframework.jms.support.converter.MappingJackson2MessageConverter;
import org.springframework.jms.support.converter.MessageConverter;
import org.springframework.jms.support.converter.MessageType;

import javax.jms.ConnectionFactory;

/**
* @Title: ActiveMQConfig.java
* @Package com.zhy.springboot.activemq
* @Description: ActiveMQ配置类
* @author John_Hawkings
* @date 2018年12月28日
* @version V1.0
*/
@Configuration
public class ActiveMQConfig{

    @Value("${spring.activemq.user}")
    private String usrName;

    @Value("${spring.activemq.password}")
    private  String password;

    @Value("${spring.activemq.broker-url}")
    private  String brokerUrl;

    @Bean("connectionFactory")
    public ActiveMQConnectionFactory connectionFactory() {
        return new ActiveMQConnectionFactory(usrName, password, brokerUrl);
    }

    @Bean("jacksonJmsMessageConverter")
    public MessageConverter jacksonJmsMessageConverter() {
        MappingJackson2MessageConverter converter = new MappingJackson2MessageConverter();
        converter.setTargetType(MessageType.TEXT);
        converter.setTypeIdPropertyName("_type");
        return converter;
    }

    @Bean("jmsTemplate")
    JmsTemplate jmsTemplate(@Qualifier("jacksonJmsMessageConverter")MessageConverter jacksonJmsMessageConverter,@Qualifier("connectionFactory") ConnectionFactory connectionFactory) {
        JmsTemplate jmsTemplate = new JmsTemplate(connectionFactory);
        jmsTemplate.setMessageConverter(jacksonJmsMessageConverter);
        //设置优先级,0最低,9最高
        jmsTemplate.setPriority(9);
        return jmsTemplate;
    }

    @Bean("jmsMessagingTemplate")
    JmsMessagingTemplate jmsMessagingTemplate(@Qualifier("jacksonJmsMessageConverter")MessageConverter jacksonJmsMessageConverter,@Qualifier("jmsTemplate") JmsTemplate jmsTemplate) {
        JmsMessagingTemplate messagingTemplate = new JmsMessagingTemplate(jmsTemplate);
        messagingTemplate.setJmsMessageConverter(jacksonJmsMessageConverter);
        return messagingTemplate;
    }

   @Bean("jmsListenerContainerQueue")
    public JmsListenerContainerFactory<?> jmsListenerContainerQueue(@Qualifier("connectionFactory")ActiveMQConnectionFactory connectionFactory){
        DefaultJmsListenerContainerFactory bean = new DefaultJmsListenerContainerFactory();
        bean.setConnectionFactory(connectionFactory);
        //设置消息转换器
        bean.setMessageConverter(jacksonJmsMessageConverter());
        return bean;
    }

    @Bean("jmsListenerContainerTopic")
    public JmsListenerContainerFactory<?> jmsListenerContainerTopic(@Qualifier("connectionFactory")ActiveMQConnectionFactory connectionFactory){
        DefaultJmsListenerContainerFactory bean = new DefaultJmsListenerContainerFactory();
        //设置为发布订阅方式, 默认情况下使用的生产消费者方式
        bean.setPubSubDomain(true);
        bean.setConnectionFactory(connectionFactory);
        //设置消息转换器
        bean.setMessageConverter(jacksonJmsMessageConverter());
        return bean;
    }


}
此配置定义了链接工厂以及发送与接收模板的bean,可以在主项目中直接注入使用。
队列发送模板定义
package com.plough.ploughCommon.utils.mq;

import org.apache.activemq.command.ActiveMQQueue;
import org.slf4j.Logger;
import org.slf4j.LoggerFactory;
import org.springframework.beans.factory.annotation.Autowired;
import org.springframework.jms.core.JmsMessagingTemplate;
import org.springframework.stereotype.Component;

import javax.jms.Destination;

/**
 * @description ActiveMQ消息生产者
 * @author zhy
 * @date 2019年6月20日 下午16:57:54
 * @Copyright 版权所有 (c)
 * @memo 无备注说明
 */
@Component
public class ActiveMQQueueProducer {

    private final static Logger logger = LoggerFactory.getLogger(ActiveMQQueueProducer.class);

    @Autowired
    private JmsMessagingTemplate jmsMessagingTemplate;

    /**
     * 发送队列消息
     * @param destinationName 消息目的地标识
     * @param message 消息文本
     */
    public void sendMsg(String destinationName, String message) {
        if(destinationName.indexOf("queue")==-1){
            logger.error("请规范命名:{}",destinationName);
            return;
        }
        logger.info("发布了一条队列{}消息{}。", destinationName, message);
        Destination destination = new ActiveMQQueue(destinationName);
        jmsMessagingTemplate.convertAndSend(destination, message);
    }

}
主题发送模板定义
package com.plough.ploughCommon.utils.mq;

import org.apache.activemq.command.ActiveMQTopic;
import org.slf4j.Logger;
import org.slf4j.LoggerFactory;
import org.springframework.beans.factory.annotation.Autowired;
import org.springframework.jms.core.JmsMessagingTemplate;
import org.springframework.stereotype.Component;

import javax.jms.Destination;

/**
 * @description ActiveMQ消息生产者
 * @author zhy
 * @date 2019年6月20日 下午16:57:54
 * @Copyright 版权所有 (c)
 * @memo 无备注说明
 */
@Component
public class ActiveMQTopicPublisher {
    private final static Logger logger = LoggerFactory.getLogger(ActiveMQTopicPublisher.class);

    @Autowired
    private JmsMessagingTemplate jmsMessagingTemplate;

    /**
     * 发布主题消息
     */
    public void publishMsg(String destinationName, String message) {
        if(destinationName.indexOf("topic")==-1){
            logger.error("请规范命名:{}",destinationName);
            return;
        }
        logger.info("发布了一条主题{},消息{}。", destinationName, message);
        Destination destination = new ActiveMQTopic(destinationName);
        jmsMessagingTemplate.convertAndSend(destination, message);
    }
}
上面这些就是基本的消息中心通用配置了,下面看看生产者与消费者是如何使用消息调度的。需要明确一下,由于消息中心基于springboot搭建,运用的三方系统最好也是springboot项目,以免各种JAR包与其他冲突,各种坑。
注意事项
由于我们是通过将消息中心打成三方JAR包放入主项目中,那么不管是生产者还是消费者都应该扫描消息中心定义的配置,bean以及YML文件,如下所示
package com.eastpay.merchant;

import org.mybatis.spring.annotation.MapperScan;
import org.springframework.beans.factory.config.YamlPropertiesFactoryBean;
import org.springframework.boot.SpringApplication;
import org.springframework.boot.autoconfigure.SpringBootApplication;
import org.springframework.boot.web.servlet.ServletComponentScan;
import org.springframework.context.annotation.Bean;
import org.springframework.context.annotation.EnableAspectJAutoProxy;
import org.springframework.context.support.PropertySourcesPlaceholderConfigurer;
import org.springframework.core.io.ClassPathResource;

@ServletComponentScan(basePackages = {"com.eastpay.merchant.filter"})
@MapperScan({"com.eastpay.*.*.mapper","com.eastpay.permission.mapper"})
@SpringBootApplication(scanBasePackages={"com.eastpay","com.plough.*.*"})
@EnableAspectJAutoProxy(proxyTargetClass = true)
public class MerchantApplication {

	public static void main(String[] args) {
		SpringApplication.run(MerchantApplication.class, args);
	}

	@Bean//扫描多个properties
	public static PropertySourcesPlaceholderConfigurer placeholderConfigurer() {
		PropertySourcesPlaceholderConfigurer configurer = new PropertySourcesPlaceholderConfigurer();
		YamlPropertiesFactoryBean yaml = new YamlPropertiesFactoryBean();
		yaml.setResources(new ClassPathResource("application-mq.yml"));
		configurer.setProperties(yaml.getObject());
		return configurer;
	}


}
首先你的@SpringBootApplication注解应该扫描消息中心的资源,如果不配置,springboot默认加载的是当前文件下启动文件所在同级的所有文件,其次就是,需要以配置bean的方式将消息中心的yml文件加载。
//消息中心所在资源路径为【"com.plough.*.*"】
@SpringBootApplication(scanBasePackages={"com.eastpay","com.plough.*.*"})


@Bean//扫描多个properties,加载消息中心yml配置
	public static PropertySourcesPlaceholderConfigurer placeholderConfigurer() {
		PropertySourcesPlaceholderConfigurer configurer = new PropertySourcesPlaceholderConfigurer();
		YamlPropertiesFactoryBean yaml = new YamlPropertiesFactoryBean();
		yaml.setResources(new ClassPathResource("application-mq.yml"));
		configurer.setProperties(yaml.getObject());
		return configurer;
	}
生产者
package com.plough.ploughOms.controller;
import com.plough.ploughCommon.utils.json.JsonUtil;
import com.plough.ploughCommon.utils.mq.ActiveMQQueueProducer;
import com.plough.ploughCommon.utils.mq.ActiveMQTopicPublisher;
import com.plough.ploughCommon.utils.page.MyPage;
import com.plough.ploughCommon.utils.web.WebUtils;
import com.plough.ploughCommon.utils.webhead.ResVo;
import com.plough.ploughRemote.model.dto.BaUserGovDto;
import com.plough.ploughRemote.model.entity.BaUserGov;
import com.plough.ploughRemote.service.IBaUserGovService;
import org.springframework.beans.factory.annotation.Autowired;
import org.springframework.beans.factory.annotation.Value;
import org.springframework.jms.annotation.JmsListener;
import org.springframework.ui.ModelMap;
import org.springframework.web.bind.annotation.*;
import javax.servlet.http.Cookie;
import javax.servlet.http.HttpServletResponse;
import java.util.HashMap;
import java.util.List;
import java.util.Map;
/**
* @Project:plough-pro
* @Auther: zhong
* @Date: 2019/5/14 01:29
* @Description:
*/
@RestController
@RequestMapping("/test/")
public class TestCl extends BaseCl {
@Autowired
private IBaUserGovService baUserGovService;
@Value("${ActiveMQ.queueName}")
private String queueName;
@Value("${ActiveMQ.queueName2}")
private String queueName2;
@Value("${ActiveMQ.topicName}")
private String topicName;
@Autowired
private ActiveMQQueueProducer queueProducer;
@Autowired
private ActiveMQTopicPublisher topicPublisher;
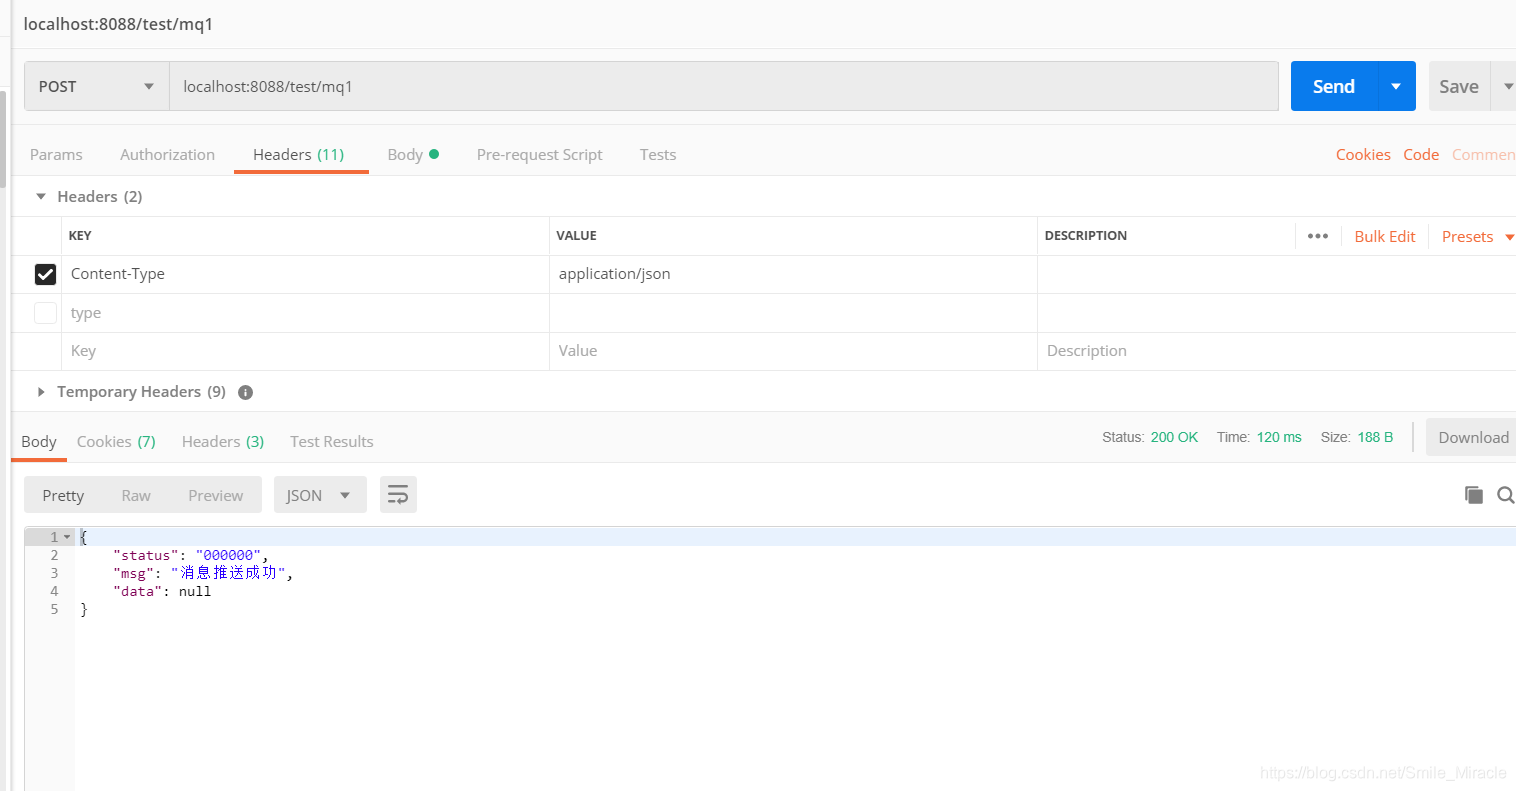
@PostMapping("/mq1")
public ResVo mqTest1(@RequestBody ModelMap map) {
logger.info(">>>>>>>>>信息中心推送消息开始<<<<<<<<<");
ResVo vo = new ResVo();
Map<String,Object> dataMap = new HashMap<>();
dataMap.put("msg","队列测试11111111111111111111111111");
queueProducer.sendMsg(queueName, JsonUtil.toJson(dataMap));
queueProducer.sendMsg(queueName2, JsonUtil.toJson(dataMap));
dataMap.clear();
dataMap.put("msg","主题测试22222222222222222222222222");
topicPublisher.publishMsg(topicName,JsonUtil.toJson(dataMap));
vo.setMsg("消息推送成功");
return vo;
}
@JmsListener(destination = "out.queue")
public void consumerMsgQueue(String msg){
System.out.println(msg);
}
}
消费者
队列消费
package com.zhy.springboot.activemq;

import javax.jms.Message;

import org.apache.activemq.command.ActiveMQTextMessage;
import org.springframework.jms.annotation.JmsListener;
import org.springframework.messaging.handler.annotation.SendTo;
import org.springframework.stereotype.Component;

import com.zhy.springboot.utils.GetMessageContentUtils;

/**
* @Title: QueueListener.java
* @Package com.zhy.springboot.activemq
* @Description: 队列监听
* @author John_Hawkings
* @date 2018年12月28日
* @version V1.0
*/
@Component
public class QueueListener {

	    @JmsListener(destination = "${ActiveMQ.queueName}", containerFactory = "jmsListenerContainerQueue")
	    @SendTo("out.queue") //双向队列
	    public String receive(Message message){
	    	ActiveMQTextMessage objectMsg = (ActiveMQTextMessage)message;
			String msg ="";
			try {
				msg = GetMessageContentUtils.getContent(objectMsg.getText());
				System.out.println(msg);
				return "------------------>我已成功接收到队列信息,QUEUE1";
			} catch (Exception e) {
				e.printStackTrace();
				return "我这边处理异常啦";
			}
	    }
}
主题消费
package com.eastpay.merchant.test11;

import org.apache.activemq.command.ActiveMQTextMessage;
import org.springframework.jms.annotation.JmsListener;
import org.springframework.stereotype.Component;

import javax.jms.Message;


@Component
public class TopicListener {

    @JmsListener(destination = "${ActiveMQ.topicName}", containerFactory = "jmsListenerContainerTopic")
    public void receive(Message message){
    	ActiveMQTextMessage objectMsg = (ActiveMQTextMessage)message;
		String msg ="";
		try {
			msg = GetMessageContentUtils.getContent(objectMsg.getText());
			System.out.println(msg);
		} catch (Exception e) {
			e.printStackTrace();
			return;
		}
    }
}
springboot高度集成常用开发,我们直接用下面注解方式来定义消费通道
@JmsListener(destination = "${ActiveMQ.topicName}", containerFactory = "jmsListenerContainerTopic")
@sendTo为双向队列,及你给我发信息,我收到了会给你回复信息,如果当前项目给多个队列推送,那么消息消费者可以通过定义相应的数据类型来区分
演示
生产者
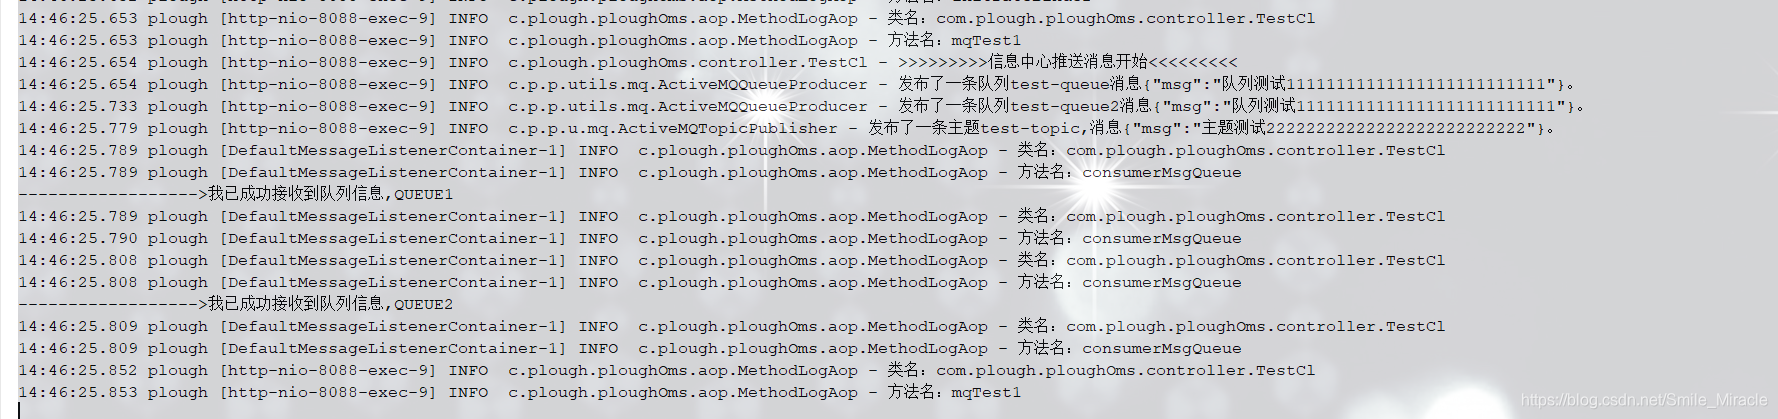
消费者1(同时也是生产者)
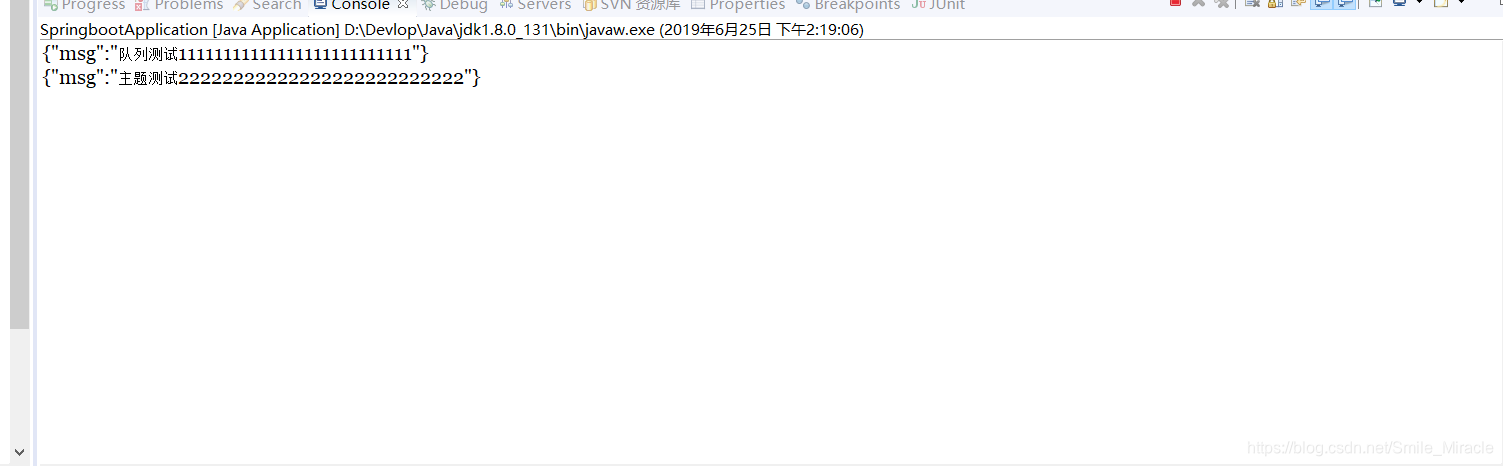
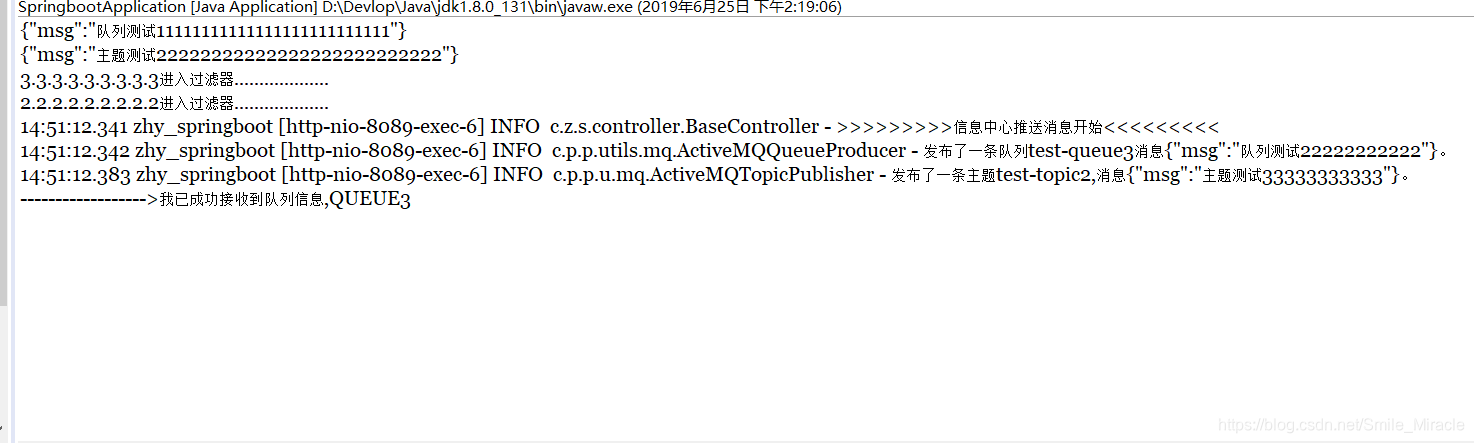
消费者2


可以看到,只要是springboot项目,通过消息中心配置,可以很快很简单的将消息组件搭建起来,通用简便。


 1223
1223


 被折叠的 条评论
为什么被折叠?
被折叠的 条评论
为什么被折叠?
 到【灌水乐园】发言


