


大家好,今天我们将通过一个实例——番茄计时器,学习下如何使用函数生命周期的一个重要函数componentDidMount():componentDidMount(),在组件加载完成, render之后进行调用,只会执行一次。
番茄工作法
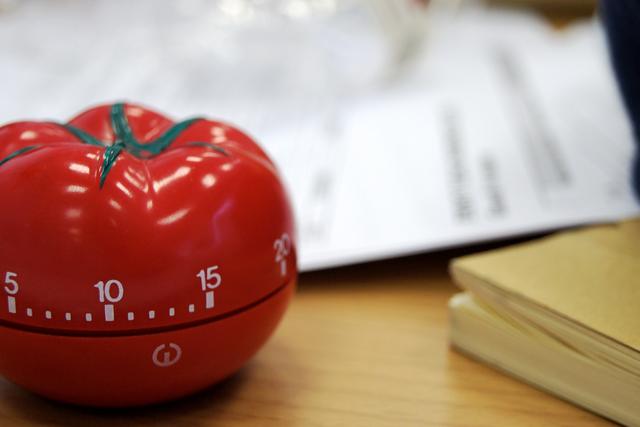
在介绍前我们首先了解下什么是番茄工作法,有利于我们完成这个实例,番茄工作法是简单易行的[时间管理]方法,使用番茄工作法,选择一个待完成的任务,将番茄时间设为25分钟,专注工作,中途不允许做任何与该任务无关的事,直到番茄时钟响起,然后在纸上画一个X短暂休息一下(5分钟就行),每4个番茄时段多休息一会儿。关于详细的介绍可以查看头条百科——https://byte.baike.com/cwiki/番茄工作法&fr=toutiao?tt_from=copy_link&utm_source=copy_link&utm_medium=toutiao_ios&utm_campaign=client_share
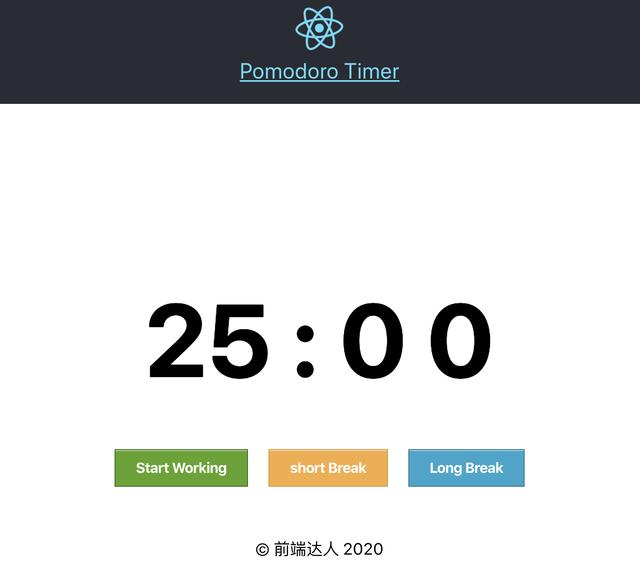
首先看看番茄计时器长啥样
下图就是我们要制作的简易番茄计时器,默认计时器为25分钟,界面上有三个按钮,分别是工作、短时间休息、长时间休息,用来启动任务计时器。
创建番茄计时器
1、基于前面几节我们创建的项目,我们在 component 文件夹内新建一个 Pomodaro 的文件夹,然后新建 Timer.js 和 Timer.css 两个文件,首先我们来看看 Timer.js 文件的基本结构,示例代码如下:
import React, { Component } from 'react';import './Timer.css';class Timer extends Component { constructor() { super(); } componentDidMount() { } render() { return ( 2、接下来,我们需要在构造函数方法里 constructor() 初始化我们本地数据状态,在这里我们初始化当前时间 time 和 alert(当任务时间到了,系统的提醒信息) 这两个值,同时初始化一些常量设置,比如工作时间 defaultTime、短暂休息时间 shortBreak 、长时间休息 longBreak,其示例代码如下 :
constructor() { super(); // Initial State this.state = { alert: { type: '', message: '' }, time: 0 }; // Defined times for work, short break and long break... this.times = { defaultTime: 1500, // 25 min shortBreak: 300, // 5 min longBreak: 900 // 15 min };}3、然后我们调用生命周期函数 componentDidMount() , 即在组件加载完成,render() 之后调用,这个方法只会触发一次,在这个例子中 ,我们将 time 的数值状态初始化为1500秒,即25分钟,在这里我们调用了初始化默认时间的方法 setDefaultTime() 方法 。
componentDidMount() { // Set default time when the component mounts this.setDefaultTime();}setDefaultTime = () => { // Default time is 25 min this.setState({ time: this.times.defaultTime });}4、完成了这些基本的定义后,我们需要呈现组件的界面 ,我们的render()方法示例代码如下:
render() { const { alert: { message, type }, time } = this.state; return (
{message}
{this.displayTimer(time)}
Start Working Short Break Long Break
);};
5、从上述代码,我们可以看出我们JSX代码很简单,我们定义变量来接收本地数据状态的值,提醒消息、类型及任务时间,当用户的任务时间到达时,我们用一块div区域展示提醒信息。你也许会注意到,这里我们使用了displayTimer() 方法展示计时器信息,这里我们传入的参数是秒,其将会格式成 mm:ss 的形式,最后我们在界面里添加了几个按钮,用于设置任务的计数器,比如开始工作25分钟,短暂休息5分钟,或者长时间休息15分钟,我们在任务按钮上,分别定义了相关的方法事件,接下来我们要完成这些事件方法。
6、首先我们来看看setTimeForWork()、setTimeForShortBreak() 和 setTimeForLongBreak() 这三个方法,这三个 方法主要作用就是更新任务类型、提醒信息及任务时间,在每个方法里我们在函数返回时触发调用 setTime() 函数用于重置任务时间计时器。这三个方法的示例代码如下:
setTimeForWork = () => { this.setState({ alert: { type: 'work', message: 'Working!' } }); return this.setTime(this.times.defaultTime);}setTimeForShortBreak = () => { this.setState({ alert: { type: 'shortBreak', message: 'Taking a Short Break!' } }); return this.setTime(this.times.shortBreak);}setTimeForLongBreak = () => { this.setState({ alert: { type: 'longBreak', message: 'Taking a Long Break!' } }); return this.setTime(this.times.longBreak);}7、在前面文章里,我们学习了箭头函数里this的穿透作用,这意味着我们不需要在构造函数中进行绑定。现在我们来看看 setTime() 函数是如何定义的。
setTime = newTime => { this.restartInterval(); this.setState({ time: newTime });}8、从上述代码你可以看出,我们调用一个 restartInterval() 方法重置任务时间,我们通过 newTime 传参的形式更新了 time 状态的值。接下来我们来实现 restartInterval() 方法 ,首先清理计时器 ,然后每秒执行计时器的相关方法,示例代码如下:
restartInterval = () => { // Clearing the interval clearInterval(this.interval); // Execute countDown function every second this.interval = setInterval(this.countDown, 1000);}9、上述代码 clearInterval(this.interval) 函数的作用就是清理计时器,因为我们进行任务切换时,需要重置计时器,然后调用 countDown 计时方法,其代码示例如下:
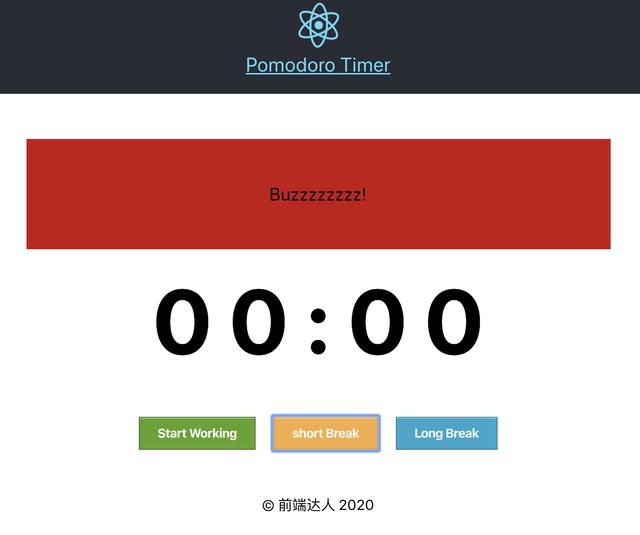
countDown = () => { // If the time reach 0 then we display Buzzzz! alert. if (this.state.time === 0) { this.setState({ alert: { type: 'buz', message: 'Buzzzzzzzz!' } }); } else { // We decrease the time second by second this.setState({ time: this.state.time - 1 }); }}10、最后我们来完成该组件的最后一个方法,其功能就是把时间格式化成 mm:ss 的形式,示例代码如下:
displayTimer(seconds) { // Formatting the time into mm:ss const m = Math.floor(seconds % 3600 / 60); const s = Math.floor(seconds % 3600 % 60); return `${m < 10 ? '0' : ''}${m}:${s < 10 ? '0' : ''}${s}`;}11、最终我们完成组件代码如下所示:
import React,{Component} from "react";import './Timer.css';class Timer extends Component{ constructor() { super(); this.state={ alert:{ type:'', message:'' }, time:0 }; this.times = { defaultTime:1500,// 25 min shortBreak:300, // 5 min longBreak:900 } }; componentDidMount() { this.setDefaultTime(); } setDefaultTime = () =>{ this.setState({ time: this.times.defaultTime }); }; setTime = newTime => { this.restartInterval(); this.setState({ time:newTime }); }; restartInterval = () => { clearInterval(this.interval); this.interval = setInterval(this.countDown,1000); }; countDown = ()=>{ // If the time reach 0 then we display Buzzzzzz! alert if(this.state.time===0){ this.setState({ alert:{ type:'buz', message:'Buzzzzzzzz!' } }) } else { // We decrease the time second by second this.setState({ time:this.state.time-1 }) } }; setTimeForWork = ()=> { this.setState({ alert:{ type:'work', message:'Working' } }); return this.setTime(this.times.defaultTime); }; setTimeForShortBreak = () =>{ this.setState({ alert:{ type:'shortBreak', message:'Taking a short Break!' } }); return this.setTime(this.times.shortBreak); }; setTimeForLongBreak = ()=>{ this.setState({ alert:{ type:'longBreak', message:'Taking a Long Break!' } }); return this.setTime(this.times.longBreak); }; displayTimer(seconds){ const m = Math.floor(seconds % 3600 / 60); const s = Math.floor(seconds % 3600 % 60); return `${m < 10 ? '0' : ''} ${m} : ${ s < 10 ? '0' : ''} ${s}`; } render() { const { alert : {message , type },time } =this.state; return(
{message}
{this.displayTimer(time)}
Start Working short Break Long Break
); }}export default Timer;
12、组件代码完成后,最后一步就是添加样式了,以下代码是番茄计时器的css代码,你可以根据需要自行修改:
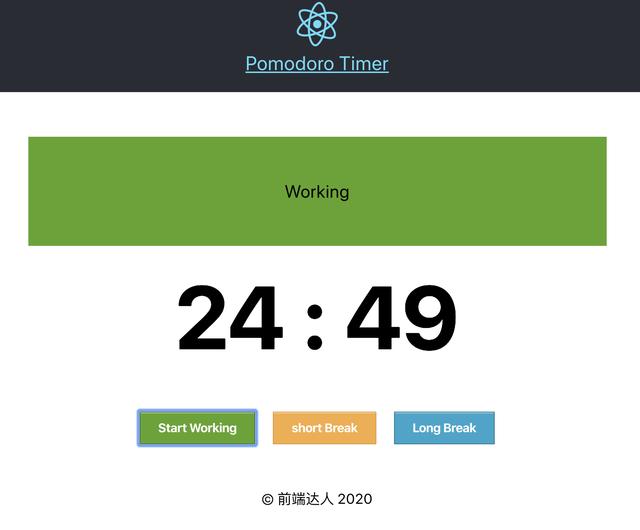
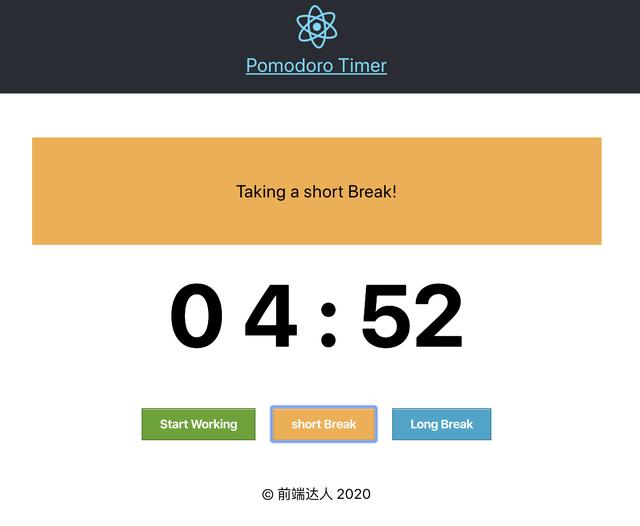
.Pomodoro { padding: 50px;}.Pomodoro .timer { font-size: 100px; font-weight: bold;}.Pomodoro .alert { font-size: 20px; padding: 50px; margin-bottom: 20px;}.Pomodoro .alert.work { background: #5da423;}.Pomodoro .alert.shortBreak { background: #f4ad42;}.Pomodoro .alert.longBreak { background: #2ba6cb;}.Pomodoro .alert.buz { background: #c60f13;}.Pomodoro button { background: #2ba6cb; border: 1px solid #1e728c; box-shadow: 0 1px 0 rgba(255, 255, 255, 0.5) inset; color: white; cursor: pointer; display: inline-block; font-size: 14px; font-weight: bold; line-height: 1; margin: 50px 10px 0px 10px; padding: 10px 20px 11px; position: relative; text-align: center; text-decoration: none;}.Pomodoro button.start { background-color: #5da423; border: 1px solid #396516;}.Pomodoro button.short { background-color: #f4ad42; border: 1px solid #dd962a;}最后不要忘记将组件引入到App.js文件中进行调用,如果你正确完成上述操作,就能看到你的计时器如下图所示:
工作任务状态
短暂休息状态
长时间休息状态
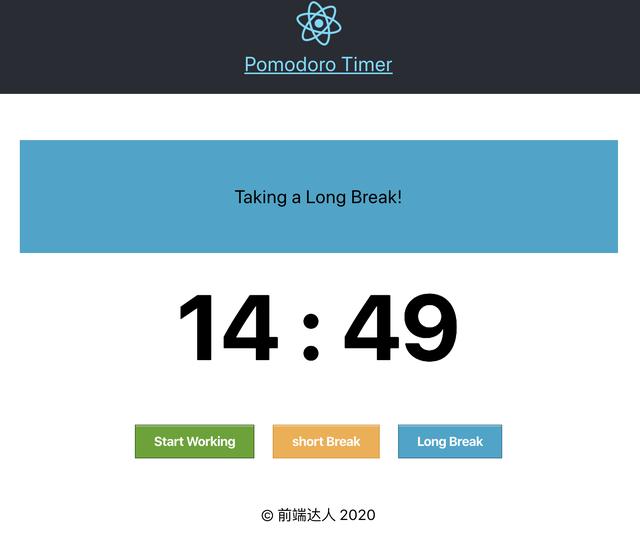
任务结束提醒
小节
本篇文章的内容就和大家分享到这里,想必大家对这个函数 componentDidMount() 的用法了解了吧,因为它只会被执行一次,在页面挂载成功的时候执行,我们的请求一般是放在componentDidMount 生命周期函数中进行调用,当然你也可以放在componentWillMount 函数中。下篇本系列文章,我将和大家继续通过实例的形式介绍生命周期函数shouldComponentUpdate(),敬请期待...
《 React 手册》系列文章
「React 手册」在 React 项目中使用 ES6,你需要了解这些(一)
「React 手册」React 16 中值得你关注的新特性
「React 手册 」在 Windows 下使用 React , 你需要注意这些问题
「React 手册 」从创建第一个React组件开始学起
「React 手册 」关于组件属性(props)与状态(state)的介绍
「React 手册 」如何创建函数组件?
「React 手册 」组件生命周期相关函数——componentWillMount


 467
467

 被折叠的 条评论
为什么被折叠?
被折叠的 条评论
为什么被折叠?
 到【灌水乐园】发言


