


WebService是个好东西,话不多说,干净利落
服务器端
来看下服务器端的结构:

先定义一个接口,用于暴露:
|
1
2
3
4
5
6
7
|
package
com.abc.webservice;
/**
* 对外暴露的接口。
*/
public
interface
IWebService {
public
String hello(String who);
}
|
再定义这个接口的实现类:
|
1
2
3
4
5
6
7
8
9
10
11
12
13
14
15
16
17
18
|
package
com.abc.webservice.impl;
import
javax.jws.WebService;
import
com.abc.webservice.IWebService;
/**
* wsdl:portType: MyService
* wsdl:service: MyWebService
*/
@WebService
(name=
"MyService"
,
serviceName=
"MyWebService"
,
targetNamespace=
"http://www.abc.com"
)
public
class
WebServiceImpl
implements
IWebService {
@Override
public
String hello(String who) {
return
"Hello "
+ who +
"!"
;
}
}
|
注意这里的name,它表示
The name of the Web Service. Used as the name of the wsdl:portType when mapped to WSDL 1.1.
serviceName,它表示
The service name of the Web Service. Used as the name of the wsdl:service when mapped to WSDL 1.1.
targetNamespace,就是你为Java客户端生成的代码的包名啦,生成的包名会自动反过来写,比如上面的是www.abc.com,生成的包名则会为package com.abc.* 。
最后将WebService发布出去:
|
1
2
3
4
5
6
7
8
9
10
11
12
13
14
15
|
package
com.abc.webservice;
import
javax.xml.ws.Endpoint;
import
com.abc.webservice.impl.WebServiceImpl;
/**
* 发布WebService
*/
public
class
Publisher {
public
static
void
main(String[] args) {
System.out.println(
"Start publish service"
);
Endpoint.publish(
"http://localhost:8080/MyService"
,
new
WebServiceImpl());
System.out.println(
"End publish service"
);
}
}
|
这之后,可以打开浏览器,输入刚刚发布的URL:http://localhost:8080/MyService,去看看效果了:

点击上图中的超链接,可以看到生成的wsdl,以下是生成的wsdl:
|
1
2
3
4
5
6
7
8
9
10
11
12
13
14
15
16
17
18
19
20
21
22
23
24
25
26
27
28
29
30
31
32
33
34
35
36
37
38
39
40
41
42
43
44
45
46
47
48
49
50
51
|
<?
xml
version
=
"1.0"
encoding
=
"UTF-8"
?>
<
definitions
xmlns:wsu
=
"http://docs.oasis-open.org/wss/2004/01/oasis-200401-wss-wssecurity-utility-1.0.xsd"
xmlns:wsp
=
"http://www.w3.org/ns/ws-policy"
xmlns:wsp1_2
=
"http://schemas.xmlsoap.org/ws/2004/09/policy"
xmlns:wsam
=
"http://www.w3.org/2007/05/addressing/metadata"
xmlns:soap
=
"http://schemas.xmlsoap.org/wsdl/soap/"
xmlns:tns
=
"http://www.abc.com"
xmlns:xsd
=
"http://www.w3.org/2001/XMLSchema"
xmlns
=
"http://schemas.xmlsoap.org/wsdl/"
targetNamespace
=
"http://www.abc.com"
name
=
"MyWebService"
>
<
types
>
<
xsd:schema
>
<
xsd:import
namespace
=
"http://www.abc.com"
schemaLocation
=
"http://localhost:8080/MyService?xsd=1"
/>
</
xsd:schema
>
</
types
>
<
message
name
=
"hello"
>
<
part
name
=
"parameters"
element
=
"tns:hello"
/>
</
message
>
<
message
name
=
"helloResponse"
>
<
part
name
=
"parameters"
element
=
"tns:helloResponse"
/>
</
message
>
<
portType
name
=
"MyService"
>
<
operation
name
=
"hello"
>
<
input
wsam:Action
=
"http://www.abc.com/MyService/helloRequest"
message
=
"tns:hello"
/>
<
output
wsam:Action
=
"http://www.abc.com/MyService/helloResponse"
message
=
"tns:helloResponse"
/>
</
operation
>
</
portType
>
<
binding
name
=
"MyServicePortBinding"
type
=
"tns:MyService"
>
<
soap:binding
transport
=
"http://schemas.xmlsoap.org/soap/http"
style
=
"document"
/>
<
operation
name
=
"hello"
>
<
soap:operation
soapAction
=
""
/>
<
input
>
<
soap:body
use
=
"literal"
/>
</
input
>
<
output
>
<
soap:body
use
=
"literal"
/>
</
output
>
</
operation
>
</
binding
>
<
service
name
=
"MyWebService"
>
<
port
name
=
"MyServicePort"
binding
=
"tns:MyServicePortBinding"
>
<
soap:address
location
=
"http://localhost:8080/MyService"
/>
</
port
>
</
service
>
</
definitions
>
|
看不懂没关系啦,这是WSDL,属于另一个范畴了,需要了解的朋友可以去搜一搜相关的资料。这里只是想说明如何使用JDK自带的WebService啦。
Java客户端
当然,WebServices可以被Java客户端调用,也可以被非Java语言的程序调用,这里我们只看Java客户端是如何调用的。
新建一个Poject,用于模拟在另一台机器上的客户端,并打开命令行:
|
1
|
>
cd
D:\Workspace\WebServiceClient\src
|
使用JDK自带的wsimport命令,生成Java客户端(注意中间有个点,表示当前目录):
|
1
|
>wsimport -keep . http:
//localhost
:8080
/MyService
?wsdl
|
这句话表示生成客户端代码,保存在当前文件夹下。

会生成以下结构的客户端代码(图中选中的部分,那个webservice包是自己建的),刚刚有提到生成的Java客户端代码会放在com.abc包下:
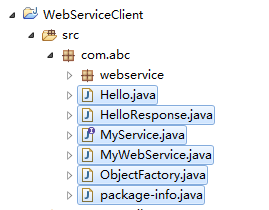
至于生成的这些类里面是什么东西,你们自己去看啦。
然后编写客户端代码(com.abc.webservice.WebServiceClient.java):
|
1
2
3
4
5
6
7
8
9
10
11
12
|
package
com.abc.webservice;
import
com.abc.MyWebService;
public
class
WebServiceClient {
public
static
void
main(String[] args) {
MyWebService myWebService =
new
MyWebService();
// 注意下面这句
MyService myService = myWebService.getMyServiePort();
System.out.println(myService.hello(
"Alvis"
));
}
}
|
这里的MyWebService类就是wsimport命令根据WebService的WSDL生成的类啦。下面是WSDL中的一段:
|
1
2
3
4
5
|
<
service
name
=
"MyWebService"
>
<
port
name
=
"MyServicePort"
binding
=
"tns:MyServicePortBinding"
>
<
soap:address
location
=
"http://localhost:8080/MyService"
/>
</
port
>
</
service
>
|
从WSDL中可以看出,有个<service>的name为MyWebService,里面包含了一个<port>,因此代码中的
|
1
|
myWebService.getMyServicePort();
|
这句话得到的实际上是得到了MyService这个类的实例了,这个类其实是远端WebService实现类的代理对象。可以看看这个生成的MyWebService类中这个方法的定义:
|
1
2
3
4
|
@WebEndpoint
(name =
"MyServicePort"
)
public
MyService getMyServicePort() {
return
super
.getPort(
new
QName(
"http://www.abc.com"
,
"MyServicePort"
), MyService.
class
);
}
|
得到这个MyService的实例后,就可以使用该实例调用远程端的方法啦:
|
1
|
myService.hello(
"Alvis"
)
|
咱们再来看看MyService类中都有哪些东东:
|
1
2
3
4
5
6
7
8
9
10
11
12
13
14
15
16
17
18
19
20
21
22
23
24
25
26
27
28
29
30
31
32
33
34
35
36
37
38
|
package
com.abc;
import
javax.jws.WebMethod;
import
javax.jws.WebParam;
import
javax.jws.WebResult;
import
javax.jws.WebService;
import
javax.xml.bind.annotation.XmlSeeAlso;
import
javax.xml.ws.Action;
import
javax.xml.ws.RequestWrapper;
import
javax.xml.ws.ResponseWrapper;
/**
* This class was generated by the JAX-WS RI.
* JAX-WS RI 2.2.4-b01
* Generated source version: 2.2
*/
@WebService
(name =
"MyService"
, targetNamespace =
"http://www.abc.com"
)
@XmlSeeAlso
({
ObjectFactory.
class
})
public
interface
MyService {
/**
* @param arg0
* @return
* returns java.lang.String
*/
@WebMethod
@WebResult
(targetNamespace =
""
)
@RequestWrapper
(localName =
"hello"
,
targetNamespace =
"http://www.abc.com"
, className =
"com.abc.Hello"
)
@ResponseWrapper
(localName =
"helloResponse"
,
targetNamespace =
"http://www.abc.com"
, className =
"com.abc.HelloResponse"
)
@Action
(input =
"http://www.abc.com/MyService/helloRequest"
,
output =
"http://www.abc.com/MyService/helloResponse"
)
public
String hello(
@WebParam
(name =
"arg0"
, targetNamespace =
""
)
String arg0);
}
|
可以看到,MyService是一个接口,因为真正的实现在远端。其实里面就一个方法,就是我们在远端定义的hello啦。
运行客户端代码即可:

这里是项目源代码,供需要的朋友参考。


 3861
3861

 被折叠的 条评论
为什么被折叠?
被折叠的 条评论
为什么被折叠?
 到【灌水乐园】发言


