


https://github.com/PacktPublishing/Game-Development-Patterns-and-Best-Practices
https://github.com/mattCasanova/Mach5
1. Introduction to Design Patterns (已看)
2. One Instance to Rule Them All - Singletons (已看)
3. Creating Flexibility with the Component Object Model (已看)
4. Aritificial Intelligence Using the State Pattern (已看)
5. Decoupling Code via the Factory Method Pattern (已看)
6. Creating Objects with the Prototype Pattern
7. Improving Performance with Object Pools
8. Controlling the UI via the Command Pattern (已看)
9. Decoupling Gameplay via the Observer Pattern
10. Sharing Objects with the Flyweight Pattern
11. Understanding Graphics and Animation
1. Introduction to Design Patterns
Chapter overview
Your objective
What are design patterns?
Why you should plan for change
Separating the what and how
An introduction to interfaces
The advantages of compartmentalizing code
The problems with using design patterns in games
Project setup
What are design patterns
https://en.wikipedia.org/wiki/Software_design_pattern
Design patterns are solutions for common programming problems. More than that, they are solutions that were designed and redesigned as developers tried to get more flexibility and reuse from their code.
Although design patterns are important, they aren't just a library that we can just plug into our game.Rather, they are a level above libraries. They are methods for solving common problems, but the details of implementing them is always going to be unique to your project. However, once you have a good working knowledge of patterns, implementing them is easy and will feel natural. You can apply them when first designing your project, using them like a blueprint or starting point. You can also use them to rework old code if you notice that it's becoming jumbled. Either way, it is worth studying patterns so your code quality will improve and your programming toolbox will grow larger.
With this toolbox, the number of ways to solve a problem is limited only by your imagination. It can sometimes be difficult to think of the best solution right off the bat. It can be difficult to know the best place or best pattern to use in a given situation. Unfortunately, when implemented in the wrong place, design patterns can create many problems, such as needlessly increasing the complexity of your project with little gain. As i mentioned before, software design is similar to writing poetry in that they are both an art. There will be advantages and disadvantages to the choices you make
Why you should plan for change
A project never ends up 100% the same as it was imagined in the pre-production phase.
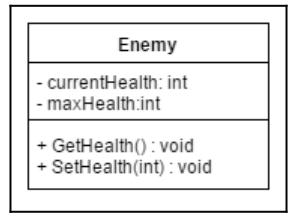
Understanding UML class diagrams
Software developers have their own form of blueprints as well, but they look different from what you may be used to. In order to create them, developers use a format called Unified Markup Language, or UML for short.


class Enemy {
public:
    void GetHealth(void) const;
    void SetHealth(int);
private:
    int currentHealth;
    int maxHealth;
};
Relationships between classes
Inheritance
First of all, we have inheritance, which shows the IS-A relationship between classes.
class FlyingEnemy: public Enemy {
public:
    void Fly(void);
private:
    int flySpeed;
};
Aggregation
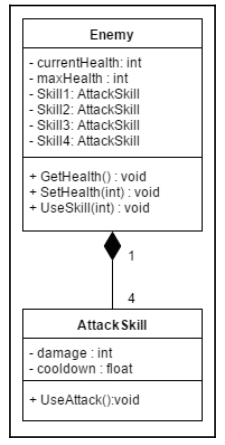
The next idea is aggregation, which is designated by the HAS-A relationship. This is when a single class contains a collection of instances of other classes that are obtained from somewhere else in your program. These are considered to have a weak HAS-A relationship as they can exist outside of the confines of the class
class CombatEncounter {
public:
    void AddEnemy(Enemy * pEnemy);
private:
    std::list<Enemy *> enemies;
};

Composition
When using composition, this is a strong HAS-A relationship, and this is when a class contains one or more instances of another class. Unlike aggregation, these instances are not created on their own but, instead, are created in the constructor of the class and then destroyed by its destuctor. Put into layman's terms, they can't exist separately from the whole.
class AttackSkill {
public:
    void UseAttack(void);
private:
    int damage;
    float cooldown;
};

class Enemy {
public:
    void GetHealth(void) const;
    void SetHealth(int);
private:
    int currentHealth;
    int maxHealth;
    AttackSkill skill1;
    AttackSkill skill2;
    AttackSkill skill3;
    AttackSkill skill4;
};
Implements
Separating the why and the how
When creating games, we have many different systems that need to be juggled around in order to provide the entire game experience. We need to have objects that are drawn to the screen, need to have realistic physics, react when they hit each other, animate, have gameplay behavior and, on top of all that, we then need to make sure that it runs well 60 times every second.
Understanding the separation of concerns
Each of these different aspects is a problem of its own, and trying to solve all of these issues at once would be quite a headache. One of the most important concepts to learn as developer is the idea of compartmentalizing problems, and breaking them apart into simpler and simpler pieces until they're all manageable.In computer science, there is a design principle known as the separation of concerns(关注点分离) which deals with the issue. In this aspect, a concern would be something that will change the code of a program. Keeping this in mind, we would separate each of these concerns into their own distinct sections, with as little overlap in functionality as possible. Alternatively, we can make it so that each section solves a separate concern.
An Introduction to interfaces
One of the main features of using design patterns is the idea of always programming to an interface and not to an implementation. In other words, the top of any class hierarhcy should have an abstract class or an interface
Polymorphism refresher
Polymorphism is one of the three pillars of an object-oriented language(along with encapsulation and inheritance). It comes from the words poly meaning many and morph meaning change.
Polymorphism is a way to call different specific class function in an inheritance hierarhcy, even though our code only uses a single type. That single type, the base class reference, will be changed many ways depending on the derived type.
class Animal {
public:
    virtual void Speak(void) const {
        M5DEBUG_PRINT("...\n");
    }
};

class Cat: public Animal {
public:
    void Speak(void) const {
        M5DEBUG_PRINT("Meow\n");
    }

    void Purr(void) const {
        M5DEBUG_PRINT("*purr*\n");
    }
};

class Dog: public Animal {
public:
    void Speak(void) const {
        M5DEBUG_PRINT("Woof\n");
    }
};

void SomeFunction(void) {
    const int SIZE = 2;
    Cat cat;
    Dog dog;
    Animal * animals[SIZE] = { &cat, &dog };

    for (int i = 0; i < SIZE; i++) {
        animals[i]->Speak();
    }
}
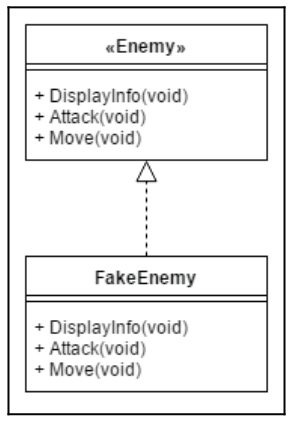
Understanding interfaces
An interface implements no funcitons, but simply declares the methods that the class will support. Then, all of the derived classes will do the implementation. In this way, the developer will have more freedom to implement the funcitons to fit each instance, while having things work correctly due to the nature of using an object-oriented language.
In C++, there isn't an official concept of interfaces, but you can simulate the behavior of interfaces by creating an abstract class
class Enemy {
public:
    virtual ~Enemy(void) { }
    virtual void DisplayInfo(void) = 0;
    virtual void Attack(void) = 0;
    virtual void Move(void) = 0;
};

class FakeEnemy: public Enemy {
public:
    virtual void DisplayInfo(void) {
        M5DEBUG_PRINT("I am a FAKE enemy");
    }

    virtual void Attack(void) {
        M5DEBUG_PRINT("I cannot attack");
    }

    virtual void Move(void) {
        M5DEBUG_PRINT("I cannot move");
    }
};
The advantages of compartmentalizing code
One important difference between procedural programming(think C-styles) and object-oriented programming is the ability to encapsulate or compartmentalize code. Oftentimes we think of this as just data hiding: making variables private. In a C-style program, the functions and data are separate, but it is hard to reuse any one function because it might depend on other functions or other pieces of data in the program. In object-oriented programming, we are allowed to group the data and function together into reusable pieces. That means we can (hopefully) take a class or module and place it in a new project. This also means that since the data is private, a variable can be easily changed as long as the interface or public methods don't change. These concepts of encapsulation are important, but they aren't showing us all of the power that this provides us.
The goal of writing object-oriented code is to create objects that are responsible for themselves. Using a lot of if/else or switch statements within your code can be a symptom of bad design. For example, if I have three classes that need to read data from a text file, I have the choice of using a switch statement to read the data differently for each class type, or passing the text file to a class method and letting the class read the data itself. This is even more powerful when combined with the power of inheritance and polymorphism.
By making the classes responsible for themselves, the classes can change without breaking other code, and the other code can change without breaking the classes. We can all imagine how fragile the code would be if a game was written entirely in the main function. Anything that is added or removed is likely to break other code. Anytime a new member joined the team, they would need to understand absolutely every line and every variable in the game before they could be trusted to write anything.
By separating code into functions or classes, we are making the code easier to read, test, debug, and maintain. Anyone joining the team would of course need to understand some pieces of the code, but it might not be necessary to understand all of graphics if they are working on game logic or file loading.
Design patterns are solutions to common programming problems flexible enough to handle change. They do this by compartmentalizing sections of code. This isn't by accident. For the purpose of this book, the definition of good encapsulated, flexible, reusable code. So it should come as no surprise that these solutions are organized into classes or groups of classes that encapsulate the changing sections of your code.
The structure of the Mach5 engine
Before we can dive into the patterns, we should spend a little time explaining the structure of the engine. You don't need to understand evey line of source code, but it is important to understand some of the core engine components and how the are used. This way we can better understand the problems we will be facing and how the solution fits together

Mach5 core engine and systems
The meaning of engine is getting a little blurred these days. Often when people talk of engines they think of entire game creation tools such as Unreal or Unity. While these are engines, the term didn't always require a tool. Game engine such as Id Software's Quake Engine or Vavlue Corporation's Source engine existed independently of tools, although the latter did have tools including the Hammer Editor for creating levels.
The term engine is also used to refer to components within the larger code base. This includes things like a rendering engine, audio engine, or physics engine. Even these can be created completely separate from a larger code base. Orge3D is an open source 3D graphics engine, while the Havok Physics engine is proprietary software created by the Havok company and used in many games.
So, when we talk about the engiens or systems of the Mach5 engine, we are simply referring to groups of related code for performing a specific task
The app
The M5App or application layer is a class responsible for interfacing with the operating system. Since we are trying to write clean, reusable code, it is important that we don't mix our game code with any operating system function calls. If we did this, our game would be difficult to port to another system. The M5App class is created in WinMain and responsible for creating and destroying every other system. Anytime our game needs to interact with the OS, including changing resolution, swithcing to full screen, or getting input from a device, we will use the M5App class. In our case, the operating system that we will be using will be Windows.
The StageManager
The M5StateManager class is responsible for controlling the logic of each stage. We consider things such as the main menu, credits creen, options menu, loading screen, and playable levels to be stages. They contain behaviors that control the flow of the game. Examples of stage behavior include reading game object data from files, spawning units after specific time intervals, or switching between menus and levels.
StageManager is certainly not a standardized name. In other engines, this section of code may be called the game logic engine; however, most of our game logic will be separated into components so this name doesn't fit. No matter what it is called, this class will control which objects need to be created for the current stage, as well as when to switch to the next stage or quit the game altogether.
Even though this uses the name manager instead of engine, it serves as one of the core systems of the game. This class controls the main game loop and manages the collection of user stages. In order to make a game, users must derive at least one class from the base M5Stage class and overload the virtual functions to implement their game logic.
The ObjectManager
The M5ObjectManager is responsible for creating, destroying, updating, and searching for game objects. A game object is anything visible on invisible in the game. This could include the player, bullets, enemies, and triggers---- the invisible regions in a game that cause events when collided with. The derived M5Stage classes will use the M5ObjectManager to create the appropriate objects for the stage. They can also search for specific game objects to update game logic. For example, a stage may search for a player object. If one doesn't exist, the manager will switch to the game over stage.
As seen in the previous diagram, our game will use components. This means the M5ObjectManager will be responsible for creating those as well.
The graphics engine
This book isn't about creating a graphics engine but we do need one to draw to the screen. Similar to how the M5App class encapsulates important OS function calls, our M5Gfx class encapsulates our graphics API. We want to make sure there is a clear separation between any API calls and our game logic. This is important so we can port our game to another system. For example, we may want to develop our game for PC, XBox One, and PlayStation 4. This will mean supporting multiple graphics APIs since a single API isn't available for all platforms. If our game logic contains API code, then those files will need to be modified for every platform.
We won't be going deep into the details of how to implement a full graphics engine, but we give an overview of how graphics works. Think of this as a primer to the world of graphics engines.
This class allows us manipulate and draw textures, as well as control the game camera and find the visible extents of the world. M5Gfx also manages two arrays of graphics components, one for world space and one for screen space. The most common use of the screen space components is for creating User Interface(UI) elements such as buttons.
Tools and utilities
Besides the core engines and systems for a game, every engine should provide some basics tools and support code. The Mach5 engine includes a few categories for tools:
Debug Tools: This includes debug asserts, message windows, and creating a debug console
Random: Helper functions to create random int or float from min/max values
Math: This includes 2D vectors and 4 x 4 matrices, as well some more general math helper functions
FileIO: Support for reading and writing .ini files
The problems with using design patterns in games
Unfortunately, there are also some issues that may come into play from using design patterns exactly as described. It's often said that the fastest executing code is the code that is never called, and using design patterns will typically require you to add more code to your project than what you would have done otherwise. This will have a permormance cost as well, as there will likely need to be more calculations done whenever you're using a part of your engine.
For instance, using some principles will cause some classes that you write to become extremely bloated with extra code. Design patterns are another form of complexity to add to your project. If the problem itself is simple, it can be a much better idea to focus on the simpler solutions before going straight into implementing a design pattern just because you have heard of it
Sometimes it's better to follow the simple rule of K.I.S.S. and remember that it is the knowledge of the pattern that holds the most important value, not using the pattern itself.
Setting up the project
Summary
2. One Instance to Rule Them All - Singletons
Chapter overview
Your objective
An overview of class access specifiers
Props and cons of global access
Understanding the static keyword
What is a Singleton?
Learning about templates
Templatizing Singletons
The advantages and disadvantages of only one instance
The Singleton in action: the Application class
Design decisions
An overview on class access specifiers
class ModifierExamples {
    public int publicInteger;
    private void PrivateMethod() {}
    protected float protectedNumber;
};

class ModifierExamples {
public:
    int publicInteger;
    int anotherExample;
private:
    void PrivateFunction() {}
    double safeValue;
protected:
    float protectedNumber;
    int AlsoProtected() { return 0; }
};
The static keyword
When we use the static keyword, there are three main contexts that it'll be used in:
Inside a function
Inside a class definition
In front of a global variable in a program with multiple files
Static keyword inside a function
The first one, being used inside of a function, basically means that once the variable has been initialized, it will stay in the computer's memory until tthe end of the program, keeping the value that it has through multiple runs of the function.
#include <string>

class StaticExamples {
public:
    void InFunction() {
        static int enemyCount = 0;
        enemyCount += 10;
        std::string toDisplay = "\n Value of enemyCount: " + std::to_string(enemyCount);
        printf(toDisplay.c_str());
    }
};

StaticExamples se;
se.InFunction();
se.InFunction();

10
20
Static keyword in class definitions
The second way is by having a variable or function in a class being defined as static. Normally, when you create an instance of a class, the compiler has to set aside additional memory for each variable that is contained inside of the class in consecutive blocks of memory.When we declare something as static, instead of creating a new variable to hold data, a single variable is shared by all of the instances of the class. In addition, since it's shared by all of the copies, you don't need to have an instance of the class to call it.
class StaticExample {
public:
    static float classVariable;
    static void StaticFunction() {
        std::string toDisplay = "\n I can be called anywhere! classVariable value: " + std::to_string(classVariable);
        printf(toDisplay.c_str());
    }

    void InFunction() {
        static int enemyCount = 0;
        enemyCount += 10;
        std::string toDisplay = "\n Value of enemyCount: " + std::to_string(enemyCount);
        printf(toDisplay.c_str());
    }
};

float StaticExamples::classVariable = 2.5f;

StaticExamples::StaticFunction();
StaticExamples::classVariable = 5;
StaticExamples::StaticFunction();
Static as a file global variable
As you may be aware, C++ is a programming language closely related to the C programming language. C++ was designed to have most of the same functionality that C had and then added more things to it. C was not object-oriented, and so, when it created the static keyword, it was used to indicate that source code in other files that are part of your project cannot access the variable, and that only code inside of your file can use it. This was designed to create class-like behavior in C. Since we have classes in C++ we don't typically use it, but I felt I should mention it for completeness.
Pros and cons of global variables
To reiterate, a global variable is a variable that is declared outside of a function or class. Doing this makes our variable accessible in every function, hence us calling it global. When being taught programming in school, we were often told that global variable are a bad thing or at least, that modifying global variables in a function is considered to be poor programming practcie.
There are numerous reasons why using global variables is a bad idea:
1. Source code is the easiest to understand when the scope of the elements used is limited. Adding in global variables that can be read or modified anywhere in the program makes it much harder to keep track of where things are being done, as well as making it harder to comprehend when bringing on new developers.
2. Since a global variable can be modified anywhere, we lose any control over being able to confirm that the data contained in the variable is valid. For instance, you may only want to surpport up to a certain number, but as a global variable this is impossible to stop. Generally, we advise using getter/setter functions instead for this reason.
3. Using global variable tightens how coupled our program are, making it difficult to reuse aspects of our projects as we need to grab from a lot of different places to make things work. Grouping things that are connected to each other tends to improve projects.
4. When working with the linker, if your global variable names are common, you'll often have issues when compiling your project. Thankfully, you'll get an error and have to fix the issue in this case. Unfortunately, you may also have an issue where you are trying to use a locally scoped variable in a project but end up selecting the global version due to mistyping the name or relying too heavily on intelligence and selecting the first thing you see, which I see students doing on multiple occasions.
5. As the size of projects grow, it becomes much harder to do maintenance and/or make changes to/on global variables, as you may need to modify many parts of your code to have it adjust correctly
This isn't to say that global access is entirely bad. There are some reasons why one would consider using it in their projects:
1. Not knowing what a local variable is
2. Not understanding how to create classes
3. Wanting to save keystrokes
4. Not wanting to pass around variables all the time to functions
5. Not knowing where to declare a variable, so making it global means anyone can get it
6. To simplify our project for components that need to be accessible anywhere within the project
Aside from the last point, those issues are really bad reasons for wanting to use global variables, as they may save you some time up front, but as your projects get larger and larger it'll be a lot more difficult to read your code. In addition, once you make something global it's going to be a lot more difficult to convert it to not be global down the road. Think that, instead of using global variables, you could instead pass parameters to different functions as needed, making it easier to understand what each function does adn what it needs to work with to faciliate its functionality.
That's not to say that there isn't any time when using a global variable is a reasonable or even a good idea. When global variables represent components that truely need to be available throughout your project, the use of global variables simplifies the code of your project, which is similar to what we are aiming to accomplish
Basically, always limit your variables to the minimal scope needed for the project and not any more. This especially comes to mind when you only ever need one of something, but plan to use that one object with many different things. That's the general idea of the Singleton design pattern and is the reason why it's important that we understand the general usage before moving onwards.
What is a Singleton?
The Singleton pattern in a nutsheel is where you have a class that you can access anywhere whthin your project, due to the fact that only one object(instance) of that class is created(instantiated). The pattern provides a way for programmers to give access to a class's information globally by creating a single instance of an object in your game.
There are multiple ways to implement the Singleton pattern or to get Singleton-like behavior. We'll go over some of the commonly seen versions and their pros and cons before moving to our final version, which is how the Mach5 engine uses it.

class Singleton {
public:
    static Singleton * GetInstance() {
        if (!instance) {
            instance = new Singleton;
        }
        return instance;
    }

private:
    static Singleton * instance;
};
Keeping the single in Singleton
class Singleton {
public:
    static Singleton * GetInstance() {
        if (!instance) {
            instance = new Singleton;
        }

        return instance;
    }

private:
    static Singleton * instance;

    // Disable usability of silently generated functions
    Singleton();
    ~Singleton();
    Singleton(const Singleton &);
    Singleton& operator=(const Singleton&);
};

C++ 11 or above
Singleton() = delete;
~Singleton() = delete;
Singleton(const Singleton &) = delete;
Singleton& operator=(const Singleton&) = delete;
Another thing that may possibly be an issue is that instance is a pointer. This is becaus, as a pointer, our users have the ability to call delete on it and we want to make sure that the object will always be available for our users to access. To minimize this issue, we could change our pointer to be a reference.
static Singleton& GetInstance() {
    if (!instance) {
        instance = new Singleton;
    }

    return *instance;
}
Programmers are used to working with references as aliases for objects that exist somewhere else in our project. People would be surprised if they ever saw something like:
Singleton& singleton = Singleton::GetInstance();
delete &singleton;
While technically doable, programmers won't expect to ever use delete on the address of a reference. The nice thing about using references is that, when you need them in code, you know that they exist because they''re managed somewhere else in the code---- and you don't need to worry about how they are used.
Deleting our object correctly
void SpawnEnemy() {
    static int numberOfEnemies = 0;
    ++numberOfEnemies;
}
The numberOfEnemies variable is created and has been initialized before any code in the project has been executed, most likely when the game was being loaded. Then, once SpawnEnemy is called for the first time, it will have already been set to 0(or nullptr). Conveniently, as the proejct is not allocated dynamically, the comiler will also create code so that, when the game exists, it will call the deconstructor for our object automatically.
class Singleton {
public:
    static Singleton & GetInstance() {
        static Singleton instance;
        return instance;
    }

private:
    // Disable usability or silently generated functions
    Singleton();
    ~Singleton();
    Singleton(const Singleton &);
    Singleton& operator=(const Singleton&);
};
Learning about templates
Templates are a way for you to be able to create generic classes that can be extended to have the same functionality for different datatypes. It's another form of abstraction, letting you define a base set of behavior for a class without knowing what type of data will be used on it.
#include <iostream>

template <class T>
class TemplateExample {
public:
    TemplateExample();
    ~TemplateExample();
    T TemplateFunction(T);
};


template <class T>
TemplateExample<T>::TemplateExample() {
    printf("\nConstructor");
}

template <class T>
TemplateExample<T>::~TemplateExample() {
    printf("\nDeconstructor");
}

template <class T>
T TemplateExample<T>::TemplateFunction(T obj) {
    std::cout << "\nValue: " << obj;
    return obj;
}

TemplateExample<int> teInt;
teInt.TemplatedFunction(5);

TemplateExample<float> teFloat;
teFloat.TemplatedFunction(2.5);

TemplateExample<std::string> teString;
teString.TemplatedFunction("Testing");
Templatizing Singletons
template <typename T>
class Singleton {
public:
    Singleton() {
        // Set our instance variable when we are created
        if (instance == nullptr) {
            instance = static_cast<T*>(this);
        } else {
            // If instance already exists, we have a problem
            printf("\nError: Trying to create more than one Singleton");
        }
    }

    // Once destroyed, remove access to instance
    virtual ~Singleton() {
        instance = nullptr;
    }

    // Get a reference to our instance
    static T & GetInstance() {
        return *instance;
    }

    // Creates an instance of our instance
    static void CreateInstance() {
        new T();
    }

    // Deletes the instance, needs to be called or resource leak
    static void RemoveInstance() {
        delete instance;
    }

private:
    static T * instance;
};

template <typename T>
T * Singleton<T>::instance = nullptr;


class HighScoreManager: public Singleton<HighScoreManager> {
public:
    void CheckHighScore(int score);
private:
    int highScore;
};

void HighScoreManager::CheckHighScore(int score) {
    std::string toDisplay;

    if (highScore < score) {
        highScore = score;
        toDisplay = "\nNew High Score: " + std::to_string(score);
        printf(toDisplay.c_str());
    } else {
        toDisplay = "\nCurrent High Score: " + std::to_string(highScore);
        printf(toDisplay.c_str());
    }
}

void SplashStage::Init(void) {
    HighScoreManager::CreateInstance();
    HighScoreManager::GetInstance().CheckHighScore(10);
    HighScoreManager::GetInstance().CheckHighScore(100);
    HighScoreManager::GetInstance().CheckHighScore(50);
}

void SplashStage::Shutdown(void) {
    HighScoreManager::RemvoeInstance();
    M5ObjectManager::DestroyAllObjects();
}
Advantages/disavantages of using only one instance
Finally, one of the more common mistakes we see once programmers learn about Singletons, is to create managers for everything, and then make the managers all Singletons
The Singleton in action - the Application class
class M5App {
public:
    friend class M5StageManager;

    /* Call These in Main */

    /* This must be called first, before the game is started */
    static void Init(const M5InitData& initStruct);
    /* Call this after you add your stage to start the game */
    static void Update(void);
    /* Call this after Update is finished */
    static void Shutdown(void);

    /* Call these to control or get info about the application */

    /* Use this to change to fullscreen and back */
    static void SetFullScreen(bool fullScreen);
    /* Use this to show and hide the window */
    static void ShowWindow(bool show);
    /* Use this to show and hide the default window cursor */
    static void ShowCursor(bool showCursor);
    /* Use this to change the resolution of the game */
    static void SetResolution(int width, int height);
    /* Returns the width and height of the window (client area) */
    static M5Ve2 GetResolution(void);

private:
    static LRESULT CALLBACK M5WinProc(HWND win, UNIT msg, WPARAM wp, LPARAM lp);
    static void ProcessMessage(void);
};
Summary
3. Creating Flexibility with the Component Object Model
Chapter overview
Is it possible to write game objects in a reusable way?
How can we decouple our game objects from our core engine code?
If we have a reusable game object, how can we make it flexible enough to use in different games or account for changes in our game design while the game is being developed?
Your objective
Learning the wrong way is often just as important as learning the right way.
Why a monolithic game object is a bad design
Why inheritance hierarchies are inflexible
Learning and implementing the Strategy pattern and the Decorator pattern
Learning and implementing the Component Object Model
Why a monolithic game object is a bad design
The easy way to solve a problem means solving the immeidate problem in the fastest way possible. Examples of this might be hardcoding a number or string literal instead of using a named constant, copying code instead of writing a function or refactoring code into a base class, or just writing coe without thinking about how it can impact the rest of the code base.
On the other hand, solving a problem with the right way means thinking about how the new code will interact with the old code. It also means thinking about how the new code will interact with future code if the desgin changes. The right way doesn't mean that there is only one correct solution to the problem. There are often many possible ways to reach the same result. The creativity involved in programming is one of the reasons programming is so much fun
Veteran programmers know that in the long run, the easy way often turns out to be more difficult. This is often because a quick fix solves an immediate problem but doesn't consider the changes that will occur as the project evolves
The monolithic game object
The easy way to do a game object is to have a single struct that contains all of the data a game object will need. This seems correct because everything in the game has the same basic data. Fro example, we know players and enemies all have a position, scale and rotation. So our struct will look like this:
struct GameObject {
    // using vectors from the Mach 5 Engine
    M5Vec2 pos;
    M5Vec2 scale;
    float rotation;
};
This game object works well in theory, but it is too basic. It is true that everything in our game probably needs a position, scale, and rotation. Even an invisible trigger region needs these properties. However, as it stands, we can't draw our obejct: we have no health, and no way to do damage. So, let's add a few things to make the game object a little more real:
struct Object {
    // using vectors from the Mach 5 Engine
    M5Vec2 pos;
    M5Vec2 scale;
    float rotation;
    float damage;
    int health;
    int textureID;    // for drawing
    float textureCoords[4];    // for sprite animation
    unsignedchar color[4];    // the color of our image
};
Now we have added a few more basic elements to our game object. Most of our game object types will have health and damage, and we have added a texture ID so we can draw our game object, and some texture coordinates so we can use a sprite sheet for animation. Finally, we added a color so we can reuse the same texture and color it differently for different enemies
This is not that bad yet but, unfortunately, this is just the beginning. Once we start making a real game instead of just brainstorming about a basic game object, our struct member count starts to explode.
Imagine we are making a Space Shooter. There are lots of things we will want to add:
The player will have multiple types of weapons that all do different amounts of damage.
The player might have access to bombs and missiles that each have an ammo count
The missle needs a target to seek
The bomb needs an explosion radius
There are two super enemies that each have a special ability with a cool-down time
The player and one super enemy both have the ability to use a shield
The UI buttons have some actions associated with clicking them
We have power-ups that add health and add lives
We need to add a lives count to all objects to account for the power up
We should add velocity to objects and do time-based movement instead of just setting the position directly
We need to add an enumeration for the type of the game object so we can update it properly
struct GameObject {
    M5Vec2 pos;
    M5Vec2 scale;
    M5Vec2 vel;
    float rotation;
    ObjectType tpe;    // Our object type enum
    int objectID;    // So the missile can target
    int lives;
    int shieldHealth;    // For Player and SuperBomber
    int health;
    float playerLaserDamage;
    float playerIonDamage;
    float playerWaveCannonDamage;
    float superRaiderDamage;
    float superRaiderAbilityDamage;
    float superRaiderAbilityCoolDownTime;
    float superBomberDamage;
    float superBombAbilityDamage;
    int bombCount;
    float bombRadius;
    int missileCount;
    int missileTargetID;
    int textureID;    // the object image
    float textureCoords[4];    // for sprite animation
    unsiged char color[4];    // the color of our image
    Command * command;    // The command to do
};
As you can see, this basic method of creating a game object doesn't scale very well. We already have more than 25 members in our struct and we haven't even talked about adding space stations that can spawn or repair units. We have only two boss types, we can make a few enemy types by allowing different enemies to use different player weapons such as the laser or missile, but we are still limited.
The major problem with this approach is that, as the game gets bigger, our game object must also get very big. Some types, such as the player, will use many of these member, but other types, such as a UI button, will only use a small amount. This means if we have lots of game objects, we are very likely wasting a lot of memory per object.
The problem with object behavior
So far, we have only considered what members the game object has. We haven't considered how each object will have its behavior updated. Right now, the game object is just data. Since it has no functions, it can't update itself. We could easily add an Update function for the game object but, in order to update each type of object correctly, we would need a switch statement:
// Create our objects
Object gameObjects[MAX_COUNT];

// initialization code here
// ...

// Update loop
for (int i = 0; i < objectInUse; i++) {
    switch (gameObjects[i].type) {
        case OT_PLAYER:
            // Update based on input
            break;
        case OT_SUPER_RAIDER:
            // Add intercept code here
            break;
        case OT_SUPER_BOMBER:
            // Add case code here
            break;
        case OT_MISSILE:
            // Add find target and chase code here
            break;
        case OT_BOM:
            // add grow to max radius code here
            break;
        default:
            M5DEBUG_ASSERT(true, "Incorrect Object Type");
            break;
    }
}
Again, this approach doesn't scale well. As we add more object types, we need to add even more cases to our switch statement. Since we only have one struct type, we need to have a switch statement,whenever we need to do something object-type-specific.
If we are adding behaviors, we will also face the decision of adding data to our object or hardcoding a value into the switch statement. For example, if our bomb grows in size, how does it grow? We could hard code scale.x *= 1.1f into our switch statement or we can add member data float bombScaleFactor to our struct.
In the end, this approach just isn't that flexible. Changing our design is very difficult because there are switch statements and public memebers throughout our code. If we were to make a game like this, then our code base would be a complete mess after only a few months. The worst part would be that once the game was completed, we wouldn't be able to reuse any code. The game object and all behaviors would be so gameplay-specific that unless we make a sequel, we would need to remake a brand new game object.
The benefits of the monolithic game object
It is worth noting that even if you choose this approach, you can still have your core engines decoupled from the game object. When writing the graphics engine, for example, instead of passing in a game object as parameter to a Draw function, we could pass in the members that the graphics engine needs:
void Graphics::SetTexture(int textureID);
void Graphics::SetTextureCoords(const float * coordArray);
void Graphics::Draw(const M5Mtx44& worldMtx);
vs
void Graphics::Draw(const Object& obj);
Another argument for creating objects like this is that we know exactly what is in our game object. Compared with other approaches, we never need to cast our object or search for properties within the object. These operations make the code more compicated and have a slight performance cost. By using a simple struct, we have direct access to the variables and the code is easier to understand.
The only time we might use thi approach is if we know 100% that the number of object types won't be large, for example, if you are making a puzzle game and the only game objects are sheep and walls. Puzzle games are often very simple and use the same mechanics over and over, In this case, this is a good approach because it is easy and doesn't require any time building a complicated system.
Why inheritance hierarchies are inflexible
The idea that Players, Enemies, Missiles, and Medics should all derive from one base object is very common to programmers new to object-oriented programming. It makes a lot of sense on paper that if you have a Raider and a SuperRaider, one should inherit from the other. I believe this comes from how inheritance is taught. When you are first learning about inheritance, you will almost always see a picture similar to this:
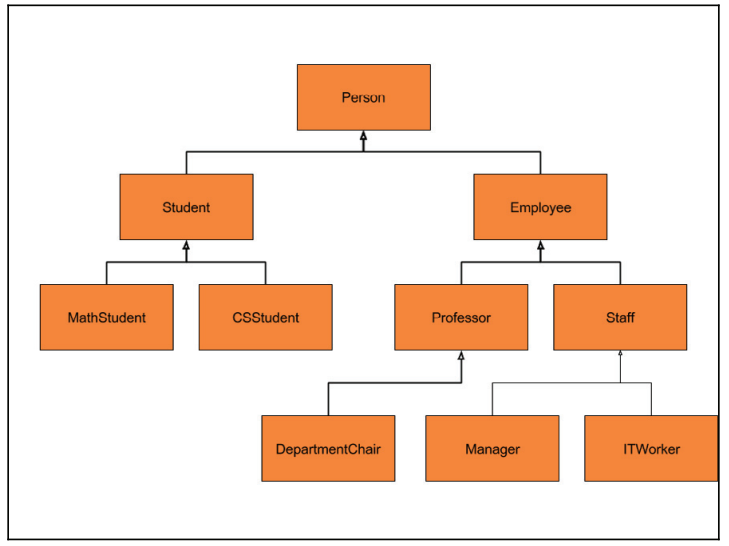
Many introductory programming courses are so focused on the mechanics of inheritance that they forget to tell you how to use it properly. A picture like the one above makes it easy to understand that ITWorker is an Employee, which is a Person, However, once you go beyond the mechanics, it is time to learn how to use inheritance correctly. This is why books on design patterns exist.
Inheritance is a powerful tool that lets us extend classes by adding members and methods that are specific to the derived classes. It allows us to start with general code and create more specialized classes. This solves one of the original problems that we had with the extremely bloated object struct in the first section. Inheritance lets us take an existing class, such as a Raider, and add more members to create a SuperRaider:
// Inheritance Based Object:
class Object {
public:
    Object(void);
    virtual ~Object(void);    // virtual destructor is important
    virtual void Update(float dt);
    virtual void CollisionReaction(Object * pCollidedWith);
protected:
    // We still need the basic data in all object
    M5Vec2 m_pos;
    M5Vec2 m_scale;
    float m_rotation;
    int m_textureID;
};

// Inheritance Based derived class
class Unit: public Object {
public:
    Unit(void);
    virtual ~Unit(void);
    virtual void Update(float dt);
    virtual void CollisionReaction(Object * pCollidedWith);
protected:
    M5Vec2 m_vel;
    float m_maxSpeed;
    float m_health;
    float m_damage;
};

class Enemy: public Unit {
public:
    Enemy(void);
    virtual ~Enemy(void);
    virtual void Update(float dt);
    virtual void CollisionReaction(Object * pCollidedWith);
protected:
    unsigned char m_color[4];
    float m_textureCoords[4];
};
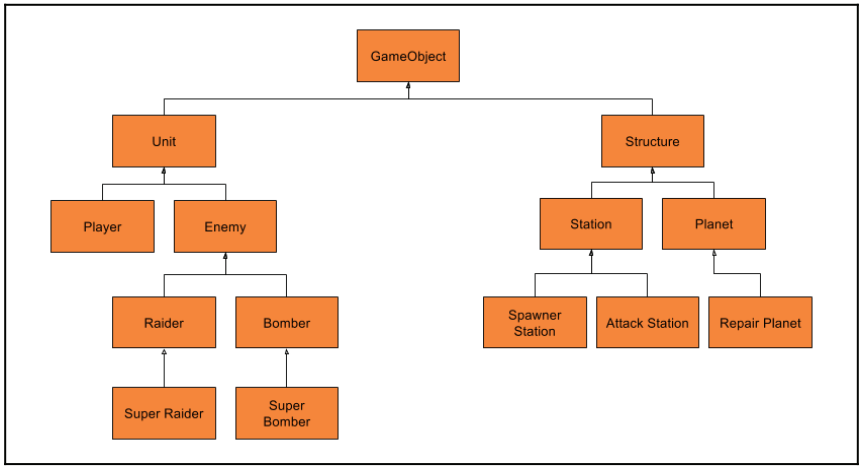
This hierarchy makes a lot of sense when first designing a space shooter. It allows us to separate the details of a Raider class or a Bomb class away from the Player class. Adding a game object is easy because we can extend a class to create what we need.Removing a game object is easy because all the code is contained within each derived class. In fact, now that we have separate classes, each one can be responsible for itself via class methods. This means we no longer need switch statements all over our code.
Best of all, we can use the power of virtual functions to decouple our derived classes from the core engines of our game. By using an array of base class pointers to the derived class instances, our core engines such as graphics or physics are only coupled to the object interface instead of derived classes, such as Planet or SpawnerStation
Without inheritance hierarchy, the code would be as follow:
// Create our objects
Object gameObjects[MAX_COUNT];

// initialization code here
// ...
for (int i = 0; i < objectsInUse; ++i) {
    switch (gameObjects[i].type) {
        case OT_PLAYER:
            break;
        case OT_PLANET:
            break;
        case OT_ENEMY_SPAWNER:
            break;
        case OT_RAIDER:
            break;
        case OT_BOMBER:
            break;
        default:
            break;
    }
}
With inheritance and polymorphism, the code is as follow:
// Create our objects
Object * gameObjects[MAX_COUNT];

// initialization code here
// ...
for (int i = 0; i < objectInUse; ++i) {
    gameObjects[i]->Update(dt);
}
Organizing the code by what it does, not what it is
What is the difference between the Raider and the Bomber, really? How are a Raider and a SuperRaider different? May be they have a different speed, a different texture, and a different damage value? Do these changes in data really require a new class? Those are really just different value, not different behaviors. The problem is that we can creating extra classes because the concept of a Raider and SuperRaider is different, but there aren't differences in behavior.
Our class hierarchy actually violates three principles I teach, two of which I learned from the Gang of Four book:
"Keep your inheritance trees shallow"
"Favor object composition over class inheritance" - Gang of Four, p20
"Consider what should be variable in your design.This approach is the opposite of focusing on the cause of redesign. Instead of considering what might force a change to a design, consider what you want to be able to change without redesign. The focus here is on encapsulating the concept that varies, a theme of many design patterns" - Gang of Four p29
A different way to state the third principle is the following:
"Find what varies and encapsulate it"
These principle exist to eliminate, or completely avoid, the problems that can and will arise when using inheritance.
The problem with our current design is that if we create a new class for every object type, we will end up with a lot of little classes that are mostly the same.Raider, SuperRaider, Bomber, and SuperBomber are mostly the same with just a few minor differences, some of which are only differences in float and int values.While this approach may seem like an improvement over the easy way, it becomes a problem because we will end up writing the same behavior code over and over again in many classes. If we have a lot of enemies, we might end up writing the same basic ChasePlayerAI code in every Update function. The only solution is moving the ChasePlayerAI up to a base class.
Let's take another look at our Space Shooter hierarchy but this time, let's add in some different behaviors to our classes:
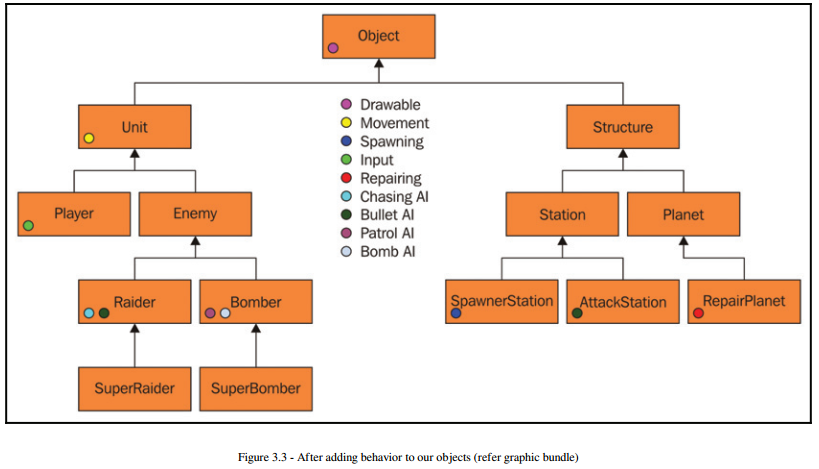
We have decided that our base object class will at least be drawable to make things simple. If an object such as a trigger region needs to be invisible, we can simply support disabling rendering by putting a bool in the drawable behavior so it won't get drawn. However, with this game object approach, I still have some duplicated code. Both the Raider class and the AttackStation class have some AI that targets and shoots bullets at the Player. We have only duplicated our code once so maybe it isn't a big deal.
Unfortunately, all game designs will change. What happens when our designer wants to add asteroids to our game? Technically, they are structures so they need some of the data inherited from that class, but they also move. Our designer also really liked the SpawnerStation class and wants to add that ability to a new SpanwerPlanet class, and to a new BossSpawner class. Should we rewrite the code two more times, or refactor the code into the base class? Our designer also wants to give the Station the abiity to slowly partorl an area. This means the Station class needs the Patrol AI ability as well. Let's take a look at our hierarchy now:
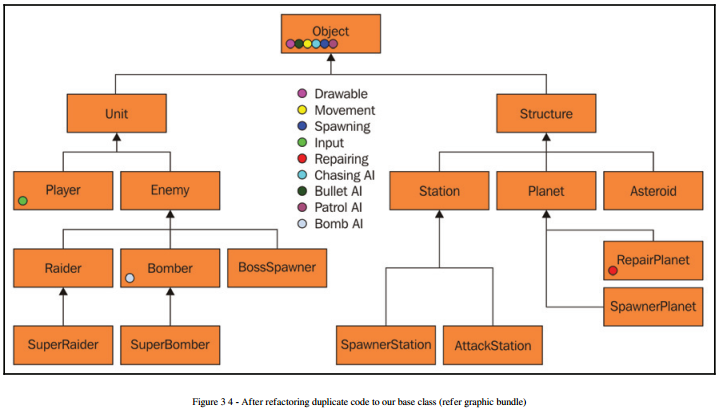
As it turns out, this approach isn't as flexible as it originally seemed. In order for our design to be really flexible, almost all of the behaviors need to be factored up into the base class. In the end, we aren't much better off than when we worte our game object the easy way.And it is still possible that our designer will want to create the RepairHelper that chases the Player, meaning that everything will be in the base class.
Avoiding the Diamond of Death
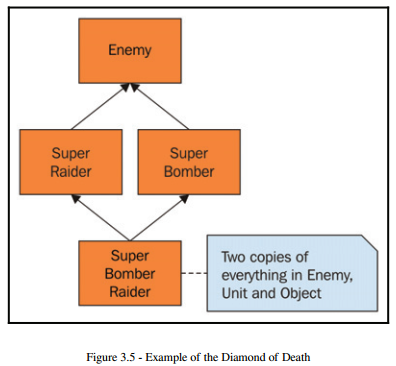
C++ has ways of solving this problem, but most programmers agree that the solution makes things more complicated to understand and more difficult to use. The rule of thumb is that we should just avoid using multiple inheritance. We have seen some of the problems that it can cause and we haven't even talked about bugs related to using new and delete in a situation like this.
The Strategy pattern and the Decorator pattern
We saw that in trying to be more flexible with our game object, a lot of behaviors was factored into the base class.We also said that it would be nice to attach a behavior at runtime and have it detach itself when we are done with it.
There are actually two disign patterns that have the potential to help our desing, The Strategy pattern and the Decorator pattern. The Strategy pattern is all about encapsulating sets of behaviors instead of inheriting. The Decorator pattern is all about dynamically adding responsibilities as needed.
The Strategy pattern explained
The Strategy pattern is about encapsulating a set of behaviors and having the client control the behavior through an interface, instead of hardcoding the behavior into the client function itself. What is this means that we want the game object to be completely independent of the behavior it uses.Imagine that we want to give each enmey a different attack and flight AI. We could use the Strategy pattern instead of creating an inheritance tree:
class Enemy: public Unit {
public:
    Enemy(void);
    virtual ~Enemy(void);
    virtual void Update(float dt);
    virtual void CollisionReaction(Object * pCollidedWith);
protected:
    unsinged char m_color[4];
    FlightAI * m_flight;
    AttackAI * m_attack;
};
In this case, our client is the Enemy class and the interfaces that the client controls are the AttackAI and FlightAI. This is a much better solution than inheriting from the Enemy because we are only encapsulating what varies: the behavoir. This pattern allows us to create as many FlightAI derived classes as we need and to reuse them to create different kinds of game object types, without needing to expand our inheritance tree. Since we can mix different strategy combinations, we can get a large number of different overall behaviors.
We are going to share the same strategies for both units and structures, so we should actually remove our inheritance tree altogether and just use the Object as our client.This way, the Object class becomes a collection of strategies, and our design is simpler. Plus, we are following some great programming principles:
Programming to an interface means that our client depends on behavior in an abstract class instead putting behavior in the client itself
Our interfaces are opened for extension so we can easily add as many behaviors as we need. The interface is simple so it won't need to be changed, which might break code.
Our inheritance trees are shallow so we don't need to worry about the Diamond of Death
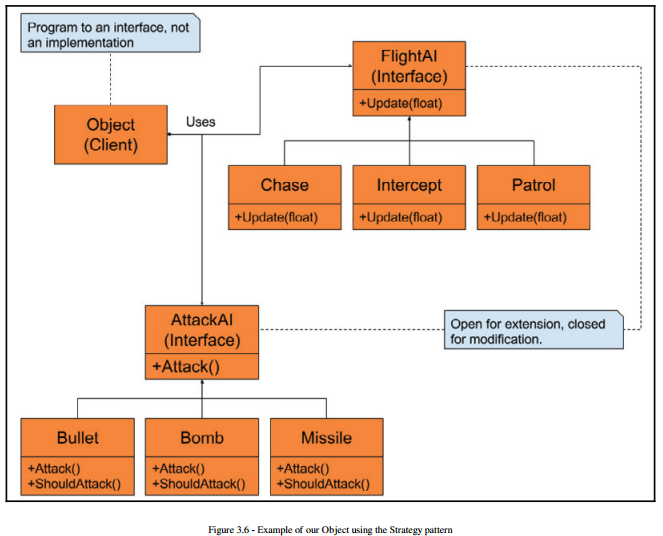
The Strategy pattern allows our game object to be very flexible without the need for an inheritance tree. With these six small classes shown in the preceding diagram, we can have a total of nine different game object behaviors. If we add anew FlightAI, we have 12 possible game object behaviros. Creating brand new strategies allows for an amazing amount of mixed behaviors. However, if we only extend just the two strategies, we don't need to modify the Object at all.This works for the Player as well, if we make an AttackAI and FlightAI that have access to input
Staying with only two strategies is unlikely, which means that whenever we add anew strategy, we will need to change the Object by adding a new member and modifying the Update function. This means that while the pattern is flexible enough to let use change strategies at runtime, we can't add behaviors dynamically. If we need to add acid damage as a debuff in our game, we would need a Damage base class, and to give a Damage base class pointer to the object:
class Object {
public:
    // Same as before...
protected:
    // Other Object Strategies
    // ...
    Damage * m_damage;
};
This doesn't seem like a great solution because most damage will be instantaneous and, most of the time, the player isn't even taking damage. That means this will be either null or an empty strategy class, such as using a NoDamage derived class, that will be updated every frame but will do nothing. This is also no way to stack corrosive effects or to have two types of damage affecting the Player, such as corrosive damage and ice damage.which might cause the Player to move slower for 10 seconds. We really need a way to dynamically add and remove these ability. Luckily, there is a pattern for that.
The Decorator pattern explained
The purpose of the Decorator pattern is to dynamically add responsibility to an object at runtime.The goal is to be a flexible alternative to creating derived classes while still allowing for extended behavior. What this means is that we can take our object and add decorations or, in cour case, behaviors at runtime.
This pattern requires that the Decorator and our object are derived from a common base class so they share the same interface. Each Decorator will then layer itself on top of an object or another Decorator to create more interesting object types and effects. When a function gets called on a Decorator, it will call the corresponding function on the next layer down, eventually calling the function of the object. It is similar in concept to the Russian Matryoshka dolls, the dolls that contain smaller and smaller versions inside of themselves. The final, most nested object is always the object with the core functionality:

class Component {
public:
    virtual ~Component(void) { }
    virtual std::string Describe(void) const = 0;
};

class Object: public Component {
public:
    Object(const std::string & name) : m_name(name) { }
    virtual std::string Describe(void) const {
        return m_name;
    }
private:
    std::string m_name;
};

// Our base and derived Decorators
class Decorator: public Component {
public:
    Decorator(Componet * comp): m_comp(comp) { }
    virtual ~Decoraotr(void) { delete m_comp; }
protected:
    Component * m_comp;
};

class RocketBoosters: public Decorator {
public:
    RocketBoosters(Component * comp): Decorator(comp) { }
    virtual std::string Describe(void) const {
        return m_comp->Describe() + " with RocketBoosters";
    }
};

class LaserCannons: public Decorator {
public:
    LaserCannons(Component * comp): Decorator(comp) { }
    virtual std::string Describe(void) const {
        return m_comp->Describe() + " with LaserCannon";
    }
};

int main(void) {
    Component * ship = new Object("Player");
    std::cout << ship->Describe() << std::endl;
    delete ship;

    Component * rocketShip = new RocketBoosters(new GameObject("Enemy"));
    std::cout << rocketShip->Describe() << std::endl;
    delete rocketShip;

    Component * laserRocketShip = new LaserCannons(new RocketBoosters(new GameObject("Boss")));
    std::cout << laserRocketShip->Describe() << std::endl;
    delete laserRocketShip;
}
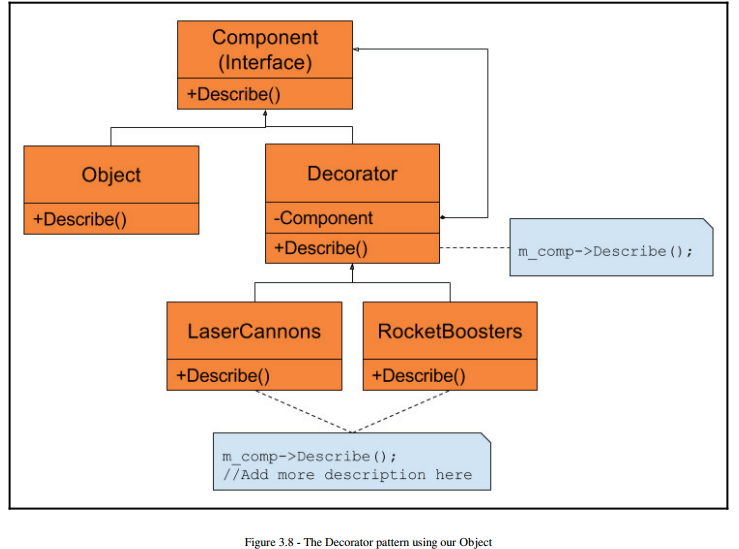
The Decorator classes layer our concrete object class and add more information on top of the object. However, right now, all we are doing is adding superficial decorations. Since the Decorator class doesn't know whether it has a pointer to the object class or another Decorator, it can't modify the object. A good analogy is that the Strategy pattern changes the guts of the object, while the Decorator pattern changes the skin.This can be useful but doesn't help us with our buff/debuff problem, we would need to add a method to find the object down the chain, or give a pointer to the object in the constructor of a Decorator.
Another problem is that this pattern was designed to add a Decorator dynamically, but doesn't allow us to remove one. In this case of using a corrosive damage Decorator, we would only want it to exist for a set time, and then automatically detach itself. This can't be done, since a Decorator doesn't have a pointer to its parent.
Unfortunately, neither the Decorator nor the Strategy pattern will work perfectly for us. What we really need is a new pattern that is combination of the Strategy and Decorator patterns that does the following:
Encapsulates specific behavior into components so we avoid Object inheritance trees.
Allows for a flexible number of components so we don't need to modify the Object each time we create a new component type
Lets us add and remove components at runtime
Gives components direct access to the Object so it can be modified
Allows components to be searchable by other components so they can interact
The Component Object Model explained
The alternative can be found by many names, though none are definitive yet. In this book, we still call it the Component Object Model, but others have called the Entity Component System or just Component System.No matter what you call it, the concept is surprisingly simple to learn and easy to implement.
The Component Object Model inverts the concept of the Decorator pattern, where each Decorator added a new layer on top of the game object.Instead of layering our object, which we have already seen problems with, we will put the decorations inside of it. Since we don't know how many we will need, our object will hold a container of decorations, as opposed to a single pointer. In the simplest form, our object is nothing more than a container for these components.
If you search for Component Object Model(or Componet Based object Model) on the Internet, you will get results that are similar to what we saw in the Strategy pattern. The object contains hardcoded pointers to each possible strategy. While using this approach alone is much better than a monolithic object or an inheritance-based object, we are stuck checking for null pointers or constantly modifying what strategies exists in our object.
In this alternative method, every strategy type will derive from a common interface. This way, out object can contain an array, or in our case an STL vector of base class Component pointers. This is like the Decorator, except our object is a separate class; it doesn't derive from the Component interface.Instead, a Component will have a pointer to its parent object class. This solves the problem in which a Decorator didn't know whether it held a pointer to another Decorator, or to the actual object. Here we avoid that problem by always giving our Component a pointer to the object it controls:
// Using only Strategy Pattern
class Object {
public:
    void Update(float dt);
    //...

private:
    GfxComp * m_gfx;
    BehaviorComp * m_behavior;
    ColliderComp * m_collider;
};

// Using flexible Component Object Model
class Object {
public:
    void Update(float dt);
    //...

private:
    std::vector<Component *> m_components;
};

// Our Base Component
class Component {
public:
    virtual void Update(float dt) = 0;
protected:
    Object * m_obj;
};
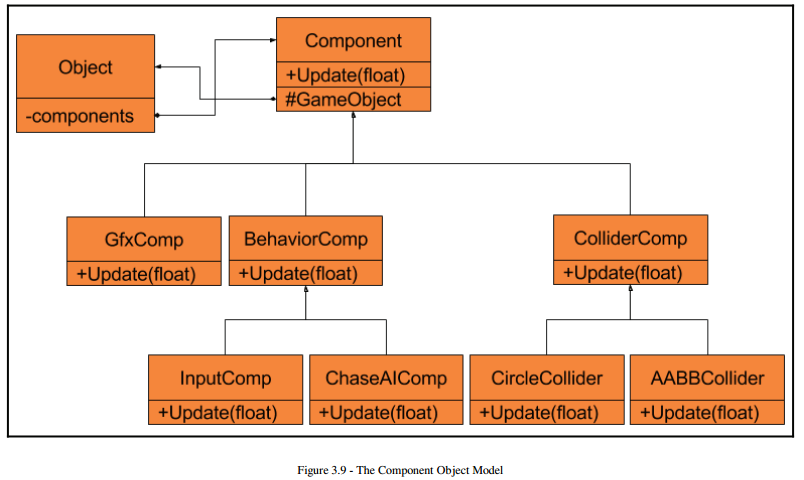
This approach allows us to be very flexible because our object is nothing more than components. There is nothing in it that is specific to any type. There is no code that is strictly for the Player or SuperRaider. We are free to add, change, or remove anything at runtime. This is important because in the early stages of development, the game design and game objectc wil change a lot. If we were to hardcode pointers to different type base class Strategies, we would spend a lot of time changing those pointer types in the game object.
Using the Component Object Model makes our code almost completely reusalbe as well. The game object itself is just an empty container of Components, and they are often so simple that most of them, such as a CircleCollider, can be used in any game. This means that a behavior component, originally meant only for the Player or SpawnerStation, can be eaisly used for any game object.
Implementing the Component Object Model
Now that we have seen a basic version in code as well as a diagram, let's look at exacty how the Mach5 Engine implements this system. As you will see, the M5object, as it is called, contains a position, rotation, scale, and velocity. Of course, these elements could be contained in a transform component; however, these are so common that most other components will need access to this information. This is different to data such as texture coordinates or a circle collider's radius, which might not need to be shared at all:
// Component based Game object used in the Mach 5 Engine
class M5Object {
public:
    M5Object(M5ArcheTypes type);
    ~M5Object(void);

    // Public interface
    void Update(float dt);
    void AddComponent(M5Component * pComponent);
    void RemoveComponent(M5Component * pComponent);
    void RemoveAllComponents(void);
    void RemoveAllComponents(M5ComponentTypes type);
    int GetID(void) const;
    M5ArcheTypes GetType(void) const;
    M5Object * Clone(void) const;
    template <typename T>
    void GetComponent(M5ComponentTypes type, T * & pComp);
    template <typename T>
    void GetAllComponents(M5ComponentTypes type, std::vector<T*>& comps);

    M5Vec2 pos;
    M5Vec2 scale;
    M5Vec2 vel;
    float rotation;
    float rotationVel;
    bool isDead;
private:
    // Shorter name for my vector
    typedef std::vector<M5Component*> ComponentVec;
    // Shorter name for my iterator
    typedef ComponentVec::iterator VecItor;

    ComponentVec m_components;
    M5ArcheType m_type;
    int m_id;
    static int s_objectIDCounter;
};
The first thing you will notice is that there are two enumerations in this code, M5Archetypes and M5ComponentTypes. These will become more useful later when we are talk about creating Factories.However, for now, it is enough to understand that these will allow us to search through a collection of M5Objects and get the components we need. For example, if we have a collection of M5objects but we need to find the Player, the M5Archetypes enum will allow us to do that.
The next thing you will notice is the M5object is more than just a container of components. It has some public and private data. The public data is unlikely to need validating or protecting. We could create getters and setters but they would really just simply get and set the data, so it isn't 100% neccessary. SInce they are public, we are locked into keeping them public forever. If you wish to make them private and create accessor methods, that is fine. There are some very important variables that we want to be private. The ID and the type are set once and can't be changed, and the array of components is accessed through functions to add, remove, and clear all components. Let's discuss the purpose of the public variables first:
pos: The position of the M5Object. This is the rotational center, or pivot point, of the object
scale: The height and width of the M5Object, before rotation
vel: The velocity of the M5Object. This is used to do time-based movement instead of simply setting the position to plus or minus some value.
rotation: The rotation in radians. Positive rotations are counterclockwise
rotationalVel: The rotational velocity of the M5Object,used to do time-based rotations
isDead: This allow the M5Object to mark itself for deletion. Other objects or components are free to call one of the DestroyObject functions found in the M5ObjectManager; however, it isn't a good idea for an object to delete itself in the middle of its own Update function
We are keeping these as part of the M5object because they are so common that all or almost all components will need access to them. We are making these as public because these is no validation or protecting that we need to do on the data.
The private section starts with two type defs.They let us create shorter names for templated types. This is simply a style choice. Another style choice is to have an m_ in front of all of the private member variable names.This or something similar is a common parctice for class members. We didn't do this with our public members because we are treating them more like properties. Now let's look at the rest of the private data:
m_component: This is the array of M5Component pointers. Each component in the vector will get updated in the Update function.
m_type: The type of object. It will get set in the constructor and never change. It allows the user to use the M5ObjectManager ot search or remove objects based on type.
m_id: This is a unique ID among M5Objects. It can be useful in cases such as a missile needing to target a specific instance of an object.If the missile contains a pointer to the target object,it can't know whether the object has been destroyed. If we instead know the ID, we can search to see whether the target still exists.
s_objectIDCounter: This is the shared ID counter for all M5Objects.This guarantees that each object will get a unique value because they are all using the same shared variable. Notice that this is marked with an s_ to indicate that it is static
That is all of the data in the object. Now, let's look at the functions.
M5object is the constructor for the class. It sets starting values for the variables as well as setting the type and giving a unique ID. Notice that we reserve an amount of starting space for the vector. A game object can have as many components as it needs, but in an actual game, we don't expect them to have more than a few on average. By pre-allocating, we may avoid additional calls to new (we will be a doing a lot anyway):
M5Object::M5Object(M5ArcheTypes type): pos(0,0), scale(1,1), vel(0, 0), rotation(0), rotationVel(0), isDead(false), m_components(), m_type(type), m_id(++s_objectIDCounter) {
    m_components.reserve(START_SIZE);
}
~M5object is the destructor for our game object. Here we want to make sure that we delete all of the components in our game object, so we make use of one of our public functions to help us:
M5Object::~M5Object(void) {
    RemoveAllComponents();
}
AddComponent adds the given component pointer to this object vector. You will notice that before the component is added, you will need to check to make sure the same pointer isn't already in the list. While this isn't very likely to happen, it could be a hard bug to find later so it is worth the check. It is also important when given a component to use the SetParent method of M5Component to make sure this object will be controlled by the component:
void M5Object::AddComponent(M5Component * pToAdd) {
    // Make sure this component doesn't already exist
    VecItor found = std::find(m_components.begin(), m_components.end(), pComponent);

    if (found != m_components.end())
        return;

    // Set this object as the parent
    pComponent->SetParent(this);
    m_components.push_back(pComponent);
}
Update is the most used function in the M5Object. This will get called automatically by the M5ObjectManager every frame.It is used to update every component as well as update position and rotation based on their velocities. The other important role of the Update function is that is deletes any dead components. Except for the RemoveAllComponents function, this is the only place where components are deleted:
void M5Object::Update(float dt) {
    int endIndex = m_components.size()  - 1;
    for (; endIndex >=0; --endIndex) {
        if (m_components[endIndex]->isDead) {
            delete m_components[endIndex];
            m_components[endIndex] = m_components[m_components.size() - 1];
            m_components.pop_back();
        } else {
            m_components[endIndex]->Update(dt);
        }
    }

    // Update object data
    pos.x += vel.x * dt;
    pos.y += vel.y * dt;
    rotation += rotationVel * dt;
}
RemoveComponent is used for cases such as when you have buffs or debuffs on an object and you want the stage, or some other object, to delete it. For example, the Player may be using a shield but, after being hit with ion damage, the physics collider finds the shield and immediately removes it. Instead of using this method, it would aslo be fine to simply mark the component as dead and it will be cleaned up in the next update loop.
This code follows a similar pattern to the AddComponent function. First, we test to make sure the component exists. If it does exist, we swap places with the last item in the vector and pop back the vector. After that, we use the SetParent method to remove this object as the parent pointer before deleting it. This is a small precaution as, in case another pointer to this component exists, the program will crash instead of causing an undefined error:
void M5Object::RemoveComponent(M5Component * pComponent) {
    // Make the sure the instance exists in this object
    VecItor end = m_components.end();
    VecItor itor = std::find(m_components.begin(), end, pToRemove);

    if (itor != end)
        return;

    (*itor)->isDead = true;
}
RemoveAllComponents is the helper function used in the destructor. It deletes all components in the object. Except for the destructor, there probably isn't much use for it. However, it was made public for those rare occasions where this is the behavior you need. This function simply loops through the vector and deletes every component, then finally clears the vector:
void M5Object::RemoveComponents(void) {
    VecItor itor = m_components.begin();
    VecItor end = m_components.end();
    while (itor != end) {
        delete (*itor);
        ++itor;
    }
    m_components.clear();
}
The second version of RemoveAllComponents removes all components of a specific type. This is another situation where external code, such as a stage, object, or even another component needs to remove a group of the same component type.This could be used to remove all corrosive damage effects on the Player, for example.
In this code, we are searching for the correct type, so we cannot use the std::vector::find method. Instead, we use a for loop and check the type of each component. If we find the correct type, we delete the current one, swap with the end and pop back. Since we are doing a swap, but continue searching, we must make sure to check the current index again to see whether it matches as well:
void M5Object::RemoveAllComponents(M5ComponentTypes type) {
    for (size_t i = 0; i < m_components.size(); ++i) {
        if (m_components[i]->GetType() == type) {
            m_components[i]->isDead = true;
        }
    }
}
GetComponent and GetAllComponents are helper functions to find and cast specific component types in an M5Object, if they exist.As I said before, sometimes it is necessary that components interact. In that case, we need a way to search for a specific component and to convert it to the correct type. These two functions are almost the same. The first one finds the first instance of the correct component type and assign it to the pointer parameter. If one doesn't exist, we make sure to set the parameter to 0. The second one finds all components of the correct type and saves them in the vector parameter. These are template functions so the component can be cast to the correct type supplied by the user:
template <typename T>
void M5Object::GetComponent(M5ComponentTypes type, T*& pComp) {
    size_t size = m_components.size();
    for (size_t  i = 0; i < size; i++) {
        if (m_components[i]->GetType() == type) {
            pComp = static_cast<T*>(m_components[i]);
            return;
        }
    }
    pComp = 0;
}

template <typename T>
void GetAllComponent(M5ComponentTypes type, std::vector<T*>& comps) {
    size_t size = m_components.size();
    for (size_t i =0; i <size; ++i) {
        if (m_components[i]->GetTypes() == type) {
            comp.push_back(static_cast<T*>(m_components[i]));
        }
    }
}
The GetID and GetType functions just return the private class data.The Clone method is more interesting but we still go into more detail about it when we discuss the Prototype pattern
Implementing components
class M5Component {
public:
    M5Component(M5ComponentTypes type);
    virtual ~M5Component(void);
    virtual M5Component * Clone(void) = 0;
    virtual void Update(float dt) = 0;
    virtual void FromFile(M5IniFile &);
    void SetParent(M5Object * pParent);
    M5ComponentTypes GetType(void) const;
    int GetID(void) const;

    bool isDead;
protected:
    M5Object * m_pObj;
private:
    int m_id;
    M5ComponentTypes m_type;
    static int s_compIDCounter;
};
The data section doesn't contain as much as the M5Object, but now it is split into three sections which are public, private, and protected:
isDead: This is the only public data and it serves a similar function to the member in the game object. This allows the component to mark itself for deletion. It isn't a good idea for a component to call RemoveComponent on itself during its own Update function.
m_pObj: This is a pointer to the M5Object that owns this component.
m_id: The unique ID of this component. This allows users to get access to this specific component again, without the risk of saving a pointer which may become invalid
m_type: The type of this component. This allows users to search for a specific component within a game object.
s_compIDCounter: This is used to create a unique ID for each component
The functions of the M5Component are not that interesting because they are mostly virtual. However, it is worth going over their purpose.
M5Component is the non-default constructor for the component. This takes an argument of type M5ComponentTypes so that the private data m_type is guaranteed to be set by a derived type:
M5Component::M5Component(M5ComponentTypes type): isDead(false), m_pObj(0), m_type(type), m_id(++s_componentID) {
}
~M5Component is the destructor for the class. Since this is meant to be a base class, it is important that a virtual destructor exsits so that the correct method will be called when using polymorphism:
M5Component::~M5Component(void) {
    // Empty Base Class virtual destructor
}
Update is where the component does the action. This method will be called every frame and its intended purpose is to add a behavior and/or data to the M5Object. It is marked as pure virtual(=0) so that the base class is forced to override it. That also means there is no body to the base class version.
FromFile is a vritual function that allows the component to read data from a preloaded INI file. It is not marked as pure virtual, meaning that a component doesn't need to override this function. This might be the case if the derived component has no data to be loaded from a file:
void M5Component::FromFile(M5IniFile&) {
    // Empty for the base class
}
The SetParent method is simply a setter from m_pObj. Recall the AddComponent function of M5Object. When a component is added to an object, the object uses this function so the component knows which object to control.
The GetType and GetID functions are similar to the functions in M5Object. They allow the component to be searchable and saved without needing to use pointers that may become invalid. The M5Component also has a pure virtual Clone method. There is no function body in the base class. We will discuss the Clone method of both M5Component and M5Object when we discuss the Prototype pattern.
Creating and removing objects and components
In order to use the Component Object Model, first create a game object, then add some components, then finally add it to the M5ObjectManager which calls an update on the game object every frame.
If we wanted to create a Player object to fly around on screen, but stay within the bounds of the screen, we could do this inside the Init method of a stage:
M5Object * pObj = new M5Object(AT_Player);

GfxComponent * pGfxComp = new GfxComponent;
PlayerInputComponent * pInput = new PlayerInputComponent;
ClampComponent * pClamp = new ClampComponent;

pObj->AddComponent(pGfxComp);
pObj->AddComponent(pInput);
pObj->AddComponent(pClamp);

// Set position, rotation, scale here
// ...
M5ObjectManager::AddObject(pObj);
This code works fine, but there are a few problems. Frist, we didn't specify what texture we want. However, we could easily add a textureID or filename as a parameter to the GfxComponent constructor. The larger problem is that this code was tedious to write and we don't want to write it again and again. If we are creating a player in another stage, it will likely contain the exact same code. So a better approach is to factor this code into the M5ObjectManager:
M5Object * M5ObjectManager::CreateObject(M5ArcheTypes type) {
    switch(type) {
        case AT_Player:
            M5Object * pObj = new M5Object(AT_Player);
            GfxComponent * pGfxComp = new GfxComponent;
            PlayerInputComponent * pInput = new PlayerInputComponent;
            ClampComponent * pClamp = new ClampComponent;
            pObj->AddComponent(pGfxComp);
            pObj->AddComponent(pInput);
            pObj->AddComponent(pClamp);
            AddObject(pObj);
            // Set position, rotation, scale here
            // ...
            break;
        case AT_Bullet:
            // ...More Code here
Now in our stage Init function, we can simply write the following:
M5Object * pObj = M5ObjectManager::CreateObject(AT_Splash);
// Set additional data here if needed
However, this is pretty hardcoded. This explicity creates all of the components that a Player(and every type) needs, which means that our M5ObjectManager now contains game-specific code. The benefit of using the Component Object Model is that it is flexible, but we have lost some of that flexibility by having a hardcoded switch statement. We really want our designers, not programmers, to choose what goes into a Player, Raider, or SuperRaider. That means loading our object types from a file. In our case, we will use INI files because they are simple to use and simple to understand. They consist of global or labeled sections of key/value pairs. Here is an example Player archetype found in Player.ini:
posX = 0
posY = 0
velX = 0
velY = 0
scaleX = 10
scaleY = 10
rot = 0
rotVel = 0
components = GfxComponent PlayerInputComponent ClampComponent

[GfxComponent]
texture = playerShip.tga

[PlayerInputComponent]
forwardSpeed = 100
bulletSpeed = 7000
rotationSpeed = 10
Notice that the first(global) section of the INI file contains all data found in the M5Object. Since we know that those variable always exist in the object, they are placed at the top. This includes a list of components that this archetype will use. Here we have GfxComponent, PlayerInputComponent, and ClampComponent. The next section are data associated with each component, for example, with the GfxComponent we can specify our texture to load. The ClampComponent doesn't need any data loaded so we didn't need to add a section for it
Comparing the Component Object Model with the monolithic object or the inheritance tree, we can see that the component-based approach is vastly more flexible and reusable. With this method, we can write as many different components as we want and let the designer choose what behaviors each object uses. The best part is that everything but the most game-specific components can be used in another game.
That means that the PlayerInputComponent probably can't be reused in another game, but the ClampComponent and GfxComponent can be used whether we are making another Space Shooter, Platformer, or Racer.
One note about components used for graphics, such as GfxComponent and CircleColliderComponent: these are special in the sense that they need to interact with core engines in a way that other components may not need to. For example, the Graphics engine might want to organize these components based on whether they are world space objects or screen space objects(referred to as HUD space, since these would be things such as buttons and health bars). The Physics engine might want to use a special partition data structure to minimize the number of collision tests that need to be performed. For this reason, these components are automatically registered to their respective core engines when created through the object Manager and they automatically unregister when thery are deleted.
Performance concerns
There are a lot of benefits to using the Component Object Model. These days, many engines use this approach because of the flexibility it provides. However, the flexibility comes at a cost to performance. The biggest performence costs are calls to new/delete, cache coherency, and virtual methods.
Our M5ObjectManager uses pointers to M5Object which uses an STL vector of pointers to components. This means that we create Bullets, Asteroids, Raiders and Planets, we are constantly calling new and delete. These are slow functions and have the chance to fragment our memory. In a later chapter, we will see how object pools can help us solve both of these problems.
Virtual methods are also a source of potential performance problems because the function to call must always be looked up at runtime and they cannot be inlined by the compiler. Again, this is the price we pay for flexibility. We have an approach that allows our designer to load a behavior from a file and change that behavior at runtime. In my option, that outweighs the performance issues, at least at the beginning of the development cycle.
You may have heard premature optimization is the root of all evil. It is more important to focus on making a fun game and to solve the performance problems later. You always have the option of hardcoding specific behaviors or data in the game object much later in the development cycle. If possible, you might merge two or more components that always get used together once you are in the polish stage. However, by limiting your flexibility early on, you may never discover a fun feature that comes from mixing two components in a way that wasn't originally planned.
My advice is to focus first on algorithmic optimizations, then macro optimizations, then finally micro optimizations. What I mean is that it is better to worry about the time complexity of your physics engine and how many draw calls or collision tests you are performing, before worrying about what is in the CPU cache or the performance cost of virtual functions. While they can be a problem, these things fall under the category of micro optimizations.
Summary
4. Aritificial Intelligence Using the State Pattern
Chapter overview
Your Objective
The State pattern explained
Introduction to State Machines
An overview of enumerations
Doing things based on our states
Why if statements could get you fired
Expanding on the State Machine
The State pattern in action--M5StateMachine
The State pattern in action--StateManager
Issues with FSMs
The State pattern explained
The State pattern is a way to allow a game object to change its behavior and funcitonality in response to different stimuli within the game, especially when a variable or a condition within that object changes, as those changes may trigger a change in state. The state of an object is managed by some context(commonly referred to in the game industry as a machine), but the states tell the machine when to change states and thereby functionality. The State pattern contains two parts: the state and the context. The context object holds the current state and can be used by the state class to change what state should be run, whereas the state object holds the actual functionality:
Introduction to State Machines
We often write code to react to things happening within the game environment based on the expectations of us, as well as our players. For instance, if we are creating a 2D side-scrolling platformer game, when the player presses one of the arrow keys, we're expecting the player's character to move and, whenever we press the spacebar, we expect the sprite to jump intto the air. Or perhaps in a 3D game, when our player sees a panel with a large button, they expect to be able to press it.
Tons of things in our ordinary lives act this way as well, reactive to center stimuli. For instance, when you use your television remote, you expect certain things to happen, or even when swiping or tapping on your mobile phone. Based on the stimuli provided, the state of our object may change. We call something that can be in one of multiple states at a time a State Machine
Almost every program you write can be considered a State Machine of some sort. The second that you add in an if statement to your project, you have developed code that can be in at least one of those states. That being said, you don't want to have a bunch of switch and/or if statements inside of your code as it can quickly get out of hand and make it difficult to understand exactly what it is that your coding is doing.
As programmers, we often want to take our problems and break them down over and over again until they are in their simplest form, so let's see a possible way to do that. In game development, you'll hear references to an FSM which stand for Finite State Machine. Finite means that there are only a certain number of states and that they are all clearly defined for what they can do and how they will change between states.
An overview of enumerations
Let's say we're going to create a simple enemy. This enemy will not do anything by default, but if the player is nearby, it will move toward them. However, if the player get too far away from them, then they will stop their pursuit. FInally, if the player shoots the enemy, it will die. So, keeping that in mind, we can exract the states that we'll need. They are as follows:
Idle
Follow
Death
While we are creating our State Machine, we need some way to keep track of what state our objects are going to be in. One may think a way to do this would be to have a bool(Boolean value of true or false) for each possible state there is and then set them all to false,except for the state we're in. This is a very bad idea.
Another thought could be to just have an integer and then set a value for each one that there is. This is also a bad idea, as using numbers in this way is basically the same thing as using magic numbers in our code, since the numbers have no logic to them for people to read.Alternatively, you could have #defines for each possible value, but that will allow people to put in whatever number they want without any protections at all. Instead, whenever we see a series of things where only one of them is true at time, we can make sure of the programming feature of enumerations, called enums for short.
The basic concept of using enumerations is that you get to create your own custom data types which are restricted to only have a certain list of values.Unlike integers or #defines, these numbers are expressed using constans and allow us to have all of the advantages of having a value, such as being able to compare values. In our case, an enum for our states would look something like the following:
enum State {
Idle,
Follow,
Death
};
Acting on states
enum State {
    Idle,
    Follow,
    Death
};

class ChagePlayerComponent: public M5Component {
public:
    ChagePlayerComponent(void);
    virtual void Update(float dt);
    virtual void FromFile(M5IniFile& iniFile);
    virtual ChagePlayerComponent * Clone(void);
private:
    float m_speed;
    float m_followDistance;
    float m_loseDistance;

    void FollowPlayer();
    float GetDistanceFromPlayer();
    State m_currentState;
};

void ChasePlayerComponent::FollowPlayer() {
    std::vector<M5Object *> players;
    M5ObjectManager::GetAllObjectsByType(AT_Player, players);
    M5Vec2 dir;
    M5Vec2::Sub(dir, players[0]->pos, m_pObj->pos);
    m_pObj->rotation = std::atan2f(dir.y, dir.x);
    dir.Normalize();
    dir *= m_speed;
    m_pObj->vel = dir;
};

ChasePlayerComponent::ChagePlayerComponent(void):M5Component(CT_ChasePlayerComponent), m_speed(1) {
    m_currentState = Idle;
}

void ChasePlayerComponent::FromFile(M5IniFile& iniFile) {
    iniFile.SetToSection("ChasePlayerComponent");
    iniFile.GetValue("speed", m_speed);
    iniFile.GetValue("followDistance", m_followDistance);
    iniFile.GetValue("loseDistance", m_loseDistance);
}

M5Component * ChasePlayerComponent::Clone(void) {
    ChasePlayerComponent* pNew = new ChasePlayerComponent;
    pNew->m_speed = m_speed;
    pNew->m_followDistance = m_loseDistance;
    return pNew;
}

void ChasePlayerComponent::Update(float) {
    switch (m_currentState) {
        case Idle:
            m_pObj->vel = M5Vec2(0, 0);

            if (GetDistanceFromPlayer() < m_followDistance) {
                m_currentState = Follow;
            }
            return;
        case Follow:
            FollowPlayer();
            if (GetDistanceFromPlayer() > m_loseDistance) {
                m_currentState = Idle;
            }
            break;
        case Death:
            m_pObj->isDead = true;
            break;
    }
}
Issues with conditionals
void MinValue(int a, int b) {
    if (a < b) {
        return a;
    }
    else {
        return b;
    }
}

void MinValue(int a, int b) {
    return (a < b) ? a : b;
}

void AttackPlayer(Weapon * weapon) {
    if (weapon.name == "Bow") {
        ShootArrow(weapon);
    } else if (weapon.name == "Sword") {
        MeleeAttack(weapon);
    } else {
        IdelAnimation(weapon);
    }
}

void AttackPlayer(Weapon * weapon) {
    switch (weapon.type) {
        case 0:
            ShootArrow(weapon);
            break;
        case 1:
            MeleeAttack(weapon);
            break;
        default:
            IdelAnimation(weapon);
            break;
    }
}

class Weapon {
public:
    virtual void Attack() {

    };
};

class Bow: Weapon {
public:
    virtual void Attack() {
    };
};

void AttackPlayer(Weapon * weapon) {
    weapon->Attack();
}
Expanding on the State Machine
class ChasePlayerComponent: public M5Component {
public:
    // ...
    virtual void EnterState(State state);
    virtual void UpdateState(State state, float dt);
    virtual void ExitState(State state);
    virtual void SetNewState(State state, bool initialState = false);
    // ...
}

void ChasePlayerComponent::EnterScene(State state) {
    // Depending on what state we are in, do different things
    switch (state) {
        case Idle:
            if (m_pObj) {
                m_pObj->vel = M5Vec2(0, 0);
            }
            M5DEBUG_PRINT("\nIdle: Enter");
            break;
        case Follow:
            M5DEBUG_PRINT("\nFollow: Enter");
            break;
        case Death:
            m_pObj->isDead  true;
            M5DEBUG_PRINT("\nDeath: Enter");
            break;
    }
}

void ChasePlayerComponent::UpdateState(State state, float) {
        switch (state) {
            case Idle:
                if (GetDistanceFromPlayer() < m_followDistance) {
                    SetNewState(Follow);
                }
                break;
            case Follow:
                FollowPlayer();
                if (GetDistanceFromPlayer() > m_loseDistance) {
                    SetNewState(Idle);
                }
                break;
        }
}

void ChasePlayerComponent::ExitState(State state) {
    switch (state) {
        case Idle:
            M5DEBUG_PRINT("\nIdle: Exit");
            break;
        case Follow:
            M5DEBUG_PRINT("\nFollow: Exit");
            break;
    }
}

void ChasePlayerComponent::SetNewState(State state, bool initialState) {
    if (!initialState) {
        ExitState(currentState);
    }

    m_currentState = state;
    EnterState(m_currentState);
}

void ChasePlayerComponent::Update(float dt) {
    UpdateState(m_currentState, dt);
}

ChasePlayerComponent::ChasePlayerComponent(void): M5Component(CT_ChasePlayerComponent), m_speed(1) {
    SetNewState(Idle, true);
}

SplashStage::~SplashStage(void) {
    M5ObjectManager::RemoveAcheType(AT_Splash);
}
The State pattern in action - the M5StateMachine class
#ifndef M5STATEMACHINE_H
#define M5STATEMACHINE_H

#include "M5Component.h"
#include "M5Vec2.h"

class M5State {
public:
    virtual ~M5State(void) {}
    virtual void Enter(float dt) = 0;
    virtual void Update(float dt) = 0;
    virtual void Exit(float dt) = 0;
};

class M5StateMachine: public M5Component {
public:
    M5StateMachine(M5ComponentTypes type);
    virtual ~M5StateMachine(void);
    virtual void Update(float dt);
    void SetNextState(M5State * pNext);
private:
    M5State * m_pCurr;
};

#endif

#include "M5StateMachine.h"

M5StateMachine::M5StateMachine(M5ComponentTypes type): M5Component(type), m_pCurr(nullptr) {

}

M5StateMachine::~M5StateMachine(void) {

}

void M5StateMachine::Update(float dt) {
    m_pCurr->Update(dt);
}

void M5StateMachine::SetNextState(M5State * pNext) {
    if (m_pCurr) {
        m_pCurr->Exit();
    }

    m_pCurr = pNext;
    m_pCurr->Enter();
}

#ifndef RANDOM_LOCATION_COMPONENT_H
#define RANDOM_LOCATION_COMPONENT_H

#include "Core\M5Component.h"
#include "Core\M5StateMachine.h"
#include "Core\M5Vec2.h"

class RandomGoComponent;

class RLCFindState: public M5State {
public:
    RLCFindState(RandomComponent * parent);
    void Enter(float dt);
    void Update(float dt);
    void Exit(float dt);
private:
    RandomGoComponent * m_parent;
};

class RLCRotateState: public M5State {
public:
    RLCRotateState(RandomComponent * parent);
    void Enter(float dt);
    void Update(float dt);
    void Exit(float dt);
private:
    float m_targetRot;
    M5Vec2 m_dir;
    RandomComponent * m_parent;
};

class RLCGoState: public M5State {
public:
    RLCGoState(RandomGoComponent * parent);
    void Enter(float dt);
    void Update(float dt);
    void Exit(float dt);
private:
    RandomGoComponent * m_parent;
};

class RandomComponent : public M5StateMachine {
public:
    RandomGoComponent(void);
    virtual void FromFile(M5IniFile&);
    virtual M5Component * Clone(void);
private;
    friend RLCFindState;
    friend RLCGoState;
    friend RLCRotateState;

    float m_speed;
    float m_rotateSpeed;
    M5Vec2 m_target;

    RLCFindState m_findState;
    RLCRotateState m_rotateState;
    RLCGoState m_goState;
};

#endif


#include "RandomGoStates.h"
#include "RandomGoComponent.h"

#include "Core\M5Random.h"
#include "Core\M5Object.h"
#include "Core\M5Intersect.h"
#include "Core\M5Gfx.h"
#include "Core\M5Math.h"
#include <cmath>

FindState::FindState(RandomGoComponent * parent): m_parent(parent) {

}

void FindState::Enter() {
    M5Vec2 botLeft;
    M5Vec2 topRight;
    M5Gfx::GetWorldBotLeft(botLeft);
    M5Gfx::GetWorldTopRight(topRight);

    M5Vec2 target;
    target.x = M5Random::GetFloat(botLeft.x, topRight.x);
    target.y = M5Random::GetFloat(botLeft.y, topRight.y);

    m_parent->SetTarget(target);
}

void FindState::Update(float) {
    m_parent->SetNextState(m_parent->GetState(RGS_ROTATE_STATE));
}

void FindState::Exit() {

}

RotateState::RotateState(RandomComponent * parent): m_parent(parent) {

}

void RotateState::Enter() {
    M5Vec2 target = m_parent->GetTarget();
    M5Vec2::Sub(m_dir, target, m_parent->GetM5Object()->pos);

    m_targetRot = std::atan2f(m_dir.y, m_dir.x);
    m_targetRot = M5Math::Wrap(m_targetPos, 0.f, M5Math::TWO_PI);

    m_parent->GetM5Object()->rotationVel = m_parent->GetRotationSpeed();
}

void RotateState::Update(float) {
    m_parent->GetM5Object()->rotation = M5Math::Wrap(m_parent->GetM5Object()->rotation, 0.f, M5Math::TWO_PI);

    if (M5Math::IsInRange(m_parent->GetM5Object()->rotation, m_targetRot - .1f, m_targetRot + .1f)) {
    m_parent->SetNextState(m_parent->GetState(RGS_GO_STATE));
    }

    void RotateState::Exit() {
        m_parent->GetM5Object()->rotationVel = 0;

        m_dir.Normalize();
        M5Vec2::Scale(m_dir, m_dir, m_parent->GetSpeed());

        m_parent->GetM5Object()->vel = m_dir;
}

GoState::GoState(RandomComponent * parent): m_parent(parent) {

}

void GoState::Enter() {

}

void GoState::Update(float) {
    M5Vec2 target = m_parent->GetTarget();
    if (M5Intersect::PointCircle(target, m_parent->GetM5Object()->pos, m_parent->GetM5Object()->scale.x)) {
        m_parent->SetNextState(m_parent->GetState(RGS_FIND_STATE));
    }
}

void GoState::Exit() {
    m_parent->GetM5Object()->vel.Set(0, 0);
}

RandomGoComponent::RandomGoComponent(): M5StateMachine(CT_RandomGoComponent), m_speed(1), m_rotateSpeed(1), m_findState(this), m_rotateState(this), m_goState(this) {
    SetNextState(&m_findState);
}

void RandomGoComponent::FromFile(M5IniFile& iniFile) {
    iniFile.SetToSection("RandomGoComponent");
    iniFile.GetValue("speed", m_speed);
    iniFile.GetValue("rotationSpeed", m_speed);
}

RandomGoComponent * RandomGoComponent::Clone(void) const {
    RandomGoComponent * pNew = new RandomGoComponent;
    pNew->m_speed = m_speed;
    pNew->m_rotateSpeed = m_rotateSpeed;
    return pNew;
}

M5State * RandomGoComponent::GetState(RandomGoState state) {
    switch (case) {
        case RGS_FIND_STATE:
            return &m_findState;
            break;
        case RGS_ROTATE_STATE:
            return &m_rotateState;
            break;
        case RGS_GO_STATE:
            return &m_goState;
            break;
    }

    return &m_findState;
}
The State pattern in action - StageManager
class M5StageManager {
public:
    friend class M5App;

    // Register a GameState and a builder with the StageManager
    static void AddStage(M5StageType type, M5StageBuilder * builder);
    // Removes a Stage Builder from the Manager
    static void RemoveStage(M5StageTypes type);
    // Clear all stage from the StageManager
    static void ClearStages(void);
    // Sets the given stage ID to the starting stage of the game
    static void SetStartStage(M5StageTypes startStage);
    // Test if the game is quiting
    static bool IsQuitting(void);
    // Test stage is restarting
    static bool IsRestarting(void);
    // Gets the pointer to the users game specific data
    static M5GameData & GetGameData(void);
    // Sets the next stage for the game
    static void SetNextStage(M5StageTypes nextStage);
    // Pause the current stage, so it can be resumed but changes stages
    static void PauseAndSetNextStage(M5StageTypes nextStage);
    // Resumes the previous stage
    static void Resume(void);
    // Tells the game to quit
    static void Quit(void);
    // Tells the stage to restart
    static void Restart(void);
private:
    static void Init(const M5GameData & gameData, int framesPerSecond);
    static void Update(void);
    static void Shutdown(void);
    static void InitStage(void);
    static void ChangeStage(void);
};

void M5StateManager::ChangeState(void) {
    /* Only unload if we are not restarting */
    if (s_isPausing) {
        M5ObjectManager::Pause();
        M5Phy::Pause();
        M5Gfx::Pause(s_drawPaused);
        PauseInfo pi(s_pStage, s_currentStage);
        s_pauseStack.push(pi);
        s_isPauseing = false;
    } else if (s_isResuming) {
        /* Make sure to shutdown the stage */
        s_pStage->Shutdown();
        delete s_pStage;
        s_pStage = nullptr;
    } else if (!s_isRestarting) { // Just changing the stage
        /* Make sure to shutdown the stage */
        s_pStage->Shutdown();
        delete s_pStage;
        s_pStage = nullptr;

        // If we setting the next stage, that means we are ignore all
        // paused states, so lets clear the pause stack
        while (!s_pauseStack.empty()) {
            M5Gfx::Resume();
            M5Phy::Resume();
            M5ObjectManager::Resume();
            PauseInfo pi = s_pauseStack.top();
            pi.pStage->Shutdown();
            delete pi.pStage;
            s_pauseStack.pop();
        }
    } else if (s_isRestarting) {
        s_pStage->Shutdown();
    }

    s_currStage = s_nextStage;
}
Issues with FSMs
We've seen some of the ways in which FMSs can be valuable things to add your projects and how they can make simple AI behavior much easier, but there are some issues with them.
Traditional FSM such as the ones we've displayed here can, over time, become unmanageable as you continue to add many different states to them. The difficult part is keeping the number of states to a minimum while also adding complexity by adding new contexts in which your characters can respond
You'll also have a lot of similar code being written as you'll be reduilding different behaviors that have pieces of others, which can also be time-consuming. Another thing that's been going on on recently in the game industry is AI programmers moving on to more complex ways of handing AI, such as behavior trees.
Summary
5. Decoupling Code via the Factory Method Pattern
Chapter overview
Your objective
Learning why using switch statements can be bad
Lerning the Dependency Inversion Principle
Learning the Factory Method pattern
Building a Component, Stage, and Object Factory
Improve your Factories by using templates
The trouble with switch statements
M5Object * M5ObjectManager::CreateObject(M5ArcheTypes type) {
    switch (type) {
        case AI_Player:
            // Create player object
            M5Object * pPlayer = new M5Object(AT_Player);

            // Create the components we'd like to use
            GfxComponent * pGfx = new GfxComponent;
            PlayerInputComponent * pInput = new PlayerInputComponent
            ClampComponent * pClamp = new ClampComponent;

            // Attach them to our player
            pObj->AddComponent(pGfx);
            pObj->AddComponent(pInput);
            pObj->AddComponent(pClamp);

            // Add this object to the M5ObjectManager
            AddObject(pPlayer);
            return pPlayer;
            break;
    case AT_Bullet:
        // ...More Code here
This solves the problem of needing to change our stages whenever an object is changed. However, we will still have to change our switch statement and the object manager if your objects or components change. Actually, except for this function, the Object Manager doesn't really care about any derived component types. It only needs to dependent on the M5Component abstract class.If we can fix this funciton, we can completely decouple our derived component types from this class
The solution to our problem is the same solution used to solve the stage management problem I faced years ago, the Dependency Inversion Principle
The Dependency Inversion Principle
The concept of avoiding concreate classes isn't new. Robert.C.Martin defined this idea in The C++ Report in May 1996 in an article titled The Dependency Inversion Principle. It is the D in his SOLID design principles. The principle has two parts:
High-level modules should not depend on low-level modules. Both should depend on abstractions.
Abstractions should not depend on details. Details should depend on abstractions
While this may seem like mouthful, the concept is actually very easy. Imagine we have a StageManager class that is responsible for initializing, updating, and shutting down all of the stages in our game. In this case, our StageManager is our high-level modules, and the stages are the low-level modules. The StageManager will control the creation and behavior of our low-level module, the stages. This principle says that our StageManager code shouldn't depend on derived stage classes, but should instead depend on an abstract stage class.
Here our StageManager has a function called Update, which looks like this:
void StageManager::Update() {
    Level1 level1;
    level1.StartGame();
    while (nothingChanged) {
        level1.PlayGame();
    }
    level1.EndGame();
}
Of course, this is just the first level of our game, so we will need to include code to update the main menu, and the second level of our game. Since these classes are unrelated, we will need a switch statement to make a choice between stages:
void StageManager::Update() {
    switch (currentStage) {
        case LEVEL1:
            SpaceShooterLevel1 level1;
            level1.StartLevel();
            while (currentStage == nextStage) {
                level1.PlayLevel();
            }
            level1.EndLevel();
            break;
        case LEVEL2:
            SpaceShooterLevel2 level2;
            level2.StartGame();
            while (currentStage == nextStage) {
                level2.PlayLevel();
            }
            level2.EndLevel();
            break;
        case MAIN_MENU:
            SpaceShooterMainMenu mainMenu;
            mainMenu.OpenMenu();
            while (currentStage == nextStage) {
                mainMenu.Show();
            }
            mainMenu.CloseMenu();
            break;
    }
}
You can see that as we continue to add more and more levels, this code will get large very fast and it will quickly become impossible, or just really difficult to maitain. This is because we will need to go into this function and remember to update the switch statement every time a new stage is added to the game.
The first part of this section, tells us that that our StageManager class shouldn't depend on levels or menus, but should instead depend on a common abstraction. That means that we should create an abstract base class for all of our stages. The second parts says that the abstraction shouldn't care whether the stage is a level or a menu. In fact, it shouldn't even care that we are making a stage for a space shooter game, a platformer, or a racing game. A major benefit of using this principle, besides having more flexible code, is that our StageManager class will no longer depend on anyting in this specific game, so we can reuse it for our next project:

class Stage {
public:
    virtual ~Stage(void) { }
    virtual void Init(void) = 0;
    virtual void Update(void) = 0;
    virtual void Shutdown(void) = 0;
};

class MainMenu: public Stage {
public:
    virtual ~MainMenu(void);
    virtual void Init(void);
    virtual void Update(void);
    virtual void Shutdown(void);
private:
    // Specific MainMenu data and functions here...
};

void StageManager::Update() {
    // We will talk about how to get the current stage soon
   Stage * pStage = GetCurrentStage();

    // Once we have the correct Stage we can run our code
    pStage->Init();

    while (currentStage == nextStage) {
        pStage->Update();
    }

    pStage->Shutdown();
}

Now the Update function of StageManager is much simpler. Since we are only dependent on the abstract class, our code no longer needs to change based on derived implementations. We have also simplified the interface of all stages. The functions of each stage no longer change based on the details of the class(menu, level, and so on); instead, they all share a common interface. As you can see, knowing about the Dependency
The Factory method pattern
The Factory method pattern is exactly the design pattern we need to solve our problem. The purpose of this pattern is to have a way of creating the derived class that we want without needed to specify the concreate class in our high-level module. This is done by defining an interface for creating objects, but letting subclasses decide which class to instantiate.
In our case, we will create a StageFactory interface with a method called Build that will return a Stage *. We can then create subclasses such as Level2Factory to instantiate our derived classes. Our StageManager class now only needs to know about the Stage and StageFacotry abstractions:
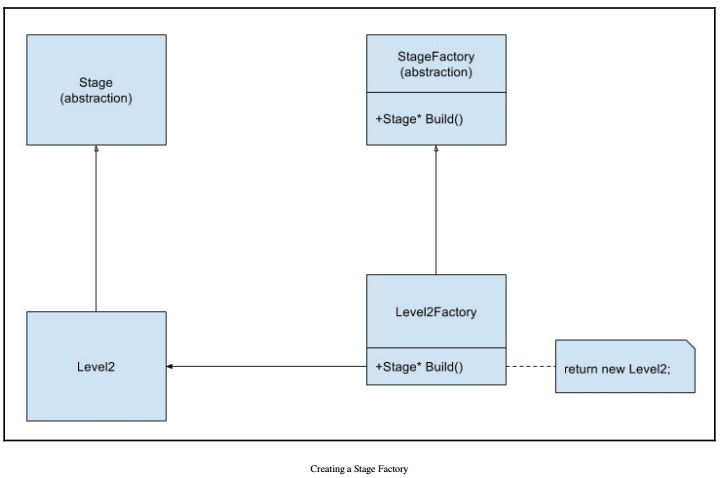
void StageManager::Update() {
    Stage * pStage = m_stageFactory->Build();

    pStage->Init();

    while (currentStage == nextStage) {
        pStage->Update();
    }

    pStage->Shutdown();
    m_StageFactory->Destroy(pStage);
}
Notice that we have moved the call to new from our StageManager::Update function into derived StageFactory methods. We have successfully decoupled our StageManager from our derived Stage classes. However, the cal to Build represents the creation of only one derived Stage class.We still need a way to choose which derived Stage we want to use and which derived StageFactory we need to instantiate. We need a way to choose between different types of factories. Before we look at the solution that was used in the Mach5 Engine, let's look at an alternative Factory method, the Static Factory.
The Static Factory
The simplest way to implement a factory method the way we want is with either a global function or a static class function. We could define a function called MakeStage outside of StateManager that is responsible for instanting the correct derived type based on a parameter. In this case, we will use an enum called StageType to help us choose our correct type:
Stage * MakeStage(StageType type) {
    switch (type) {
        case ST_Level1:
            return new Level1;
            break;
        case ST_Level2:
            return new Level2;
            break;
        case ST_MainMenu:
            return new MainMenu;
            break;
        default:
            break;
    }
}
If we use this style of factory, our StageManager::Update function will look like this:
void StageManager::Update() {
    Stage * pStage = MakeStage(currentStage);
    pStage->Init();
    while (currentStage == nextStage) {
        pStage->Update();
    }
    pStage->Shutdown();
    DestroyStage(pStage);
}
This version of the factory method works exactly as we want. We can now choose which derived Stage class is instantiated. We still have a switch statement that we must maintain, but at least our higher-level modules is no longer dependent on derived classes.In the default case, where our switch statement can't match the correct type, we are left with the choice of using an assert to crash the program, throwing an exception and letting the client resolve the issue, or perhaps returning null, which still gives responsibility to the client.
The Static Factory successfully decouples our StageManager class from specific derived Stage classes, while allowing us to choose which stage will be instantiated at runtime. This is great, but as I said, this isn't how the Mach5 Engine implements Stage or component factories. Instead, Mach5 uses a more dynamic solution, so we will call it the Dynamic Factory.
The Dynamic Factory
While the Static Factory is simple enough for our purpose, the Mach5 Engine uses a different approach. This approach combines the polymorphic solution of the classic Factory method with selection capability of the Static Factory. This new approach uses a searchable collection of derived StageFactory classes.
Remeber that problem with the classic Factory method is that the method represents only one cass to instantiate. This allows our code to beflexible because we don't depend on a derrived Stage class or a call to the new operator. However, we still needed a way to get specific derived StageFactory instances.
In the Mach5 Engine, the names are changed a little. There is only one StageFactory class, which contains a collection of M5StageBuilder pointers (there an classic Factories), which implement a Build method. The design looks like this:
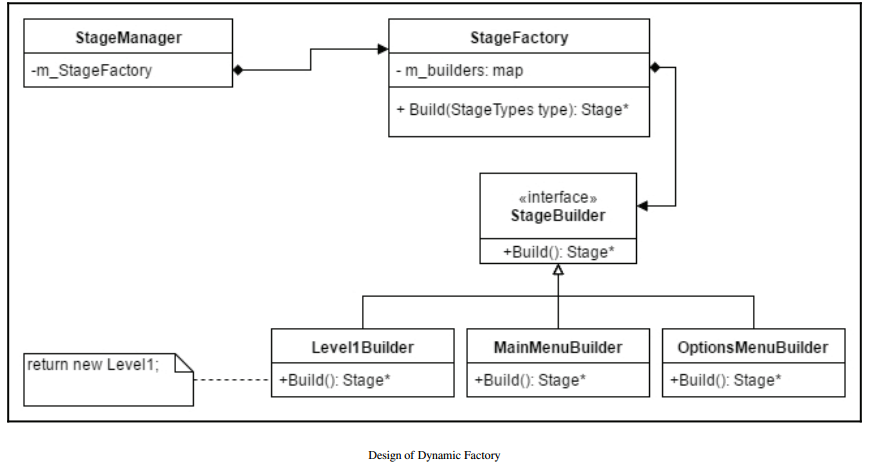
class M5Stage {
public:
    virtual ~M5Stage(void);
    virtual void Load(void) = 0;
    virtual void Init(void) = 0;
    virtual void Update(float dt) = 0;
    virtual void Shutdown(void) = 0;
    virtual void Unload(void) = 0;
};
Creating our Stage Builders
class M5StageBuilder {
public:
    virtual ~M5StageBuilder()
    virtual M5Stage * Build(void) = 0;
};
Even tough the name is different, this is how the classic Factory method would be implemented. The Mach5 Engine calls this a Builder instead of Factory but it is only a change in the name and not the functionality. The name of the Build method isn't important. Some programs will call the method Create or Make. Mach5 calls it Build but any of these names are fine.
No matter what the name is, a user creating a game with the Mach5 Engine would want to derive their own specific stage builders for the stages in theire game.
class SplashStageBuilder: public M5StageBuilder {
public:
    virtual M5Stage * Build(void);
};

M5Stage * SplashStageBuilder::Build(void) {
    return new SplashStage;
}

class MainMenuStageBuilder: public M5StageBuilder {
public:
    virtual M5Stage * Build(void);
};

M5Stage * MainMenuStageBuilder::Build(void) {
    return new MainMenuStage;
}
To some, this might seem a little tedious. In fact, the biggest complaint I heard from people first learning about object-oriented programming is that they feel like they waste a lot time creating many files with small classes in them. To them, it feels like a lot of work for every little pay-off;
I agree that programming this way can require lots of files and lots little classes. However, I disagree with it being a waste of time. I think these arguments are a reuslt of shortsighted thinking. They are only thinking of the time it takes to write the original code, but they aren't thinking about the time it will save when making changes to the design or the time it will take to test and debug.
It doesn't take much time to create new files. With an integrated development environment such as Visual Studio, it takes less than 10 seconds to create a source and header file. Writing small classess such as the builders above doesn't take much time either. In total, writing these two classes takes less than five minutes. Of course, this is more than directly writing new into a high-level module, but remember that the goal is to write code that can adapt to change in our game design.
These shortsighted arguments are similar to the complaints of new programmers learning to write functions. We have already discussed the benefits of writing functions and those same benefits apply here. We souldn't think only of the time it takes to write the initial code. We need to factor in how long it will take to test and debug the code, how likely it is to introduce new bugs into old code, how long it will take to modify if our design changes a month or year from now, and if the design does change, how likely is it that modifying our code will introduce bugs.
It is important to understand that by using design patterns we are writing more code upfront, so that we can cut down on the time it takes to test, debug, integrate, maintain, and change our code in the future. It is important to understand that writing the original code is easy and cheap, while changing it later is much harder and more expensive. In thi case, cheap and expensive could be referring to hours worked or money spent paying programmers
The template builder
// M5StageBuilder.h
template <typename T>
class M5StageTBuilder: public M5StageBuilder {
public:
    virtual M5Stage * Build(void);
};

template <typename T>
M5Stage * M5StageTBuilder<T>::Build(void) {
    return new T();
}

// SomeFile.cpp
#include "M5StageBuilder.h"
#include "MainMenuStage.h"

void SomeFunction(void) {
    // Creating the class needs the type
    M5Builder * pBuilder = new M5StageTBuilder<SplashStage>();

    // But using the Build function doesn't need the type
    M5Stage * pStage = pBuilder->Build();
}
Creating the Dynamic Factory class
class M5StageFactory {
public:
    ~M5StageFactory(void);
    void AddBuilder(M5StageTypes name, M5StageBuilder * builder);
    void RemoveBuilder(M5StageTypes type);
    void ClearBuilders(void);
    M5Stage * Build(M5StageTypes name);
private:
    typedef std::unordered_map<M5StageTypes, M5StageBuilder *> BuilderMap;
    typedef BuilderMap::iterator MapItor;
    BuilderMap m_builderMap;
};

M5Stage * M5StageFactory::Build(M5StaageTypes type) {
    ArcheTypeItor itor = m_builderMap.find(type);
    if (itor == m_builderMap.end()) {
        return nullptr;
    } else {
        return itor->second->Build();
    }
}

bool M5StageFactory::AddBuilder(M5StageTypes name, M5StageBuilder * pBuilder) {
    std::pair<MapItor, bool> itor = m_builderMap.insert(std::make_pair(name, pBuilder));
    return itor.second;
}

void M5StageFactory::RemoveBuilder(M5StageTypes name) {
    BuilderMap::iterator itor = m_buildMap.find(name);
    if (itor == m_builderMap.end()) {
        return;
    }
    delete itor->second;
    itor->second = 0;

    m_builderMap.erase(itor);
}

void M5StageFactory::ClreaBuilders(void) {
    MapItor itor = m_builderMap.begin();
    MapItor end = m_builderMap.end();

    while (itor != end) {
        delete itor->second;
        itor->second = 0;
        ++itor;
    }

    m_builderMap.clear();
}

M5StageFacotyr::~M5StageFactory(void) {
    ClearBuilders();
}
Using the Dynamic Factory
Now that we have a completed Factory class, let's look at how we would use it. Since the goal of this class was to decouple our M5StageManager from our specific derived M5Stage classes, it makes sense that it will be used in the M5StageManager class:
class M5StageManager {
public:
    // Lots of other stuff here...
    static void AddStage(M5StageTypes type, M5StageBuilder * builder);
    static void RemoveStage(M5StageTypes type);
    static void ClearStages(void);
private:
    // Lots of other stuff here
    static M5StageFactory s_stageFactory;
};
Since the factory will be private in the M5StageManager, we will add interface functions so the user can control the factory without knowing the implementation. This allows us to change the details, without affecting the user.
Inside the M5StageManager::Update function, we will use the factory to get access to the current stage. Notice that this class is completely decoupled from any specific M5Stage derived classes. This give the user freedom to change the game design, including stage types, stage count, and stage names, without needing to modify the M5StageManager class.
In fact, that is the purpose of creating the Mach5 Engine the way we are. It can be used and reused in many game projects without changing the engine code. Here is a simplified version(pausing/restarting code has been omitted) of the M5StageManager::Update showing code relevant to the stages and factory:
void M5StageManager::Update(void) {
    float frameTime = 0.0f;
    /* Get the Current stage */
    M5Stage * pCurrentStage = s_stageFactory.Build(s_currStage);
    /* Call the initialize function */
    pStage->Init();

    /* Keep going until the stage has changed or we are quitting */
    while ((s_currStage == s_nextStage) && !s_isQuitting && !s_isRestarting) {
        /* Our main game loop */
        s_timer.StartFrame();    /* Save the start time of the frame */
        M5Input::Reset(frameTime);
        M5App::ProcessMessages();

        pStage->Update(frameTime);

        M5ObjectManager::Update(frameTime);
        M5Gfx::Update();
        frameTime = s_timer.EndFrame();    /* Get the total frame time */

        /* Make sure to Shut down the stage */
        pStage->Shutdown();

        ChangeStage();
}
Creating a component and Object Factory
// Component Factory
class M5ComponentFactory {
public:
    ~M5ComponentFactory(void);
    void AddBuilder(M5ComponentTypes type, M5ComponentBuilder* builder);
    void RemoveBuilder(M5ComponentTypes type);
    M5Component * Build(M5ComponentTypes type);
    void ClearBuilders(void);
private:
    typedef std::unordered_map<M5ComponentTypes, M5ComponentBuilders *> BuilderMap;
    typedef BuilderMap::iterator MapItor;
    BuilderMap m_builderMap;
};

// Object Factory
class M5ObjectFactory {
public:
    ~M5ObjectFactory(void);
    void AddBuilder(M5ArcheTypes type, M5ObjectBuilder* builder);
    void RemoveBuilder(M5ArcheTypes type);
    M5Object * Build(M5ArcheTypes type);
    void ClearBuilders(void);
private:
    typedef std::unordered_map<M5ArcheTypes, M5ObjectBuilder *> BuilderMap;
    typedef BuilderMap::iterator MapItor;
    BuilderMap m_buiderMap;
};
The Templated Factory
// M5Factory.h
template<typename EnumType, typename BuilderType, typename ReturnType>
class M5Factory {
public:
    ~M5Factory(void);
    void AddBuilder(EnumType type, BuilderType * pBuilder);
    void RemoveBuilder(EnumType type);
    ReturnType * Build(EnumType type);
    void ClearBuilders(void);
private:
    typedef std::unordered_map<EnumType, BuilderType *> BuilderMap;
    typedef typename BuilderMap::iterator MapItor;
    BuilderMap m_builderMap;
};

// M5Factory.h
template<typename EnumType, typename BuilderType, typename   ReturnType>
ReturnType * M5Factory<EnumTYpe, BuilderType, ReturnType>::Build(EnumType type) {
    MapItor itor = m_builderMap.find(type);
    M5DEBUG_ASSERT(itor != m_builderMap.end(), "Trying to use a Builder that doesn't exist");
    return itor->second->Buld();
}

class M5StageManager {
public:
    // Same as before
private:
    // static M5StageFactory s_stageFactory; // Our Old Code
    static M5Factory<M5StageTypes, M5StageBuilder, M5Stage> s_stageFactory;    // Our new code
};

class M5ObjectManager {
public:
    // See M5ObjectManager.h for details
private:
    static M5Factory<M5ComponentTypes, M5ComponentBuilder, M5Component> s_componentFactory;
    static M5Factory<M5ArcheTypes, M5ObjectBuilder, M5Object> s_ObjectFactory;
};

#include "M5StageManager.h"
#include "M5StageTypes.h"
#include "M5StageBuilder.h"
#include "GamePlayStage.h"
#include "SplashStage.h"

vid RegisterStages(void) {
    M5StageManager::AddStage(ST_GamePlayStage, new M5StageTBuilder<GamePlayStage>());
    M5StageManager::AddStage(ST_SplashStage, new M5StageTBuilder<SplashStage>());
}
Architecting versus over-architecting
Over-architecting is the concept of spending time planning as well as writing code that includes completely unneeded and ultimately unused features. Since every project has a deadline, over-architecting means wasting time that could be better spent writing code that
will be used.
In our effort to learn design patterns, we want to know not only how to use them, but also about when not to use them. When you are working on a project, you must always find the balance between writing flexible code and getting the project finished on time. It always
takes more time to write flexible, reusable code, so you have to consider whether it is worth the extra time to write that code.
It would be great to spend time creating the ultimate graphics engine, or creating a content creation tool that can rival Unreal or Unity. However, if you strive to write perfect, flexible, 100% reusable code, you may never complete your game. You may end up writing a great particle system and have your designers only use 10% of the capabilities. This is why many companies choose to use a premade engine in the first place. Those companies don't want to spend time or money on creating a tool. They want to spend time making a game that is fun.
The opposite of this situation is just as bad. We don't want to write code that breaks whenever a change is introduced, or is impossible to use again. We can all imagine how ugly the code would be if an entire game was written in the standard NBJO function. We might laugh at the thought of someone doing that, while at the same time hardcoding behavior with large if/else chains instead of using Finite State Machines. Finding the balance between these two extremes is difficult. I already mentioned that besides writing the initial code, there are additional factors to consider. These include the time it takes to test and debug the code as well as time to modify code if and when change occurs.
Determining whether writing flexible code is worth the time also includes determining how likely that code is to change. This is why we are using Singleton classes for our core engines. These are unlikely to change during the project. Of course, if we need to support multiple graphics APIs, multiple platforms, or even a multithreaded environment, we might make a different decision. This is also why using the Component Object Model and Finite State Machines are very useful, since our game objects and their behavior are likely to change constantly.
In this case, we need to choose between using the Static Factory or the Dynamic Factory. The Static Factory is very simple to write and use. Since it is so simple, testing and debugging should be easy. It is likely to change, but those changes should be easy as well.
However, when using the Static Factory, we must write, test, debug, and maintain code for at least three separate types in our game: the stages, components, and objects. These will change often during the development cycle. Each time a change occurs, you would need to go back and modify these functions.
The templated Dynamic Factory is a little more difficult to implement, especially if you aren't very familiar with using templates. However, the major benefit of using the templated Dynamic Factory is that we only need to write the code once, and we can use it for stages, components, and objects. In addition, we have the ability to add, remove, or change items in our factories at runtime. As I mentioned, this could mean changing archetype builders based on difficulty to create harder versions of the same archetype without needing new enumeration values. Finally, we have the option of using this code again in another project, which is unlikely if we stick with the Static Factory.
Summary
6. Creating Objects with the Prototype Pattern
Your objectives
Learn the trouble with using a factory for game objects
Implement the Prototype pattern
Learn how the Mach5 engine uses the Prototype pattern
Implement components within the Mach5 Engine
Learn how to define objects completely in a file
The trouble with using a factory for game objects
// SplashStageBuilder.h
#include "M5StageBuilder.h"

class SplashStageBuilder: public M5StageBuilder {
public:
    virtual M5Stage * Build(void);
};

// SplashStageBuilder.cpp
#include "SplashStageBuilder.h"
#include "SplashStage.h"

M5Stage * SplashStageBuilder::Build(void) {
    return new SplashStage();
}
The reason we did this is so that changes to the SplashStage class only affect this file as opposed to the M5StageManager, for example. This means any changes to derived stage or stage builder classes cannot break other code, because the other code will only be using an M5Stage pointer. Changes to this class could still break other code, particularly if this stage was removed from the game altogether. However, by minimizing dependencies, we reduce the chances that other code will need to be changed in the future.
// M5StageBuilder.h
class M5StageBuilder {
public:
    virtual ~M5StageBuilder(void) { }
    virtual M5Stage * Build(void) = 0;
};

template <typename T>
class M5StageTBuilder: public M5StageBuilder {
public:
    virtual M5Stage * Build(void);
};

template <typename T>
M5Stage * M5StageTBuilder<T>::Build(void) {
    return new T();
}
Using builders with objects
Solution - reading from files
The Prototype pattern explained
The virtual constructor
The problem with constructors
The benefits of a virtual constructor
We don't need to know the type
No need to subclass
It's eay to make exact copies
Examples of the clone method in Mach5
The Gfx and collider components
Cloning an object
Choosing a copy constructor
Covariant return type
Loading archetypes from a file
Archetype files
The object manager
Summary
7. Improving Performance with Object Pools
Chapter overview
Your objectives
Why you should care about memory
The Object Pool pattern explained
Implementing a basic object pool
Operator overloading in C++
Building the object pool for Mach5
Issues with object pools
Summary
8. Controlling the UI via the Command Pattern
Chapter overview
Your objectives
Learn the naive approach to handling input and why it should be avoided
Implement the Command pattern using function pointers and the class method pointer
Learn how the Mach5 Engine uses the Command pattern
Implement UI buttons with the Mach5 Engine
How can we control actions through buttons?
In fact, in genres such as real-time strategy, there is no difference between clickable buttons and game objects. They player can click on any unit or building and give them orders.
At first thought, our buttons could just be game objects. They both have a position, scale, and texture, and the texture will be drawn to the screen. Depending on the game, you might draw your buttons using orthographic projection while the objects will be drawn using perspective projection. However, the difference go deeper than that.
At its core, a button has an action that needs to be performed when it is clicked or selected. This behavior is usually simple; it doesnt' require creating an entire stage machine class. It does however, require a little thought so we don't end up hardcoding button functionality all over our high-level modules or repeating similar code in many different places.
In chapter 5, Decoupling Code via the Factory Method Pattern, we saw an extremely naive way to handle a button click on a menu screen. Recall that this code was written by one of the authors early in their programming career:
if ((p.x > .15 * GetSystemMetrics(SM_CXSCREEN)) && (p.x < .42 * GetSystemMetrics(SM_CXSCREEN)) && (p.y > .58 * GetSystemMetrics(SM_CYSCREEN)) && (p.y < .70 * GetSystemMetrics(SM_CYSCREEN))) {
    if (mousedown) {
        mGameState = TCodeRex::LOAD;
        mGameLevel = L0;
    }
}
There are a lot of problems with this code:
First, the rectangular like region is hardcoded to the aspect ratio in full screen mode. If we were to switch from widescreen 16:9 aspect ratio to standard 4:3 aspect ratio or even if we changed from full screen to windowed mode, this code wouldn't work correctly.
Second, the click region is based on the screen and not the button itself. If the button position or size were to change, this code wouldn't change correctly.
Third, this menu screen is coupled to the Windows GetSystemMetric function instead of an encapsulated platform code class like the M5App class. This means if we want to run on a different operation system or platform, this menu and possibly all menus need to be modified.
Finally, the state(stage in Mach5) switching action is hardcoded to the menu. If we decide to perform a different action, we need to modify the menu. If this action can be performed by both a button click and keyboard input, we need to update and maintain both sections of code.
As you can see, this isn't an ideal way to handle buttons in a game. This is basically the worst way you can implement buttons. This code is very likely to break if anything changes. It would be nice if the author could say this code was only written as a demonstration of what not to do. Unfortunately, a book like the one you are reading didn't exist at the time, so he had to learn the hard way.
Callback functions
A better way to deal with these button actions is with callback functions. Callback functions in C/C++ are implemented using pointers to functions. They allow you to pass functions around as if they were variables. This means functions can be passed to other functions, returned from functions, or even stored in a variable and called later. This allows us to decouple a specific function from the module that will call it. It is a C style way to change which function will be called at runtime.
int Square(int x)
int (*)(int);
int (*pFunc)(int);

int (*pFunc)(int);
pFunc = Square;
std::cout << "2 Squared is " << pFunc(2) << std::endl;

// Fills array with random values from 0 to maxVal - 1
void RandomFill(int * array, int size, int maxVal) {
    for (int i = 0; i < size; ++i) {
        array[i] = std::rand() % maxVal;
    }
}

// Fills array with value
void ValueFill(int * array, int size, int value) {
    for (int i = 0; i < size; ++i) {
        array[i] = value;
    }
}

// Fills array with ordered values from 0 - maxValue - 1 repeatedly
void ModFill(int * array, int size, int maxVal) {
    for (int i = 0; i < size; ++i) {
        array[i] = i % maxVal;
    }
}

// Helper to print array
void PrintArray(const int * array, int size) {
    for (int i = 0; i < size; ++i) {
        std::cout << array[i] <<  " ";
    }
    std::cout << std::endl;
}

void FillAndPrint(void (*fillFunc)(int *, int, int), int * array, int size, int param);

// Defines a function pointer type named FillFunc
typedef void(*FillFunc)(int *, int, int);

void FillAndPrint(FillFunc pFunc, int * array, int size, int param) {
    pFunc(array, size, param);
    PrintArray(array, size);
}

int main() {
    const int SIZE = 20;
    int array[SIZE];
    // See the Random number generator
    std::srand(static_cast<unsigend>(time(0)));
    FillAndPrint(ValueFill, array, 20, 3);
    FillAndPrint(RandomFill, array, 10, 5);

    return 0;
}

Repeated code in the component
We have the problem of wanting to decouple a specific function call from the place that calls it. It would be nice to be able to create a button component that could save a function pointer or something like it, and call it when the component is clicked.
One solution could be to create a new component for every action we want to execute. For example, we might want to create a component that will change the stage to the main menu. We could create a component class that knows how to perform that exact action:
// MainMenuComponent.h
class MainMenuComponent: public M5Component {
public:
    MainMenuComponent(void);
    ~MainMenuComponent(void);
    virtual void Update(float dt);
    virtual void FromFile(M5IniFile &);
    virtual MainMenuComponent * Clone(void) const;
private:
};

// MainMenuComponent.cpp
void MainMenuComponent::Update(float dt) {
    M5Vec2 mouseClick;
    M5Input::GetMouse(mouseClick);

    if (M5Input::IsTriggered(M5_MOUSE_LEFT) && M5Intersect::PointRect(clickPoint, m_pObj->pos, m_pObj->scale.x, m_pObj->scale.y)) {
        M5StageManager::SetNextStage(ST_MainMenu);
    }
}
The preceding case is a very simple example because it is only calling a static function with the parameter hardcoded, but the function pointer as well as the function parameter could easily be passed in to the constructor of this component. In fact, we could pass any object to the constructor and hardcode a specific method call in the update function. For example, we could pass an M5Object to a component such as the one above. The button click might change the texture of the object. For example:
// SwapTextureComponent.cpp
void SwapTextureComponent::Update(float dt) {
    M5Vec2 mouseClick;
    M5Input::GetMouse(mouseClick);

    if (M5Input::IsTriggered(M5_MOUSE_LEFT) && M5Intersect::PointRect(clickPoint, m_pObj->pos, m_pObj->scale.x, m_pObj->scale.y)) {
        // Get the Graphics Component
        M5GfxComponent * pGfx = 0;
        m_saveObj->GetComponent(CT_GfxComponent, pGfx);

        // DO soemthing to swap the texture...
    }
}
Unfortunately, there is a big problem with code like this; the action is completely coupled to the button click. This is bad for two reasons. First, we can't use this action for a keyboard or controller press unless we add additional keys to our UI button click component. Second,what happens when we have a list of actions that we want to perform? For example, synchronizing the movement of multiple UI objects, or scripting an in-game cut scene. Since the actions require the mouse to be pressed on the object, our action is very limited.
The other reason this approach is bad is because we must repeat the exact same mouse click test code in every button component that we create. What we would like to do is decouple the action from the button click component. We would need to create a separate UI button component and an action class. By doing that, we would factor out the part of the code that repeats, and we would gain the ability to use the actions on their own.
The Command pattern explained
The Command pattern is exactly the pattern that solves our problem. The purpose of the Command pattern is to decouple the requester of an action from the object that performs the action. That is exactly the problem we have. Our requester is the button, and it needs to be decoupled from whatever specific function call will be made. The Command pattern takes our concept of a function pointer and wraps it into a class with a simple interface for performing the function call. However, this pattern allows us more flexibility. We will easily be able to encapsulate function pointers with multiple parameters, as well as with C++ object and member functions. Let's start off easy with just two simple functions that have the same parameter count and return type:
int Square(int x) {
    return x * x;
}

int Cube(int x) {
    return x * x * x;
}
The Command pattern encapsulates a request into an object, and it gives a common interface to perform that request. In our example, we will call our interface method Execute(), but it could be called anything. Let's look at the Command abstract class:
int Square(int x) {
    return x * x;
}

int Cube(int x) {
    return x * x * x;
}

// Base Command Class
class Command {
public:
    virtual ~Command(void) { }
    virtual void Execute(void) = 0;
};

// Derived command classes
class Square5Command: public Command {
public:
    virtual void Execute(void) {
        std::cout << "5 squared is " << Square(5)  << std::endl;
};

// The function signature of both Square and Cube
typedef int (*OneArgFunc)(int);

// Command that can use any function of type OneArgFunc
class OneArgCommand: public Command {
public:
    OneArgCommand(OneArgFunc action, int * pValue): m_action(action), m_pValue(pValue) { }

    virtual void Execute(void) {
        *m_pValue = m_action(*m_pValue);
    }
private:
    OneArgFunc m_action;
    int * m_pValue;
};

int main(void) {
    const int SIZE = 3;
    int value = 2;
    // This commands could be loaded via another function
    Command * commands[SIZE] = {
        new Square5Command;
        new OneArgCommand(Square, &value);
        new OneArgCommand(Cube, &value);
    };

    // The Client Code
    commands[0]->Execute();    // Square5
    std::cout << "value is " << value << std::endl;
    commands[1]->Execute();    // OneArg Square
    std::cout << "value is " << value << std::endl;
    commands[2]->Execute();    // OneArg Cube
    std::cout << "value is " << value << std::endl;

    for (int i = 0; i < SIZE; ++i) {
        delete commands[i];
    }

    return 0;
}


5 squared is 25
value is 2
value is 4
value is 64
Two parameters and beyond
int Add(int x, int y) {
    return x + y;
}

typedef int (*TwoArgsFunc)(int, int);

class TwoArgsCommand: public Command {
public:
    TwoArgCommand(TwoArgFunc action, int x, int y): m_action(action), m_first(x), m_second(y) { }

    virtual void Execute(void) {
        std::cout << "The Result is " << m_action(m_first, m_second) << std::endl;
    }

private:
    TwoArgsFunc m_action;
    int m_first;
    int m_second;
};

Command * commands[SIZE] = {
    new Square5Command,
    new OneArgCommand(Square, &value),
    new OneArgCommand(Cube, &value),
    new TwoArgCommand(Add, 5, 6)
};

// The Client Code
commands[0]->Execute();
std::cout << "value is " << value << std::endl;
commands[1]->Execute();
std::cout << "value is " << value << std::endl;
commands[2]->Execute();
std::cout << "value is " << value << std::endl;
commands[3]->Execute();

5 squared is 25
value is 2
value is 4
value is 64
The Result is 11
Pointers to member functions
// Example of hard-coding a class method
virtual void Execute(void) {
    m_gameObject->Draw();
}

class SomeClass {
public:
    // Example of what the compiler addas to every
    // Non-static class method. THIS IS NOT REAL CODE
    void SomeFunc(SomeClass * const this);
private:
    int m_x;
};

SomeClass someClass;
// when we type this
someClass.SomeFunc();

// The compiler does something like this
SomeClass::SomeFunc(&someClass);

void SomeClass::SomeFunc(/* Some Class * const this */) {
    // We can still use the this pointer even though it sin't
    // in the parameter list
    this->m_x += 2;

    // But we don't have to use it.
    m_x += 2;
}

SomeClass someClass;
// This doesn't work because they are not the same type
void (*BadFunc)(void) = &SomeClass::SomeFunc;

// We must include the class type
void (SomeClass::*GoodFunc)(void) = &SomeClass::SomeFunc;
Pointer to member command
class SomeObject {
public:
    SomeObject(int x): m_x(x) { }

    void Display(void) {
        std::cout << "x is " << m_x << std::endl;
    }

    void Change(void) {
        m_x += m_x;
    }
private:
    int m_x;
};

typedef void (SomeObject::*SomeObjectMemeber)(void);

class SomeObjectCommand: public Command {
public:
    SomeObjectCommand(SomeObject * pObj, SomeObjectMember member): m_pObj(pObj), m_member(member) {

}
    virtual void Execute(void) {
        (m_pObj->*m_member)();
    }
private:
    SomeObject * m_pObj;
    SomeObjectMember m_member;
};

#define CALL_MEMBER_FUNC(pObj, member) ((pObj)->*(member))

virtual void Execute(void) {
    CALL_MEMBER_FUNC(m_pObj, m_member)();
}

int main(void) {
    const int SIZE = 6;
    int value = 2;
    SomeObject object(10);
    Command * commands[SIZE] = {
        new Square5Command,
        new OneArgCommand(Square, &value),
        new OneArgCommand(Cube, &value),
        new TwoArgCommand(Add, 5, 6),
        new SomeObjectCommand(&object, &SomeObject::Display),
        new SomeObjectCommand(&object, &SomeObject::Change)
    };

    // The Client Code
    commands[0]->Execute();
    std::cout << "value is " << value << std::endl;
    commands[1]->Execute();
    std::cout << "value is " << value << std::endl;
    commands[2]->Execute();
    std::cout << "value is " << value << std::endl;
    commands[3]->Execute();

    // Member function pointers
    commands[4]->Execute();
    commands[5]->Execute();
    commands[4]->Execute();

    for (int i = 0; i < SIZE; ++i) {
        delete commands[i];
    }

    return 0;
}

template<typename Type, typename Method>
class TMethodCommand: public Command {
public:
    TMethodCommand(Type * pObj, Method method): m_pObj(pObj), m_method(method) {

    }

    virtual void Execute(void) {
        (m_pObj->*m_method)();
    }
private:
    Type * m_pObj;
    Method m_method;
};
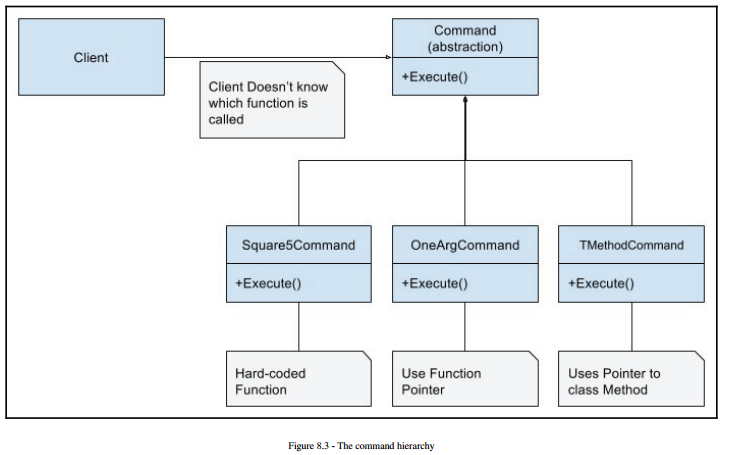
The benefits of the command pattern
Treating a function call like an object
The biggest benefit of using the Command pattern is that we are encapsulating the function or method call and the parameters. This means that everything needed for the call can be passed to another function, returned from a function, or stored as a variable for later use. This is an extra level of indirection over only using function or method pointers, but it means the client doesn't need to worry about the details. They only need to decide when to execute the command.
This might not seem very useful since we need to know all the function arguments before we pass it to the client. However, this situation can happen more often than you might think. The fact that the client doesn't need to know the details of the function call means that systems such as the UI can be incredibly flexible, and possibly even read from a file.
Physically decoupling the client and the function call
One aspect of good design is low coupling. We have talked about this a lot before, and it applies here as well. First, since the client is only dependent on the base Command class, it is easier to test. This is because both the client and the specific function calls or actions can be tested independently to ensure that they work. Furthermore, since these unit tests are testing smaller amounts of code, we can be more confident that all possible cases are tested. This also means that the client or the commands have a better chance to be reused because of the low coupling within this project.
Second, the client is less likely to break when changes to the code base occur. Since the client doesn't know which functions or methods are called, any changes to parameter counts or method names are local only to the commands that implement the changed
methods. If more commands need to be added, those commands will automatically work with the existing client because they will use the Command class interface. Finally, compile times can be reduced because the client needs to include fewer header files.
Including fewer header files can lower the compile time since every time the header changes, every source file that includes it must be recompiled. Even the smallest change to a comment in a header file means that all the function calls from that header need to be
rechecked for correct syntax at compile time and relinked at link time. Since our client doesn't know the details of the functions calls, there are no header files to include.
Temporal decoupling
// Examples of setting up function calls
// Immediate execution
Add(5, 6);
// Delayed execution
Command * p1 = new TwoArgCommand(Add, 5, 6);

// Immediate execution
someObject.Display();
// Delayed execution
Command * p2 = new SomeObjectCommand(&object, &SomeObject::Display);
Undo and redo
Another major benefit of having the call details packaged together in a class is the ability to undo an operation. Every modern desktop application, as well as the best web applications being made these days, features the ability to undo the last action or actions. This should be a standard that you strive to follow when implementing a level editor for your game.
Implementing a single level of undo in an application can seem like a large task. The naive approach might be to save the entire state of the application, possibly to a file, and reload that state when we need to undo. Depending on the application, there might be a lot of data to save. This method doesn't scale well in applications that can have dozens or hundreds of levels of undo. As the user does more actions, you would need to make sure to delete the oldest state before saving the current one.
This simple approach is even more difficult when you also need to implement redo. Obviously, the text editors and tools that we use every day don't store hundreds of undo and redo files on the hard drive. There must be a better way.
Instead of saving the entire state of the program, you only need to save information about the action that happened, and what data was changed. Saving a function and the parameters to the function sounds a lot like the Command pattern. Let's look at a simple example of moving a game object from one place to another in a level editor. We could create a command like this:
class MoveCommand: public Command {
public:
    MoveCommand(Object * pObj, const Vec2D& moveTo): m_pObj(pObj), m_method(method), m_oldPos(pObj->pos) {

    }

    virtual void Execute(void) {
        m_pObj->pos = m_moveTo;
    }

    // Add this method to the Command Interface
    virtual void Undo(void) {
        m_pObj->pos = m_oldPos;
    }

private:
    Object * m_pObj;
    Vec2D m_moveTo;
    Vec2D m_oldPos;    // Save the old position so we can redo
};
By adding the Undo method to the command interface and making sure to save the old data that will be modified in the Execute method, performing undo and redo becomes incredibly simple. First, we need to implement a command for every action that can be
performed in our editor. Then, when the user interacts with the editor, instead of directly calling a function, they always call a command and add it to the end of our array of commands. Undoing and redoing is just a matter of calling the Execute or Undomethod of the current array index.
It might seem like a lot of work to create all those commands, and it is. However, that work is replacing the work of hardcoding function calls when a user presses keys or clicks the mouse. In the end, you will build a better system that people will want to use.
Easy UI with commands in Mach5
class M5Command {
public:
    virtual ~M5Command(void);
    virtual void Execute(void) = 0;
    virtual M5Command * Clone(void) const = 0;
};

class UIButtonComponent: public M5Component {
public:
    UIButtonComponent(void);
    ~UIButtonComponent(void);
    virtual void Update(float dt);
    virtual UIBUttonComponent * Clone(void) const;
    void SetOnClick(M5Command * pCommand);
private:
    M5Command * m_pOnClick;
};

UIButton Component::UIButtonComponent(void): M5Component(CT_UIButtonComponent), m_pOnClick(nullptr) {

}

UIButtonComponent::~UIButtonComponent(void) {
    delete m_pOnClick;
    m_pOnClick = 0;
}

void UIButtonComponent::Update(float) {
    if (M5Input::IsTriggered(M5_MOUSE_LEFT)) {
        M5Vec2 clickPoint;
        M5Input::GetMouse(clickPoint);
        if (M5Intersect::PointRect(clickPoint, m_pObj->pos, m_pObj->scale.x, m_pObj->scale.y)) {
            M5DEBUG_ASSERT(m_pOnClick != 0, "The UIButton command is null");
            m_pOnClick->Execute();
        }
    }
}

UIButtonComponent * UIButtonComponent::Clone(void) const {
    UIButtonComponent * pClone = new UIButtonComponent();
    pClone->m_pObj = m_pObj;

    if (pClone->m_pOnClick != nullptr) {
        pClone->m_pOnClick = m_pOnClick->Clone();

    return pClone;
}

void UIButtonComponent::SetOnClick(M5Command * pCommand) {
    delete m_pOnClick;
    m_pOnClick = pCommand;
}

void UIButtonComponent::Update(float) {
    M5Vec2 clickPoint;
    M5Input::GetMouse(clickPoint);

    if (M5Intersect::PointRect(clickPoint, m_pObj->pos, m_pObj->scale.x, m_pObj->scale.y)) {
        if (M5Input::IsTriggered(M5_MOUSE_LEFT)) {
            // Do onClick Command
        } else {
            // Do onMouseOver Command
        }
    }
}
Using commands
class ChangeStageCommand: public M5Command {
public:
    ChangeStageCommand(M5StageTypes nextStage);
    ChangeStageCommand(void);
    virtual void Execute(void);
    void SetNextStage(M5StageTypes nextStage);
    virtual ChangeStageCommand * Clone(void) const;
private:
    M5StageTypes m_stage;
};

void ChangeStageCommand::Execute(void) {
    M5StageManager::SetNextStage(m_stage);
}
Summary
9. Decoupling Gameplay via the Observer Pattern
Chapter overview
Your Objectives
Learn two ways that gameplay code can cause trouble for your engine code
Implement the simple Observer pattern example
Learn the pros and cons of the Observer pattern
How gameplay creeps into every system
The first time someone makes a game, there is very likely no distinction between the game and the engine. This is usually because there is no engine. A common first game would include Ticktacktoe or Hangman. Games like these are simple enough that they can be
completely written in main, or possibly using a few functions. They are also simple enough that they don't require complex systems like graphics or physics. There is no need for reusable engine code.
As you are learning to program more, you may decide to try making a 2D game using a graphics API, like DirectX or OpenGL. Code like this can be very difficult the first time it is used, so writing cleanly separated code isn't a top priority. Just as before, the game is made with just a few functions or classes. Drawing code is often mixed with collision code in one single file.
At some point, we all get to a place where the code is too complex and fragile. Hardcoding too many game object types or too many levels make us wish for a better way. Of course, that is the reason for this book. We are trying to find a better way to create games.
Throughout this book there has been one major theme: things always change!
To cope with this change, we have tried to create a clear distinction between the parts of our game that will change and the parts of the game that are unlikely to change. In clear terms, we are trying to separate our engine code from our gameplay code. This clear separation of parts has lead us through eight chapters of patterns that solve very large and specific problems in games. Every game must deal with creating flexible game objects with complex behaviors. So, we learned about the Component Object Model and Finite Stage Machines. Every game must deal with creating an easy to modify UI. So, we learned about using the Command pattern to read actions from a file. These are common problems with common solutions.
However, as you write more code and you start to add more features to your game, you will always find that the clear separation between engine and gameplay starts to blur. One place that this becomes obvious is physics. The physics engine is responsible for moving
objects as well as testing for and resolving collisions.
While this engine should be purely mathematical, the fact is that a game is made up of more than just physics objects. It is made of bullets, raiders, players, and more. When a bullet collides with a player, we must execute some very specific gameplay code, such as deleting the bullet, creating a small particle effect at the collision point, and subtracting player health. The question is, where should this code be executed? If the code is placed inside the physics engine, it is highly coupled with every game object type. If it is executed outside of the engine, we need to get the collision information to the correct location in a clean way.
The same problem of creeping gameplay code occurs with achievements. Achievements are always game specific but they end up getting mixed all throughout a code base. They can range from tracking behavior such as how many bullets the player fired, to tracking total time played or how long the game has been paused. However, they could always be related to engine specific behavior such as how many times the resolution has been changed, how many network connections have been made, how many times a UFO game object was created or destroyed, or how many collision events of a certain kind have occurred. This blurred line between engine and gameplay code, as well as general increased dependencies, makes code reuse very difficult
Hardcoding requirements
We know that introducing gameplay code to our engines increases dependencies and limits code reuse. We also know that for a given action, the requirements are likely to change as gameplay features are added. Imagine the situation of adding controller support for split screen multiplayer in our space shooter. As more controllers are plugged in, additional players are created, the game difficulty is increased, and we split the screen to follow the new player. In this case, the original controller detection occurs in the Input Manager, but we need to notify a few other engines that something has changed. An example of this code might look like this:
// Not real code, just an example!
void InputManager:Update(void) {
    int controllerCount = GetControllerCount();
    if (controllerCount > m_currentControllerCount) {
        m_currentControllerCount = controllerCount;
        Object * pObj = ObjectManager::CreatePlayer(controllerCount);
        GameLogic::SetDifficulty(controllerCount);
        // player position is the camera location for the screen
        Graphics::SetScreenCount(controllerCount, pObj->pos);
    }
}
We might be reasonably certain that this code won't change. If we are, then hardcoding the requirements is fine. However, if we are not certain, it is good to assume that requirements always change. We might need to support online multiplayer and send a message to the Network Manager. We might allow the player to choose which type of space ship they want from a list of possible player ships, so we need to call a different Object Manager function or pause and switch to a new Ship Selection Stage via the Stage Manager.
In this case, we have a set of objects that need to be notified when an event occurs. We want the notification to happen automatically, but we don't want to change the Input Manager every time a new object needs to be notified. More generally, we have a broadcasting object that we don't want to change every time there is a new object that needs to listen. This would be like a Wi-Fi router needing to be updated every time a new device is in range.
The situation above describes interactions between different core engines. However, these interactions only happen this way because of the specific requirements of the game. Even though there is no gameplay code, the functionality of the specific game has crept into the input engine, and would need to be changed if we were making a different game. Of course, we could try to factor out some of this code into a game logic engine or just put similar code into a stage. Is there another way? We will consider that, but first, we will explore the problem from the other side.
Polling
The Observer pattern explained
The Subject and Observer
The Player
The Observers
Push versus Pull
Benefits of using the Observer pattern
Problems using the Observer pattern
Dangling references
Overuse
Implementing interfaces
When to notify
Summary
10. Sharing Objects with the Flyweight Pattern
Chapter overview
Your objectives
Introductions to particles
Implementing particles in Mach5
Why memory is still an issue
Introduction to the Flyweight pattern
Transitioning to ParticleSystems
Creating different system types
Developing the ParticleFactory
Using the ParticleFactory
Summary
11. Understanding Graphics and Animation
Chapter overview
Your objectives
Introduction to monitor refresh rates
What is a pixel?
The horizontal and vertical blank
Refresh rate
Double buffering
The back buffer
VSync
Triple buffering
LCD monitors
Time-based movement and animation
Frame-based movement
Time-based movement
Summary
12. Best Practices
Chapter overview
Your objectives
Learning fundamental code quality techniques
Avoid magic numbers
White space
Indentation
Blank lines and spaces
Comments and self-documenting code
Commenting
Learning and understand the uses of the const keyword
Const function parameters
Const classes as parameters
Const member functions
Problems with const
Learning how iteration can improve your game and code design
The game development cycle
Production phase
Prototyping
Playtesting
Conducting a playtest
Iteration
Meeting milestones
Learning when to use scripting in a game
Introduction to assembly
Moving to higher-level programming languages
Introducing the compiler
Introduction to scripting languages
Using interpreters
Just in time compilation
Why use a scripting language?
When to use C++
Compiled versus scripting
Summary


 2021
2021


 被折叠的 条评论
为什么被折叠?
被折叠的 条评论
为什么被折叠?
 到【灌水乐园】发言


