


1.栈
导航控制器自身有一个针对显示内容的栈,也有一个对于导航栏的栈,当有新的内容欲显示时,进的导航栏和显示内容会被压入此栈,这样原本显示中的导航栏和显示内容则会进入到栈的更深一层中,根据栈的先进后出功能,最后被压入栈的界面先出栈。不过导航视图控制器始终有两个栈,一个栈控制导航栏内容,一个栈控制显示内容,并且开发者有义务也必须保持这两个栈的深度一致,否则程序会将不同步异常抛出。
对于显示内容的压栈操作API如下:
-(void)pushViewController:(UIViewController *)viewController animated:(BOOL )animated
对于显示内容的出栈操作API如下:
-(UIViewController *)popViewControllerAnimated:(BOOL)animated
-(NSArray *)popToRootViewControllerAnimated:(BOOL)animated
-(NSArray *)popToViewController:(UIViewController *)viewController animated:(BOOL)animated
在pushViewController视图控制器对象时,UINavigationController会对此对象retain一次,待到pop时才release,也就是说在pop时试图控制器的引用计数应该为0.
不过有些时候,特别是当开发者重写导航栏或者重写导航试图控制器时,还是会需要手动保持层次的平衡,这是可以额外的调用UINavigationBar对象的一下几个API
-(void)pushNavigationItem:(UINavigationItem *)item animated:(BOOL)animated
-(UINavigationItem *)popNavigationItemAnimated:(BOOL)animated
2.导航视图控制器的一下特性事例
(1)对UIViewController对象的navigationItem.title属性进行字符串赋值
(2)对UIViewController对象的title属性进行字符串配置
所以在viewDidLoad中修改如下
self.navigationItem.title=@"";
self.title=@""
(3)导航栏左中右位置的配置
-(void)initNavBar
{
    //创建一个UISegmentControl控件
    UISegmentedControl *aSegment=[[UISegmentedControl alloc]initWithFrame:CGRectMake(0.0f, 0.0f, 1000.0f, 30.0f)];

    //为控件新增三段内容
    [aSegment insertSegmentWithTitle:@"1" atIndex:0 animated:NO];

    [aSegment insertSegmentWithTitle:@"2" atIndex:1 animated:NO];

    [aSegment insertSegmentWithTitle:@"3" atIndex:2 animated:NO];

    //第一次出来显示的选择
    aSegment.selectedSegmentIndex=0;

    //将segment设置在中间
    self.navigationItem.titleView=aSegment;

    //为导航栏左边配置一个系统自带样式的按钮
    //按钮相应函数时actionDone:
    self.navigationItem.leftBarButtonItem=[[UIBarButtonItem alloc]initWithBarButtonSystemItem:UIBarButtonSystemItemDone target:self action:@selector(actDone:)];

    //为导航栏右边配置一个系统自带式样的按钮
    //按钮相应函数是actNext:
    self.navigationItem.rightBarButtonItem=[[UIBarButtonItem alloc]initWithBarButtonSystemItem:UIBarButtonSystemItemAction target:self action:@selector(actNext:)];
}
接下来就是工具栏的配置了。和导航栏一样,导航视图控制器也只有唯一一个底部的工具栏,如果我们打算使用导航控制器的那个工具栏,也需要遵循他的模式来进行。
如果我们并非打算所有视图都需要显示这个工具栏,所以我们将工具栏的配置代码放置在viewWillAppear函数中,每当视图显示时,进行工具栏的更新
-(void)updateToolBar
{
    //配置工具栏的样式
    self.navigationController.toolbar.barStyle=UIBarStyleDefault;

    //显示工具栏
    [self.navigationController setToolbarHidden:NO animated:YES];
    self.toolbarItems=[[NSArray alloc]initWithObjects:[[UIBarButtonItem alloc]initWithBarButtonSystemItem:UIBarButtonSystemItemAdd target:self action:@selector(actAdd:)], nil];

}
效果图如: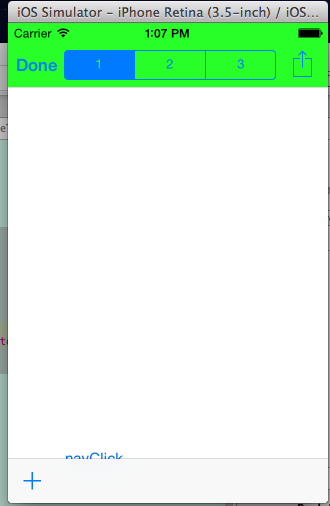
(4)导航栏右位置的多按钮
撰写initNavBar函数,以及隐藏工具栏,代码如下:
-(void)initNavBar
{
    UILabel *labTitle=[[UILabel alloc]initWithFrame:CGRectMake(0.0f, 0.0f, 1000.0f, 44.0f)];
    labTitle.backgroundColor=[UIColor darkGrayColor];
    labTitle.textColor=[UIColor whiteColor];
    labTitle.text=@"看右侧";
    labTitle.textAlignment=NSTextAlignmentCenter;

    //配置一个UILabel到导航栏中间
    self.navigationItem.titleView=labTitle;

    UIView *aView=[[UIView alloc]initWithFrame:CGRectMake(0.0f, 0.0f, 60.0f, 36.0f)];
    aView.backgroundColor=[UIColor clearColor];

    //第一个按钮
    UIButton *buttonA = [UIButton buttonWithType:UIButtonTypeRoundedRect];
    [buttonA setTitle:@"按钮" forState:UIControlStateNormal];
    buttonA.titleLabel.font=[UIFont systemFontOfSize:12.0f];
    buttonA.frame=CGRectMake(0.0f, CGRectGetHeight(aView.frame)/2-13.0f, 30.0f, 26.0f);
    [buttonA addTarget:self action:@selector(actButtonA:) forControlEvents:UIControlEventTouchUpInside];
    [aView addSubview:buttonA];

    //第二个按钮
    UIButton *buttonB = [UIButton buttonWithType:UIButtonTypeInfoLight];
    buttonA.frame=CGRectMake(CGRectGetWidth(aView.frame)-CGRectGetWidth(buttonA.frame), CGRectGetHeight(aView.frame)/2-CGRectGetHeight(buttonA.frame), CGRectGetWidth(buttonA.frame), CGRectGetHeight(buttonA.frame));
    [buttonB addTarget:self action:@selector(actButtonB:) forControlEvents:UIControlEventTouchUpInside];
    [aView addSubview:buttonB];

    self.navigationItem.rightBarButtonItem=[[UIBarButtonItem alloc]initWithCustomView:aView];

    //对于navgationItem左侧的返回按钮的修改
    self.navigationItem.backBarButtonItem=[[UIBarButtonItem alloc]initWithTitle:@"Go Back" style:UIBarButtonItemStyleBordered target:self action:NULL];

}
导航栏左右两侧的控件宽度是没有固定的上限的,也就是说如果设置的过于宽,会对另一头以及中间部分的显示内容产生影响。
这里,右侧的两个按钮都暂时使用了系统自带的按钮式样。由于是UIButton,可以添加图片的
效果如下: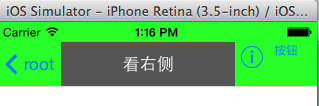
5.工具栏内容修改和全屏显示
首先需要对当前的工具栏内容进行修改,实现代码的原理就是对工具栏的元素数组进行再次赋值
-(void)initNav
{
    self.navigationItem.title=@"更改工具栏按钮";
}

-(void)updateToolBar
{
    //工具栏的元素
    self.toolbarItems=[[NSArray alloc]initWithObjects:[[UIBarButtonItem alloc] initWithBarButtonSystemItem:UIBarButtonSystemItemStop target:self action:@selector(actStop:)],
                       [[UIBarButtonItem alloc] initWithBarButtonSystemItem:UIBarButtonSystemItemFlexibleSpace target:self action:@selector(actPlay:)],
                       [[UIBarButtonItem alloc] initWithBarButtonSystemItem:UIBarButtonSystemItemCamera target:self action:@selector(actCamera:)],nil
                       ];

    //修改工具栏的样式
    self.navigationController.toolbar.barStyle=UIBarStyleBlackOpaque;
    [self.navigationController setToolbarHidden:NO animated:YES];

}
工具栏样式设置为UIBarStyleBlackOpaque,是工具栏有某种透明的能力,连导航栏和系统的状态栏都能够透明甚至隐藏,从而实现真正的一个试图占满整个屏幕的情况。
这种全屏显示的模式常见于视频电影播放的应用程序和图片游览的应用程序,对于全屏的支持,UIViewController主要依靠wantsFullScreenLayout属性设置成YES来辅助实现。并且在UIViewController中属性Top Bar选成Translucent Black Navigation,如图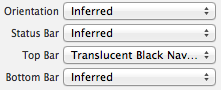
由于只在当前视图中呈现透明黑色样式的导航栏,所以在当前视图被推出栈之前,将样式变回才好,相关代码改写如下:
 1 -(void)viewWillAppear:(BOOL)animated
 2 {
 3     [super viewWillAppear:animated];
 4     [self updateToolBar];
 5     [self updateNavBarStyle:YES];
 6 }
 7
 8 -(void)viewWillDisappear:(BOOL)animated
 9 {
10     [super viewWillDisappear:animated];
11     [self updateNavBarStyle:NO];
12 }
13
14 -(void)updateNavBarStyle:(BOOL)bAppear
15 {
16     //全屏模式
17     if(bAppear)
18     {
19         self.navigationController.navigationBar.translucent=YES;
20         self.navigationController.navigationBar.barStyle=UIBarStyleBlackTranslucent;
21     }
22     //默认模式
23     else
24     {
25         self.navigationController.navigationBar.translucent=NO;
26         self.navigationController.navigationBar.barStyle=UIBarStyleDefault;
27     }
28 }
全屏模式一般需要一个外部触发器,不如我们自己制作一个触发器,让用户在视图上点击一次作为全屏和默认模式的切换信号。把这个手势事件在viewDidLoad中先进性注册。
 1 - (void)viewDidLoad
 2 {
 3     [super viewDidLoad];
 4     // Do any additional setup after loading the view.
 5     [self initNav];
 6
 7     //单击手势的注册
 8     UITapGestureRecognizer *tapGesture=[[UITapGestureRecognizer alloc] initWithTarget:self action:@selector(actTap:)];
 9     [self.view addGestureRecognizer:tapGesture];
10 }
对于手势的响应函数
 1 -(IBAction)actTap:(id)sender
 2 {
 3     //全屏中
 4     if(self.navigationController.navigationBarHidden)
 5     {
 6         //状态栏显示
 7         [[UIApplication sharedApplication]setStatusBarHidden:NO withAnimation:UIStatusBarAnimationFade];
 8
 9         //导航栏显示
10         [self.navigationController setNavigationBarHidden:NO animated:YES];
11         //工具栏显示
12         [self.navigationController setToolbarHidden:NO animated:YES];
13     }
14     //非全屏中
15     else
16     {
17         //状态栏隐藏
18         [[UIApplication sharedApplication]setStatusBarHidden:YES withAnimation:UIStatusBarAnimationFade];
19
20         //导航栏隐藏
21         [self.navigationController setNavigationBarHidden:YES animated:YES];
22
23         //工具栏隐藏
24         [self.navigationController setToolbarHidden:YES animated:YES];
25     }
26 }
随后需要修改UISegmentController上第二标题“工具栏”
修改UISegment 点击事件 actNext的方法如下:
-(IBAction)actNext:(id)sender
{
     switch(_mySegments.selectedSegmentIndex)
     {
            case 0:
                break;
            case 1:
                break;
            case 2:
                HBNavToolBarController *aNewVC=[[HBNavToolBarController alloc]init];
                aNewVC.wantsFullScreenLayout=YES;
                 break;
            default:
                 break;
     }
     [self.navigationController pushViewController:aNewVC animated:YES];
}
显示结果如下:
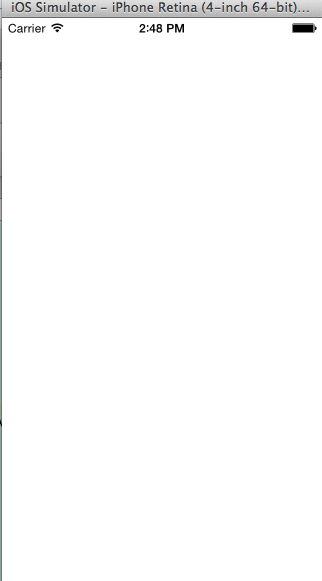
6.动画过度和超大视图
 1 - (IBAction)actNext:(id)sender {
 2     HBResizeViewController *resizeVC=[[HBResizeViewController alloc]init];
 3
 4     //自定义动画
 5     CATransition *animation=[CATransition animation];
 6     animation.delegate=self;
 7     animation.duration=0.5;
 8     animation.timingFunction=UIViewAnimationCurveEaseInOut;
 9     animation.removedOnCompletion=NO;
10     animation.type=@"pageCur1";
11     animation.subtype=kCATransitionFromBottom;
12     animation.endProgress=1.0f;
13     [self.navigationController.view.layer addAnimation:animation forKey:@"animation"];
14     [self.navigationController pushViewController:resizeVC animated:NO];
15
16 }
当需要执行自定义动画是,往往会将导航控制器的默认栈动画首先进行关闭,即对pushViewController: animated: 方法的第二个参数传入NO


 815
815


 被折叠的 条评论
为什么被折叠?
被折叠的 条评论
为什么被折叠?
 到【灌水乐园】发言


