


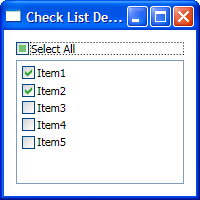
实际项目中常常要实现有CheckBox列表框。但是WPF没有自带这样的一个控件,下面就用Style来实现这样的功能。而对于CheckBox列表框,又常常会有一个Select All的CheckBox来表示当前列表框的选择状态。这个功能也会被包含在下面的示例之中。效果如下图所示。
对于单纯的,没有后台数据绑定的情况下,这个功能可以用ItemContainerStyle来实现。代码如下:


CheckListBoxItemContainerStyle

Code highlighting produced by Actipro CodeHighlighter (freeware)http://www.CodeHighlighter.com/--><Style x:Key="CheckListBoxItemContainerStyle"
       TargetType="{x:Type ListBoxItem}">
  <!--Set it un-focusable, becaues the CheckBox in it should be focusable and only it.-->
  <Setter Property="Focusable" Value="False"/>
  <Setter Property="Template">
    <Setter.Value>
      <ControlTemplate TargetType="{x:Type ListBoxItem}">
        <CheckBox Content="{TemplateBinding Content}"
              ContentTemplate="{TemplateBinding ContentTemplate}"
              ContentTemplateSelector="{TemplateBinding ContentTemplateSelector}"
              IsChecked="{Binding IsSelected, RelativeSource={RelativeSource TemplatedParent}}"/>
      </ControlTemplate>
    </Setter.Value>
  </Setter>
</Style>
其中要对Content和ContentTemplate等属性进行绑定,以方便对其进行扩展,保证其通用性。这个Style一般会放在Application级别的Resource中。
对于有后台数据绑定的情况,一般会有双个属性要绑定,一个是CheckBox里的Content,一个是CheckBox的IsChecked。绑定的路径,只有在用一个Style的ListBox那里才知道,所以并不能写在这个Style里,否则会破坏这个Style的通用性。比较合理的方式是基于这个现有的Style进行修改。
对于下面的数据类。
DataItem Class
public string Name { get { return name; } set { name = value; OnPropertyChanged( " Name " ); } }
public bool IsEnabled { get { return isEnabled; } set { isEnabled = value; OnPropertyChanged( " IsEnabled " ); } }
#region INotifyPropertyChanged Members
public event PropertyChangedEventHandler PropertyChanged;
#endregion
protected virtual void OnPropertyChanged( string propertyName) { PropertyChangedEventHandler temp = PropertyChanged; if (temp != null ) { temp( this , new PropertyChangedEventArgs(propertyName)); } } }
我们需要下面这个有针对性的Style来应用数据绑定。
DataItemCheckListBoxStyle

Code highlighting produced by Actipro CodeHighlighter (freeware)http://www.CodeHighlighter.com/--><Style x:Key="DataItemCheckListBoxStyle"
       TargetType="{x:Type ListBox}"
       BasedOn="{StaticResource {x:Type ListBox}}">
  <Setter Property="ItemTemplate">
    <Setter.Value>
      <DataTemplate>
        <TextBlock Text="{Binding Name}"/>
      </DataTemplate>
    </Setter.Value>
  </Setter>
  <Setter Property="ItemContainerStyle">
    <Setter.Value>
      <Style TargetType="{x:Type ListBoxItem}"
             BasedOn="{StaticResource CheckListBoxItemContainerStyle}">
        <Setter Property="IsSelected"
                Value="{Binding IsEnabled}"/>
        <Setter Property="Margin" Value="2,2,0,0"/>
      </Style>
    </Setter.Value>
  </Setter>
  <Setter Property="SelectionMode" Value="Multiple"/>
</Style>
在上面的Style中,使用了ItemTemplate来指定CheckBox里的Content绑定到的属性,并把ListBoxItem的IsSelected绑定数据的相应属性上。由于这个Style是针对特定数据写的,所以应当放置在使用这个Style的ListBox所在的Window的Resource中。
当然,也可以为ListBox添加两个绑定类型的Attached Property来实现一个通用的Style。不过这个Property一样要在使用的地方设置,其实没有太大区别。有兴趣的读者可以自己试一下。
对于Select All这个CheckBox而言,用Attached Property倒是很方便。给CheckBox添加一个SyncTarget属性指向要同步的ListBox,就可以在Window.xaml.cs之外的地方同步CheckBox和ListBox了。代码如下:
ToggleButtonProperty

Code highlighting produced by Actipro CodeHighlighter (freeware)http://www.CodeHighlighter.com/-->public class ToggleButtonProperty
{
    // Using a DependencyProperty as the backing store for SyncTarget.  This enables animation, styling, binding, etc...
    public static readonly DependencyProperty SyncTargetProperty =
        DependencyProperty.RegisterAttached("SyncTarget", typeof(ListBox), typeof(ToggleButtonProperty), new UIPropertyMetadata(new PropertyChangedCallback(OnSyncTargetChanged)));

    public static ListBox GetSyncTarget(DependencyObject obj)
    {
        return obj.GetValue(SyncTargetProperty) as ListBox;
    }

    public static void SetSyncTarget(DependencyObject obj, ListBox value)
    {
        obj.SetValue(SyncTargetProperty, value);
    }

    private static void OnSyncTargetChanged(DependencyObject sender, DependencyPropertyChangedEventArgs e)
    {
        ToggleButton checker = sender as ToggleButton;
        if (checker == null)
        {
            throw new InvalidOperationException("SyncTarget property only works on ToggleButton.");
        }

        ListBox targetList = e.NewValue as ListBox;
        if (targetList == null)
        {
            throw new InvalidOperationException("Sync target must be a ListBox.");
        }

        //TODO: Un-subscribe OldValue's Event.

        checker.Checked += (s, a) =>
        {
            targetList.SelectAll();
        };

        checker.Unchecked += (s, a) =>
        {
            targetList.UnselectAll();
        };

        targetList.SelectionChanged += (s, a) =>
        {
            checker.IsChecked = targetList.SelectedItems.Count == 0 ? false :
                targetList.SelectedItems.Count == targetList.Items.Count ? (bool?)true : null;
        };
    }
}
使用方式也很简单。如下代码所示。
用法

Code highlighting produced by Actipro CodeHighlighter (freeware)http://www.CodeHighlighter.com/--><DockPanel Margin="12">
    <CheckBox Content="Select All"
              Margin="0,0,0,5"
              DockPanel.Dock="Top"
              ext:ToggleButtonProperty.SyncTarget="{Binding ElementName=checkListBox}"/>
    <ListBox x:Name="checkListBox"
             Style="{StaticResource DataItemCheckListBoxStyle}"
             ItemsSource="{Binding Path=Items, ElementName=mainWindow}"/>
</DockPanel>
完整的项目文件可以从这里下载。
转载至http://www.cnblogs.com/nankezhishi/archive/2009/12/30/checkablelistbox.html


 1万+
1万+

 被折叠的 条评论
为什么被折叠?
被折叠的 条评论
为什么被折叠?
 到【灌水乐园】发言


