一、简介
OpenSWan是Linux下IPsec的最佳实现方式,其功能强大,最大程度地保证了数据传输中的安全性、完整性问题。
OpenSWan支持2.0、2.2、2.4以及2.6内核,可以运行在不同的系统平台下,包括X86、X86_64、IA64、MIPS以及ARM。
更多详情请参见OpenSWan项目主页:http://www.openswan.org
L2tp ipsecconfiguration using openswan and xl2tpd:
https://github.com/xelerance/Openswan/wiki/L2tp-ipsec-configuration-using-openswan-and-xl2tpd
二、系统环境
测试说明
network-to-network模式。在lserver和rserver上安装配置openswan,建立IPsec ×××,使lclient和rclient可以互访。
roadwarriors模式。在lserver上安装配置xl2tp。windows客户机通过***拨入访问内部网络。
操作系统
本文使用Xenserver建立4台虚拟机进行测试。操作系统Centos6.2。
内核:2.6.32-220.el6.x86_64
IP分配
hostname eth0 eth1 gateway remarks lserver 172.26.184.28 192.168.0.1 172.26.184.1 Left gateway lclient 192.168.0.2 xxx
(means not exist)
192.168.0.1 Left cliect rserver 172.26.184.30 192.168.1.1 172.26.184.1 Right gateway rclient 192.168.1.2 xxx(means not exist) 192.168.1.1 Right client
三、Network-To-Network模式安装配置
1)安装前操作系统初始化
开启转发
#vi /etc/sysctl.conf
将下面2项
net.ipv4.ip_forward= 0
net.ipv4.conf.default.rp_filter= 1 改为:net.ipv4.ip_forward= 1
net.ipv4.conf.default.rp_filter = 0
禁用ICMP重定向
sysctl -a | egrep"ipv4.*(accept|send)_redirects" | awk -F "=" '{print$1"= 0"}' >> /etc/sysctl.conf
# sysctl -p
关闭selinux
#vi /etc/sysconfig/selinux
设置SELINUX为disabled
SELINUX=disabled
配置安装源:
Openswan加载centos光盘源即可,xl2tpd需要加载epel源
配置光盘源
#vi /etc/yum.repo/CentOS-Media.repo
[c6-media]
name=CentOS-$releasever- Media
baseurl=file:///media/CentOS/
file:///media/cdrom/
gpgcheck=1
enabled=1
gpgkey=file:///etc/pki/rpm-gpg/RPM-GPG-KEY-CentOS-6
光盘挂载到如下目录
/manager/ISO/CentOS-6.2-x86_64-bin-DVD1.iso
4.2G4.2G0 100% /media/CentOS
/manager/ISO/CentOS-6.2-x86_64-bin-DVD2.iso
1.3G1.3G0 100% /media/cdrom
配置epel源
#vi /etc/yum.repo/custom.repo
[epel]
name=epel
baseurl=http://172.26.184.241/epel/6/x86_64/
enabled=1
gpgcheck=0
重启
#reboot
2)软件安装
在lserver、rserver上安装openswan、lsof
#yum install openswan lsof –y
安装验证
执行下面的命令验证OpenSWan是否正确安装
#ipsec--version
如果程序正确安装,此命令将显示
Linux OpenswanU2.6.32/K(no kernel code presently loaded)
See `ipsec--copyright' for copyright information.
这里没有加载任何的IPsec stack,当启动IPsec后会自动加载系统自带的netkey。
3)openswan配置(Network-To-Network模式)
当使用Network-To-Network方式时,作为每个子网网关的主机不能像子网内部主机那样透明访问远程子网的主机。
如果网关服务需要访问远程内部子网,需要建立网关服务器的网络与远程子网的IPsec ×××。
启动ipsec
#service ipsec start
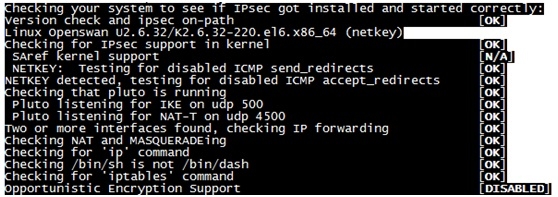
确认openswan运行状态
#ipsec verify
IPSec设定
配置共享密钥(新建如下文件,文件名可自定义,扩展名必须是)
#vi /etc/ipes
: PSK "cisco"
配置ipsec.conf
vi /etc/ipsec.conf
# /etc/ipsec.conf - Openswan IPsec configuration file
#
# Manual:     ipsec.conf.5
#
# Please place your own config files in /etc/ipsec.d/ ending in .conf
version 2.0     # conforms to second version of ipsec.conf specification
# basic configuration
config setup
        # Debug-logging controls:  "none" for (almost) none, "all" for lots.
        # klipsdebug=none
        # plutodebug="control parsing"
        # For Red Hat Enterprise Linux and Fedora, leave protostack=netkey
        protostack=netkey
        nat_traversal=yes
        virtual_private=
        oe=off
        # Enable this if you see "failed to find any available worker"
        nhelpers=0
conn net-to-net
        authby=secret
        type=tunnel
        ike=aes256-sha2_256;modp2048
        phase2alg=aes256-sha2_256;modp2048
#       sha2_truncbug=yes
        left=172.26.184.28
        leftsubnet=192.168.0.1/24
        right=172.26.184.30
        rightsubnet=192.168.1.1/24
        forceencaps=yes
        dpddelay=1
        dpdtimeout=3
        dpdaction=restart
        auto=start
重启ipsec服务
#service ipsec restart
Iptables配置
如果开启iptables需加入以下配置:
-A INPUT-p icmp --icmp-type echo-request -j ACCEPT
-AOUTPUT -p icmp --icmp-type echo-reply -j ACCEPT
-AOUTPUT -p icmp --icmp-type echo-request -j ACCEPT
-A INPUT-p icmp --icmp-type echo-reply -j ACCEPT
-A INPUT–p udp --dport 500 -j ACCEPT
-A INPUT–p udp --dport 4500 -j ACCEPT
-A OUTPUT–p udp --sport 500 -j ACCEPT
-A OUTPUT–p udp --sport 4500 -j ACCEPT
4)验证×××连接
在lserver或rserver上验证:
#ipsec auto --up net-to-net
以下信息表示×××连接成功:
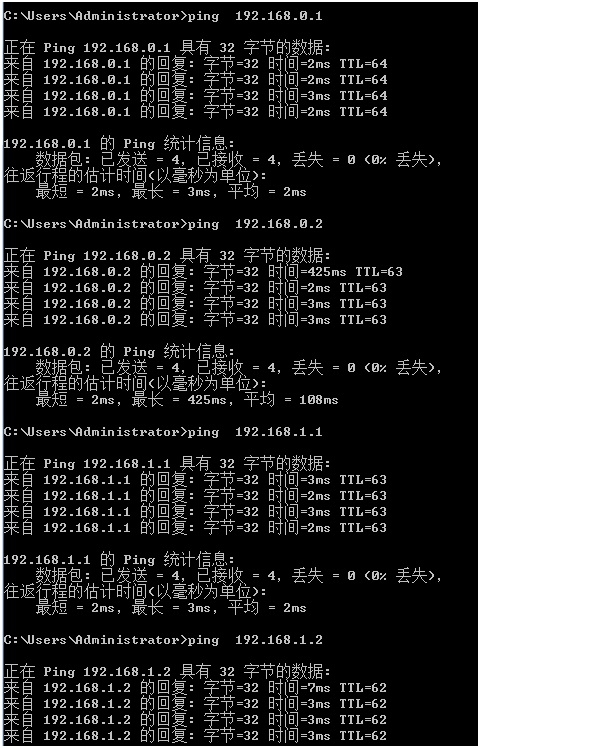
在lclient或rclient上ping对方测试:
四、roadwarriors模式安装配置
1.软件安装
#yum installxl2tpd –y
2.Openswan配置(roadwarriors模式)
配置ipsec.conf
#vi/etc/ipsec.conf
# /etc/ipsec.conf- Openswan IPsec configuration file
#
# Manual:ipsec.conf.5
#
# Please placeyour own config files in /etc/ipsec.d/ ending in .conf
version 2.0# conforms to second version of ipsec.confspecification
# basicconfiguration
config setup
# Debug-logging controls:"none" for (almost) none,"all" for lots.
# klipsdebug=none
# plutodebug="controlparsing"
# For Red Hat Enterprise Linux andFedora, leave protostack=netkey
protostack=netkey
nat_traversal=yes
virtual_private=%v4:192.168.0.0/16,%v4:10.0.0.0/8,%v4:172.16.0.0/12,%v4:25.0.0.0/8,%v4:!192.168.0.1/24
oe=off
# Enable this if you see "failedto find any available worker"
nhelpers=0
conn net-to-net
authby=secret
type=tunnel
ike=aes256-sha2_256;modp2048
phase2alg=aes256-sha2_256;modp2048
#sha2_truncbug=yes
left=172.26.184.28
leftsubnet=192.168.0.1/24
right=172.26.184.30
rightsubnet=192.168.1.1/24
forceencaps=yes
dpddelay=1
dpdtimeout=3
dpdaction=restart
auto=start
conn l2tp-psk
authby=secret
pfs=no
auto=start
rekey=no
# overlapip=yes# for SAref + MAST
# sareftrack=yes# for SAref + MAST
type=transport
left=172.26.184.28
leftprotoport=17/1701
#
# The remote user.
#
right=%any
rightprotoport=17/%any
rightsubnet=vhost:%priv,%no
#You may put yourconfiguration (.conf) file in the "/etc/ipsec.d/" and uncomment this.
#include/etc/ipsec.d/*.conf
3.xl2tpd配置
#vi/etc/xl2tpd/xl2tpd.conf
[global]
listen-addr = 172.26.184.28
auth file = /etc/ppp/chap-secrets
[lns default]
ip range =192.168.0.128-192.168.0.254
local ip =192.168.0.1
assign ip = yes
require chap = yes
refuse pap = yes
requireauthentication = yes
name = openswan***
ppp debug = yes
pppoptfile =/etc/ppp/options.xl2tpd
length bit = yes
4.ppp配置
#vi /etc/ppp/options.xl2tpd
ipcp-accept-local
ipcp-accept-remote
#ms-dns8.8.8.8
# ms-dns192.168.1.1
# ms-dns192.168.1.3
# ms-wins192.168.1.2
# ms-wins192.168.1.4
noccp
auth
crtscts
idle 1800
mtu 1410
mru 1410
nodefaultroute
debug
lock
proxyarp
connect-delay 5000
logfile /var/log/xl2tpd.log
5./etc/ppp/chap-secrets配置
给用户从地址池里分配一个地址,或者分配一个静态IP。
#vi/etc/ppp/chap-secrets
# Secrets forauthentication using CHAP
# clientserversecretIPaddresses
test*** *test*** *
*******192.168.0.20
6.验证×××连接
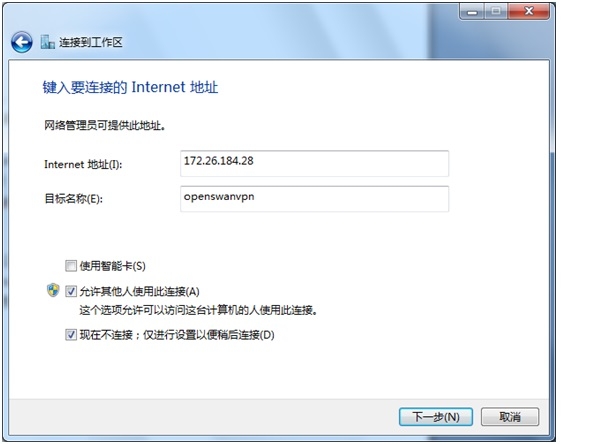
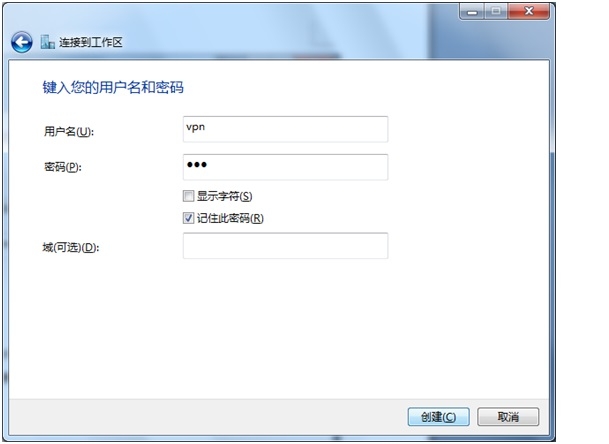
Windows客户机新建***连接:以下是win7的设置
开始->控制面板->网络和Internet->网络和共享中心->设置新的连接或网络->连接到工作区->使用我的Internet连接我的×××。
回到“网络和共享中心”页面,点击“连接到网络”,右击openswan***,单击“属性”,在“安全”页点击高级设置,在L2TP页,选择“使用预共享密钥做身份认证”,并输入共享密钥。客户端设置完成,可以连接***测试。
转载于:https://blog.51cto.com/fire7758/1351256


 2346
2346


 被折叠的 条评论
为什么被折叠?


