


Maven插件配置
<build>
    <plugins>
        <plugin>
            <!-- 编译插件 -->
            <groupId>org.apache.maven.plugins</groupId>
            <artifactId>maven-compiler-plugin</artifactId>
            <version>2.3.2</version>
            <configuration>
                <source>1.6</source>
                <target>1.6</target>
            </configuration>
        </plugin>
        <plugin>
            <!-- 发布插件 -->
            <groupId>org.apache.maven.plugins</groupId>
            <artifactId>maven-deploy-plugin</artifactId>
            <version>2.5</version>
        </plugin>
        <plugin>
            <!-- 打包插件 -->
            <groupId>org.apache.maven.plugins</groupId>
            <artifactId>maven-jar-plugin</artifactId>
            <version>2.3.1</version>
        </plugin>
        <plugin>
            <!-- 安装插件 -->
            <groupId>org.apache.maven.plugins</groupId>
            <artifactId>maven-install-plugin</artifactId>
            <version>2.3.1</version>
        </plugin>
        <plugin>
            <!-- 单元测试插件 -->
            <groupId>org.apache.maven.plugins</groupId>
            <artifactId>maven-surefire-plugin</artifactId>
            <version>2.7.2</version>
            <configuration>
                <skip>true</skip>
            </configuration>
        </plugin>
        <plugin>
            <!-- 源码插件 -->
            <groupId>org.apache.maven.plugins</groupId>
            <artifactId>maven-source-plugin</artifactId>
            <version>2.1</version>
            <!-- 发布时自动将源码同时发布的配置 -->
            <executions>
                <execution>
                    <id>attach-sources</id>
                    <goals>
                        <goal>jar</goal>
                    </goals>
                </execution>
            </executions>
        </plugin>
        <!-- 生成javadoc文档包的插件 -->
            <plugin>
                <groupId>org.apache.maven.plugins</groupId>
                <artifactId>maven-javadoc-plugin</artifactId>
                <version>2.10.2</version>
                <configuration>
                    <aggregate>true</aggregate>
                </configuration>
                <executions>
                    <execution>
                        <id>attach-javadocs</id>
                        <goals>
                            <goal>jar</goal>
                        </goals>
                    </execution>
                </executions>
            </plugin>
    </plugins>
  </build>
编译打包
<build>
	<resources>
		<resource>
			<directory>src/main/resources</directory>
			<includes>
				<include>**/*.*</include>
			</includes>
			<filtering>false</filtering>
		</resource>
		<resource>
			<directory>src/main/java</directory>
			<includes>
				<include>**/*.properties</include>
				<include>**/*.xml</include>
				<include>**/*.tld</include>
			</includes>
			<filtering>false</filtering>
		</resource>
	</resources>
	<plugins>
		<plugin>
			<groupId>org.springframework.boot</groupId>
			<artifactId>spring-boot-maven-plugin</artifactId>
		</plugin>
	</plugins>
</build>
maven命令
maven-dependency-plugin最大的用途是帮助分析项目依赖
dependency:list能够列出项目最终解析到的依赖列表
dependency:tree能进一步的描绘项目依赖树
dependency:analyze可以告诉你项目依赖潜在的问题,如果你有直接使用到的却未声明的依赖,该目标就会发出警告。
maven-dependency-plugin还有很多目标帮助你操作依赖文件,
dependency:copy-dependencies能将项目依赖从本地Maven仓库复制到某个特定的文件夹下面。
上传jar包到本地仓库:
mvn install:install-file -Dfile=lucene-queryparser-4.6.1.jar -DgroupId=org.apache.lucene -DartifactId=lucene-queryparser -Dversion=4.6.1 -Dpackaging=jar上传jar包到私服仓库:
这个上传命令,要依赖:settings.xml里的配置,比如:mirror配置,server配置。
mvn deploy:deploy-file -DgroupId=com.maven.api -DartifactId=maven-api -Dversion=1.0 -Dpackaging=jar -Dfile=本地jar包的地址 -Durl=上传到的私有仓库的地址 -DrepositoryId=nexusDgroupId、DartifactId、Dversion : 构建的基本坐标,你需要根据你上次的jar包自行改变
Dpackaging : 上传的包的类型,一般为jar,不用改变,根据你的实际情况来改变。
Dfile : 需要上传的包的地址
Durl : 上传到的私有仓库的地址
DrepositoryId : 身份信息。
Dversion : 版本
mvn dependency:analyze
好,接下来我们在eclipse里面运行一下试试看。如下图:
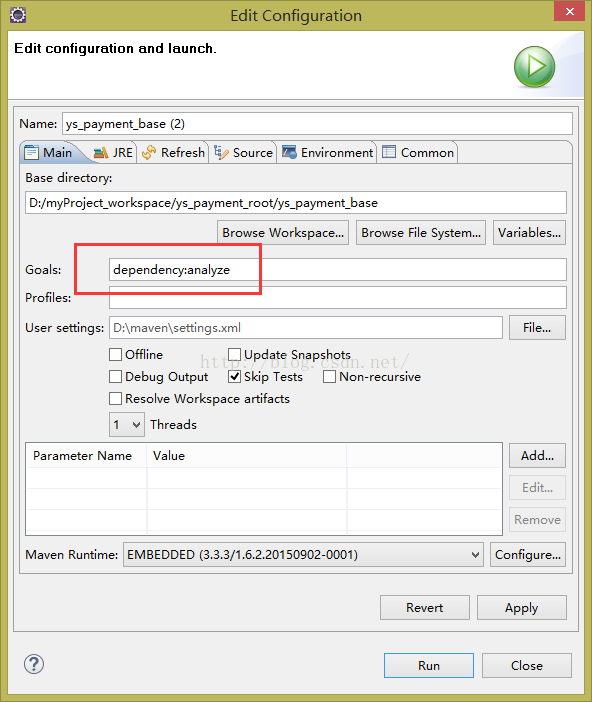
运行结果如下:

这里分析结果我们发现这个命令会将依赖分为两类:
第一类:Used undeclared dependencies found
这个是指,某些依赖的包在代码中有用到它的代码,但是它并不是直接的依赖,也没有在pom中声明,是通过传递引入的一类包。
这里重点我们关注第二类:
Unused declared dependencies found
这个就是我们在pom中声明依赖了,但是在实际代码中并没有用到的包!也就是多余的包。
注意:这里说的实际代码没有用到,指的是在main/java和test里没有用的,但是并不是意味着别的地方没有用到,所以在删除依赖的时候,我们要小心,最好备份,例如我们在web.xml里面用到某些类,这个类依赖包A,这个maven是分析不出来的。还有运行时需要用到的也分析不出来!!!
配置私服nexus
-
在maven配置文件settings.xml对应位置添加配置
<mirror> <id>public</id> <name>Public Repositories</name> <url>http://localhost:8081/nexus/content/groups/public/</url> <mirrorOf>*</mirrorOf> </mirror> <mirror> <id>releases_repo</id> <url>http://192.168.10.201:8081/nexus/content/repositories/central/</url> <mirrorOf>*</mirrorOf> </mirror> <mirror> <id>snapshots_repo</id> <url>http://192.168.10.201:8081/nexus/content/repositories/central/</url> <mirrorOf>*</mirrorOf> </mirror> -
如果需要下载 nexus 中特定分组的包(可选)
Maven获取jar的默认顺序是
- 1. Releases 在发布库里面查找(主要用于稳定版)
- 2. Snapshots 在快照库里面查找(和上面的区别就是在pom加了个<version>0.0.5-SNAPSHOT</version>,主要用于开发阶段)
- 3. 3rd party 不是我们自己开发的,也在中央库找不到的,就要到这里手动上传包到私服。
- 4. Central 到中央库查找。
在项目pom.xml 中对应位置添加
<project ...>

  ...

  <repositories>
    <repository>
      <id>public</id>
      <url>http://localhost:8081/nexus/content/groups/public/</url>
    </repository>
    <repository>
      <id>releases_repo</id>
	  <url>http://localhost:8081/nexus/content/repositories/releases</url>
    </repository>
    <repository>
      <id>snapshots_repo</id>
      <url>http://localhost:8081/nexus/content/repositories/snapshots</url>
    </repository>
  </repositories>

 ....

</project>
发布JAR到私服
1.添加全局账号配置(setting.xml)
   <servers>
    <server>
		<id>releases_repo</id>
		<username>admin</username>
		<password>admin123</password>
	</server>
	<server>
		<id>snapshots_repo</id>
		<username>admin</username>
		<password>admin123</password>
	</server>
  </servers>
2.添加 库提交 链接(pom.xml)
在项目pom.xml 中对应位置添加
<distributionManagement>
	<repository>
		<id>releases_repo</id>
		<name>Release Repository</name>
		<url>http://localhost:8081/nexus/content/repositories/releases</url>
	</repository>
	<snapshotRepository>
		<id>snapshots_repo</id>
		<name>Snapshots Repository</name>
		<url>http://localhost:8081/nexus/content/repositories/snapshots</url>
	</snapshotRepository>
</distributionManagement>- 项目版本号中包含
-SNAPSHOT例如<version>1.0.0-SNAPSHOT</version>会被放入nexus-snapshots对应的组 - 项目版本号中不包含
-SNAPSHOT例如 <version>1.0.0</version> 会被放入nexus-releases对应的组
2.添加 库下载 链接(pom.xml)
<repositories>
    <repository>
      <id>releases_repo</id>
	  <url>http://localhost:8081/nexus/content/repositories/releases</url>
    </repository>
    <repository>
      <id>snapshots_repo</id>
      <url>http://localhost:8081/nexus/content/repositories/snapshots</url>
    </repository>
</repositories>
3.发布源码包
在项目pom.xml 中对应位置添加
<plugin>
    <groupId>org.apache.maven.plugins</groupId>
    <artifactId>maven-source-plugin</artifactId>
    <version>3.0.1</version>
    <executions>
        <execution>
            <id>attach-sources</id>
            <phase>verify</phase>
            <goals>
                <goal>jar-no-fork</goal>
            </goals>
        </execution>
    </executions>
</plugin>
4.发布源码包打包发布
mvn clean deploy -Dmaven.test.skip=true
# 或者
mvn clean deploy -e

##有源码打包和发布,分别使用相同的groupId和artifactId。
mvn clean source:jar package
mvn clean source:jar deploy
5.settings.xml例子
<?xml version="1.0" encoding="UTF-8"?>

<settings xmlns="http://maven.apache.org/SETTINGS/1.0.0"
          xmlns:xsi="http://www.w3.org/2001/XMLSchema-instance"
          xsi:schemaLocation="http://maven.apache.org/SETTINGS/1.0.0 http://maven.apache.org/xsd/settings-1.0.0.xsd">
   <localRepository>/app/work/repository</localRepository>
  <!-- interactiveMode
   | Default: true
  <interactiveMode>true</interactiveMode>
  -->

  <!-- offline
   | Default: false
  <offline>false</offline>
  -->

  <pluginGroups>
    <!-- pluginGroup
     | Specifies a further group identifier to use for plugin lookup.
    <pluginGroup>com.your.plugins</pluginGroup>
    -->
  </pluginGroups>

  <proxies>
    <!-- proxy
     | Specification for one proxy, to be used in connecting to the network.
     |
    <proxy>
      <id>optional</id>
      <active>true</active>
      <protocol>http</protocol>
      <username>proxyuser</username>
      <password>proxypass</password>
      <host>proxy.host.net</host>
      <port>80</port>
      <nonProxyHosts>local.net|some.host.com</nonProxyHosts>
    </proxy>
    -->
  </proxies>

  <servers>
	<server>
      <id>public</id>
      <username>admin</username>
      <password>admin123</password>
    </server>
	<server>
		<id>releases_repo</id>
		<username>admin</username>
		<password>admin123</password>
	</server>
	<server>
		<id>snapshots_repo</id>
		<username>admin</username>
		<password>admin123</password>
	</server>
  </servers>

  <mirrors>
	 <mirror>
      <id>public</id>
      <mirrorOf>*</mirrorOf>
      <url>http://localhost:8081/nexus/content/groups/public/</url>
    </mirror>
	<mirror>
      <id>thirdparty</id>
      <mirrorOf>*</mirrorOf>
      <url>http://localhost:8081/nexus/content/repositories/thirdparty</url>
    </mirror>

  </mirrors>

  <profiles>
	<profile>
      <id>public</id>
      <repositories>
        <repository>
			<id>snapshots_repo</id>
            <name>Snapshots</name>
            <url>http://localhost:8081/nexus/content/repositories/snapshots/</url>
            <releases><enabled>true</enabled></releases>
            <snapshots><enabled>true</enabled></snapshots>
        </repository>
		<repository>
         	<id>releases_repo</id>
			<name>Releases</name>
			<url>http://localhost:8081/nexus/content/repositories/releases/</url>
			<releases><enabled>true</enabled></releases>
			<snapshots><enabled>true</enabled></snapshots>
        </repository>

		<repository>
         	<id>thirdparty</id>
			<name>3rd party</name>
			<url>http://localhost:8081/nexus/content/repositories/thirdparty</url>
			<releases><enabled>true</enabled></releases>
			<snapshots><enabled>true</enabled></snapshots>
        </repository>
		<repository>
          <id>public</id>
          <name>Public Repositories</name>
          <url>http://localhost:8081/nexus/content/groups/public/</url>
          <releases><enabled>true</enabled></releases>
          <snapshots><enabled>true</enabled></snapshots>
        </repository>
      </repositories>

      <pluginRepositories>
		<pluginRepository>
			<id>snapshots_repo</id>
            <name>Snapshots</name>
            <url>http://localhost:8081/nexus/content/repositories/snapshots/</url>
            <releases>
            	<enabled>true</enabled>
            	<updatePolicy/>
            	<checksumPolicy/>
            </releases>
            <snapshots><enabled>true</enabled></snapshots>
        </pluginRepository>

        <pluginRepository>
			<id>releases_repo</id>
            <name>Releases</name>
            <url>http://localhost:8081/nexus/content/repositories/releases/</url>
            <releases><enabled>true</enabled><updatePolicy/></releases>
            <snapshots><enabled>true</enabled><updatePolicy/></snapshots>
        </pluginRepository>

		<pluginRepository>
			<id>public</id>
            <name>Public Repositories</name>
            <url>http://localhost:8081/nexus/content/groups/public/</url>
            <releases><enabled>true</enabled><updatePolicy/></releases>
            <snapshots><enabled>true</enabled><updatePolicy/></snapshots>
        </pluginRepository>
      </pluginRepositories>
    </profile>
  </profiles>

  <activeProfiles>
    <activeProfile>public</activeProfile>
  </activeProfiles>
</settings>


 1万+
1万+


 被折叠的 条评论
为什么被折叠?
被折叠的 条评论
为什么被折叠?
 到【灌水乐园】发言


