1 前言
本文主要实战演示k8s部署go服务,实现滚动更新、重新创建、蓝绿部署、金丝雀发布
2 go服务镜像准备
2.1 初始化项目
2.2 编写main.go
package main

import (
    "flag"
    "github.com/gin-gonic/gin"
    "net/http"
    "os"
)

var version = flag.String("v", "v1", "v1")

func main() {
    router := gin.Default()
    router.GET("", func(c *gin.Context) {
        flag.Parse()
        hostname, _ := os.Hostname()
        c.String(http.StatusOK, "This is version:%s running in pod %s", *version, hostname)
    })
    router.Run(":8080")
}
package main

import (
    "flag"
    "github.com/gin-gonic/gin"
    "net/http"
    "os"
)

var version = flag.String("v", "v1", "v1")

func main() {
    router := gin.Default()
    router.GET("", func(c *gin.Context) {
        flag.Parse()
        hostname, _ := os.Hostname()
        c.String(http.StatusOK, "This is version:%s running in pod %s", *version, hostname)
    })
    router.Run(":8080")
}- 1.
- 2.
- 3.
- 4.
- 5.
- 6.
- 7.
- 8.
- 9.
- 10.
- 11.
- 12.
- 13.
- 14.
- 15.
- 16.
- 17.
- 18.
- 19.
- 20.
- 21.
- 22.
- 23.
- 24.
- 25.
- 26.
- 27.
- 28.
- 29.
- 30.
- 31.
- 32.
- 33.
- 34.
- 35.
- 36.
- 37.
- 38.
- 39.
- 40.
2.3 本地测试运行


2.4 编写Dockerfile
v1.3版本
FROM golang:latest AS build

WORKDIR /go/src/test
COPY . /go/src/test
RUN go env -w GOPROXY=https://goproxy.cn,direct
RUN CGO_ENABLED=0 go build -v -o main .

FROM alpine AS api
RUN mkdir /app
COPY --from=build /go/src/test/main /app
WORKDIR /app
ENTRYPOINT ["./main", "-v" ,"1.3 "]
FROM golang:latest AS build

WORKDIR /go/src/test
COPY . /go/src/test
RUN go env -w GOPROXY=https://goproxy.cn,direct
RUN CGO_ENABLED=0 go build -v -o main .

FROM alpine AS api
RUN mkdir /app
COPY --from=build /go/src/test/main /app
WORKDIR /app
ENTRYPOINT ["./main", "-v" ,"1.3 "]- 1.
- 2.
- 3.
- 4.
- 5.
- 6.
- 7.
- 8.
- 9.
- 10.
- 11.
- 12.
- 13.
- 14.
- 15.
- 16.
- 17.
- 18.
- 19.
- 20.
- 21.
- 22.
- 23.
- 24.
2.5 构建镜像
2.6 发布镜像到docker hub
2.7 重复上述步骤,构建v2.0版本镜像并发布到docker hub
修改Dockerfile
FROM golang:latest AS build

WORKDIR /go/src/test
COPY . /go/src/test
RUN go env -w GOPROXY=https://goproxy.cn,direct
RUN CGO_ENABLED=0 go build -v -o main .

FROM alpine AS api
RUN mkdir /app
COPY --from=build /go/src/test/main /app
WORKDIR /app
ENTRYPOINT ["./main", "-v" ,"2.0 "]
FROM golang:latest AS build

WORKDIR /go/src/test
COPY . /go/src/test
RUN go env -w GOPROXY=https://goproxy.cn,direct
RUN CGO_ENABLED=0 go build -v -o main .

FROM alpine AS api
RUN mkdir /app
COPY --from=build /go/src/test/main /app
WORKDIR /app
ENTRYPOINT ["./main", "-v" ,"2.0 "]- 1.
- 2.
- 3.
- 4.
- 5.
- 6.
- 7.
- 8.
- 9.
- 10.
- 11.
- 12.
- 13.
- 14.
- 15.
- 16.
- 17.
- 18.
- 19.
- 20.
- 21.
- 22.
- 23.
- 24.
构建并发布
3 滚动更新
接下来的部分,需要k8s运行环境,这里是一主两从的k8s环境来演示
3.1 编写k8s的rolling-update.yaml文件
apiVersion: apps/v1
kind: Deployment
metadata:
  name: rolling-update
  namespace: test
spec:
  strategy:
    rollingUpdate:
      maxSurge: 25%
      maxUnavailable: 25%
    type: RollingUpdate
  selector:
    matchLabels:
      app: rolling-update
  replicas: 4
  template:
    metadata:
      labels:
        app: rolling-update
    spec:
      containers:
        - name: rolling-update
          command: ["./main","-v","v1.3"]
          image: joycode123/go-publish:v1.3
          ports:
            - containerPort: 8080
---
apiVersion: v1
kind: Service
metadata:
  name: rolling-update
  namespace: test
spec:
  ports:
    - port: 8080
      protocol: TCP
      targetPort: 8080
  selector:
    app: rolling-update
  type: ClusterIP
apiVersion: apps/v1
kind: Deployment
metadata:
  name: rolling-update
  namespace: test
spec:
  strategy:
    rollingUpdate:
      maxSurge: 25%
      maxUnavailable: 25%
    type: RollingUpdate
  selector:
    matchLabels:
      app: rolling-update
  replicas: 4
  template:
    metadata:
      labels:
        app: rolling-update
    spec:
      containers:
        - name: rolling-update
          command: ["./main","-v","v1.3"]
          image: joycode123/go-publish:v1.3
          ports:
            - containerPort: 8080
---
apiVersion: v1
kind: Service
metadata:
  name: rolling-update
  namespace: test
spec:
  ports:
    - port: 8080
      protocol: TCP
      targetPort: 8080
  selector:
    app: rolling-update
type: ClusterIP- 1.
- 2.
- 3.
- 4.
- 5.
- 6.
- 7.
- 8.
- 9.
- 10.
- 11.
- 12.
- 13.
- 14.
- 15.
- 16.
- 17.
- 18.
- 19.
- 20.
- 21.
- 22.
- 23.
- 24.
- 25.
- 26.
- 27.
- 28.
- 29.
- 30.
- 31.
- 32.
- 33.
- 34.
- 35.
- 36.
- 37.
- 38.
- 39.
- 40.
- 41.
- 42.
- 43.
- 44.
- 45.
- 46.
- 47.
- 48.
- 49.
- 50.
- 51.
- 52.
- 53.
- 54.
- 55.
- 56.
- 57.
- 58.
- 59.
- 60.
- 61.
- 62.
- 63.
- 64.
- 65.
- 66.
- 67.
- 68.
- 69.
- 70.
- 71.
- 72.
- 73.
- 74.
- 75.
- 76.
- 77.
- 78.
- 79.
- 80.
3.2 部署v1.3到k8s中

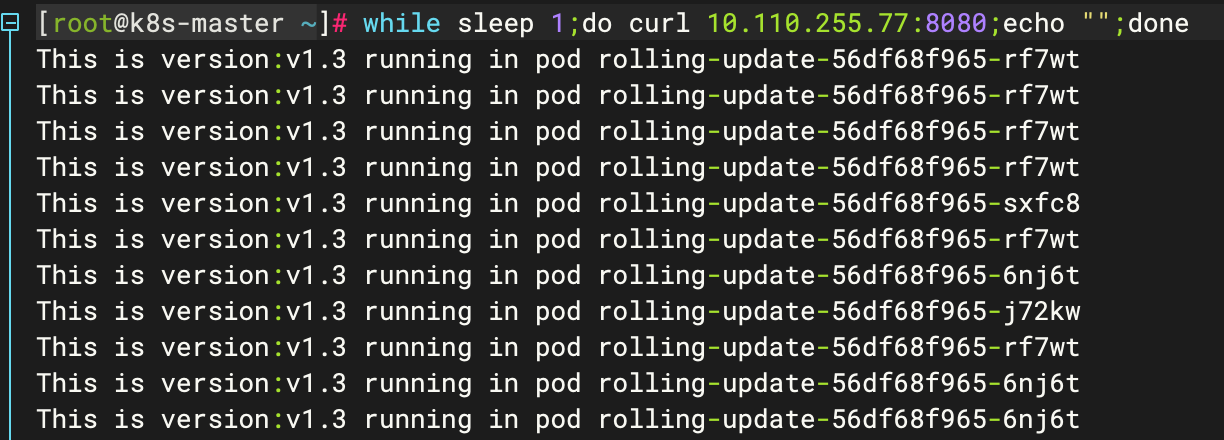
3.3 测试
为了便于测试出效果,新开一个窗口,执行如下命令

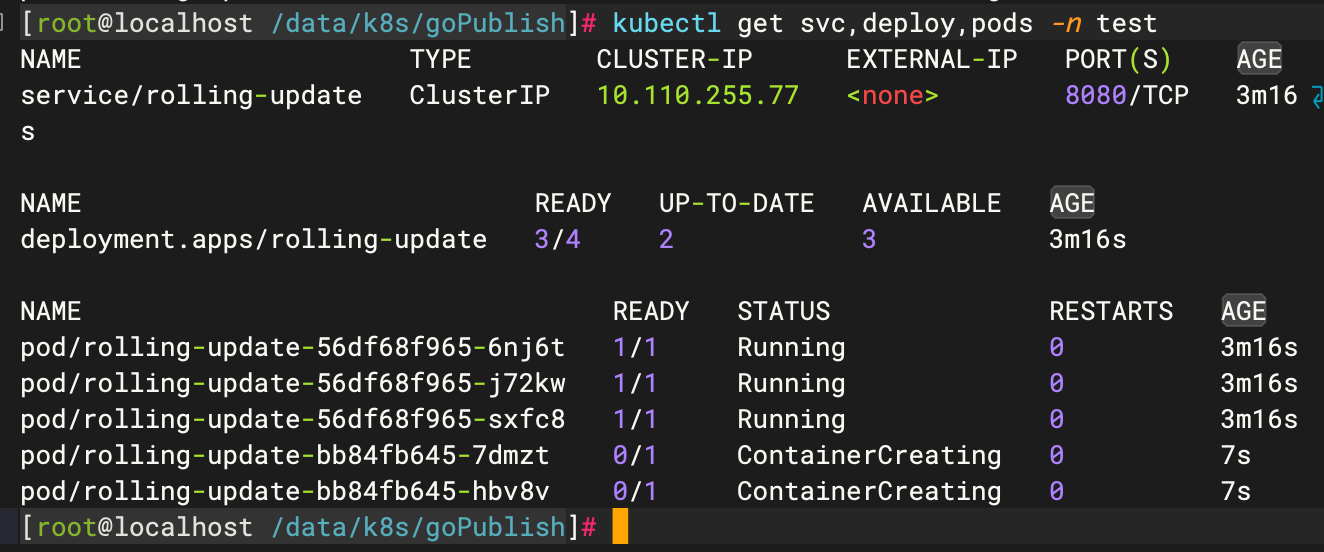
3.4 部署v2.0到k8s中
修改rollingUpdate.yaml
apiVersion: apps/v1
kind: Deployment
metadata:
  name: rolling-update
  namespace: test
spec:
  strategy:
    rollingUpdate:
      maxSurge: 25%
      maxUnavailable: 25%
    type: RollingUpdate
  selector:
    matchLabels:
      app: rolling-update
  replicas: 4
  template:
    metadata:
      labels:
        app: rolling-update
    spec:
      containers:
        - name: rolling-update
          command: ["./main","-v","v2.0"]
          image: joycode123/go-publish:v2.0
          ports:
            - containerPort: 8080
---
apiVersion: v1
kind: Service
metadata:
  name: rolling-update
  namespace: test
spec:
  ports:
    - port: 8080
      protocol: TCP
      targetPort: 8080
  selector:
    app: rolling-update
  type: ClusterIP
apiVersion: apps/v1
kind: Deployment
metadata:
  name: rolling-update
  namespace: test
spec:
  strategy:
    rollingUpdate:
      maxSurge: 25%
      maxUnavailable: 25%
    type: RollingUpdate
  selector:
    matchLabels:
      app: rolling-update
  replicas: 4
  template:
    metadata:
      labels:
        app: rolling-update
    spec:
      containers:
        - name: rolling-update
          command: ["./main","-v","v2.0"]
          image: joycode123/go-publish:v2.0
          ports:
            - containerPort: 8080
---
apiVersion: v1
kind: Service
metadata:
  name: rolling-update
  namespace: test
spec:
  ports:
    - port: 8080
      protocol: TCP
      targetPort: 8080
  selector:
    app: rolling-update
type: ClusterIP- 1.
- 2.
- 3.
- 4.
- 5.
- 6.
- 7.
- 8.
- 9.
- 10.
- 11.
- 12.
- 13.
- 14.
- 15.
- 16.
- 17.
- 18.
- 19.
- 20.
- 21.
- 22.
- 23.
- 24.
- 25.
- 26.
- 27.
- 28.
- 29.
- 30.
- 31.
- 32.
- 33.
- 34.
- 35.
- 36.
- 37.
- 38.
- 39.
- 40.
- 41.
- 42.
- 43.
- 44.
- 45.
- 46.
- 47.
- 48.
- 49.
- 50.
- 51.
- 52.
- 53.
- 54.
- 55.
- 56.
- 57.
- 58.
- 59.
- 60.
- 61.
- 62.
- 63.
- 64.
- 65.
- 66.
- 67.
- 68.
- 69.
- 70.
- 71.
- 72.
- 73.
- 74.
- 75.
- 76.
- 77.
- 78.
- 79.
- 80.

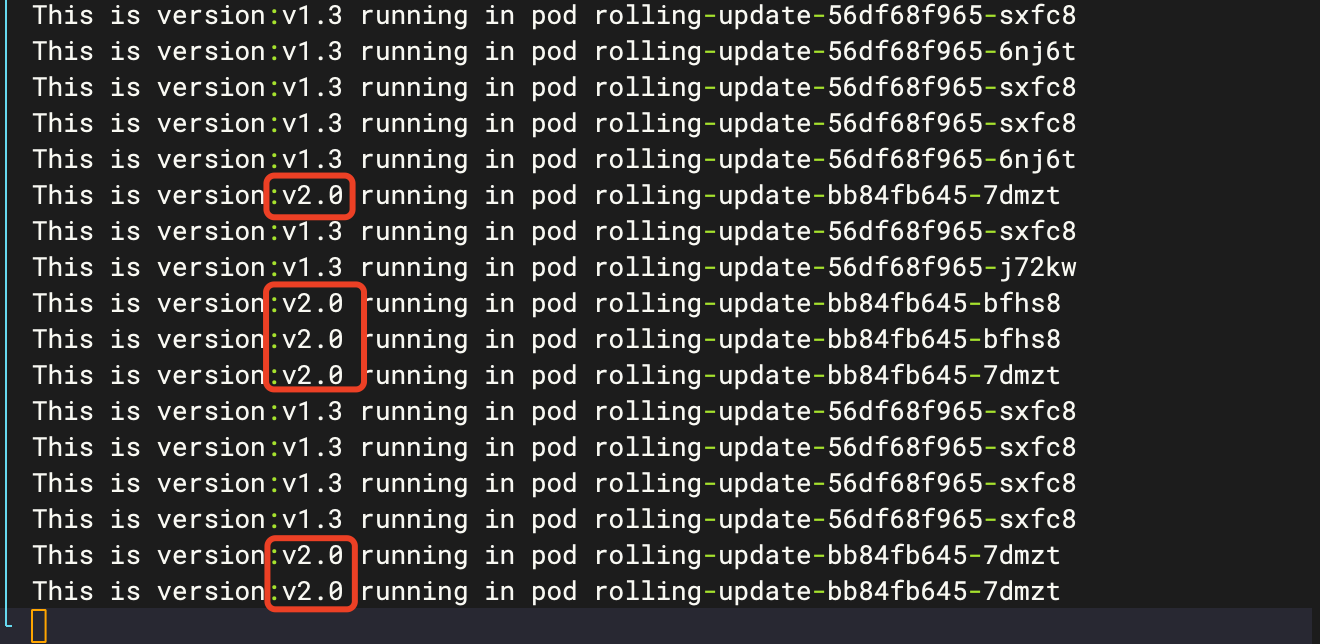
注意观察测试窗体的变化,可以看到,2.0版本完全部署之前,v1.3和v2.0同时提供服务,当v2.0部署完成后,就只剩下v2.0提供服务了


4 重建部署
4.1 删除前面部署的滚动更新deployment、service、pods

4.2 编写recreate.yaml
apiVersion: apps/v1
kind: Deployment
metadata:
  name: recreate
  namespace: test
spec:
  strategy:
    type: Recreate
  selector:
    matchLabels:
      app: recreate
  replicas: 4
  template:
    metadata:
      labels:
        app: recreate
    spec:
      containers:
        - name: recreate
          image: joycode123/go-publish:v1.3
          ports:
            - containerPort: 8080
          livenessProbe:
            tcpSocket:
              port: 8080
---
apiVersion: v1
kind: Service
metadata:
  name: recreate
  namespace: test
spec:
  ports:
    - port: 80
      protocol: TCP
      targetPort: 8080
  selector:
    app: recreate
  type: ClusterIP
apiVersion: apps/v1
kind: Deployment
metadata:
  name: recreate
  namespace: test
spec:
  strategy:
    type: Recreate
  selector:
    matchLabels:
      app: recreate
  replicas: 4
  template:
    metadata:
      labels:
        app: recreate
    spec:
      containers:
        - name: recreate
          image: joycode123/go-publish:v1.3
          ports:
            - containerPort: 8080
          livenessProbe:
            tcpSocket:
              port: 8080
---
apiVersion: v1
kind: Service
metadata:
  name: recreate
  namespace: test
spec:
  ports:
    - port: 80
      protocol: TCP
      targetPort: 8080
  selector:
    app: recreate
type: ClusterIP- 1.
- 2.
- 3.
- 4.
- 5.
- 6.
- 7.
- 8.
- 9.
- 10.
- 11.
- 12.
- 13.
- 14.
- 15.
- 16.
- 17.
- 18.
- 19.
- 20.
- 21.
- 22.
- 23.
- 24.
- 25.
- 26.
- 27.
- 28.
- 29.
- 30.
- 31.
- 32.
- 33.
- 34.
- 35.
- 36.
- 37.
- 38.
- 39.
- 40.
- 41.
- 42.
- 43.
- 44.
- 45.
- 46.
- 47.
- 48.
- 49.
- 50.
- 51.
- 52.
- 53.
- 54.
- 55.
- 56.
- 57.
- 58.
- 59.
- 60.
- 61.
- 62.
- 63.
- 64.
- 65.
- 66.
- 67.
- 68.
- 69.
- 70.
- 71.
- 72.
- 73.
- 74.
- 75.
- 76.
- 77.
- 78.
4.3 部署v1.3到k8s中

4.4 测试
为了便于测试出效果,新开一个窗口,执行如下命令

4.5 部署v2.0
修改recreate.yaml
apiVersion: apps/v1
kind: Deployment
metadata:
  name: recreate
  namespace: test
spec:
  strategy:
    type: Recreate
  selector:
    matchLabels:
      app: recreate
  replicas: 4
  template:
    metadata:
      labels:
        app: recreate
    spec:
      containers:
        - name: recreate
          image: joycode123/go-publish:v2.0
          ports:
            - containerPort: 8080
          livenessProbe:
            tcpSocket:
              port: 8080
---
apiVersion: v1
kind: Service
metadata:
  name: recreate
  namespace: test
spec:
  ports:
    - port: 80
      protocol: TCP
      targetPort: 8080
  selector:
    app: recreate
  type: ClusterIP
apiVersion: apps/v1
kind: Deployment
metadata:
  name: recreate
  namespace: test
spec:
  strategy:
    type: Recreate
  selector:
    matchLabels:
      app: recreate
  replicas: 4
  template:
    metadata:
      labels:
        app: recreate
    spec:
      containers:
        - name: recreate
          image: joycode123/go-publish:v2.0
          ports:
            - containerPort: 8080
          livenessProbe:
            tcpSocket:
              port: 8080
---
apiVersion: v1
kind: Service
metadata:
  name: recreate
  namespace: test
spec:
  ports:
    - port: 80
      protocol: TCP
      targetPort: 8080
  selector:
    app: recreate
type: ClusterIP- 1.
- 2.
- 3.
- 4.
- 5.
- 6.
- 7.
- 8.
- 9.
- 10.
- 11.
- 12.
- 13.
- 14.
- 15.
- 16.
- 17.
- 18.
- 19.
- 20.
- 21.
- 22.
- 23.
- 24.
- 25.
- 26.
- 27.
- 28.
- 29.
- 30.
- 31.
- 32.
- 33.
- 34.
- 35.
- 36.
- 37.
- 38.
- 39.
- 40.
- 41.
- 42.
- 43.
- 44.
- 45.
- 46.
- 47.
- 48.
- 49.
- 50.
- 51.
- 52.
- 53.
- 54.
- 55.
- 56.
- 57.
- 58.
- 59.
- 60.
- 61.
- 62.
- 63.
- 64.
- 65.
- 66.
- 67.
- 68.
- 69.
- 70.
- 71.
- 72.
- 73.
- 74.
- 75.
- 76.
- 77.
- 78.
注意观察,在重建过程中,服务会有短暂的中断

5 蓝绿部署
5.1 删除之前的部署
5.2 编写blueGreen.yaml文件(green版本)
apiVersion: apps/v1
kind: Deployment
metadata:
  name: green
  namespace: test
spec:
  strategy:
    rollingUpdate:
      maxSurge: 25%
      maxUnavailable: 25%
    type: RollingUpdate
  selector:
    matchLabels:
      app: bluegreen
  replicas: 4
  template:
    metadata:
      labels:
        app: bluegreen
        version: v1.3
    spec:
      containers:
        - name: bluegreen
          image: joycode123/go-publish:v1.3
          ports:
            - containerPort: 8080
apiVersion: apps/v1
kind: Deployment
metadata:
  name: green
  namespace: test
spec:
  strategy:
    rollingUpdate:
      maxSurge: 25%
      maxUnavailable: 25%
    type: RollingUpdate
  selector:
    matchLabels:
      app: bluegreen
  replicas: 4
  template:
    metadata:
      labels:
        app: bluegreen
        version: v1.3
    spec:
      containers:
        - name: bluegreen
          image: joycode123/go-publish:v1.3
          ports:
- containerPort: 8080- 1.
- 2.
- 3.
- 4.
- 5.
- 6.
- 7.
- 8.
- 9.
- 10.
- 11.
- 12.
- 13.
- 14.
- 15.
- 16.
- 17.
- 18.
- 19.
- 20.
- 21.
- 22.
- 23.
- 24.
- 25.
- 26.
- 27.
- 28.
- 29.
- 30.
- 31.
- 32.
- 33.
- 34.
- 35.
- 36.
- 37.
- 38.
- 39.
- 40.
- 41.
- 42.
- 43.
- 44.
- 45.
- 46.
- 47.
- 48.
- 49.
- 50.
- 51.
- 52.
5.3 部署v1.3版本(green版本)
5.4 修改blueGreen.yaml(blue版本)
apiVersion: apps/v1
kind: Deployment
metadata:
  name: blue
  namespace: test
spec:
  strategy:
    rollingUpdate:
      maxSurge: 25%
      maxUnavailable: 25%
    type: RollingUpdate
  selector:
    matchLabels:
      app: bluegreen
  replicas: 4
  template:
    metadata:
      labels:
        app: bluegreen
        version: v2.0
    spec:
      containers:
        - name: bluegreen
          image: joycode123/go-publish:v2.0
          ports:
            - containerPort: 8080
apiVersion: apps/v1
kind: Deployment
metadata:
  name: blue
  namespace: test
spec:
  strategy:
    rollingUpdate:
      maxSurge: 25%
      maxUnavailable: 25%
    type: RollingUpdate
  selector:
    matchLabels:
      app: bluegreen
  replicas: 4
  template:
    metadata:
      labels:
        app: bluegreen
        version: v2.0
    spec:
      containers:
        - name: bluegreen
          image: joycode123/go-publish:v2.0
          ports:
- containerPort: 8080- 1.
- 2.
- 3.
- 4.
- 5.
- 6.
- 7.
- 8.
- 9.
- 10.
- 11.
- 12.
- 13.
- 14.
- 15.
- 16.
- 17.
- 18.
- 19.
- 20.
- 21.
- 22.
- 23.
- 24.
- 25.
- 26.
- 27.
- 28.
- 29.
- 30.
- 31.
- 32.
- 33.
- 34.
- 35.
- 36.
- 37.
- 38.
- 39.
- 40.
- 41.
- 42.
- 43.
- 44.
- 45.
- 46.
- 47.
- 48.
- 49.
- 50.
- 51.
- 52.
5.5 部署v2.0版本(blue版本)

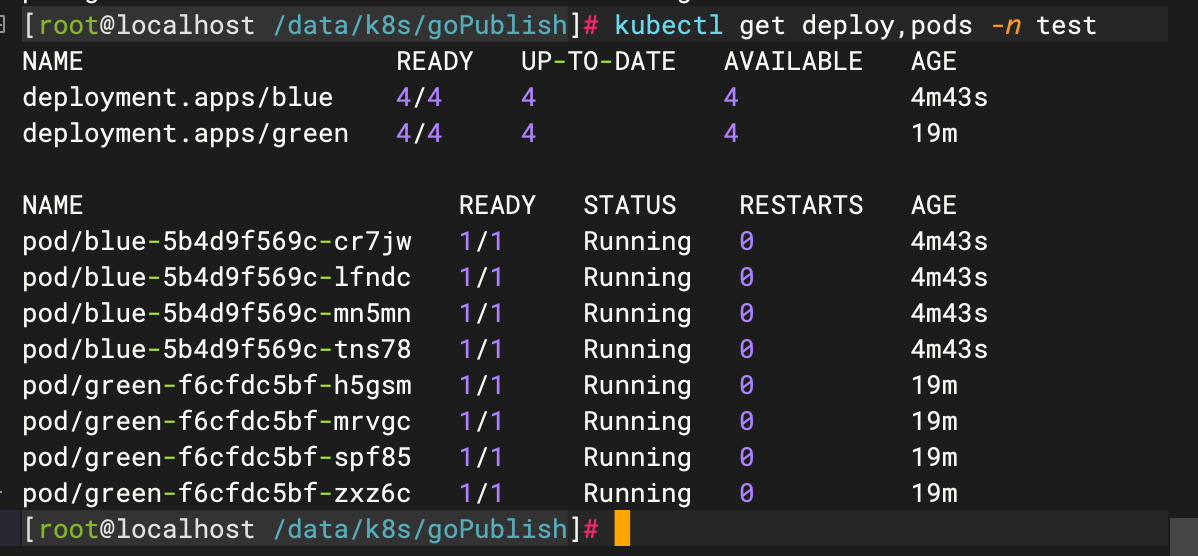
这时,在k8s中同时存在blue版本和green版本在运行着
5.6 编写blueGreenService.yaml
apiVersion: v1
kind: Service
metadata:
  name: bluegreen
  namespace: test
spec:
  ports:
    - port: 80
      protocol: TCP
      targetPort: 8080
  selector:
    app: bluegreen #注意,这里的app要和blueGreen.yaml的label的app相一致
    version: v1.3
  type: ClusterIP
apiVersion: v1
kind: Service
metadata:
  name: bluegreen
  namespace: test
spec:
  ports:
    - port: 80
      protocol: TCP
      targetPort: 8080
  selector:
    app: bluegreen #注意,这里的app要和blueGreen.yaml的label的app相一致
    version: v1.3
type: ClusterIP- 1.
- 2.
- 3.
- 4.
- 5.
- 6.
- 7.
- 8.
- 9.
- 10.
- 11.
- 12.
- 13.
- 14.
- 15.
- 16.
- 17.
- 18.
- 19.
- 20.
- 21.
- 22.
- 23.
- 24.
- 25.
- 26.
- 27.
- 28.
5.7 测试访问

5.8 切换到blue版本(v2.0)
修改blueGreenService.yaml文件
apiVersion: v1
kind: Service
metadata:
  name: bluegreen
  namespace: test
spec:
  ports:
    - port: 80
      protocol: TCP
      targetPort: 8080
  selector:
    app: bluegreen
    version: v2.0
  type: ClusterIP
apiVersion: v1
kind: Service
metadata:
  name: bluegreen
  namespace: test
spec:
  ports:
    - port: 80
      protocol: TCP
      targetPort: 8080
  selector:
    app: bluegreen
    version: v2.0
type: ClusterIP- 1.
- 2.
- 3.
- 4.
- 5.
- 6.
- 7.
- 8.
- 9.
- 10.
- 11.
- 12.
- 13.
- 14.
- 15.
- 16.
- 17.
- 18.
- 19.
- 20.
- 21.
- 22.
- 23.
- 24.
- 25.
- 26.
- 27.
- 28.

可以看出,如果要在蓝绿版本之间切换,只要修改blueGreenService.yaml文件的版本号即可。
6 金丝雀发布
在蓝绿版本发布的基础上,修改blueGreenService.yaml
apiVersion: v1
kind: Service
metadata:
  name: bluegreen
  namespace: test
spec:
  ports:
    - port: 80
      protocol: TCP
      targetPort: 8080
  selector:
    app: bluegreen
  type: ClusterIP
apiVersion: v1
kind: Service
metadata:
  name: bluegreen
  namespace: test
spec:
  ports:
    - port: 80
      protocol: TCP
      targetPort: 8080
  selector:
    app: bluegreen
type: ClusterIP- 1.
- 2.
- 3.
- 4.
- 5.
- 6.
- 7.
- 8.
- 9.
- 10.
- 11.
- 12.
- 13.
- 14.
- 15.
- 16.
- 17.
- 18.
- 19.
- 20.
- 21.
- 22.
- 23.
- 24.
- 25.
- 26.
相比之前的yaml主要是去掉selector选择器下的version整个KV键值对
接着测试:

这个时候,blue版本和green版本都可以提供服务,如果要设置权重,则控制好blue版本和green版本的副本数量即可实现。


 817
817

 被折叠的 条评论
为什么被折叠?


