


防盗链技术可以有效的解决网站访问量不大,但压力比较大的问题。现在以.jpg文件为例,在asp.net里如何实现防盗链技术。
新建一个asp.net网站,添加两个图片文件:right.jpg,error.jpg,right.jpg为本站显示的正确的图片,error.jpg为其他网站访问时的错误图片。
Default.aspx放置如下代码:
<
asp:Image ID
=
"
Image1
"
runat
=
"
server
"
Height
=
"
179px
"
ImageUrl
=
"
~/right.jpg
"
Width
=
"
197px
"
/>
新建Handler.cs类,代码如下:
using System;
using System.Web;
public class Handler : IHttpHandler {
public void ProcessRequest (HttpContext context) {
context.Response.Expires = 0 ;
context.Response.Clear();
context.Response.ContentType = " image/jpg " ;
if (context.Request.UrlReferrer.Host == " localhost " )
{
context.Response.WriteFile(context.Request.PhysicalPath);
context.Response.End();
}
else
{
context.Response.WriteFile(context.Request.PhysicalApplicationPath + " error.jpg " );
context.Response.End();
}
}
public bool IsReusable {
get {
return true ;
}
}
}
在web.config的节点中添加以下代码:
<
add verb
=
"
*
"
path
=
"
*.jpg
"
type
=
"
Handler
"
/>
调试该程序,图片将显示正常的图片。
将代码 if (context.Request.UrlReferrer.Host == "localhost")中的"localhost"给为其他字符,调试程序,将显现error.jpg
这样就达到了我们所说的图片防盗链技术了。
现在来说下如何在IIS中也显现这种效果。
选择网站->右键点击属性->点击虚拟目录->配置->映射->添加
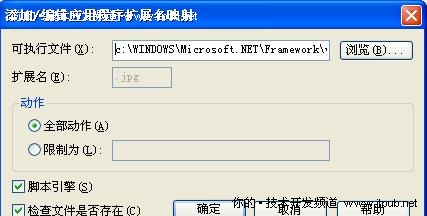
按如图所示添加,可执行文件选择:
C:\WINDOWS\Microsoft.NET\Framework\v2.0.50727\aspnet_isapi.dll
这样你的网站也实现了防盗链技术。


 221
221


 被折叠的 条评论
为什么被折叠?
被折叠的 条评论
为什么被折叠?
 到【灌水乐园】发言


